1
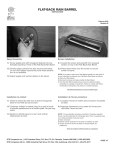
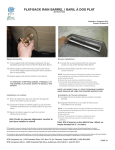
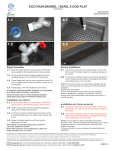
RockLock Wall System™
USER INSTRUCTIONS
Straight Consumer Pack Includes: 4 Straight WallRock Sections, 5 - 18” spikes, 3 EndRocks
Curved Consumer Pack Includes: 4 CurveRock Sections, 5 - 18” spikes, 3 EndRocks
July 2011
Revision 1
RockLock
Interlocking Border System
WallRock Module Measurements
Each end overlaps 6” in the interlocking
system, so for straight walls:
2 WallRocks = 7’6”
3 WallRocks = 11’
4 WallRocks = 14’6”
5 WallRocks = 18’
6 WallRocks = 21’6”
7 WallRocks = 25’ etc.
Add in 3 feet 6 inches with each
WallRock
3 EndRocks are needed to complete
the ends of non-interlocking
WallRocks.
Components
WallRock
Spike
Front
EndRock
Back
CurveRock
Note: Component pieces will vary between the straight consumer pack and the curved consumer pack. See above for details.
Suggested Layout Configurations
Wall Structure
4 WallRocks
4 WallRocks / 4 CurveRocks
4 CurveRocks
4 WallRocks / 3 EndRocks
RTS Companies Inc. | 1027 Industrial Place, P.O. Box 179, St. Clements, Ontario N0B 2M0 | 1-800-663-2803
RTS Companies US, Inc. | 2900 Industrial Park Drive, Austinburg, Ohio 44010-0183 | 1-888-641-3077
PAGE 1/2
For Placement on Ground or Grass
1. Select a layout configuration; some
suggested layouts are on the previous page,
or design your own. Lay the RockLock Wall
System modules down in the rough locations.
2. Make sure the rock-textured surfaces of the
modules face the outside of the structure, with
the rock-textured top surfaces facing up.
3. Interlock 2 sections together: WallRocks
can be joined at either a 90-degree angle or
as a straight line.
4. Insert a spike to secure the 2 sections
together, but do not hammer into the ground
until you are finished with the complete layout.
5. Complete your layout by connecting
additional
WallRocks,
CurveRocks
or
EndRocks.
6. When you are finished, make sure the structure
is where you want it to be, then hammer the
steel spikes into the ground.
The fit of the spikes is designed to be a tight
one. The spike may require some turning,
particularly on two-high configurations, in
order to get the spike through the connections.
CAUTION:
Do not drive spikes into the ground where there
is any type of underground plumbing, electrical
or gas lines. Please check with your local utility
companies.
EndRock Placement
Check the letters on the EndRocks before installing, follow the diagram below.
B
WallRock
C
Finished WallRock
With EndRocks
A
For Placement on a Terrace or Patio
For added stability (optional), since the spikes cannot anchor the system into the ground, open the plug on the back of the WallRock and fill with
sand or gravel before setting up the system. Replace the plug. Follow instructions above; steps 1 - 5.
RTS Companies Inc. warrants its products to be free from defects in materials and workmanship under normal use and service for the period of one year. All warranty periods begin on the date of
invoice. This warranty does not cover defects, which are merely cosmetic, but is limited to defects, which result in structural failure, including structural failure due to material corrosion or deterioration.
This warranty does not cover damage due to vandalism, abuse, lack of maintenance or improper installation. RTS Standard Terms and Conditions apply.
RTS Companies Inc. | 1027 Industrial Place, P.O. Box 179, St. Clements, Ontario N0B 2M0 | 1-800-663-2803
RTS Companies US, Inc. | 2900 Industrial Park Drive, Austinburg, Ohio 44010-0183 | 1-888-641-3077
PAGE 2/2