Transcript
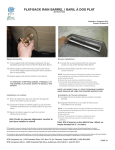
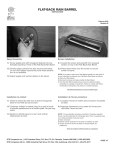
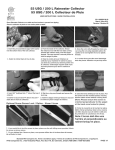
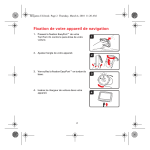
ECO RAIN BARREL / BARIL À DOS PLAT
Instructions
May / Mai 2015
Revision /Révision 00
1.1
2.1
1.2
2.2
Spigot Assembly
Screen Installation
1.1 Wrap the spigot with two to three layers of the teflon
2.1 Center the screen into the recessed area on top of the
tape supplied at the threaded section shown above.
1.2 Screw spigot (end with hexagonal feature) into prethreaded opening in front of the ECO Rain Barrel.
1.3 Thread spigot until the hex face touches the barrel. Do
not over tighten beyond the point where another turn is
not possible.
1.4 Adjust spigot until vertical relative to the barrel.
TO PREVENT STRIPPING BARREL THREADS, LAY THE BARREL
FLAT BACK DOWN TO INSTALL THE SPIGOT.
NOTE: NO MORE THAN A 3 FOOT STANDARD GARDEN
HOSE SHOULD BE USED FOR PROPER WATER FLOW.
ECO barrel. The holes should not overhang the edge of
the cutout.
2.2 The screen is attached using two #8 screws supplied in
the kit. Ensure that the screen is flat against the recess
when attaching so it does not flex.
NOTE: If you plan to leave your Rain Barrel outside over the
winter it is very important to winterize your ECO Rain Barrel
as follows:
a) Drain your Rain Barrel.
b) Turn the Rain Barrel upside down and set in desired
location, preferably in a garage or basement. Failure to
comply with these winterization instructions may result in a
voided warranty.
Installation du robinet
1.1 Wrap the spigot with two to three layers of the teflon
tape supplied at the threaded section shown above.
1.2 Visser le robinet (le côté avec le butoir hexagonal)
dans le trou fi leté au bas du baril.
1.3 Continuer à fi leter le robinet jusqu’à ce que le butoir
s’emboîte parfaitement à la surface plate. Ne pas trop
serrer.
1.4 Ajuster le robinet jusqu’à ce qu’il soit vertical
relativement au baril.
Afin d’éviter un mauvais alignement, coucher le
baril pour installer le robinet
Note: Afin d’assurer un bon débit d’eau, utiliser un
boyau standard de 3’ ou moins.
Installation de l’écran protecte
2.1 Center the screen into the recessed area on top of the
ECO barrel. The holes should not overhang the edge of
the cutout.
2.2 The screen is attached using two #8 screws supplied in
the kit. Ensure that the screen is flat against the recess
when attaching so it does not flex.
NOTE: Si vous planifi ez laisser votre Baril à l’extérieur
pendant l’hiver, il est très important de l’aménager pour l’hiver.
La garantie sera nul si cette procédure n’est pas suivie :
a) Vider votre baril
b) Tourner le baril à l’envers et placer à l’endroit désiré, de
préférence.
RTS Companies Inc. warrants its products to be free from defects in materials and workmanship under normal use and service for the period of one year. All warranty periods begin on the date of invoice. This
warranty does not cover defects, which are merely cosmetic, but is limited to defects, which result in structural failure, including structural failure due to material corrosion or deterioration.
This warranty does not cover damage due to vandalism, abuse, lack of maintenance or improper installation. RTS Standard Terms and Conditions apply.
RTS Companies Inc off re une période de garantie de 1 an à partir de la date de la vente, contre les défauts de fabrication. La garantie s’applique uniquement si le produit est utilisé à l’intérieur des limites
d’utilisation normale, telles que décrites dans le manuel d’instructions. Une copie complète de la politique de garantie peut être obtenue par téléphone 1-800-663-2803 ou www.rtshomeaccents.ca
RTS Companies Inc. | 1027 Industrial Place, St. Clements, Ontario N0B 2M0 | 1-800-663-2803
RTS Companies US, Inc. | 2900 Industrial Park Drive, Austinburg, Ohio 44010-0183 | 1-888-641-3077
PAGE 1/1