Transcript
Installation 1 inch Joints
Cap
Bracket
Stacking Joint
The Stacking Joint Contains:
• 2 Stakes
• 4 Brackets
• 2 Caps
• 8 Screws
Tools Required:
Hammer or Mallet, Power Drill
or Screwdriver
Image 1
Image 2
Bracket
Stacking Joint
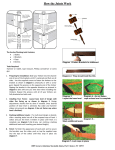
Preparing for installation: Slide one end of a timber into the channel end of one of the
brackets (See Image 1) so that the edge of the bracket is flush with the lower concave
edge of the composite timber. (See Image 2) and below the upper convex edge. (See
image 3) Carefully screw the bracket in place using the screws supplied with a power drill
or screwdriver. Be careful not over-tighten the screws. Repeat this process on the opposite end of the timber flipping the bracket in the opposite direction. (See Image 4) Repeat
for all timbers.
Installing Your Frame: Select the desired location of your raised garden, lay out the
timbers to the desired design, then insert a Joint Stake through each of the corner
brackets and hammer the stake into the soil. (See Image 5) You can locate your raised
garden on a cement surface by simply removing the spike from each of the Joint Stakes
with a hacksaw to allow them to rest on a hard surface.
Image 3
Image 4
Stacking Additional Levels: If a multi-level design is desired, slide a stacking stake into
all of the exposed tops of level 1 stakes and put the level 2 timbers in place until level 2 is
complete (See Image 6) You can continue stacking additional levels until reaching your
desired height
Finish: To finish the appearance of each joint and to secure the brackets over the stake,
push or tap the supplied caps into the tops of the stakes until they snap in place
Image 5
Image 6