1
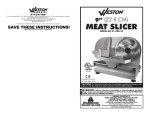
ATTENTION!
All Trademarks and Registered Trademarks are property of the respective companies.
SAVE THESE INSTRUCTIONS!
Refer to them often and use them to instruct others.
MANUAL
MULTI-GRAIN &
CEREAL MILL
MODEL # 36-3601-W
Due to constant factory improvements, the product pictured
might differ slightly from the product received.
REV040711
If any components of this unit are broken, do not operate properly, or for product returns, please
contact Weston Products LLC
Phone: 1-800-814-4895 (Outside the U.S. 440-638-3131)
20365 Progress Drive, Strongsville, Ohio 44149
WestonProducts.com
6
WESTON WARRANTY INFORMATION
3
5
SAVE THIS WARRANTY INFORMATION FOR YOUR RECORDS!
9
2
6
3
7
5
Main
Body
11
1
8
10
4
Foot
Clamp
Thumbscrew
CUT ALONG THE DOTTED LINE AND SEND THE WARRANTY CARD ALONG WITH A COPY OF YOUR ORIGINAL
PURCHASE RECEIPT TO:
Weston Products LLC
20365 Progress Drive, Strongsville, OH 44149
COMPONENT LIST
DIAGRAM
NUMBER
1
2
3
4
5
6
7
8
9
10
11
PART
DESCRIPTION
Grinding Plate Pressure Screw
Wing Nut
Shield
Rotating Thumbscrew with Bolt
Auger
Adjustable Grinding Plate
Retainer Cap
Rubber Protector Plate
Hopper Handle
Thumbscrew with Cap Washer
Weston Products LLC warrants to the ORIGINAL RETAIL PURCHASER of this product that if operated in
accordance with the printed instruction accompanying it, then for a period of 1 year from the date of purchase,
the product shall be free from defects in material and workmanship.
The Warranty Card, along with a copy of the original receipt, must be received by Weston Products LLC
within 30 days from purchase date for the warranty to apply. Failure to send the completely filled out Warranty
Card, along with a copy of the original receipt, will void the warranty.
The product must be delivered to or shipped freight prepaid to Weston Products LLC for warranty services,
in either its original packaging or similar packaging affording an equal degree of protection. Damage due to
shipping is not the responsibility of the company. Weston Products LLC charges a $35.00 per hour bench
charge. NOTE: No repairs will be started without the authorization of the customer. The return shipping cost
to the customer will be added to the repair invoice.
Weston Products LLC will repair (or at its discretion, replace) the product free of charge, if in the judgment
of the company, it has been proven to be defective as to seller’s labor and material, within the warranty period.
New or rebuilt replacements for factory defective parts will be supplied for one (1) year from the date of
purchase. Replacement parts are warranted for the remainder of the original warranty period.
For non-warranty repairs, contact Weston Products LLC’s Customer Service at 1-800-814-4895 M-F
8am-5pm EST (outside of the United States 440-638-3131) to obtain a Return Merchandise Authorization
Number (RMA Number). Weston Products LLC will refuse all returns that do not contain this number. DO
NOT RETURN THE UNIT WITHOUT PROPER AUTHORIZATION FROM WESTON PRODUCTS LLC.
LIMITATIONS: The warranty is void if the product is used for any purpose other than that for which it is
designed. The product must not have been previously altered, repaired, or serviced by anyone else other
than Weston Products LLC. If applicable, the serial number must not have been altered or removed. The
product must not have been subjected to accident in transit or while in the customer’s possession, misused,
abused, or operated contrary to the instructions contained in the instruction manual. This includes failure
caused by neglect of reasonable and necessary maintenance, improper line voltage and acts of nature. This
warranty is not transferable and applies only to U.S. and Canadian sales.
Except to the extent prohibited by applicable law, no other warranties whether expressed or implied,
including warranty merchantability and fitness for a particular purpose, shall apply to this product. Under no
circumstances shall Weston Products LLC be liable for consequential damages sustained in connection with
said product and Weston Products LLC neither assumes nor authorizes any representative or other person to
assume for it any obligation or liability other than such as is expressly set forth herein. Any applicable implied
warranties are also limited to the one (1) year period of the limited warranty.
This warranty covers only the product and its specific parts, not the food or other products processed in it.
PART
NUMBER
36-3602
36-3603
36-3604
36-3605
36-3606
36-3607
36-3608
36-3609
36-3611
36-3612
36-3613
WESTON WARRANTY CARD
SEND THIS CARD ALONG WITH A COPY OF YOUR ORIGINAL PURCHASE RECEIPT TO:
WESTON WARRANTY, WESTON PRODUCTS LLC, 20365 PROGRESS DRIVE, STRONGSVILLE, OH 44149
Customer Name: _________________________________
Address: _______________________________________
City/State/Zip: ___________________________________
Telephone Number: (_________) ____________________
E-Mail Address: _________________________________
If any components of this unit are broken or the unit does not operate
properly, call Weston Products LLC Toll Free at
1-800-814-4895
Monday thru Friday 8:00am-5:00pm EST. Outside the U.S. call 440-638-3131
Original Date of Purchase: ______/________/________
Product Model #: _________________________________
Serial # (if applicable): ______________________
-2-
-7-
GENERAL FOOD SAFETY INFORMATION
There are basic rules to follow when handling food, they are
COOK, SEPARATE, CLEAN, and CHILL.
COOK
It’s crucial to cook food to a safe internal temperature to destroy bacteria that is present.
The safety of hamburgers and other foods made with ground meat has been receiving a
lot of attention lately, and with good reason. When meat is ground, the bacteria present
on the surfaceois mixed othroughout the ground mixture. If this ground meat is not cooked
to at least 160 F to 165 F, bacteria will not be destroyed and there’s a good chance you
will get sick.
Solid pieces of meat like steaks and chops don’t have dangerous bacteria like E. coli on
the inside, so they can be served more
rare. Still, any beef cut should be cooked to an
o
internal
temperature of at least 145 F (medium rare). The
safe temperature for poultry
o
o
is 180 F and solid cuts of pork should be cooked to 160 F. Eggs should be thoroughly
cooked too. If you are making a meringue or other recipe that uses uncooked eggs, buy
specially pasteurized eggs or use prepared meringue powder.
SEPARATE
Foods that will be eaten uncooked and foods that will be cooked before eating MUST
ALWAYS be separated. Cross-contamination occurs when raw meats or eggs come in
contact with foods that will be eaten uncooked. This is a major source of food poisoning.
Always double-wrap raw meats and place them on the lowest shelf in the refrigerator so
there is no way juices can drip onto fresh produce. Then use the raw meats within 1-2
days of purchase, or freeze for longer storage. Defrost frozen meats in the refrigerator,
not on the counter.
When grilling or cooking raw meats or fish, make sure to place the cooked meat on a
clean platter. Don’t use the same platter you used to carry the food out to the grill.Wash
the utensils used in grilling after the food is turned for the last time on the grill, as well as
spatulas and spoons used for stir-frying or turning meat as it cooks.
Make sure to wash your hands after handling raw meats or raw eggs. Washing hands with
soap and water, or using a pre moistened antibacterial towelette is absolutely necessary
after you have touched raw meat or raw eggs. Not washing hands and surfaces while
cooking is a major cause of cross-contamination.
CLEAN
Wash your hands and work surfaces frequently when you are cooking. Washing with
soap and warm warm water work for at least 15 seconds, then dry with a paper towel.
CHILL
o
Chilling food
is very important. The danger zoneo where bacteria multiply is between 40
F
o
o
and 140 F. Your refrigerator should be set to 40 F or below; your freezer should be 0 F or
below. Simple rule: serve hot foods hot, cold foods cold. Use chafing dishes or hot plates
to keep food hot while serving. Use ice water baths to keep cold foods cold. Never let any
food
sit at room temperature for more than 2 hours - 1 hour if the ambient temperature is
o
90 F or above. When packing for a picnic, make sure the foods are already chilled when
they go into the insulated hamper. The hamper won’t chill food - it just keeps food cold when
properly packed with ice. Hot cooked foods should be placed in shallow containers and
immediately refrigerated so they cool rapidly. Make sure to cover foods after they are cool.
NOTE: Special considerations must be made when using venison or other wild game,
since it can become heavily contaminated during field dressing. Venison is often held
at temperatures that could potentially allow bacteria to grow, such as when it is being
transported. Refer to the USDA Meat and Poultry Department for further questions or
information on meat and food safety.
-6-
GENERAL SAFETY RULES
WARNING!
READ AND FULLY UNDERSTAND ALL
INSTRUCTIONS AND WARNINGS PRIOR TO
USING THIS APPLIANCE. YOUR SAFETY IS
MOST IMPORTANT: FAILURE TO COMPLY
WITH PROCEDURES AND SAFE GUARDS MAY
RESULT IN SERIOUS INJURY OR PROPERTY
DAMAGE. REMEMBER: YOUR PERSONAL
SAFETY IS YOUR RESPONSIBILITY!
1. Read all instructions before using the Mill. 7.
2. Close adult supervision is necessary
when the Mill is used near children. NEVER 8.
leave the Mill unattended around small children.
3.
DO NOT use fingers to scrape material
away from the grinding plates.
AVOID contacting moving parts. Wait
until all moving parts have stopped
before removing any parts of the Mill.
The use of attachments or parts from other
manufacturers is not recommended,
personal injury or damage to the Mill may
result.
9. WEAR EYE PROTECTION! Wear safety
glasses. Everyday eye glasses are NOT
safety glasses. Safety Glasses conform to
ANSI Z87.1 requirements. NOTE:
Approved safety glasses have “Z87”
4. DO NOT put your fingers or hands into printed or stamped on them.
Mill or Hopper, as serious injury will result.
10.DO NOT use the Mill while under the
5. DO NOT continue to operate this Mill influence of drugs, medications or
after it malfunctions, is dropped, or alcohol.
damaged in any other manner. For
service, return the Mill to the nearest 11.TIE BACK loose hair and clothing, and roll
authorized service facility for repair or up long sleeves before operating the Mill.
REMOVE ties, rings, watches, bracelets or
adjustment.
other jewelry before operating the Mill.
6. Thoroughly clean all parts that will come
into contact with food before you use the 12.Keep fingers clear of the auger and
grinding plates at all times.
Mill for the first time.
SAVE THESE INSTRUCTIONS!
Refer to them often and use them to instruct others.
ADDITIONAL ACCESSORIES AVAILABLE
Sauce Maker & Food Strainer
Traditional Style Pasta Machine
Non-Stick Hamburger Press
Food Grade Silicone Spray
07-0801
01-0201
07-0301
03-0101-W
These products and many more products can be ordered by visiting
W e s t o n P r o d u c t s . c o m or by calling
Weston Products LLC Toll Free at 1-800-814-4895
Monday thru Friday 8:00am-5:00pm EST. Outside the U.S. call 440-638-3131
-3-
CLEANING INSTRUCTIONS
.
Before using for the first time, you must completely disassemble the Cereal & Grain
Mill and thoroughly clean all parts with hot water and dish detergent. Rinse with clean
water and dry thoroughly.
.
For cleaning between uses, simply brush away any left over material with a towel or
medium bristle brush.
.
DO NOT clean any parts of the Multi-Grain & Cereal Mill in a dishwasher.
GRINDING INSTRUCTIONS
1 Fill the Hopper with the material you intend to grind.
2. Position a bowl or plate under the Grinding Plates to catch the material as it is
being ground.
3. Slowly turn the Handle clockwise.
4. Inspect the material that has been ground.
NOTE: Depending on the type of material that is being ground and your personal
preferences, you may need to adjust the Pressure Screw to achieve your desired
results.
ASSEMBLY INSTRUCTIONS
1. Clamp the Main Body to the edge of a table or counter top. Make sure the
Rubber Protector Plate is positioned on the Foot to prevent damage to the work
surface.
NOTE: The maximum recommended thickness of the clamping surface should not
exceed 1½”.
FOR COARSE GRINDING: Loosen the Wing Nut and turn the Pressure Screw counter
clockwise – this will increase the gap in the Grinding Plate, resulting in a coarser grind.
Then re-tighten the Wing Nut and resume grinding.
FOR FINE GRINDING: Loosen the Wing Nut and turn the Pressure Screw clockwise
– this will decrease the gap in the Grinding Plate, resulting in a finer grind. Then retighten the Wing Nut and resume grinding.
2. Insert the Auger and Adjustable Grinding Plate into the Main Body.
3. Install the Shield with Grinding Plate Pressure Screw onto the Main Body.
TIPS FOR EASY OPERATION
4. Position the Rotating Thumbscrews into the slots in the Main Body and securely
tighten.
• Always make sure the material you are grinding is completely dry.
Material that
contains moisture will decrease the performance of the Mill.
5. Set the Adjustable Grinding Plate Pressure Screw and securely tighten the
Wing Nut against the Shield.
• Turn the Handle at constant speed, try to avoid starting and stopping the Handle
while grinding.
6. Install the Handle onto the end of the Auger.
• If the Mill becomes jammed and the Handle will not turn, briefly turn the Handle
counter-clockwise to remove jam. Resume normal grinding.
7. Secure Handle to the Auger using the Thumbscrew and attached Cap Washer.
8. Install Hopper onto the top of the Main Body.
-4-
• Do Not fill the Hopper with more material than what you plan on grinding.
• Always make sure the Mill is securely attached to work surface before you start
grinding .
-5-