1
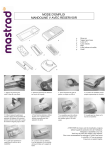
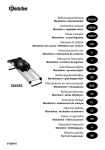
ATTENTION!
All Trademarks and Registered Trademarks are property of the respective companies.
SAVE THESE INSTRUCTIONS!
Refer to them often and use them to instruct others.
STAINLESS STEEL
MANDOLINE
VEGETABLE
SLICER
MODEL #01-0006
Due to constant factory improvements, the product pictured
might differ slightly from the product received.
REV040711
If any components of this unit are broken, do not operate properly, or for product returns, please
contact Weston Products LLC
Phone: 1-800-814-4895 (Outside the U.S. 440-638-3131)
20365 Progress Drive, Strongsville, Ohio 44149
WestonProducts.com
WESTON WARRANTY INFORMATION
SAVE THIS WARRANTY INFORMATION FOR YOUR RECORDS!
Depth
Depth Adjustment
Adjustment Plate Plate Thumbscrews
Front
Stand
Slicer Body
Rear
Stand
Food
Pusher
Blade
c
a
Locking
Tab
d
b
e
Spikes
Blade
Blade
Handle
f
Bottom
View of
Food
Pusher
CUT ALONG THE DOTTED LINE AND SEND THE WARRANTY CARD ALONG WITH A COPY OF YOUR ORIGINAL
PURCHASE RECEIPT TO:
COMPONENT LIST
DIAGRAM NUMBER
Weston Products LLC warrants to the ORIGINAL RETAIL PURCHASER of this product that if operated in
accordance with the printed instruction accompanying it, then for a period of 1 year from the date of purchase,
the product shall be free from defects in material and workmanship.
The Warranty Card, along with a copy of the original receipt, must be received by Weston Products LLC
within 30 days from purchase date for the warranty to apply. Failure to send the completely filled out Warranty
Card, along with a copy of the original receipt, will void the warranty.
The product must be delivered to or shipped freight prepaid to Weston Products LLC for warranty services,
in either its original packaging or similar packaging affording an equal degree of protection. Damage due to
shipping is not the responsibility of the company. Weston Products LLC charges a $35.00 per hour bench
charge. NOTE: No repairs will be started without the authorization of the customer. The return shipping cost
to the customer will be added to the repair invoice.
Weston Products LLC will repair (or at its discretion, replace) the product free of charge, if in the judgment
of the company, it has been proven to be defective as to seller’s labor and material, within the warranty period.
New or rebuilt replacements for factory defective parts will be supplied for one (1) year from the date of
purchase. Replacement parts are warranted for the remainder of the original warranty period.
For non-warranty repairs, contact Weston Products LLC’s Customer Service at 1-800-814-4895 M-F
8am-5pm EST (outside of the United States 440-638-3131) to obtain a Return Merchandise Authorization
Number (RMA Number). Weston Products LLC will refuse all returns that do not contain this number. DO
NOT RETURN THE UNIT WITHOUT PROPER AUTHORIZATION FROM WESTON PRODUCTS LLC.
LIMITATIONS: The warranty is void if the product is used for any purpose other than that for which it is
designed. The product must not have been previously altered, repaired, or serviced by anyone else other
than Weston Products LLC. If applicable, the serial number must not have been altered or removed. The
product must not have been subjected to accident in transit or while in the customer’s possession, misused,
abused, or operated contrary to the instructions contained in the instruction manual. This includes failure
caused by neglect of reasonable and necessary maintenance, improper line voltage and acts of nature. This
warranty is not transferable and applies only to U.S. and Canadian sales.
Except to the extent prohibited by applicable law, no other warranties whether expressed or implied,
including warranty merchantability and fitness for a particular purpose, shall apply to this product. Under no
circumstances shall Weston Products LLC be liable for consequential damages sustained in connection with
said product and Weston Products LLC neither assumes nor authorizes any representative or other person to
assume for it any obligation or liability other than such as is expressly set forth herein. Any applicable implied
warranties are also limited to the one (1) year period of the limited warranty.
This warranty covers only the product and its specific parts, not the food or other products processed in it.
Weston Products LLC
20365 Progress Drive, Strongsville, OH 44149
PART DESCRIPTION
PART
NUMBER
WESTON WARRANTY CARD
a
Slicing Blade
01-0007
b
Waffle Blade
N/A
c
3/16” (5 mm) Julienne Blade
N/A
Customer Name: _________________________________
d
5/16” (7 mm) Julienne Blade
N/A
e
7/16” (10 mm) Julienne Blade
N/A
Address: _______________________________________
f
Blade Case
N/A
PART NUMBER
01-0020
SEND THIS CARD ALONG WITH A COPY OF YOUR ORIGINAL PURCHASE RECEIPT TO:
WESTON WARRANTY, WESTON PRODUCTS LLC, 20365 PROGRESS DRIVE, STRONGSVILLE, OH 44149
City/State/Zip: ___________________________________
Telephone Number: (_________) ____________________
If any components of this unit are broken or the unit does not operate
properly, call Weston Products LLC Toll Free at
1-800-814-4895
Monday thru Friday 8:00am-5:00pm EST. Outside the U.S. call 440-638-3131
E-Mail Address: _________________________________
Original Date of Purchase: ______/________/________
Product Model #: _________________________________
Serial # (if applicable): ______________________
-2-
To adjust thickness, loosen the Depth Adjustment Plate Thumb Screws on both
sides of the Slicer Body and slide the Depth Adjustment Plate to the desired slicing
thickness, then secure into place by tightening the Depth Adjustment Plate Thumb
Screws.
7. Maintain constant pressure on the Food Pusher so that the Spikes
continue to hold the vegetable/fruit.
TYPES OF SLICES
Julienne Blades
The three Julienne Blades that come with
the Vegetable Slicer have the following
thicknesses – 3/16”, 5/16”, and 7/16”. The more
teeth on the Blade, the THINNER the sticks of
vegetable/fruit will be. The less teeth on the
Blade, the THICKER the sticks of vegetable/
fruit will be .
WARNING
SHARP BLADES!
Protective/cut-resistant
Kevlar Gloves are
recommended
whenever handling
the Blades!
Only use the Julienne Blades with the Straight
Edge Slicing Blade. Do not use them with the
Waffle Blade.
• Cut the vegetables/fruit in sections corresponding to the desired
length of the julienne strips (approximately 3”-6” (7.6 - 15.2 cm) long).
• Place the vegetable/fruit lengthwise onto the Food Pusher Spikes.
Smooth Blade
This is the Vegetable Slicer’s main Blade and features a straight edge for
basic slicing.
The straight edge of the Smooth Blade is ideal for slicing a variety of foods from
carrots and cabbage to lemons and potatoes.
• For straight cuts, place the vegetable/fruit either endwise or
lengthwise onto the Food Pusher Spikes.
Waffle Blade
GENERAL SAFETY RULES
WARNING!
READ AND FULLY UNDERSTAND ALL INSTRUCTIONS
AND WARNINGS PRIOR TO USING THIS UNIT. YOUR
SAFETY IS MOST IMPORTANT! FAILURE TO COMPLY
WITH PROCEDURES AND SAFE GUARDS MAY
RESULT IN SERIOUS INJURY OR PROPERTY DAMAGE.
REMEMBER: YOUR PERSONAL SAFETY IS YOUR
RESPONSIBILITY!
1. KEEP FINGERS CLEAR of the
Blade at all times. NEVER push the
product with your hands in line of the
Blade when slicing. ALWAYS use
the Food Pusher.
6. NEVER use any accessories or
parts from other manufacturers. Doing
so will VOID YOUR WARRANTY and
may cause injury.
7. Be sure the Mandoline Slicer is
stable during use. Both Front and
Rear Stands should be securely on
the work surface.
2. NEVER use fingers to scrape
food away from the Blade. SEVERE
INJURY MAY RESULT.
3. NEVER LEAVE THE MANDOLINE
SLICER
UNATTENDED.
Close
supervision is necessary when used
near children. The Mandoline Slicer is
NOT to be used by children.
8. DO NOT use this Mandoline
Slicer for frozen foods or anything
other than food stuffs.
4. CHECK
FOR
DAMAGED
PARTS. Before using the Slicer,
check that all parts are operating
properly and perform the intended
functions.
9. Remove the Blade after each
use to clean. Clean with hot soapy
water. Dry thoroughly. Protective/
cut-resistant Kevlar Gloves are
recommended whenever handling
the Blades.
5. The manufacturer declines any
responsibility in the case of improper
use of this unit.
10. DO NOT use the Mandoline
Slicer while under the influence of
drugs or alcohol.
SAVE THESE INSTRUCTIONS!
Refer to them often and use them to instruct others.
The Waffle Blade creates crinkle and waffle cuts, and is easy to use with any
fruit/vegetable. A crinkle cut requires only one pass over the Blade.
Waffle Cuts: For a waffle cut, the key is to adjust the height of the Depth
Adjustment Plate so that the slices are only slightly thicker than the serrated
edge of the Blade.
• Once you adjust the thickness of the Depth Adjustment Plate, place
the food onto the Food Pusher Spikes and make a pass over the
Blade.
• Next, rotate the vegetable/fruit 90o and make a second pass
over the Blade to complete the cut. This rotation will create an
opposing crinkle cut on each side of the vegetable/fruit.
ADDITIONAL ACCESSORIES AVAILABLE
Sauce Maker & Food Strainer
Traditional Style Pasta Machine
Non-Stick Hamburger Press
Food Grade Silicone Spray
07-0801
01-0201
07-0301
03-0101-W
These products and many more products can be ordered by visiting
W e s t o n P r o d u c t s . c o m or by calling
Weston Products LLC Toll Free at 1-800-814-4895
Monday thru Friday 8:00am-5:00pm EST. Outside the U.S. call 440-638-3131
-6-
-3-
CLEANING & DISASSEMBLY
Cleaning your Mandoline Slicer should be done
immediately after use to prevent food from drying on
the parts. The Slicer Body should be washed by hand
in warm soapy water, rinsed, then dried immediately.
Lightly oil the Slicer Body with a food safe lubricant
before storing.
The Blades and the Hand Guard/Food Pusher can
be washed in the top rack of a dishwasher. Carefully
position these pieces where they won’t cut or damage
other utensils.
WARNING
SHARP BLADES!
Protective/cut-resistant
Kevlar Gloves are
recommended
whenever handling
the Blades!
CAUTION:
If hand washing the Blades and
underside of Hand Guard/Food Pusher, always
wipe AWAY from Blade edges. These surfaces are extremely sharp and can cause
severe injury!
Locking Tab facing up. Slide it into the right-hand side of the Slicer Body pushing it all
the way in until it latches into place.
CAUTION: The Blades are very sharp! NEVER touch the Blade, always use the Blade Handles!
3. If using a Julienne Blade in conjunction with the Straight Edge Slicing Blade,
install the Straight Edge Slicing Blade first, then install the Julienne Blade by holding
it by the Blade Handle. Firmly slide it into right hand side of the Slicer Body pushing it
all the way in until in place. NOTE: Only use Julienne Blades with the Straight
Edge Slicing Blade. Do not use them with the Waffle Blade.
4. Once Blade(s) are installed, loosen the Depth Adjustment Plate Thumb Screws
on both sides of the Slicer Body and slide the Depth Adjustment Plate to the desired
slicing thickness, then secure into place by tightening the Depth Adjustment Plate
Thumb Screws. CAUTION: When moving Depth Adjustment Plate, hold Depth
Adjustment Plate by the end farthest away from the Blades to avoid
injury.
1. When finished slicing, remove any remaining material from the Hand Guard/Food
Pusher.
2. Remove the Slicing Blade by holding on to the Handle and depressing the Locking
Tab. Be careful during Blade removal as the Blade is sharp! Remember to always hold
Blade by the handle.
3. If using a Julienne Blade in addition to the Slicer Blade, remove the Julienne
Blade by holding on to the handle and carefully sliding it out of the Slicer Body.
CAUTION: Once Blades are removed, DO NOT immerse them in water! Blades
should be washed either in a top rack of the dishwasher or by holding onto the Blade
handle. With a soapy towel, wipe AWAY from the Blade edges. To rinse Blade, hold
by the Handle and wipe with a clean, damp towel, or hold under running water. After
Blades are clean and dry, BE SURE TO STORE OUT OF REACH OF CHILDREN!
4. Completely remove the Depth Adjustment Plate Thumb Screws. Once the
Thumb Screws are removed, the Depth Adjustment Plate should slide out of the
bottom of the Slicer Body.
5. If desired, the Front and Rear Stands can also be removed by simply squeezing
the ends of the Stand together and removing from mounting holes. However, it is not
typically necessary for proper cleaning.
ASSEMBLY INSTRUCTIONS
It is recommended that the Vegetable Slicer be
thoroughly washed prior to use!
1. Using a flat and sturdy work platform, unfold the
Front and Rear Stands of the Slicer Body. Position
the Vegetable Slicer with the Rear Stand closest to
you.
2. To insert your Blade of choice, carefully remove
the Blade from holder, holding it by the Blade Handle.
The arrow should be pointing to the right of the
-4-
WARNING
SHARP BLADES!
Protective/cut-resistant
Kevlar Gloves are
recommended
whenever handling
the Blades!
DIRECTIONS FOR USE
1. Install the Blade(s) according to the type of
slicing you plan on doing.
CAUTION: The Blades are very sharp! NEVER touch the Blade, always use the Blade Handles!
2. Position the Vegetable Slicer on a steady,
flat working surface, with the Rear Stand is
closest to you.
3. ALWAYS use the Food Pusher. NEVER
use your fingers, hands or other objects to push
the food on the Slicer! The Food Pusher is
designed so that it will not touch the Blades as
you slide it up and down the face of the Slicer.
WARNING
SHARP BLADES!
Protective/cut-resistant
Kevlar Gloves are
recommended
whenever handling
the Blades!
There are two arrows on the Food Pusher. Always make sure that these arrows
are pointing down the face of the Slicer, toward the Blades. The elongated
edges help keep it aligned on Slicer.
4. Cut vegetable/fruit to fit the width of the Food Pusher, 3-7/8” (9.8 cm) wide
is the maximum. Trim tips and stems for uniformity.
5. Press the vegetable/fruit onto the Food Pusher so that the Spikes pierce
into the vegetable/fruit.
6. To make slices, hold the knob on top of the Food Pusher and slide it DOWN
the Vegetable Slicer and over the Slicing Blade(s). REMEMBER to always
slice away from yourself! Use smooth, steady strokes to cut the vegetables/
fruits. Never attempt to cut too quickly.
NOTE: Several test cuts may be needed to achieve the desired cutting
thickness.
-5-