1
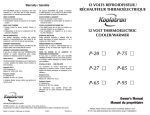
Warranty
This KOOLATRON product is warranted to the retail consumer for 90 days from date of
retail purchase, against defects in material and workmanship.
AUTOMATIC
RECHARGEABLE
CORKSCREW
WHAT IS COVERED
- Replacement parts and labor.
- Transportation charges to customer for the repaired product.
WHAT IS NOT COVERED
- Commercial or industrial use of this product.
- Damage caused by abuse, accident, misuse, or neglect.
- Transportation of the unit or component from the customer to Koolatron.
IMPLIED WARRANTIES
Any implied warranties, including the implied warranty of merchantability are also
limited to duration of 90 days from the date of retail purchase.
WARRANTY REGISTRATION
Register on-line at www.koolatron.com AND keep the original, dated, sales receipt with
this manual.
WARRANTY AND SERVICE PROCEDURE
If you have a problem with your unit, or you require replacement parts, please telephone
the following number for assistance: 1-800-265-8456
A Koolatron Master Service Centre must perform all warranty work. Service after warranty
may be obtained at a Master Service Centre or at an authorized service dealer. Purchase
Receipt is required to establish warranty eligibility.
Koolatron has Master Service Centres at these locations:
Koolatron U.S.A.
4330 Commerce Dr.
Batavia, NY 14020-4102 U.S.A.
Koolatron Canada
27 Catharine Ave.
Brantford, ON N3T 1X5 Canada
www.koolatron.com
©2011 Koolatron, Inc. All rights reserved.
All specification are subject to change without notice.
Made in China
KP1-36C2
H1S137
07/2011-v1
User Manual
corkscrew
foil cutter
storage slot
switch
recharge
base
120V power adapter
FEATURES
• Designed to fit all traditional wine bottles
• Fully charged it easily opens up to 30 bottles with the touch of a button
LED light
• Charging time: 8 hours
foil cutter
• Only take 8 seconds to pull the cork
• Noise: < 78db
• Convenient storage slot for foil cutter at the back of the recharge base
2
3
SAFETY
BATTERIES
- Household Use Only.
- This unit is not intended for use in wet or damp locations.
- Place unit on a flat surface, away from heat or water sources.
- Do not use the appliance if the plug or cable is damaged. If the power cord is damaged and/or
is malfunctioning, please contact the manufacturer.
- DO NOT attempt to repair or adjust any electrical or mechanical functions on this unit as this may
void warranty.
- Pull the plug out of the outlet to disconnect. DO NOT pull the cord.
- Do not touch the plug with wet hands.
- Never clean appliance parts with flammable fluids. Do not store or use gasoline or any other
flammable vapors and liquids in the vicinity of this or any other appliance. The fumes can
create a fire hazard or explosion.
- Unplug the appliance when not in use.
This Corkscrew contains rechargeable batteries. Before you dispose of your Corkscrew you must
remove the batteries and dispose of them responsibly. To take out the battery pack remove the 3
screws from the rear cover. Carefully ease the 2 covers apart, please note that there are springs
inside your Corkscrew that will move once the covers are parted but normally stay inside the product. Unplug the leads from the battery pack and remove it from your Corkscrew. Dispose of the
rechargeable battery pack and product responsibly.
Use of extension cords
Because of potential safety hazards under certain conditions, we strongly recommend against the
use of an extension cord. However, if you must use an extension cord, it is absolutely necessary that
it is a UL-listed (in the United States) or a CSA-listed (in Canada), 3-wire grounding type appliance
extension cord having a grounding type plug and outlet and that the electrical rating of the cord is
15 amperes (minimum) and 120 volts.
INSTALLATION
• Push the round connector of the power adapter into the connection at the rear of the charging
base.
• Place the charging stand on a flat, level surface.
• Carefully place your Corkscrew on the charging stand.
CHARGING
• Before first use you should charge your Corkscrew for at least 6 - 8 hours.
• Insert the transformer into a suitable wall socket, the charging LED on the charging stand illuminates. This LED is illuminated whenever your Corkscrew is correctly placed on the charging
stand that is connected to the mains.
• We recommend that you always return your Corkscrew to the charging stand, so that it is fully
charged and available to use at any time.
4
OPERATING
• This Corkscrew is designed to effortlessly remove the cork from the bottle. In order to ensure
the ease of use and safe operation we recommend that you read these instructions carefully and
retain them for future reference.
• Always remove the foil from the top of the bottle before extracting the cork. Use the supplied foil
cutter by positioning it at the top of the bottle, gripping the sides (with a light pressure) and
rotate the foil cutter.
• Take your Corkscrew in one hand and keeping it as vertical as possible place it on top of the
bottle. Never force the corkscrew over wide topped bottles. Hold the bottle firmly.
• Press on the bottom of the switch. The spiral screw will now remove the cork. Keep pressing the
switch until your Corkscrew motor stops running. The cork is now fully removed. Release the
switch.
• Lift your Corkscrew clear of the bottle and press the upper part of the switch. The spiral screw
will rotate in the opposite direction to eject the cork.
SYNTHETIC CORKS
• This product is designed for use on traditional corks and bottles. Synthetic corks are smaller and
do not expand when removed. Bottle opening and cork extraction can be performed as normal
on synthetic corks, however, their size may result in them not being ejected as above. In this
instance, follow this simple procedure with the utmost care; hold the cork firmly with a suitable
tool (e.g. pliers) and depress the top of the control switch as normal. The cork will then unscrew
and be released. This will not affect the on-going use or performance of your corkscrew.
5