1
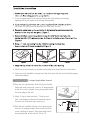
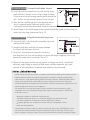
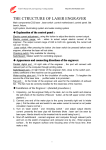
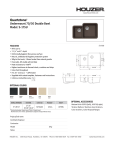
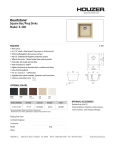
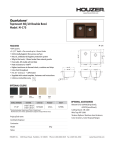
Topmount Sinks
ar
Mounting Clips (included)
2. If you are replacing old sink, remove old one and verify existing countertop
opening will fit your new sink by setting it temporarily.
(For model 3120-8BS please see template that comes with the sink)
jig
8. Attach faucet and strainers as necessary according to the manufacturer’s instructions.
9. Verify your sink installation channel and clips that came with the sink and follow proper
instructions below.
I-Channel System L-shaped single blade channel
10.Place the sink upside down. Hold clip by the bracket
firmly and insert one leg at a time in 45 degree angle
to the slot in the I-channel, facing sharp teeth toward
the outer edge of the sink.
11. Attach 3 clips in front and back. 2 clips to each
side. Use extreme caution while inserting clips as
the teech are sharp and may cause injury.
12.Place the sink carefully into the cutout opening and
be sure it is properly seated. Make sure the sink rim
covers caulking all around. Then press down firmly
around perimeter of the sink rim. (Go to 13)
U-channel System U-shaped double blade channel
10. Insert clip into the channel from the end, placing screw
head inside the channel. Locate 3 clips in front and back.
2 clips to each side and arrange spacing evenly around the
sink. Position the clip assembly pararrel to the channel.
11. Place the sink carefully into the cutout opening and be
sure it is properly seated. Make sure sink rim covers
caulking all around. Press down firmly around the perimeter of the sink rim.
12. Rotate clamp of the clip 90 degree to the channel and tighten screw clockwise from the
center clip using long screw driver.(Go to 13)
J-bracket System J-shaped bracket with long screw
10. Insert bolt (with L-clip attached) horizontally into round
opening of the bracket.
11. Swing the bolt down vertically; the spacer between
the threads will self-center the bolt.
12. Grasp the L-clip and ensure long side is facing out
and away from sink. Turn bolt clockwise; this action will begin snugging up the L-clip
towards the underside of countertop. (Go to 13)
13. Tighten all clips evenly and do not over tighten as damage can result. Install drain
and water supply fitting as necessary. Wipe excess caulking compound and check
carefully as some adjustment for position and tightness may be reuqired.
HOUZER stainless steel sinks are produced to the highest manufacturing standards and are covered by a limited
lifetime warranty that protects the original purchaser against any defects in materials and workmanship
under normal use. If upon determination by HOUZER that the sink is defective, HOUZER will replace without
charge, with an equivalent sink or refund, will be sent to the original purchaser that it has been used in
a residential application and installed, used and maintained according to the instructions supplied with the sink,
and not damaged due to abuse, misuse or negligence.
This warranty will not cover any labor charges incurred in installation, removal, replacement or repair,
transportation cost or any consequential damages, which might be caused by the product. HOUZER shall
not be liable in case of;
Improper installation or modification of original product.
Damages resulting from abuse, such as scratches by dropping heavy objects into the sink
Scratches resulting from scrubbing with steel wool, abrasive pads or cleaners
Improper application such as exposure to corrosive chemicals, or photographic solutions
Any commercial application
If the original purchaser finds a defect in material or workmanship, please contact HOUZER Warranty Service,
2605 Kuser Road, Hamilton, NJ 08691. Please include proof of purchase or sales receipt. The law in some
states may expand or modify this warranty. This warranty supersedes all other warranties, expressed or implied.
HOUZER Inc. 2605 Kuser Road, Hamilton, NJ 08691 Ph.1.800.880.3639 F. 1.609.584.1930 www.HouzerSink.com