Transcript
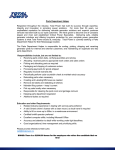
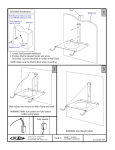
TOOLS REQUIRED: IMPORTANT ASSEMBLY INSTRUCTIONS: -Philips head screwdriver -Tape Measure -Stud locator for ceilings and walls covered with drywall 1. Never exceed maximum total load of 50lbs (23 Kgs) 2. Before use, thoroughly test the hoist fully weighted with the item intended to be stored to ensure the unit has been installed securely and is functioning properly 3. Do not cut the rope. 1. Determine the correct distance between the two pulley hooks (e.g. handlebars to back of seat on bicycle). IMPORTANT WARNING: Read all instructions carefully prior to installing and using this Ceiling Hoist. Improper installation can result in personal injury and/or damage to property. If in doubt, have this item installed by a professional. The manufacturers and sellers of this item cannot accept responsibility for any injury or damage caused by incorrect installation or improper use. 2. Locate the ceiling joist. Transfer the distance measurement (Step 1) so that the pulley brackets line up the correct distance along the joist. It is also possible to mount the pulley bracket first onto a board which can then be securely mounted to joists as illustrated. 3. Securely tie a double knot in the end of the cord and feed the cord through the square hole on the end of the pulley unit that does not have the cord locking mechanism. The knotted end will then be between the ceiling and pulley bracket. 4. Using the wood screws provided, carefully mount each pulley bracket into the ceiling joist at the correct distance so the hooks will line up (as measured in 1). Important; ensure that at least 3 screws are securely mounted into the joist on each pulley bracket. Pre-drilling 1/8” pilot holes will make this job easier. CEILING JOIST 5. Thread the cord through the pulleys as shown. Be sure to carefully thread the cord down through both parts of the locking mechanism. 6. Mount the rope cleat at a safe height out of reach of small children and screw directly into a stud using two wood screws supplied. WALL STUD 6 USAGE INSTRUCTIONS: Raising an item Ensure the hooks are properly located and the cord is not twisted before pulling on the cord. The auto-locking device will hold the item suspended with each pull. Once hoisted to the correct height, wrap the excess cord securely around the cleat. Do not cut excess cord Lowering an item Pull the cord toward the rear pulley while maintaining tension on the cord. This will release the auto-locking mechanism so the weight of the item will now cause the item to lower. Keeping the tension in this direction, slowly let the cord out as the item lowers. Once low enough, remove it from the hooks and wrap the cord back on the cleat. For hoisting some items, like Kayaks, it may be necessary in addition to use a suitable strap system with the hooks. Delta Design Company 125 Washington St. Unit #7 Foxborough, MA 02035 USA Phone: 1- 800 - 474 - 6615 EL GRECO RS2100 ASSEMBLY DIAGRAM Copyright 2008