1
MUSTEE
HOSPITALITY SINK
MUSTEE
HOSPITALITY SINK
MODEL 11
“SELF RIMMING — COUNTERTOP MOUNTED”
MODEL 11
LISTED
FILE NO. 820
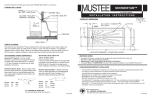
Your Hospitality Sink requires a 15 1/2” x 18 1/2” countertop cutout. Refer to Rough-In for detail dimensions.
NOTE: The centerline of the drain is located 11” from the back edge and 8 1/2” from either side. If you choose, you
may use your Hospitality Sink as a template for laying out the countertop cutout. Measure actual part before drilling
or cutting countertop.
PARTS ILLUSTRATION
CARE AND CLEANING
The surface of your Self-Rimming Countertop Sink may be cleaned with a mild soap in warm water using a soft
cloth. For stubborn stains use “Soft-Scrub” by Clorox or Lysol “Tub & Tile Cleaner” or a powdered detergent such
as “Spic-n-Span.” Never use abrasive scouring powder or steel wool pads as they will dull the surface. A periodic
coating of a silicone based marine polish will help retain the fine finish.
ROUGH-IN DIMENSIONS
* NOTE:
DIMENSIONS SHOWN ARE NOMINAL,
MEASURE ACTUAL PARTS BEFORE
DRILLING/CUTTING COUNTERTOP.
PARTS LIST
PART NUMBER
KEY
NO. WHITE
BONE
DESCRIPTION
1.
1
11.101
11.102
Self Rimming Sink
2
*
*
Mounting Stud (4 Required)
3
*
*
Mounting Plate (4 Required)
4
*
*
Mounting Nut (4 Required)
HINT:
If pencil does not mark surface of countertop, you may apply 2” wide masking tape to the approximate area and
do the marking directly on the tape surface. Leave tape in place to protect countertop surface during drilling
and cutting.
2.
* NOTE: FOR REPLACEMENT HARDWARE, ORDER COMPLETE PARTS PACKAGE
PART NO. 10.606 — PACKAGES WILL NOT BE SPLIT FOR INDIVIDUAL PARTS.
E.L. MUSTEE & SONS, INC.
5431 West 164th Street • Brook Park, Ohio 44142
Place Hospitality Sink (1) upside down on countertop in desired location — hold sink in place and scribe a guide
line all around the rim with a pencil.
Remove Hospitality Sink, measure in 3/4” from guide line all around; this will be your cutting line. Measure in
3/4” in each corner; this will be the center point for the 7/8” diameter hole — 4 required. Insert (fine tooth) sabre
saw blade into one of the corner holes and cut along “Cutout line.” — See “Countertop Cutout Details”
E.L. MUSTEE & SONS, INC.
4
SI-166 (6•06)
5431 West 164th Street • Brook Park, Ohio 44142
SI-166 (6•06)
3.
COUNTERTOP CUTOUT DETAILS
SINK OUTLINE — DO NOT
CUT ON THIS LINE!!
The rear ledge of your Hospitality Sink will accept many different faucets; 4” Center Set on center, 4” Center Set
either right or left, 8” Center Set on center. Depending on the model faucet you choose, the appropriate holes will
have to be drilled. You will notice that there are five indented hole locators molded-in, on the underside of the rear
ledge, do not cut out faucet holes until you have measured the actual faucet you intend to use — some single
lever faucets require a large center/supply hole and small diameter mounting holes. A 1” diameter, fine tooth hole
saw with center drill pilot would normally be used for the majority of faucet hole drilling. Drill from underside of
rear ledge to mark center, turn upright to finish cutting with hole saw.
INDENTED HOLES ON UNDERSIDE OF
REAR LEDGE TO BE DRILLED OUT BY
CUSTOMER TO ACCEPT EITHER 4” OR
8” SUPPLY CENTER FAUCETS
FAUCET HOLE DETAIL
4.
Install “Basket” Style Drain Assembly per manufacturer’s instructions. The Hospitality Sink is furnished with a
3 1/2” diameter drain hole.
5.
Install Mounting Studs (2) in each corner lug — CAUTION — DO NOT OVERTIGHTEN!! A standard 5/16” socket
or wrench is required. Screw stud in place until nut makes contact with bottom of lug — continue 1/4 turn,
maximum. Repeat this operation for each mounting lug. — See “TYPICAL STUD INSTALLATION”
HINT:
APPLY A DAB OF SILICONIZED
SEALANT TO THREADS TO
LUBRICATE STUD AND EASE
INSTALLATION.
TYPICAL STUD INSTALLATION
6.
Apply a bead of clear siliconized sealant* (not furnished) all around the underside of the rim in the molded-in
groove — See Detail Drawing. Place Hospitality Sink into the countertop cutout, secure from the underside with
hardware provided. You will need a 7/16” socket or wrench to secure
Mounting Nuts (4) in place. Wipe away any excess sealant that squeezes
out during tightening. — See “CAULKING / SEALANT DETAIL”
APPLY A BEAD OF SILICONIZED
SEALANT* APPROXIMATELY 3/8”
DIA. — THIS AREA, AROUND
UNDERSIDE OF RIM.
*Siliconized Sealant such as:
CELULON™ Plumbing & HVAC
Adhesive Sealant by Red Devil®
7.
CAULKING/SEALANT
Complete water supply and proper sanitary waste trap connections as specified by local code requirements.
Numbers in ( ) parantheses refer to Key Numbers in Parts List.
SI-166 (6•06)
2
3
SI-166 (6•06)
MUSTEE
HOSPITALITY SINK
MUSTEE
HOSPITALITY SINK
MODEL 11
“SELF RIMMING — COUNTERTOP MOUNTED”
MODEL 11
LISTED
FILE NO. 820
Your Hospitality Sink requires a 15 1/2” x 18 1/2” countertop cutout. Refer to Rough-In for detail dimensions.
NOTE: The centerline of the drain is located 11” from the back edge and 8 1/2” from either side. If you choose, you
may use your Hospitality Sink as a template for laying out the countertop cutout. Measure actual part before drilling
or cutting countertop.
PARTS ILLUSTRATION
CARE AND CLEANING
The surface of your Self-Rimming Countertop Sink may be cleaned with a mild soap in warm water using a soft
cloth. For stubborn stains use “Soft-Scrub” by Clorox or Lysol “Tub & Tile Cleaner” or a powdered detergent such
as “Spic-n-Span.” Never use abrasive scouring powder or steel wool pads as they will dull the surface. A periodic
coating of a silicone based marine polish will help retain the fine finish.
ROUGH-IN DIMENSIONS
* NOTE:
DIMENSIONS SHOWN ARE NOMINAL,
MEASURE ACTUAL PARTS BEFORE
DRILLING/CUTTING COUNTERTOP.
PARTS LIST
PART NUMBER
KEY
NO. WHITE
BONE
DESCRIPTION
1.
1
11.101
11.102
Self Rimming Sink
2
*
*
Mounting Stud (4 Required)
3
*
*
Mounting Plate (4 Required)
4
*
*
Mounting Nut (4 Required)
HINT:
If pencil does not mark surface of countertop, you may apply 2” wide masking tape to the approximate area and
do the marking directly on the tape surface. Leave tape in place to protect countertop surface during drilling
and cutting.
2.
* NOTE: FOR REPLACEMENT HARDWARE, ORDER COMPLETE PARTS PACKAGE
PART NO. 10.606 — PACKAGES WILL NOT BE SPLIT FOR INDIVIDUAL PARTS.
E.L. MUSTEE & SONS, INC.
5431 West 164th Street • Brook Park, Ohio 44142
Place Hospitality Sink (1) upside down on countertop in desired location — hold sink in place and scribe a guide
line all around the rim with a pencil.
Remove Hospitality Sink, measure in 3/4” from guide line all around; this will be your cutting line. Measure in
3/4” in each corner; this will be the center point for the 7/8” diameter hole — 4 required. Insert (fine tooth) sabre
saw blade into one of the corner holes and cut along “Cutout line.” — See “Countertop Cutout Details”
E.L. MUSTEE & SONS, INC.
4
SI-166 (6•06)
5431 West 164th Street • Brook Park, Ohio 44142
SI-166 (6•06)