1
PRE-INSTALLATION & JOBSITE CONDITIONS
•
Your solid hardwood flooring must undergo an acclimatization period
(i.e. it must be stored in the room where it will be laid) for at least 72
hours prior to installation or test the floor with appropriate moisture
meter. The moisture levels should differ no more than 4% between the
subfloor and the planks. For wood flooring plank products (products
wider than 3”) there should be no more than 2% moisture difference
between the flooring and subfloor.
•
•
•
•
SUBFLOOR REQUIREMENTS
The following subfloor recommendations are intended to
complement the installation of hardwood flooring as an interior
finish. Hardwood flooring is not a structural component. These
recommendations are not intended to supersede federal, state or
local building codes, but as with many other interior finish
products, may require modifying existing structural components
for a successful installation.
We recommend 3 types of sub-floors- plywood/OSB, solid wood planks
(1 X 6 or larger), or sleepers (2 X 4 inch). Each sub-floor has separate
installation instructions as follows:
•
Solid Hardwood flooring may be installed on or above grade
provided that the sub-floor is:
•
•
SOLID WOOD SUBFLOOR- Solid planks should be nailed diagonally
across the joists with a ¼” gap between the boards.
CONCRETE- There are several methods of installing solid flooring
over concrete. One method is to use 5/8” or ¾” plywood. It is
recommended that a vapor barrier be used prior to installation of the
floor, preferably, a 4-6 mil. Polyethylene film with enough excess to be
placed under the baseboards. Fasten the plywood to the concrete
using the appropriate fasteners. Another way of laying the plywood on
concrete is to cut the plywood in 4’ X 4’ squares and lay it in mastic. A
moisture barrier must also be used with this method.
Another alternative would be to use “sleepers”. This method uses
treated 2” X 4” lumber laid flat in asphalt mastic every 12 inches at
right angles to the finished floor. Overlap or stagger the sleepers by at
least 4’ and make sure each one is securely imbedded into the mastic.
A polyethylene moisture barrier is then laid over the sleepers. Be
certain not to puncture or bunch up the poly, or it will not create an
effective vapor barrier. Nail the flooring through the plastic into the
sleepers.
Sub-floors should be clean prior to the floor installation.
Sweep the area to remove all dust and debris.
Make sure the subfloor is dry to 12% moisture content or
less.
Blending of cartons: To achieve a uniform installation
appearance, preselect and set aside hardwood planks that
blend best with all trims and moldings. Install these planks
next to best blended moldings.
Floor should be installed blending planks from several
cartons at the same time to ensure good color and shade
mixture throughout the installation.
Be attentive to staggering the ends of the boards at least 4” 6” (10-15 cm) when possible in adjacent rows.
Do not install in areas of high moisture such as bathrooms
and powder rooms.
•
•
•
Flat - within ¼” in a 10’ radius.
Dry - always test the sub-floor with the appropriate
moisture meter. Installation cannot continue until the
sub-floor moisture does not exceed 12% and the subfloor and flooring moisture differ no more than 4%. On
3”or wider the sub-floor and the flooring being
installed should not differ more than 2%.
Clean – all construction debris, soil, mud and any
other objects on or adhering to the floor are scraped
and swept away before the installation.
Sound – All damaged or swollen sub-flooring should
be replaced. Check the floor for squeaks / loose
components, repair any found by adding fasteners or
adhesive.
Do not Install Solid Hardwood Flooring over radiant
heating systems or attempt to glue the flooring directly
to any sub-floor surface.
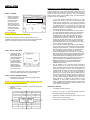
st
1 Row Nail
through Face
Sub-floors should be level within ¼” in each 10’ direction. High areas
should be sanded flat. Low areas should be filled with latex leveling
compound
Eased
Edge
Urethane
Finish
15#
Felt
3. PRE-INSTALLATION PREPARATION
TOOLS NEEDED
Tape Measure
Chalk line or string
Hammer
Nail Set
Drill
Mechanical Fastener
Mallet
SUPPLIES NEEDED
10D Nails
Drill bit smaller than nail
15# Felt Paper
Cleats or Staples
Color Matched Wood Putty
Pry Bar
Broom
Mohawk FloorCare Essentials Hardwood & Laminate Cleaner
BEFORE YOU START:
•
•
•
Plan your layout and determine the direction of the
installation in the room. Planks installed parallel to windows
accent the hardwood best.
Remove existing base, shoe molding or threshold carefully.
They can be used to cover the ¾” expansion gap left around
the perimeter of the room.
Undercut doors and casings using a handsaw laid flat on a
piece of scrap flooring. This will eliminate difficult scribe cuts.
Subsequent Rows
Power Nailed
Plywood
Subfloor
Solid Wood
Floor
Do not install Solid Hardwood Flooring over particleboard,
fiberboard, wafer board, or pressed wood panel