1
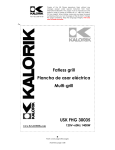
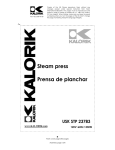
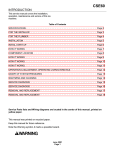
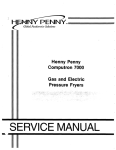
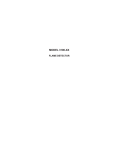
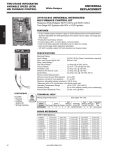
Fax +32 2 359 95 50
Copies of the I/B. Please reproduce them without any
changes except under special instruction from Team
International BELGIUM. The pages must be reproduced and
folded in order to obtain a booklet A5 (+/- 148.5 mm width x
210 mm height). When folding, make sure you keep the good
numbering when you turn the pages of the I/B. Don’t change
the page numbering. Keep the language integrity. Print only
what is inside the frame.
Steam press
Prensa de planchar
Presse à repasser
STP 30138
120V~60Hz 1200W (10A)
Front cover page (first page)
Assembly page 1/35
Fax +32 2 359 95 50
Copies of the I/B. Please reproduce them without any
changes except under special instruction from Team
International BELGIUM. The pages must be reproduced and
folded in order to obtain a booklet A5 (+/- 148.5 mm width x
210 mm height). When folding, make sure you keep the good
numbering when you turn the pages of the I/B. Don’t change
the page numbering. Keep the language integrity. Print only
what is inside the frame.
IMPORTANT SAFEGUARDS
When using electrical appliances, basic safety precautions should
always be followed, including the following:
1. READ ALL INSTRUCTIONS
2. Use the appliance only for the purpose for which it is intended.
3. Check that your mains voltage corresponds to that stated on the
appliance.
4. To protect against electrical shock do not immerse cord, plugs, or
appliance in water or other liquid.
5. The power switch must always be put in the “OFF” position before
plugging or unplugging from the outlet. Never yank the cord to
disconnect form the outlet; instead, grasp the plug and pull to
disconnect.
6. Do not allow the cord to touch the hot surfaces. Let the
appliance cool down completely (for about 30 minutes) before
moving it or putting it away.
7. Always disconnect the appliance from the electrical outlet when
filling with water or emptying; and when not in use. Be careful to
avoid spilling water on the appliance when filling.
8. Do not operate the appliance with a damaged cord or plug or
after the appliance has been dropped or damaged in any
manner. To avoid the risk of electric shock, do not disassemble
the appliance; take it to a qualified service center for
examination and repair. Incorrect reassembly can cause a risk of
electric shock when the appliance is used.
9. If the appliance is not operating normally, disconnect from the
power supply and have the appliance serviced by an authorized
service center.
10. Close supervision is necessary when the appliance is used by or
near children. Young children should be supervised to ensure that
they DO NOT play with the appliance.
11. Please keep out of reach of children and pets. This product is not
intended for use by children, by persons with reduced physical,
sensory or mental capabilities, or lacking experience or
knowledge, unless they have been given supervision or instruction
concerning the use of the product, by a person responsible for
2
Assembly page 2/35
STP 30138 - 120501
Fax +32 2 359 95 50
Copies of the I/B. Please reproduce them without any
changes except under special instruction from Team
International BELGIUM. The pages must be reproduced and
folded in order to obtain a booklet A5 (+/- 148.5 mm width x
210 mm height). When folding, make sure you keep the good
numbering when you turn the pages of the I/B. Don’t change
the page numbering. Keep the language integrity. Print only
what is inside the frame.
their safety. Extra caution is always necessary when using this
product.
12. Burns can occur from touching hot metal parts, hot water or
steam. The pressing plate and metal parts can become very hot
when the steam press is in operation. For this reason, to avoid
burns, keep your hands away from these hot surfaces, and be
careful when using the steam shot function.
13. Do not touch hot surfaces. Use handle and knobs.
14. Do not let the cord hang over the edge of counters.
15. Always put the appliance in a secure, stable place, on a table or
counter when using.
16. Do not move the appliance without unplugging it first.
17. Use distilled water in the appliance. Do not use perfumes or
products containing alcohol in the appliance as they would
damage the steam press.
18. This appliance must be grounded. Do not alter the plug or
attempt to defeat this feature.
SPECIAL INSTRUCTIONS: to avoid a circuit overload, do not operate
another high wattage appliance on the same circuit.
SAVE THESE INSTRUCTIONS
HOUSEHOLD USE ONLY
3-PRONG PLUG INSTRUCTIONS
For your personal safety, this appliance must be grounded. This
appliance is equipped with a power supply cord having a 3-prong
grounding plug. To minimize possible shock hazard, the cord must be
plugged into a mating 3-prong, grounding type, wall socket,
grounded in accordance with the National Electrical Code
ANSI/NFPA 70 latest edition and all local codes and ordinances. If a
mating wall receptacle is not available, it is the personal
responsibility and obligation of the customer to have a properly
grounded, 3-prong, wall receptacle installed by a qualified
electrician.
3
Assembly page 3/35
STP 30138 - 120501
Fax +32 2 359 95 50
Copies of the I/B. Please reproduce them without any
changes except under special instruction from Team
International BELGIUM. The pages must be reproduced and
folded in order to obtain a booklet A5 (+/- 148.5 mm width x
210 mm height). When folding, make sure you keep the good
numbering when you turn the pages of the I/B. Don’t change
the page numbering. Keep the language integrity. Print only
what is inside the frame.
SHORT CORD INSTRUCTIONS
A short power supply cord is provided to reduce the hazards resulting
from becoming entangled in, or tripping over a longer cord.
Extension cords may be used if care is exercised in their use.
• The extension cord should be a grounding type 3-wire cord.
• The electrical rating of the extension cord should be at least
that of the appliance. If the electrical rating of the extension
cord is too low, it could overheat and burn.
• The resulting extended cord should be arranged so that it will
not drape over the counter top or tabletop where it can be
pulled on by children or tripped over.
PART DESCRIPTION
17
1.
2.
3.
4.
5.
6.
7.
8.
9.
Handle
Pressing plate
Ironing board with cover
Water tank
Locking knob
Burst of steam buttons (for left
and right handed people)
Power light (red)
ON/OFF switch
10.
11.
12.
13.
14.
15.
16.
17.
16
15
Temperature / fabric setting
indicator
Heat indicator light (green)
Temperature display (oF only)
Steam ready light (blue)
Temperature / fabric selection (+)
Temperature / fabric selection (-)
Pressing cushion
Spray bottle
Water beaker
4
Assembly page 4/35
STP 30138 - 120501
Fax +32 2 359 95 50
Copies of the I/B. Please reproduce them without any
changes except under special instruction from Team
International BELGIUM. The pages must be reproduced and
folded in order to obtain a booklet A5 (+/- 148.5 mm width x
210 mm height). When folding, make sure you keep the good
numbering when you turn the pages of the I/B. Don’t change
the page numbering. Keep the language integrity. Print only
what is inside the frame.
BEFORE USE
Set the appliance on a sturdy work surface. Unlock the locking knob.
FILLING THE WATER TANK
Use preferably demineralized water. If you want to use the steam
function fill the water tank as follows:
1) Unplug the steam press from the outlet and make sure it is cool. If
not, let it cool down.
2) The pressing plate (2) must be lifted to the raised (up) position.
3) Slide the water tank towards the front of the unit. It will not come
completely out so do not force it to do so. Remove the lid of the
water tank (4) by a counter-clockwise turning motion. Using the
water beaker (17), slowly pour the distilled water into the water
tank. Never overfill the water tank. The water level can be seen
through the front of the tank.
4) Be careful to avoid spilling water onto the steam press when
filling.
5) Put the lid back in place using a clockwise turning motion.
6) Slide the water tank back in.
Note: When pressing, unplug the appliance before refilling.
OPERATING INSTRUCTIONS
1. Make sure the locking knob (5) is in the open position (UNLOCK)
allowing free movement of the pressing plate before plugging in
the appliance.
2. Lift the pressing plate (2) to the fully raised (up) position.
3. Plug the appliance into an electric outlet. The red power light (7)
should be blinking.
4. Press the “ON/OFF” button (8) and the red power light (7) will stay
on.
TEMPERATURE SETTINGS
•
You can choose the temperature setting according to the cloth
you are pressing (see table below).
5
Assembly page 5/35
STP 30138 - 120501
Fax +32 2 359 95 50
•
•
•
•
Copies of the I/B. Please reproduce them without any
changes except under special instruction from Team
International BELGIUM. The pages must be reproduced and
folded in order to obtain a booklet A5 (+/- 148.5 mm width x
210 mm height). When folding, make sure you keep the good
numbering when you turn the pages of the I/B. Don’t change
the page numbering. Keep the language integrity. Print only
what is inside the frame.
Press the arrow buttons (13) (14) to choose the kind of fabric you
wish to press. Press “ > “ (13) to move selection to a higher
temperature setting and press “ < “ (14) to move selection to a
lower temperature setting. If in doubt, please check the garment
label.
The Heat Indicator light (10) will start flashing.
When the Heat Indicator light goes off, the pressing plate has
reached the temperature for the desired setting.
When changing the setting from a higher selection to a lower
setting, allow several minutes after making the change, for the
pressing plate to cool down sufficiently, before continuing use.
Kind of textile
Nylon
Silk
Wool
Cotton
Linen
* For reference only
Temperature*
50-80oC / 120-175oF
80-110oC / 175-230oF
110-140oC / 230-285oF
140-170oC / 285-340oF
170-200oC / 340-390oF
Steam
NO
NO
NO
YES
YES
NOTE: You may find it more efficient to arrange your fabrics from
those requiring the lowest setting to those requiring the highest
setting and proceed accordingly. This will avoid any unnecessary
delay or wait for the pressing plate to cool.
NOTE: the temperature display will only display temperatures in
Fahrenheit degrees (oF).
STEAM CONTROL
•
•
•
Steam is produced only when the blue steam ready light (12) is
on (the press needs to reach a temperature of 150oC / 300oF),
meaning at the higher temperature settings (Cotton and Linen).
If this is the first time you are using the steam press or you have
been storing it for some time, lift the pressing plate (2) into the
raised position and press the burst of steam button several times
until the steam begins to flow.
The burst of steam function shall only be used when the steam
ready light is on and with the steam press in a slightly opened
6
Assembly page 6/35
STP 30138 - 120501
Fax +32 2 359 95 50
•
•
Copies of the I/B. Please reproduce them without any
changes except under special instruction from Team
International BELGIUM. The pages must be reproduced and
folded in order to obtain a booklet A5 (+/- 148.5 mm width x
210 mm height). When folding, make sure you keep the good
numbering when you turn the pages of the I/B. Don’t change
the page numbering. Keep the language integrity. Print only
what is inside the frame.
position. Do NOT use the burn of steam function when the steam
press is closed, or you may damage the unit.
Do not press the burst of steam button (6) for more than 5
seconds or water may drip on your garment.
The handle (1) is equipped with 2 steam burst buttons (6), in order
for the press to be used easily by right-handed or left-handed
people.
PRESSING
Make sure the locking knob (5) is in the open position (UNLOCK).
Lift the handle (1). The pressing plate (2) moves to the up position.
Carefully arrange the garment to be pressed onto the ironing
board (3).
Note: Avoid contact with the hot plate at any time!
• Grasp the handle of the pressing plate (2) and lower it onto the
ironing board (3), capturing the garment between the two halves
of the steam press.
• For lightly creased garments, simply lowering the handle and
allowing the pressing plate to rest on the ironing board for a few
seconds will be sufficient. Return then to the open position.
• For very creased garments, continue to grasp the handle and
push it downwards completely, until the pressing plate is pushed
to its lowest position. Then open the press.
• If the temperature is set high enough you may give the fabric a
burst of steam by pressing the burst of steam button (6) to
remove stubborn wrinkles.
Caution: For bursts of steam, lower the pressing plate until it is about
two inches from the garment, not completely down! Press the burst
of steam button for about 3-5 seconds. After releasing the burst of
steam button you may fully lower the pressing plate.
Note: Do not press the burst of steam button when the pressing plate
is in its lowest (closed) position.
• After a few seconds, lift the handle and bring the pressing plate
back to the raised position.
•
•
•
7
Assembly page 7/35
STP 30138 - 120501
Fax +32 2 359 95 50
Copies of the I/B. Please reproduce them without any
changes except under special instruction from Team
International BELGIUM. The pages must be reproduced and
folded in order to obtain a booklet A5 (+/- 148.5 mm width x
210 mm height). When folding, make sure you keep the good
numbering when you turn the pages of the I/B. Don’t change
the page numbering. Keep the language integrity. Print only
what is inside the frame.
USING THE SPRAY BOTTLE
Lightly spray the garment with the spray bottle (16) before placing it
on the ironing board. This helps to distribute an even, fine mist over
the fabric, preparing it to be pressed, and removing all wrinkles.
USING THE PRESSING CUSHION
Some garments have been constructed with details, such as darts,
curved seams and shoulder pads, which are not intended to be
pressed flat. A pressing cushion is supplied with your steam press for
use with these areas.
• Use the cushion (15) whenever pressing areas where no creases
are desired or to shape tailored garments.
• Place the area to be pressed onto the ironing board.
• Place the pressing cushion under the dart, seam etc.
• Make sure the area to be pressed is raised and lower the pressing
plate. The raised area is the only area the plate should contact.
NOTE: Do not attempt to lower the pressing plate to its lowest position
or lock the pressing plate against the ironing board with the pressing
cushion in place. You MAY DAMAGE the steam press by doing so.
• Raise the pressing plate after a few seconds.
FINISHING PRESSING / STORAGE
•
•
•
•
•
Water may be left in the water tank, because it will not drip out if
the machine is stored in an upright position. However, it is very
recommended that if the machine will be stored for some time,
that all the water in the unit should be drained by pressing the
burst of steam button until all of the water is pumped out.
Press the “ON/OFF” button, the red power light will start blinking.
Disconnect the plug from the wall outlet. Leave the appliance in
open position.
Wait for the steam press to cool completely (approximately 30
minutes).
When cool, lower the pressing plate onto the ironing board
pushing the handle to its lowest position.
Turn the locking knob to the “Lock” position. This should prevent
the steam press from opening while being moved or stored.
8
Assembly page 8/35
STP 30138 - 120501
Fax +32 2 359 95 50
•
•
Copies of the I/B. Please reproduce them without any
changes except under special instruction from Team
International BELGIUM. The pages must be reproduced and
folded in order to obtain a booklet A5 (+/- 148.5 mm width x
210 mm height). When folding, make sure you keep the good
numbering when you turn the pages of the I/B. Don’t change
the page numbering. Keep the language integrity. Print only
what is inside the frame.
Loosely wrap the electric cord and place it in the opening at the
front of the base of the ironing board. You can also disconnect
the power cord from the unit.
Emptying the water tank after each use is preferable if possible.
CLEANING
•
•
•
To clean the pressing plate, place the pressing cushion in the
center of the ironing board. Place a clean towel over the
pressing cushion and the ironing board. Set the temperature
control to its maximum setting. When the ready light comes on
and the steam ready light goes off, gently lower the pressing
plate onto the pressing cushion. With water in the water tank,
press the burst of steam button 6 to 7 times. Be careful to avoid
touching the hot metal surfaces or leaving your hand in the way
of steam.
Once the pressing plate has cooled down you can clean the
surface with a damp cloth. DO NOT use any abrasive material or
cleaner on the pressing plate! This pressing plate has a non-stick
coating that will help for cleaning.
The ironing board cover is removable for normal washing. You
can clean the ironing board cover with water and mild
detergent; rinse with warm water.
SAFETY FEATURES (AUTO SHUT-OFF)
The multiple safety features of this appliance turn off electric power
to the heater when the pressing plate has been left against the
ironing board for about 10 seconds. You will hear a warning beep
and the red power indicator (7) will start flashing. If the pressing plate
(2) is left in the open (up) position without use after approximately 15
minutes, the unit will also be automatically shut-off.
In either case, to restart the unit, you have to press the “ON/OFF”
button (8) again.
9
Assembly page 9/35
STP 30138 - 120501
Fax +32 2 359 95 50
Copies of the I/B. Please reproduce them without any
changes except under special instruction from Team
International BELGIUM. The pages must be reproduced and
folded in order to obtain a booklet A5 (+/- 148.5 mm width x
210 mm height). When folding, make sure you keep the good
numbering when you turn the pages of the I/B. Don’t change
the page numbering. Keep the language integrity. Print only
what is inside the frame.
TROUBLESHOOTING
PROBLEM
CAUSE
SOLUTION
Steam press cannot be
opened with the
handle
Steam press becomes
warm but DOES NOT
remove wrinkles.
Locking knob is in
locked position
Turn the locking knob
to the unlocked
position
Gradually increase the
temperature until
obtaining the desired
results; spray water over
the piece of garment.
Press DOES NOT get
warm.
Temperature has not
been selected
Press is not plugged
into an outlet.
Automatic Shut-Off is
engaged. The pressing
plate has been left
open for more than 15
minutes (or closed for
more than 10 seconds)
Water Level is too low.
Temperature is set too
low.
No Steam
Temperature setting is
not high enough for the
fabric; the piece of
garment is too dry.
Water drips from the
pressing plate.
Burst of steam button
has been pressed too
long.
The handle will not
move into the
automatic maximum
pressure position
(handle completely
down).
Item on the ironing
board is too thick
10
Assembly page 10/35
Make a proper fabric
selection.
Plug the appliance in.
Press “ON/OFF” again.
Fill the water tank.
If suitable for the fabric,
make a selection to a
higher temperature.
Wait for the steam
ready light to come on.
If not, use spray bottle
as directed.
Do not press the burst
of steam button for
more than 5 seconds
continuously.
Keep one hand on
handle and exert light
pressure on thicker
items. Burst more steam
for wrinkles.
STP 30138 - 120501
Fax +32 2 359 95 50
Copies of the I/B. Please reproduce them without any
changes except under special instruction from Team
International BELGIUM. The pages must be reproduced and
folded in order to obtain a booklet A5 (+/- 148.5 mm width x
210 mm height). When folding, make sure you keep the good
numbering when you turn the pages of the I/B. Don’t change
the page numbering. Keep the language integrity. Print only
what is inside the frame.
WARRANTY
We suggest that you complete and return the enclosed Product
Registration Card promptly to facilitate verification of the date of
original purchase. However, return of the Product Registration Card is
not a condition of these warranties. You can also fill out this warranty
card online, at the following address: www.KALORIK.com
This KALORIK product is warranted in the U.S.A. for 1 year from the
date of purchase against defects in material and workmanship. This
warranty is not transferable. Keep the original sales receipt. Proof of
purchase is required to obtain warranty performance.
During this period, if the KALORIK product, upon inspection by
KALORIK, is proven defective, it will be repaired or replaced, at
Kalorik’s option, without charge to the customer. If a replacement
product is sent, it will carry the remaining warranty of the original
product.
This warranty does not apply to any defect arising from a buyer's or
user's misuse of the product, negligence, failure to follow KALORIK
instructions noted in the user’s manual, use on current or voltage
other than that stamped on the product, wear and tear, alteration
or repair not authorized by KALORIK, or use for commercial purposes.
There is no warranty for glass parts, glass containers, filter basket,
blades and agitators, and accessories in general. There is also no
warranty for parts lost by the user.
ANY WARRANTY OF MERCHANTABILITY OR FITNESS WITH RESPECT TO
THIS PRODUCT IS ALSO LIMITED TO THE ONE YEAR LIMITED WARRANTY
PERIOD.
Some states do not allow limitation on how long an implied warranty
lasts or do not allow the exclusion of incidental or consequential
damages, so the above limitations may not apply to you. This
warranty gives you specific legal rights, and you may also have other
rights which vary from state to state.
11
Assembly page 11/35
STP 30138 - 120501
Fax +32 2 359 95 50
Copies of the I/B. Please reproduce them without any
changes except under special instruction from Team
International BELGIUM. The pages must be reproduced and
folded in order to obtain a booklet A5 (+/- 148.5 mm width x
210 mm height). When folding, make sure you keep the good
numbering when you turn the pages of the I/B. Don’t change
the page numbering. Keep the language integrity. Print only
what is inside the frame.
If the appliance should become defective within the warranty
period and more than 30 days after date of purchase, do not return
the appliance to the store: often, our Customer Service
Representatives can help solve the problem without having the
product serviced. If servicing is needed, a Representative can
confirm whether the product is under warranty and direct you to the
nearest service location.
If this is the case, bring the product, or send it, postage prepaid by
the user (all Kalorik customers are responsible for the initial shipment
back to the warranty center), along with proof of purchase and a
return authorization number indicated on the outer package, given
by our Customer Service Representatives. Send to the authorized
KALORIK Service Center (please visit our website at
www.KALORIK.com or call our Customer Service Department for the
address of our authorized KALORIK Service Center).
When sending the product, please include a letter explaining the
nature of the claimed defect.
If you have additional questions, please call our Customer Service
Department (please see below for complete contact information),
Monday through Thursday from 9:00am - 5:00pm (EST) and Friday
from 9:00am - 4:00pm (EST). Please note hours are subject to change.
If you would like to write, please send your letter to:
KALORIK Customer Service Department
Team International Group of America Inc.
1400 N.W 159th Street, Suite 102
Miami Gardens, FL 33169 USA
Or call:
Toll Free: +1 888-521-TEAM / +1 888-KALORIK
Only letters can be accepted at this address above. Shipments and
packages that do not have a return authorization number will be
refused.
12
Assembly page 12/35
STP 30138 - 120501
Fax +32 2 359 95 50
Copies of the I/B. Please reproduce them without any
changes except under special instruction from Team
International BELGIUM. The pages must be reproduced and
folded in order to obtain a booklet A5 (+/- 148.5 mm width x
210 mm height). When folding, make sure you keep the good
numbering when you turn the pages of the I/B. Don’t change
the page numbering. Keep the language integrity. Print only
what is inside the frame.
CONSEJOS DE SEGURIDAD
Cuando se utilizan aparatos eléctricos, hay unas precauciones
básicas de seguridad que siempre se deben seguir, tales como:
1. LEA TODAS LAS INSTRUCCIONES.
2. Use el aparato sólo para el uso al que está destinado.
3. Antes de utilizar el aparato, compruebe que el voltaje de la red
eléctrica coincide con el del aparato.
4. Para protegerse contra una descarga eléctrica, no sumerja el
aparato, el cable o el enchufe en agua o en otros líquidos.
5. Ponga siempre el interruptor en la posición “OFF” antes de
enchufar o desenchufar el aparato. Nunca tire del cable para
desconectarla de la toma de corriente, sujete el enchufe y tire
de él para desconectarla.
6. No permita que el cable toque superficies calientes. Deje enfriar
el aparato del todo antes de guardarlo (durante al menos 30
minutos).
7. Siempre desconecte el aparato de la toma de corriente cuando
esté llenando el depósito de agua o vaciándolo y también
cuando el aparato no esté en uso. Tenga cuidado de no
derramar agua en el aparato durante el llenado.
8. No utilice el aparato si el cable o el enchufe están dañados o si
el aparato se cayó o está dañado. Para evitar el riesgo de
choque eléctrico, no desarme el aparato. Llévelo a un centro de
servicio autorizado para que lo examinen y/o reparen. Si lo
vuelva a montar el aparato de forma incorrecta, podría
provocar de un choque eléctrico durante el uso.
9. Si el aparato no funciona normalmente, desconéctelo de la
toma de corriente y hágalo revisar por un centro de servicio
autorizado.
10. Es siempre necesaria la supervisión cercana cuando este
aparato esté utilizado cerca de niños. Este aparato no debe ser
usado por niños. Los niños deben ser vigilados para asegurarse
de que NO JUEGUEN con el aparato.
11. Manténgalo fuera del alcance de los niños y mascotas. Este
producto no está destinado a ser utilizado por niños, personas
13
Assembly page 13/35
STP 30138 - 120501
Fax +32 2 359 95 50
Copies of the I/B. Please reproduce them without any
changes except under special instruction from Team
International BELGIUM. The pages must be reproduced and
folded in order to obtain a booklet A5 (+/- 148.5 mm width x
210 mm height). When folding, make sure you keep the good
numbering when you turn the pages of the I/B. Don’t change
the page numbering. Keep the language integrity. Print only
what is inside the frame.
con discapacidades físicas, sensoriales o mentales, o que
carecen de experiencia o conocimiento, a menos que no sean
supervisados o instruidos acerca del uso del producto, por una
persona responsable de su seguridad. Cuando se utiliza este
producto siempre es necesaria una precaución extrema.
12. Se pueden producir quemaduras por contacto con las partes de
metal calientes, el agua caliente o el vapor. La placa de presión
y las partes metálicas pueden llegar a calentarse fuertemente
durante su uso, por tal motivo, para evitar quemaduras, no toque
estas superficies y ponga especial cuidado al usar la función de
vapor.
13. No toque las superficies calientes. Utilice siempre las asas y
botones.
14. No permita que el cable cuelgue de la orilla del mostrador
15. Coloque el aparato en una mesa o un mostrador sólido para
utilizarlo.
16. Desenchufe siempre el aparato antes de desplazarlo.
17. Utilice agua destilada con este aparato. No utilice productos
perfumados o a base de alcohol en el aparato, ya que
estropearía su aparato.
18. Conecte siempre este aparato a una toma de tierra. No intente
modificar el enchufe o la toma.
INSTRUCCIONES ESPECIALES: Para evitar una sobrecarga del circuito
no haga funcionar otro aparato de alto voltaje en el mismo circuito.
GUARDE ESTAS INSTRUCCIONES
SOLAMENTE PARA USO DOMESTICO
INSTRUCCIONES PARA LA TOMA DE TIERRA
Este aparato debe estar enchufado en una conexión con toma de
tierra. Ya que en caso de cortocircuito, la toma de tierra reduce el
riesgo de choque eléctrico, proporcionando una vía de escape
para el corriente eléctrico. Este aparato está equipado con un
cable que tiene un enchufe con toma de tierra. El enchufe debe
insertarse en una toma de corriente correctamente instalada.
No intente, de ninguna manera, modificar el enchufe.
14
Assembly page 14/35
STP 30138 - 120501
Fax +32 2 359 95 50
Copies of the I/B. Please reproduce them without any
changes except under special instruction from Team
International BELGIUM. The pages must be reproduced and
folded in order to obtain a booklet A5 (+/- 148.5 mm width x
210 mm height). When folding, make sure you keep the good
numbering when you turn the pages of the I/B. Don’t change
the page numbering. Keep the language integrity. Print only
what is inside the frame.
INSTRUCCIONES DEL CABLE
El cable de alimentación del aparato es un cable corto a fin de
disminuir el riesgo de accidentes (caídas al tropezar con él, etc.)
Puede utilizar un alargador si es necesario.
• Asegúrese de que el nivel eléctrico del cable es igual o mayor
que el indicado. Una extensión con un bajo nivel eléctrico
correría el riesgo de sobrecalentarse y de estropearse.
• Para evitar riesgos colocar de forma tal que los niños no puedan
jalarlo o tropezar con él. Que no arrastre nunca por el suelo.
• El aparato es del tipo contacto tierra, la alargadera deberá ser
un cable a tierra de 3 terminales.
PARTES
17
1.
2.
3.
4.
5.
6.
7.
8.
9.
Asa
Placa para prensar
Tabla de planchar con funda
Depósito de agua
Botón de bloqueo
Botón de doble vapor
Testigo luminoso de
funcionamiento (rojo)
Interruptor
Temperatura / Indicador de
ajuste de la tela
16
15
10. Testigo luminoso de temperatura
(verde)
11. Temperatura (oF solo)
12. Testigo luminoso del vapor (azul)
13. Selector de temperatura “+”
14. Selector de temperatura “-“
15. Cojín
16. Vaporizador
17. Recipiente de agua
15
Assembly page 15/35
STP 30138 - 120501
Fax +32 2 359 95 50
Copies of the I/B. Please reproduce them without any
changes except under special instruction from Team
International BELGIUM. The pages must be reproduced and
folded in order to obtain a booklet A5 (+/- 148.5 mm width x
210 mm height). When folding, make sure you keep the good
numbering when you turn the pages of the I/B. Don’t change
the page numbering. Keep the language integrity. Print only
what is inside the frame.
ANTES DEL USO
Coloque el aparato sobre un soporte lo suficiente estable y sólido.
Ponga el botón de bloqueo en la posición UNLOCK.
PARA LLENAR EL DEPÓSITO
Utilice preferentemente agua desmineralizada. Si desea utilizar la
función vapor, rellene el depósito siguiendo estas instrucciones:
1) Desenchufe el aparato de la toma de corriente y asegúrese de
que el aparato este frío, si no lo esta, déjelo enfriar.
2) Coloque la placa superior (2) en la posición levantada (hacia
arriba).
3) Deslice el depósito de agua (4) hacia la parte delantera del
aparato. No se puede sacar del todo, entonces no fuerza. Retire
la tapa del tanque de agua girando hacia la izquierda. Llene
despacio el depósito con agua destilada utilizando el recipiente
fornecido. No llene demasiado el depósito de agua. Se puede
ver el nivel de agua en la parte delantera del depósito.
4) Tenga cuidado de no derramar agua en el aparato durante el
llenado.
5) Ponga la tapa en su lugar girando hacia la derecha.
6) Vuelva a colocar el depósito dentro del aparato.
Nota: Durante el planchado, desenchufe el aparato antes de
rellenar el depósito.
USO
5. Asegúrese de que el botón de bloqueo (5) está en la posición
abierta (“UNLOCK”) para poder mover fácilmente la placa
superior. Enchufe el aparato.
6. Levante la placa superior (2) en la posición abierta (hacia
arriba).
7. Conecte la clavija a la red eléctrica.
8. Pulse el botón *ON/OFF* (8). El testigo rojo de funcionamiento (7)
se encenderá.
16
Assembly page 16/35
STP 30138 - 120501
Fax +32 2 359 95 50
Copies of the I/B. Please reproduce them without any
changes except under special instruction from Team
International BELGIUM. The pages must be reproduced and
folded in order to obtain a booklet A5 (+/- 148.5 mm width x
210 mm height). When folding, make sure you keep the good
numbering when you turn the pages of the I/B. Don’t change
the page numbering. Keep the language integrity. Print only
what is inside the frame.
AJUSTAR LA TEMPERATURA
•
•
•
•
•
Elija la temperatura en función del tipo de tejido a planchar
(véase cuadro más abajo).
Pulse las flechas para seleccionar el tipo de tejido que quiere
planchar. Pulse “ > “ (13) para seleccionar temperaturas altas y
“ < “ (14) para temperaturas bajas. En caso de duda, refiérase a
la etiqueta del tejido.
El testigo luminoso (10) comienza a parpadear.
Cuando el testigo de temperatura (10) se apaga, significa que la
placa superior alcanzó la temperatura deseada.
Cuando pase de una temperatura alta a una temperatura baja,
espere unos minutos para que la placa superior enfríe antes de
empezar a planchar.
Tipo de tejido
Nylon
Seda (Silk)
Lana (Wool)
Algodón (Cotton)
Lino (Linen)
* Solo como referencia
Temperatura*
50-80oC / 120-175oF
80-110oC / 175-230oF
110-140oC / 230-285oF
140-170oC / 285-340oF
170-200oC / 340-390oF
Vapor
NO
NO
NO
SÍ
SÍ
NOTA: Puede ser conveniente separar los tejidos por tipo y empezar
por los que necesitan la temperatura más alta y así sucesivamente.
Así evitará perder tiempo esperando a que la placa superior se
enfríe.
NOTA: La temperatura que aparece en la pantalla (11) va indicada
únicamente en grados Fahrenheit (oF).
UTILIZAR EL VAPOR
•
El aparato produce vapor sólo cuando el testigo azul del vapor
(12) está encendido (la prensa necesita llegar a una
temperatura de 150oC / 300oF), es decir a los ajustes de
temperatura mas alta (Algodón y por encima).
17
Assembly page 17/35
STP 30138 - 120501
Fax +32 2 359 95 50
•
•
•
•
Copies of the I/B. Please reproduce them without any
changes except under special instruction from Team
International BELGIUM. The pages must be reproduced and
folded in order to obtain a booklet A5 (+/- 148.5 mm width x
210 mm height). When folding, make sure you keep the good
numbering when you turn the pages of the I/B. Don’t change
the page numbering. Keep the language integrity. Print only
what is inside the frame.
Si utilice el aparato por primera vez o si no utilizó el aparato
durante mucho tiempo, levante la placa superior y pulse el
botón de doble vapor (6) varias veces hasta que el vapor salga.
La función de doble vapor se puede utilizar sólo cuando el
testigo luminoso de vapor (12) esté encendido Y el aparato
entreabierto. No utilice la función de doble vapor con el aparato
cerrado. Ello podría dañarlo.
No pulse el botón de doble vapor (6) durante más de 5 segundos
para que no gotee agua en la ropa.
El asa (1) esta equipada con 2 botones de ráfaga de vapor (6),
para ser utilizada fácilmente tanto por los diestros como por los
zurdos.
PLANCHAR
•
•
•
•
•
•
•
Compruebe que el botón de bloqueo (5) está en la posición
abierta (UNLOCK).
Levante el asa (1). La placa superior (2) se levanta
automáticamente hasta la posición abierta.
Disponga con cuidado la prenda que quiera planchar en la
tabla de planchar (3).
Agarre el asa de la placa superior (2) y bájela hacia la tabla de
planchar (3) para prender la prenda entre las dos placas del
aparato.
Para la ropa poco arrugada, simplemente bajar el asa y dejar la
placa superior en la tabla de planchar unos segundos será
suficiente. Vuelva a la posición abierta.
Para la ropa muy arrugada, siga agarrando el asa y presione
hacia abajo hasta que la placa superior se encuentre en la
posición más baja, luego abra el aparato.
Si la temperatura está bastante elevada, puede utilizar la función
de doble vapor pulsando el botón de doble vapor (6) para
eliminar las arrugas.
Atención: Cuando utilice los chorros de vapor, baje la placa superior
hasta que quede a cerca de 2 pulgadas de la prenda. Pulse el
botón de doble vapor durante unos 3-5 segundos. Cuando deje de
pulsar el botón de doble vapor, puede bajar del todo la placa
superior.
18
Assembly page 18/35
STP 30138 - 120501
Fax +32 2 359 95 50
Copies of the I/B. Please reproduce them without any
changes except under special instruction from Team
International BELGIUM. The pages must be reproduced and
folded in order to obtain a booklet A5 (+/- 148.5 mm width x
210 mm height). When folding, make sure you keep the good
numbering when you turn the pages of the I/B. Don’t change
the page numbering. Keep the language integrity. Print only
what is inside the frame.
NOTA: No pulse el botón de doble vapor (6) cuando la placa
superior (2) esté en la posición más baja (cerrada).
•
Después de unos segundos, levante el asa y la placa superior
hasta la posición abierta.
UTILIZAR EL VAPORIZADOR
Vaporice ligeramente la prenda antes de colocarla en la tabla de
planchar. Ello permite humidificar uniformemente la prenda para
preparar su planchado y quitar todas las arrugas.
UTILIZAR EL COJÍN
Algunos vestidos tienen detalles como pinzas, costuras redondeadas
y hombreras. Un cojín está entregado con su aparato para planchar
esas zonas.
• Utilice el cojín para planchar unas partes difíciles o para dar
forma a vestidos.
• Disponga la zona que quiera planchar en la tabla de planchar.
• Coloque el cojín debajo de la pinza, costura, etc.
• Asegúrese de que la zona que quiera planchar está levantada y
baje la placa superior. Sólo la zona levantada entrará en
contacto con la placa.
NOTA: No intente bajar la placa superior hacia la posición
mínima o bloquear la placa superior y la tabla de planchar en
posición cerrada cuando utilice el cojín. Ello puede DAÑAR el
aparato.
• Levante la placa superior después de unos segundos.
ACABADO DE UTILIZACION / GUARDAR EL
APARATO
•
•
•
Puede dejar el agua en el depósito ya que no goteará cuando
el aparato esté guardado de forma horizontal. Pero cuando
guarde el aparato por un largo periodo, se recomienda vaciar el
depósito pulsando el botón de doble vapor (6).
Pulse el botón *ON/OFF* (8). El testigo rojo de funcionamiento (7)
comenzara a parpadear. Desenchufe la clavija de la toma de
corriente. Deje el aparato en posición abierta.
Espere a que el aparato esté del todo enfriado (unos 30
minutos).
19
Assembly page 19/35
STP 30138 - 120501
Fax +32 2 359 95 50
•
•
•
•
Copies of the I/B. Please reproduce them without any
changes except under special instruction from Team
International BELGIUM. The pages must be reproduced and
folded in order to obtain a booklet A5 (+/- 148.5 mm width x
210 mm height). When folding, make sure you keep the good
numbering when you turn the pages of the I/B. Don’t change
the page numbering. Keep the language integrity. Print only
what is inside the frame.
Una vez enfriado, baje la placa superior en la tabla de plancha
presionando el asa hacia la posición más baja.
Gire el botón de bloqueo (5) hasta la posición de bloqueo
(LOCK). Ello permite que el aparato no se abra cuando lo
desplace o lo guarde.
Ponga el cable de alimentación en la abertura en la parte
delantera de la base de la tabla de planchar. También puede
desconectar el cable del aparato.
Si posible es preferible vaciar el tanque de agua (4) tras cada
uso.
LIMPIEZA
•
•
•
Para limpiar la placa superior, ponga el cojín en medio de la
tabla de planchar. Coloque una toalla limpia encima del cojín y
de la tabla de planchar. Elija la temperatura máxima. Cuando el
testigo verde de temperatura (10) se encienden, baje despacio
la placa superior en el cojín. Con agua en el depósito, pulse el
botón de doble vapor (6) unas 6-7 veces. Tenga cuidado de no
tocar las partes metálicas y de no quemarse con el vapor.
Cuando la placa superior (2) esté fría, puede limpiarla con un
paño húmedo. NO UTILICE productos abrasivos para limpiar la
placa superior. La placa superior tiene un revestimiento
antiadherente que vuelve la limpieza más fácil.
La funda de la tabla de planchar (3) es amovible. Puede
limpiarla con detergente suave y agua templada.
DISPOSITIVOS DE SEGURIDAD
Su aparato cuenta con varios dispositivos de seguridad. Si deja la
placa superior (2) cerrada en la tabla de planchar durante unos 10
segundos, el aparato se apagará automáticamente. Se oirá una
señal acústica y el testigo luminoso rojo (7) comenzara a parpadear.
Si la placa superior queda en posición abierta (levantada) sin estar
utilizada durante unos 15 minutos, el aparato se apagará
automáticamente.
En ambos casos, para volver a encender el aparato, tendrá que
pulsar el botón *ON/OFF* (8).
20
Assembly page 20/35
STP 30138 - 120501
Fax +32 2 359 95 50
Copies of the I/B. Please reproduce them without any
changes except under special instruction from Team
International BELGIUM. The pages must be reproduced and
folded in order to obtain a booklet A5 (+/- 148.5 mm width x
210 mm height). When folding, make sure you keep the good
numbering when you turn the pages of the I/B. Don’t change
the page numbering. Keep the language integrity. Print only
what is inside the frame.
PROBLEMAS Y SOLUCIONES
PROBLEMA
CAUSA
SOLUCIÓN
Es imposible abrir el
aparato con el asa
El botón de bloqueo está
en posición de bloqueo
(LOCK).
La temperatura no está
suficiente para la prenda
que quiere planchar.
Gire el botón de bloqueo
hasta la posición de
desbloqueo (UNLOCK).
Aumente
progresivamente la
temperatura hasta
obtener el resultado
deseado.
Ninguna temperatura
está seleccionada
La clavija no está
enchufada en la toma de
corriente.
El aparato se paró
automáticamente. La
placa superior quedó en
posición abierta durante
15 minutos sin estar
utilizada (o cerrada por
mas de 10 segundos)
No hay bastante agua.
Elija una temperatura
La prensa de planchar
calienta pero NO
QUITA las arrugas.
El aparato NO
CALIENTA.
Ningún vapor
La temperatura elegida
no es suficiente.
Agua sale de la placa
superior.
Pulsó el botón de doble
vapor durante mucho
tiempo.
No se puede cerrar el
asa hasta la posición
de presión automática
máxima.
La prenda en la tabla de
planchar está demasiado
gruesa.
21
Assembly page 21/35
Enchufe el aparato.
Vuelva a pulsar el botón
*ON/OFF*.
Llene el depósito de
agua.
Si conviene para la
prenda, elija una
temperatura más alta.
Espere a que el testigo
amarillo del vapor se
encienda. Puede también
utilizar el vaporizador
como arriba indicado.
No pulse el botón de
doble vapor durante más
de 5 segundos seguidos.
Utilice una presión menor
para las prendas más
gruesas. Utilice el vapor
para eliminar las arrugas.
STP 30138 - 120501
Fax +32 2 359 95 50
Copies of the I/B. Please reproduce them without any
changes except under special instruction from Team
International BELGIUM. The pages must be reproduced and
folded in order to obtain a booklet A5 (+/- 148.5 mm width x
210 mm height). When folding, make sure you keep the good
numbering when you turn the pages of the I/B. Don’t change
the page numbering. Keep the language integrity. Print only
what is inside the frame.
GARANTÍA
Le sugerimos rellenen y nos envíen rápidamente la Tarjeta de
Registro de Producto adjunta para facilitar la verificación de la
fecha de compra. Por lo tanto, la devolución de esa Tarjeta de
Registro de Producto no es una condición imprescindible para la
aplicación de esa garantía. Puede también rellenar dicha tarjeta de
garantía en línea en la dirección siguiente: www.KALORIK.com
A partir de la fecha de compra, este producto KALORIK está
garantizado un año contra los defectos materiales y de fabricación,
en los Estados Unidos. Esta garantía no es transferible. Conserve la
prueba de compra original. Se exige una prueba de compra para
obtener la aplicación de la garantía.
Durante este período, si el producto KALORIK después de una
inspección por parte de KALORIK, se manifiesta defectuoso, será
reparado o remplazado, según lo que decida KALORIK, sin gastos
para el consumidor. Si se envía un producto de remplazo, se
aplicará la garantía que queda del producto original.
Esta garantía no se aplica a los defectos causados por una mala
utilización por parte del comprador o del usuario, o una negligencia
al no respeto del manual de instrucciones KALORIK, o una utilización
en un circuito eléctrico cuyo voltaje es diferente al que figura en el
producto, o un desgaste normal, o modificaciones o reparaciones
no autorizadas por KALORIK, o por un uso con fines comerciales. No
existe garantía por las partes de cristal, jarras de cristal, filtros, cestos,
cuchillas y accesorios en general. No existe tampoco garantía por
las piezas perdidas por el usuario.
Toda garantía de valor comercial o de adaptabilidad a este
producto está limitada a un año también.
Algunos estados no ponen límites a la duración de la garantía tácita
o no autorizan la exclusión de daños y perjuicios accesorios o
indirectos, por lo que puede que las restricciones anteriormente
mencionadas no le sean aplicables a Usted. Esta garantía le otorga
derechos legales particulares, pero usted puede tener también otros
22
Assembly page 22/35
STP 30138 - 120501
Fax +32 2 359 95 50
Copies of the I/B. Please reproduce them without any
changes except under special instruction from Team
International BELGIUM. The pages must be reproduced and
folded in order to obtain a booklet A5 (+/- 148.5 mm width x
210 mm height). When folding, make sure you keep the good
numbering when you turn the pages of the I/B. Don’t change
the page numbering. Keep the language integrity. Print only
what is inside the frame.
derechos que varían de un estado a otro y algunos derechos
pueden variar de un estado a otro.
Si el aparato tuviera un defecto durante el periodo de garantía y / o
más de 30 días después de que se compró, no devuelva el aparato
en la tienda donde le compró: a menudo, nuestro Servicio al
Consumidor puede ayudar a resolver el problema sin que el
producto tenga que ser reparado. Si hace falta una reparación, uno
de nuestros representantes puede confirmar si el producto está bajo
garantía y dirigirle al servicio post-venta más próximo.
Si fuera el caso, traiga el producto (o envíelo, correctamente
franqueado) con la prueba de compra que mencione el número de
autorización de devolución indicado por nuestro Servicio al
Consumidor, al servicio post-venta KALORIK más próximo. (Visite
nuestra web www.KALORIK.com o llame al Servicio al Consumidor
para obtener la dirección del Servicio post-venta KALORIK exclusivo
más próximo).
Si envía el producto, le rogamos añadan una carta explicando la
naturaleza del defecto.
Si tiene preguntas adicionales, por favor llame al Servicio al
Consumidor (véase abajo para los datos completos), de lunes a
jueves, de las 9:00 a las 17:00 (EST), y el viernes de las 9:00 a las 16:00
(EST). Note que las horas pueden ser modificadas.
Si quiere escribirnos, puede hacerlo a la dirección siguiente:
KALORIK Servicio al Consumidor
Team International Group of America Inc.
1400 N.W 159th Street, Suite 102
Miami Gardens, FL 33169 USA
O llame gratuitamente (U.S.A.) al +1 888-521-TEAM / +1 888-KALORIK
Las cartas se aceptan solamente en la dirección anteriormente
mencionada. Los envíos y paquetes que no tengan número de
autorización de devolución serán rechazados.
23
Assembly page 23/35
STP 30138 - 120501
Fax +32 2 359 95 50
Copies of the I/B. Please reproduce them without any
changes except under special instruction from Team
International BELGIUM. The pages must be reproduced and
folded in order to obtain a booklet A5 (+/- 148.5 mm width x
210 mm height). When folding, make sure you keep the good
numbering when you turn the pages of the I/B. Don’t change
the page numbering. Keep the language integrity. Print only
what is inside the frame.
CONSIGNES DE SECURITE
Pour utiliser un appareil électrique, des précautions élémentaires
sont à respecter, telles que celles énumérées ci-dessous :
1. LISEZ L’ENSEMBLE DES INSTRUCTIONS.
2. Utilisez ce fer uniquement à des tâches pour lesquelles il est
conçu.
3. Vérifiez que la tension du réseau corresponde bien à celle notée
sur la plaque signalétique de l’appareil.
4. Pour écarter les risques d’électrocution, n'immergez pas le
cordon, la fiche ou le corps de l’appareil dans l'eau ou dans tout
autre liquide.
5. Veillez à ce que l’appareil soit éteint avant de le brancher ou de
débrancher. Ne jamais tirer sur le fil pour débrancher le cordon;
saisir la fiche et la retirer de la prise.
6. Assurez-vous que le cordon n'entre pas en contact avec les
surfaces chaudes. Laissez l’appareil refroidir complètement
(pendant 30 minutes environ) avant de le déplacer ou de le
ranger.
7. Veillez à toujours débrancher l’appareil de la prise de courant
avant de remplir ou vider le réservoir d’eau ou lorsque que
l’appareil n’est pas utilisé. Faite attention à ne pas renverser de
l’eau sur l’appareil en remplissant le réservoir.
8. N'utilisez pas un appareil dont le cordon d’alimentation est
endommagé ou qui a subi une chute ou a été endommagé.
Pour écarter les risques d’électrocution, ne démontez pas
l’appareil. Confiez les contrôles et réparations à un réparateur
qualifié. Un appareil mal remonté présente un danger
d’électrocution durant son utilisation.
9. Si le fer ne fonctionne pas convenablement, débranchez-le de la
source d’alimentation et apportez le fer à un centre de service
agréé pour le faire vérifier.
10. Faites particulièrement attention lorsque l’appareil est utilisé par
ou en présence d’enfants. Surveillez les enfants pour vous assurer
qu’ils ne jouent pas avec l’appareil.
11. Gardez hors de portée des enfants et des animaux domestiques.
Cet appareil n’est pas conçu pour être utilisé par des enfants, ou
par des personnes ayant des capacités physiques, sensorielles ou
24
Assembly page 24/35
STP 30138 – 120501
Fax +32 2 359 95 50
Copies of the I/B. Please reproduce them without any
changes except under special instruction from Team
International BELGIUM. The pages must be reproduced and
folded in order to obtain a booklet A5 (+/- 148.5 mm width x
210 mm height). When folding, make sure you keep the good
numbering when you turn the pages of the I/B. Don’t change
the page numbering. Keep the language integrity. Print only
what is inside the frame.
mentales réduites, ou sans expérience ; à moins qu’une personne
responsable pour leur sécurité leur donne des instructions ou les
supervise pour l’utilisation de l’appareil. Faites extrêmement
attention lors de l’utilisation de cet appareil.
12. Le contact avec les pièces en métal chaudes ou avec la vapeur
s’échappant des orifices de diffusion présente des risques de
brûlure. La plaque supérieure les pièces en métal deviennent
extrêmement chaudes quand l’appareil est en fonction. Pour
cette raison, n’approchez pas vos mains des surfaces chaudes,
et soyez vigilant en utilisant la fonction de jet de vapeur.
13. Ne touchez pas les surfaces chaudes. Utilisez les poignées et les
boutons.
14. Ne laissez pas le cordon pendre de la table ou des comptoirs.
15. Placez l’appareil à un endroit sûr et stable, comme une table ou
un comptoir.
16. Ne déplacez pas l’appareil sans le débrancher au préalable.
17. Utilisez de l’eau distillée. N’utilisez pas de l’eau parfumée ou des
liquides contenant de l’alcool car ils endommageraient
l’appareil.
18. C’est appareil doit être mis à la terre. Ne modifiez pas la fiche ou
n’essayez pas de désactiver cette fonction.
INSTRUCTIONS PARTICULIÈRES : pour éviter toute surcharge du réseau
électrique, ne pas utiliser un autre appareil de forte puissance sur le
même circuit.
CONSERVEZ CES INSTRUCTIONS
USAGE DOMESTIQUE UNIQUEMENT
INSTRUCTIONS POUR LES FICHES AVEC MISE A LA
TERRE
Cet appareil est équipé d’une fiche et d’un cordon permettant la
mise à la terre. Dans le cas d’un court-circuit, la mise à la terre réduit
les risques de chocs électriques en fournissant une porte de sortie au
courant électrique. Cette fiche ne peut être introduite que d’une
seule façon dans la prise murale, qui doit être installée selon les
codes électriques en vigueur et mise à la terre. Si cette fiche ne
25
Assembly page 25/35
STP 30138 – 120501
Fax +32 2 359 95 50
Copies of the I/B. Please reproduce them without any
changes except under special instruction from Team
International BELGIUM. The pages must be reproduced and
folded in order to obtain a booklet A5 (+/- 148.5 mm width x
210 mm height). When folding, make sure you keep the good
numbering when you turn the pages of the I/B. Don’t change
the page numbering. Keep the language integrity. Print only
what is inside the frame.
rentre pas correctement dans la prise, contactez un électricien
qualifié. N’essayez jamais de modifier vous-même la prise de terre
ou la fiche de l’appareil.
CONSIGNES CONCERNANT LE CORDON
Le cordon d’alimentation de l’appareil est un cordon de type court,
et ce afin de diminuer les risques d’accidents (chute si vous marchez
sur le cordon...). Vous pouvez toutefois utiliser une rallonge si
nécessaire mais:
• Assurez-vous que l'ampérage de la rallonge est égal ou supérieur
à celui de l'appareil. Une rallonge avec un ampérage inférieur à
celui de l'appareil risquerait de surchauffer et de brûler.
• La rallonge ne doit pas pendre du plan de travail ou de la table
afin d'éviter que les enfants ne le tirent ou trébuchent.
• Comme l’appareil est équipé d’une mise à la terre, la rallonge
utilisée devra être du même type.
DESCRIPTION
17
26
Assembly page 26/35
16
15
STP 30138 – 120501
Fax +32 2 359 95 50
1.
2.
3.
4.
5.
6.
7.
8.
9.
Copies of the I/B. Please reproduce them without any
changes except under special instruction from Team
International BELGIUM. The pages must be reproduced and
folded in order to obtain a booklet A5 (+/- 148.5 mm width x
210 mm height). When folding, make sure you keep the good
numbering when you turn the pages of the I/B. Don’t change
the page numbering. Keep the language integrity. Print only
what is inside the frame.
10. Témoin de température
11. Afficheur de température (oF
uniquement)
12. Témoin de vapeur disponible
13. Ajustement du type de tissu /
température (+)
14. Ajustement du type de tissu /
température (-)
15. Coussin de repassage
16. Vaporisateur
17. Bec verseur d’eau
Poignée
Presse
Planche de repassage avec
housse
Réservoir
Bouton de verrouillage
Boutons de jet de vapeur (pour
gauchers et droitiers)
Témoin lumineux de marche
(rouge)
Bouton Marche/Arrêt (ON/OFF)
Témoins pour le type de tissu
choisi
AVANT L’USAGE
Placez la presse sur un plan de travail solide et stable. Débloquez le
bouton de verrouillage en position « UNLOCK »
AVANT L’USAGE
Utilisez de préférence de l’eau déminéralisée. Si vous voulez utilisez la
fonction vapeur, remplissez le réservoir d’eau comme suit :
1. Débranchez l’appareil de la prise murale et assurez-vous que la
presse soit refroidie. Si ce n’est pas le cas, laissez la refroidir.
2. La presse (2) doit être en position relevée.
3. Tirez le tiroir réservoir d’eau (4) vers l’avant. Le réservoir ne sortira
pas complètement, donc ne forcez pas. Retirez le bouchon en
tournant dans le sens inverse des aiguilles d’une montre. En
utilisant le bec-verseur (17), versez lentement de l’eau dans le
réservoir. Ne remplissez pas trop. Le niveau d’eau peut être vu
par transparence à l’avant du réservoir.
4. Prenez soin de ne pas renverser d’eau sur les autres parties de
l’appareil.
5. Replacez le bouchon en tournant dans le sens des aiguilles d’une
montre.
6. Repoussez le tiroir dans l’appareil
Note : pendant le repassage, débranchez toujours l’appareil avant
de remplir le réservoir.
27
Assembly page 27/35
STP 30138 – 120501
Fax +32 2 359 95 50
Copies of the I/B. Please reproduce them without any
changes except under special instruction from Team
International BELGIUM. The pages must be reproduced and
folded in order to obtain a booklet A5 (+/- 148.5 mm width x
210 mm height). When folding, make sure you keep the good
numbering when you turn the pages of the I/B. Don’t change
the page numbering. Keep the language integrity. Print only
what is inside the frame.
USAGE
1. Avant de brancher l’appareil, assurez-vous que le bouton de
verrouillage (5) est en position « UNLOCK » (Déverrouillé), et laisse
la presse s’ouvrir librement.
2. Ouvrez la presse (2) et laissez-la en position relevée (position
haute).
3. Branchez l’appareil sur une prise de courant. Le voyant lumineux
rouge (7) se met à clignoter.
4. Appuyez sur le bouton « ON/OFF » (8), le témoin lumineux rouge
(7) est allumé et ne clignote plus.
REGLAGE DE LA TEMPERATURE
•
•
•
•
•
Vous pouvez choisir la température de la presse en fonction du
type de tissu à repasser (voir la table ci-dessous).
Appuyez sur les flèches pour choisir le type de tissu que vous
souhaitez repasser. Appuyez sur « > » (13) pour sélectionner une
température plus élevée, et sur « < » (14) pour sélectionner une
température plus basse. En cas de doute, consultez l’étiquette du
vêtement à repasser.
Le témoin lumineux de température (10) commence à clignoter.
Quand le témoin de température s’éteint, la température cible
(pour le type de tissu choisi) est atteinte.
Si vous changez de type de tissu en cours de repassage, pour un
réglage à la température moins élevée, attendez quelques
minutes pour laisser à la presse le temps de refroidir.
Type de tissu
Température*
Nylon
50-80oC / 120-175oF
Soie (Silk)
80-110oC / 175-230oF
Laine (Wool)
110-140oC / 230-285oF
Coton (Cotton)
140-170oC / 285-340oF
Lin (Linen)
170-200oC / 340-390oF
* Pour référence uniquement
Vapeur
NO
NO
NO
YES
YES
Note : Vous pourriez trouve plus efficace de trier le linge à repasser
en fonction de la température de repassage, de la plus faible a la
plus chaude. Cela voyous évitera des temps d’attente inutiles pour
le refroidissement de la plaque de la presse.
28
Assembly page 28/35
STP 30138 – 120501
Fax +32 2 359 95 50
Copies of the I/B. Please reproduce them without any
changes except under special instruction from Team
International BELGIUM. The pages must be reproduced and
folded in order to obtain a booklet A5 (+/- 148.5 mm width x
210 mm height). When folding, make sure you keep the good
numbering when you turn the pages of the I/B. Don’t change
the page numbering. Keep the language integrity. Print only
what is inside the frame.
Note : l’afficheur de température (11) ne peut afficher la
température qu’en degrés Fahrenheit (voir la table ci-dessus pour la
correspondance avec les degrés Celsius).
LA FONCTION VAPEUR
•
•
•
•
•
•
De la vapeur ne peut être produite uniquement quand le témoin
de vapeur (12) est allumé, c’est-à-dire quand la presse est réglée
sur des températures élevées (Coton et Lin).
Le voyant ne s’allume que si l’appareil est prêt à générer de la
vapeur (la presse doit atteindre une température minimum de
150oC / 300oF).
Si c’est la première fois que vous utilisez la presse, ou que vous
l’avez rangée pendant une longue période, laissez la presse (2)
relevée et appuyez sur un des boutons de génération de vapeur
(6) plusieurs fois, jusqu’au moment où la vapeur commence à
être générée.
La fonction « Jet de vapeur » ne peut être utilisée que quand le
témoin de vapeur (12) est allumé (vapeur disponible) et avec la
presse (2) en position légèrement ouverte ! N’utilisez jamais les jets
de vapeur quand la presse est refermée, car vous pourriez
endommager l’appareil.
N’appuyez pas sur le bouton de contrôle de la vapeur (6)
pendant plus de 5 secondes consécutives, ou de l’eau pourrait
gouter sur le vêtement à repasser.
La poignée (1) est équipée de deux boutons de contrôle de la
vapeur (6), pour une utilisation facile de l’appareil aussi bien par
les gauchers que par les droitiers.
REPASSAGE
•
•
•
Assurez-vous que le bouton de verrouillage (5) est en position
« UNLOCK » (Déverrouillé).
Levez la poignée (1). La presse (2) reste en position relevée.
Placez soigneusement le vêtement à repasser sur la planche à
repasser (3).
Note : évitez tout contact avec la presse qui est chaude !
29
Assembly page 29/35
STP 30138 – 120501
Fax +32 2 359 95 50
Copies of the I/B. Please reproduce them without any
changes except under special instruction from Team
International BELGIUM. The pages must be reproduced and
folded in order to obtain a booklet A5 (+/- 148.5 mm width x
210 mm height). When folding, make sure you keep the good
numbering when you turn the pages of the I/B. Don’t change
the page numbering. Keep the language integrity. Print only
what is inside the frame.
Attrapez la poignée (1) et abaissez la presse (2) sur la planche à
repasser (3), ce qui laisse le vêtement entre les deux surfaces
planes.
• Pour du linge légèrement froissé, abaisser légèrement et
simplement la presse pendant quelques secondes devrait suffire.
Retournez alors la presse en position ouverte.
• Pour du linge très froissé, gardez la poignée en main et abaissez
la complètement, jusqu’à ce que la poignée soit dans sa position
la plus basse, puis retournez la en position ouverte.
• Si la température est réglée suffisamment haute, vous pouvez
également donner au tissu un jet de vapeur en appuyant sur un
des boutons (6) situés sur la poignée, ce qui aidera à retirer les plis
plus tenaces.
Attention : pour les jets de vapeur, abaissez la presse (2) jusqu’à ce
qu’elle soit à environ 5 centimètres du vêtement (et pas en contact
avec le vêtement ou la planche !). Appuyez sur le bouton « jet de
vapeur » (6) pendant 3 à 5 secondes. Seulement ensuite, vous
pouvez abaissez complètement la presse sur le tissu.
Note : ne pressez pas sur les boutons de jet de vapeur si la presse est
en position basse (fermée).
• Apres quelques secondes, relevez la poignée et la presse.
•
UTILISEZ LE VAPORISATEUR
Humidifiez légèrement le tissu avec le vaporisateur (16) avant de le
placer sur la table à repasser. Cela aide à préparer le tissu pour être
repassé, et à retirer tous les plis.
UTILISER LE COUSSIN
Certains vêtements sont faits avec des détails, comme des galons,
ou des coutures spéciales, ou des épaulettes par exemple, qu’il ne
convient pas de repasser à plat. Un coussin de repassage (15) est
fourni pour vous aider à repassez dans ces zones délicates.
•
•
Placez la zone à repasser sur la planche.
Placez le coussin sous la zone délicate.
30
Assembly page 30/35
STP 30138 – 120501
Fax +32 2 359 95 50
Copies of the I/B. Please reproduce them without any
changes except under special instruction from Team
International BELGIUM. The pages must be reproduced and
folded in order to obtain a booklet A5 (+/- 148.5 mm width x
210 mm height). When folding, make sure you keep the good
numbering when you turn the pages of the I/B. Don’t change
the page numbering. Keep the language integrity. Print only
what is inside the frame.
Assurez-vous que la zone à repasser ressort et abaissez la presse.
Cette zone est la seule qui doit entrer en contact avec la plaque
chauffante de la presse.
Note : n’essayez pas de forcer la presse dans sa position la plus
basse, ou de verrouiller la presse avec le coussin sur la planche. Vous
pourriez endommager l’appareil.
• Relevez la presse en position ouverte après quelques secondes.
•
QUAND LE REPASSAGE EST FINI
•
•
•
•
•
•
•
Vous pouvez laisser de l’eau dans le réservoir, car il ne devrait pas
goutter. Cependant, il est recommandé de vider le réservoir si la
machine ne va pas être utilisée pendant une longue période.
Pour cela, drainez toute l’eau en pressant le bouton de jet de
vapeur jusqu’au moment où le réservoir est vide.
Appuyez sur le bouton « ON/OFF » (8), le témoin lumineux (7) va
se mettre à clignoter. Déconnectez le cordon de la prise murale.
Laissez la presse en position ouverte.
Attendez que l’appareil ait refroidi complètement (environ 30
minutes).
Lorsqu’elle est refroidie, abaissez la presse (2) sur la planche (3),
et appuyez sur la poignée (1) pour qu’elle atteigne sa position la
plus basse.
Tournez le bouton de verrouillage (5) en position « LOCK »
(Verrouillé). Cela va empêcher toute ouverture accidentelle
pendant le déplacement ou le stockage.
Enroulez le cordon autour de la base, ou déconnectez le cordon
de la base pour le rangement.
Vider le réservoir de toute l’eau qu’il contient est préférable si
possible.
NETTOYAGE
•
Pour nettoyer la plaque de la presse, placez le coussin au milieu
de la planche, placez au-dessus une serviette propre, et réglez la
température au maximum. Quand le témoin de température
s’éteint, et que le voyant de vapeur s’allume, abaissez
doucement la presse sur le coussin et appuyez 6 ou 7 fois sur le
bouton de jet de vapeur. Prenez soin de ne pas touchez les
31
Assembly page 31/35
STP 30138 – 120501
Fax +32 2 359 95 50
•
•
Copies of the I/B. Please reproduce them without any
changes except under special instruction from Team
International BELGIUM. The pages must be reproduced and
folded in order to obtain a booklet A5 (+/- 148.5 mm width x
210 mm height). When folding, make sure you keep the good
numbering when you turn the pages of the I/B. Don’t change
the page numbering. Keep the language integrity. Print only
what is inside the frame.
surfaces en métal avec la main, ou de laisser vos mains en
contact avec la vapeur.
Une fois la plaque refroidie, vous pouvez en nettoyer la surface
avec un tissu humide. Ne nettoyez pas la plaque avec un
matériau ou des produits nettoyants abrasifs. La plaque est
recouverte d’un revêtement antiadhésif qui devrait faciliter le
nettoyage.
La housse de la planche a repasser est amovible, et peut être
nettoyée avec un peu d’eau et de détergent puis rincée avec
de l’eau chaude.
MESURES DE SECURITE (ARRET AUTOMATIQUE)
Les mesures de sécurité intégrées à cet appareil éteignent la presse
quand celle-ci reste abaissée pendant plus de 10 secondes. Vous
entendrez une alarme sonore et le témoin de fonctionnement rouge
(7) se met à clignoter. Si la presse reste relevée en position ouverte
pendant plus de 15 minutes environ, l’appareil s’éteindra également
de lui-même.
Dans les deux cas, pour remettre l’appareil en fonction, il suffit
d’appuyer de nouveau sur le bouton « On/Off » (8).
32
Assembly page 32/35
STP 30138 – 120501
Fax +32 2 359 95 50
Copies of the I/B. Please reproduce them without any
changes except under special instruction from Team
International BELGIUM. The pages must be reproduced and
folded in order to obtain a booklet A5 (+/- 148.5 mm width x
210 mm height). When folding, make sure you keep the good
numbering when you turn the pages of the I/B. Don’t change
the page numbering. Keep the language integrity. Print only
what is inside the frame.
PROBLEMES ET SOLUTIONS
PROBLEME
CAUSE
SOLUTION
La presse ne peut pas
s’ouvrir.
Le bouton de
verrouillage est en
position « LOCK ».
La température n’est
pas assez chaude pour
le type de tissu à
repasser ; le tissu est
trop sec.
Tournez le bouton en
position « UNLOCK ».
La presse est chaude
mais ne fait pas
disparaitre les plis.
La presse ne chauffe
pas.
La température n’a pas
été sélectionnée.
L’appareil n’est pas
branché.
Pas de vapeur.
La fonction d’arrêt
automatique est
engagée après que la
presse soit restée
ouverte plus de 15
minutes, ou fermée plus
de 10 secondes.
Le niveau d’eau est
trop bas.
La température est
réglée trop basse.
De l’eau goutte de la
plaque.
Le bouton « jet de
vapeur » a été pressé
trop longtemps.
La presse ne s’abaisse
pas complétement.
L’objet sur la planche
est trop épais.
33
Assembly page 33/35
Augmentez
graduellement la
température jusqu’à
l’obtention des résultats
désirés ; humidifiez
légèrement le tissu
préalablement.
Sélectionnez la
température adéquate
pour le linge.
Connectez le cordon à
l’appareil et à la prise
murale.
Appuyez de nouveau
sur “ON/OFF”.
Remplissez le réservoir.
Si cela est autorisé pour
le type de tissus,
sélectionnez une
température plus
élevée. Sinon, utilisez le
vaporisateur.
N’appuyez pas sur le
bouton plus de 5
secondes
Gardez la main sur la
poignée pour exercer
une pression légère, et
donnez plus de vapeur.
STP 30138 – 120501
Fax +32 2 359 95 50
Copies of the I/B. Please reproduce them without any
changes except under special instruction from Team
International BELGIUM. The pages must be reproduced and
folded in order to obtain a booklet A5 (+/- 148.5 mm width x
210 mm height). When folding, make sure you keep the good
numbering when you turn the pages of the I/B. Don’t change
the page numbering. Keep the language integrity. Print only
what is inside the frame.
GARANTIE
Nous vous suggérons de remplir et de nous renvoyer rapidement la
Carte d’Enregistrement Produit ci-jointe afin de faciliter la vérification
de la date d’achat. Cependant, le renvoi de la Carte
d’Enregistrement Produit n’est pas une condition indispensable à
l’application de la présente garantie. Vous pouvez aussi remplir
cette carte de garantie en ligne à l’adresse suivante :
www.KALORIK.com.
A compter de la date d’achat, ce produit KALORIK est garanti un
an, sur le territoire des Etats-Unis, contre les défauts matériels et de
fabrication. Cette garantie n’est pas transférable. Conservez la
preuve d’achat originelle. Une preuve d’achat est exigée pour
obtenir l’application de la garantie.
Durant cette période, le produit KALORIK qui, après inspection par
KALORIK, s’avère défectueux, sera réparé ou remplacé, au choix de
KALORIK, sans frais pour le consommateur. Si un produit de
remplacement est envoyé, c’est la garantie restante du produit
originel qui s’appliquera.
La présente garantie ne s’applique pas aux défauts dus à une
mauvaise utilisation de la part de l’acheteur ou de l’utilisateur, à une
négligence, au non-respect des consignes du manuel d’utilisation
KALORIK, à une utilisation sur un circuit électrique au voltage
différent de celui renseigné sur le produit, à une usure normale, à des
modifications ou réparations non autorisées par KALORIK, ou par un
usage à des fins commerciales. Il n’existe pas de garantie pour les
parties en verre, récipients en verre, filtres, paniers, lames et
accessoires en général. Il n’existe également pas de garantie pour
les pièces perdues par l’utilisateur.
Toute garantie de valeur commerciale ou d’adaptabilité à ce
produit est également limitée à la garantie d’un an.
Certains états ne limitent pas la longueur de la garantie tacite ou
n’autorisent pas l’exclusion de dommages-intérêts accessoires ou
indirects, les restrictions ci-dessus peuvent donc ne pas s’appliquer à
34
Assembly page 34/35
STP 30138 – 120501
Fax +32 2 359 95 50
Copies of the I/B. Please reproduce them without any
changes except under special instruction from Team
International BELGIUM. The pages must be reproduced and
folded in order to obtain a booklet A5 (+/- 148.5 mm width x
210 mm height). When folding, make sure you keep the good
numbering when you turn the pages of the I/B. Don’t change
the page numbering. Keep the language integrity. Print only
what is inside the frame.
vous. Cette garantie vous donne des droits légaux particuliers, et
certains droits peuvent varier d’un état à l’autre.
Si l’appareil devait présenter un défaut durant la période de
garantie et plus de 30 jours après l’achat, ne ramenez pas l’appareil
au magasin : souvent, notre Service Clientèle peut aider à résoudre
le problème sans que le produit ne doive être réparé. Si une
réparation est nécessaire, un représentant peut confirmer si le
produit est sous garantie et vous rediriger vers notre centre de
réparation.
Le cas échéant, ramenez le produit (ou envoyez-le, dûment
affranchi), ainsi qu’une preuve d’achat, en mentionnant le numéro
d’autorisation de retour, indiqué par notre service clientèle, au
service après-vente KALORIK agrée (visitez notre site internet
www.KALORIK.com ou appelez notre département Service Clientèle
pour obtenir l’adresse du service après-vente KALORIK agréé).
Si vous envoyez le produit, veuillez y joindre une lettre expliquant la
nature du défaut.
Si vous avez des questions complémentaires, veuillez appeler notre
département Service Clientèle (voyez plus bas pour les coordonnées
complètes), du Lundi au Jeudi de 9h à 17h (EST) et le Vendredi de 9h
à 16h (EST). Veuillez noter que les heures sont sujettes à modification.
Si vous souhaitez nous écrire, adressez votre courrier à:
KALORIK Customer Service Department
Team International Group of America Inc.
1400 N.W 159th Street, Suite 102
Miami Gardens, FL 33169 USA
Ou appelez (Gratuitement des Etats-Unis): +1 888-521-TEAM ou +1
888-KALORIK.
Seules les lettres seront acceptées à l’adresse ci-dessus. Les envois
et colis n’ayant pas de numéro d’autorisation de retour seront
refusés.
Back cover page (last page)
Assembly page 35/35