1
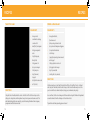
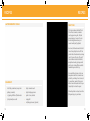
salad
chef
unprocess your food
instruction manual & recipe guide
MODEL DES001
PAGE TITLE
TABLE OF CONTENTS
Safety Guidelines................................................. 4-5
Parts & Features.................................................. 6-7
Assembly............................................................ 8-9
Using Your Salad Chef........................................... 10
Cone Attachments................................................ 11
Maintenance........................................................ 12
Recipes........................................................... 13-25
Customer Support................................................. 26
Warranty............................................................... 27
2
3
SAFETY GUIDELINES
SAFETY GUIDELINES
Please Read and Save this Instruction and Care Manual
When using electrical appliances, basic safety precautions should be followed, including:
•
Read all instructions.
•
Remove all bags and packaging from
appliance before use.
•
Make sure the appliance is thoroughly
cleaned before using.
•
Make sure the appliance is turned off
before unplugging the cord from the wall.
•
Do not use the Salad Chef for more than
2 minutes at a time as the motor may
overheat. Allow motor to cool down
between consecutive uses.
•
Do not operate the appliance without first
inserting a Cone into the Cone Holder.
•
Do not shred, grate, or slice raw/cooked
meat.
•
Do not touch or remove the Cone while
appliance is in use and the motor is on.
•
•
4
•
Never touch the Cone while it is rotating.
Never use fingers, utensils or other objects
to remove processed food from attached
Cone while appliance is plugged in.
This appliance is not intended for use by
persons (including children) with reduced
physical, sensory or mental capabilities,
or lack of experience and knowledge
unless they are provided with supervision
and instruction concerning use of the
appliance by a person responsible for
their safety.
•
When using any extension cords, make
sure the electrical rating of the wire is
compatible with the Salad Chef.
•
Avoid contact with moving parts. To reduce
the risk of injury to persons and/or damage
to the appliance, do not put your hands,
hair, clothing or other objects in the Feed
Tube or Cone during use.
•
Do not use hands or other objects to push
food into Feed Tube. Only insert the Food
Pusher into the Feed Tube.
•
If food must be removed from the Feed
Tube, turn off and unplug Salad Chef before
attempting to remove it.
•
Handle the Cones carefully as their blades
are sharp and can cause injury.
•
•
•
•
Always make sure the voltage used is
consistent with the nominal voltage of the
Dash Go Salad Chef.
All components included with the Dash Go
Salad Chef are compatible with this product
only. Do not use these parts on similar
products.
•
Check that the Salad Chef is off and
unplugged before and after each use.
Do not use the appliance if any of the parts
are damaged.
•
Do not operate any appliance with a
damaged cord or plug.
•
Do not leave the appliance unattended
when plugged in.
•
This appliance has a polarized plug (one
blade is wider than the other). To reduce
the risk of electric shock, this plug will fit in
a polarized outlet only one way. If the plug
does not completely fit in the outlet, reverse
the plug. If it still does not fit, contact a
qualified electrician. Do not attempt to
modify the plug in any way.
Always be sure to unplug the appliance
from outlet prior to assembly, disassembly,
cleaning and storage.
•
Do not place appliance on or near a hot gas
burner, hot electric burner, or in a heated
oven.
•
If appliance malfunctions, discontinue use
until problem is resolved.
•
Do not use any accessory attachments
that are not recommended by the appliance
manufacturer, as this may result in fire,
electric shock or personal injury.
•
To prevent the risk of fire, electric shock, or
personal injury, do not place the cord, plug,
or unit near water or other liquids.
•
This appliance is intended for household
use only.
5
PARTS & FEATURES
PARTS & FEATURES
Processing Chute
Food Pusher
On / Off Button
Feed Tube
Compartment
Lock Button
Splash Guard
Drive Socket
Drive Shaft
Cone Holder
Motor Base
Thick Slicer
Thin Slicer
Fine Shredder
Grater
Coarse Shredder
Cone Compartment & Lid
6
7
ASSEMBLY
ASSEMBLY
Clean the Salad Chef and all of its components prior to assembly and use. Always turn
off and unplug the appliance before assembling, disassembling, moving and cleaning.
8
1. Place the Motor Base on a clean and stable surface.
4. Hold the Processing Chute so that it is at a 90 degree
angle with the Motor Base. Insert the Drive Shaft of
the Chute into the Drive Socket. Twist the Processing
Chute counterclockwise until it locks into the Motor Base.
The Feed Tube should sit fully upright.
2. Insert the desired Cone into the Cone Holder. While
holding the Drive Shaft use your other hand to turn the
Cone clockwise until it interlocks with the Cone Holder.
5. Attach the Splash Guard by lining up the Guard’s brackets with the bracket slots located on the rim of the Cone
Holder. Twist the Splash Guard counterclockwise to lock it
into place. The lip should point downward.
3. Store the remaining Cones inside the Cone Compartment.
Cover with the Cone Compartment Lid. As you push the
Cone Compartment Lid into the back of the Motor Base,
hold down the Compartment Lock Button. The Lid will click
into place.
6. Plug in the Salad Chef. Press the On/Off Button for a few
seconds to lock the Cone into place. Put a bowl or cutting
board under the Processing Chute and get ready to shred,
slice and dice!
9
USING YOUR SALAD CHEF
WARNING: Before using the Salad Chef, make sure the Cone in use is locked into place
inside the Cone Holder. Secure the Cone by pulsing the On/Off Button for 1-2 seconds.
CONE ATTACHMENTS
Attachment
Type
Description
DO NOT use the appliance to shred tough food such as meat.
You may need to cut larger foods into pieces so that they can fit inside the Feed Tube.
1.
Choose your desired Cone. Review the Cone Attachments Table on page 11 for
instructions on which Cones are best suited for certain foods and recipes.
2.
Insert the Cone into the Cone Holder and twist clockwise until it attaches. Make sure
the Cone sits firmly in its Holder.
3.
Lock the Processing Chute into the Drive Socket on the Motor Base. Attach the
Splash Guard to the Cone Holder.
4.
Plug in the Salad Chef. Briefly press the On/Off Button to allow the Cone to lock into
place.
5.
Place a bowl or cutting board underneath the Processing Chute. Put food inside the
Feed Tube and hold down the On/Off Button. Use the Food Pusher as needed to
drive food down toward the rotating Cone.
6.
10
To change Cones, twist the Processing Chute clockwise until it detaches from the
Motor Base. Remove the Splash Guard. Place the Cone Holder face down on a flat
surface and twist the Drive Shaft clockwise until the Cone disconnects.
Thick Slicer
Great for slicing vegetables and firm fruits. Use for
coleslaw, salads and fruit tarts.
Thin Slicer
Great for radishes, mushrooms, carrots, cucumbers,
fennel and celery.
Fine Shredder
Great for making root vegetable salads, Parmesan
shreds, zucchini bread and coconut cakes.
Coarse Shredder
Great for semi-hard cheeses, cucumbers and firm
fruits. Use for chunky dip & chutney, apple bread and
carrot cake.
Grater
Great for hard cheeses, ginger, garlic and hot
peppers.
11
MAINTENANCE
Thoroughly clean the Salad Chef and its components prior to first time use. Always turn
off and unplug the appliance before cleaning. Your Salad Chef must be properly cleaned
after each use.
WARNING: DO NOT SUBMERGE MOTOR BASE IN WATER OR OTHER LIQUIDS. THE
MOTOR BASE IS NOT DISHWASHER SAFE.
1. Always unplug the appliance before cleaning.
2. Do not submerge the Motor Base in water or other liquids. Instead, wipe down the
Motor Base with a damp cloth.
3. To avoid staining the Cones, rub them with a cloth dipped in cooking oil prior to
cleaning. Be sure to handle the Cones with care as their blades are sharp and can
cause injury.
4. With the exception of the Motor Base, all components are dishwasher safe.
5. Dry all parts thoroughly before storing. To prevent the metal from rusting, allow
Cones to air dry for several hours. Store Cones inside the Cone Compartment
located in the back of the Motor Base.
RECIPES
delicious & satisfying ideas for every day
12
13
RECIPES
RECIPES
Thai-style slaw
Fennel & Pear Salad
INGREDIENTS
•
2 large carrots
•
1 small white cabbage,
INGREDIENTS
•
fronds removed
cored and cut
•
2 firm pears, peeled and cored
•
handful of microgreens
•
1/4 cup shaved Parmigiano-Reggiano
•
2 tbsp pomegranate
•
1/2 cup dried cranberries
seeds
•
1 stalk celery
1 tsp fresh ginger,
•
5 sprigs fresh parsley, stems removed
•
thinly sliced
and chopped
•
1 tbsp peanut oil
•
6 tbsp vegetable or canola oil
•
1/4 cup rice vinegar
•
3 tbsp apple cider vinegar
•
1 tbsp lime juice
•
2 tsp Dijon mustard
•
2 tsp fresh mint,
•
1 small garlic clove, minced
chopped
•
1/4 tsp black sesame seed
•
salt (to taste)
DIRECTIONS
Using the Corse Shredder, shred the carrots. Switch to the Thick Slicer and process the
cabbage. In a large bowl, mix all ingredients except microgreens and sesame seeds. Toss
until shredded vegetables are completely coated in dressing. Garnish with microgreens,
pomegranate and black sesame seeds.
14
2 large fennel bulbs,
DIRECTIONS
Cut fennel and pear so that they fit inside the Feed Tube. Use the Thin Slicer to cut fennel
and celery into thin disks, then set aside. Change to the Coarse Shredder and process the
pear. In a salad bowl, combine the fennel, celery, pear, cranberries, and parsley.
In a small bowl, stir the oil and vinegar. Add the mustard and garlic. Whisk until ingredients
are well-combined. Pour the dressing onto the salad and toss.
Top with shaved Parmigiano-Reggiano and serve!
15
RECIPES
RECIPES
MOroccan carrot salad
Grated beet salad
INGREDIENTS
•
4 large carrots
•
1/2 tsp ground cumin
•
1/2 tsp paprika
•
2 medium-sized garlic cloves,
minced
•
3 tbsp fresh lemon juice
•
1/4 cup grapeseed oil
•
1 tsp honey
•
dash of cinnamon
•
pinch of cayenne pepper (optional)
•
handful of microgreens
•
salt (to taste)
INGREDIENTS
•
1/2 lb. raw beets, cleaned and peeled
•
3 tbsp orange juice
•
1 tbsp lemon juice
•
1 tbsp extra virgin olive oil
•
2 tbsp parsley, stems removed
and chopped
•
salt (to taste)
Directions
Cut the carrots into thin ribbons with the Fine Shredder.
In a large bowl, whisk all ingredients except carrot and microgreens. Add the carrot and toss
until the shredded pieces are thoroughly coated in the mixture.
Sprinkle the microgreens over the salad and serve slightly chilled.
16
Directions
Cut the cleaned, peeled beets so that they fit inside the Feed Tube. With the Fine Shredder,
process the beets into thin pieces. Place in a bowl with the parsley and set aside.
In a small bowl, mix the orange juice, lemon juice and olive oil. Pour dressing over the beets
and toss. Salt to taste. Chill in fridge until ready to serve. Garnish with a few leaves of parsley
and enjoy!
17
RECIPES
RECIPES
Lactofermented pickles
Directions
Slice the cucumbers with the Thick
Slicer. Place cucumber, coriander
seeds, peppercorns, garlic, dill, and
grape leaves in a clean jar. You can
use one half-gallon mason jar or
several smaller jars if preferred.
In a bowl, stir the water and salt until
the salt completely dissolves. Fill the
jar with the salt water mixture, leaving
1 inch of space at the top of the jar. If
the cucumbers rise above the brine,
weigh them down by placing a small
glass bowl or a brine-filled resealable
sandwich bag inside the top.
INGREDIENTS
2 lbs. Kirby cucumbers (or any other
•
1/2 tsp coriander seeds
pickling cucumber)
•
1/4 tsp black peppercorns
•
1 qt. spring, distilled or filtered water
•
2 garlic cloves, crushed
•
3 tbsp iodine-free sea salt
•
2 sprigs dill
•
1-2 fresh grape leaves (optional)
•
18
Cover with lid and leave out at room
temperature until the cucumbers are
pickled to your liking. Do not leave out
for more than 3 weeks. If using a jar
without an airlock, make sure to open
the jar daily to release the gases.
When the pickles are done, store in the
fridge and enjoy at your leisure.
19
RECIPES
RECIPES
Tzatziki dip
DIRECTIONS
Halve the cucumber lengthwise.
With a spoon, scoop out the seeds.
Shred the seeded cucumbers with
the Coarse Shredder.
In a medium bowl, combine all
ingredients except the cucumber.
Mix until well-combined.
Stir in the shredded cucumber.
The dip should be chunky and
thick.
Chill in the fridge until ready
to serve.
Garnish with a sprig of dill or a
few mint leaves and enjoy!
INGREDIENTS
•
2 cups (16 oz.) Greek yogurt
•
2 tbsp dill, finely chopped
•
1 cucumber
•
1 tsp garlic powder
•
2 tbsp olive oil
•
salt and pepper (to taste)
•
1/2 lemon, juiced
20
21
RECIPES
RECIPES
Zucchini Banana NUt bread
Directions
Preheat the oven to 350°F. Prepare two
8” x 4” loaf pans by rubbing them with
the melted butter. Sprinkle a thin layer of
flour over the pans, turn upside down and
lightly tap to remove the excess flour.
Shred the zucchini into fine pieces with
the Fine Shredder. In a mixing bowl, stir
together all of the dry ingredients until
well-combined.
In another bowl, add the egg and liquid
ingredients. Whisk until blended, then stir
in the shredded zucchini. Make a well in
the dry ingredients with your finger and
pour in the liquid mixture. Mix well. Stir in
the walnuts and mashed banana.
ingredients
•
1/2 cup vegetable or canola oil
•
2 cups unbleached, all-purpose flour
•
2 medium zucchini
•
1/2 cup brown sugar
•
2 very ripe bananas, mashed
•
1 tsp baking soda
•
1 egg
•
1 tsp baking powder
•
1/2 tbsp cinnamon
•
1/2 tsp salt
•
1/2 cup walnuts, chopped
•
1 tsp vanilla extract
22
Divide the batter evenly between the
two loaf pans. Bake in the oven for
approximately 50-60 minutes or until a
toothpick inserted into the bread’s
center comes out clean.
Let bread cool for 15 minutes. Carefully
turn out the loaves onto a wire rack.
23
RECIPES
RECIPES
Carrot Cake With greek yogurt frosting
Carrot Cake greek yogurt frosting
INGREDIENTS
•
•
•
•
•
•
•
•
•
•
•
•
•
1 cup whole wheat flour
1 1/2 cups flour
1/2 tsp baking powder
1 tsp baking soda
2 tsp cinnamon
1 cup sugar
1/2 cup brown sugar
1 tbsp vinegar
grated rind of 1 orange
1 cup vegetable oil
4 eggs
6 medium, raw carrots
1 cup raisins
Directions
Preheat oven to 350°F and thoroughly grease a 9” x 13” pan. Shred the carrots with the
Fine Shredder. In a large bowl, mix together the oil, sugars, eggs, spices, vinegar, orange rind,
and baking soda & powder. Add both types of flour and whisk until well-combined. Finally,
mix in the carrots and raisins. The batter will be thick.
Pour into the prepared pan and bake for 50-60 minutes or until a toothpick inserted into
the cake’s center comes out clean.
24
INGREDIENTS
•
•
1 cup (6 oz.) Greek yogurt
1/2 cup powdered sugar
•
1 tsp vanilla extract
Directions
Allow the cake to cool for about 30 minutes. While the cake sits, combine the Greek yogurt,
powdered sugar and vanilla extract in a mixing bowl and whisk well. If the frosting is too
thin, you can add more powdered sugar to thicken it. Place cake on a cake plate and frost.
If you do not want to use frosting, you can dust the cake with a little powdered sugar.
25
CUSTOMER SUPPORT
For product support, warranty and maintenance related questions, please contact
StoreBound directly at: 1-800-898-6970 from 7AM - 7PM PST, Monday - Friday, or by
email at [email protected].
REPAIRS
DANGER! Risk of electric shock! The Salad Chef is an electrical appliance.
Do not attempt to repair the appliance yourself under any circumstances.
Contact customer service regarding repairs to the device.
WARRANTY
STOREBOUND, LLC – 1 YEAR LIMITED WARRANTY
Your StoreBound product is warranted to be free from defects in material and
workmanship for a period of one (1) year from the date of the original
purchase when utilized for normal and intended household use. Should any defect
covered by the terms of the limited warranty be discovered within one (1) year,
StoreBound, LLC will repair or replace the defective part. To process a warranty claim, contact
customer care at 1-800-898-6970 for further assistance and instruction. A customer
care agent will conduct troubleshooting in an attempt to fix any minor problems. If
troubleshooting fails to fix the problem, a return authorization will be issued. Proof of
purchase indicating date and place of purchase is required and should accompany the
return. You must also include your full name, shipping address, and telephone number.
We are unable to ship returns to a PO Box. StoreBound will not be responsible for delays
or unprocessed claims resulting from a purchaser’s failure to provide any or all of the
necessary information. Freight costs must be prepaid by the purchaser.
Send All Inquiries To: [email protected]
There are no express warranties except as listed above.
REPAIR OR REPLACEMENT AS PROVIDED UNDER THIS WARRANTY IS THE
EXCLUSIVE
REMEDY
OF
THE
CUSTOMER.
STOREBOUND
SHALL
NOT
BE
LIABLE FOR ANY INCIDENTAL OR CONSEQUENTIAL DAMAGES FOR BREACH OF ANY
EXPRESS OR IMPLIED WARRANTY ON THIS PRODUCT EXCEPT TO THE EXTENT
PROHIBITED BY APPLICABLE LAW. ANY IMPLIED WARRANTY OF MERCHANTABILITY OR
FITNESS FOR A PARTICULAR PURPOSE ON THIS PRODUCT IS LIMITED IN DURATION TO
THE DURATION OF THIS WARRANTY.
TECHNICAL SPECIFICATIONS
Model Number DES001
Voltage 120V ~ 60Hz
Power Rating 120W
Stock#: DGSS-20140203V1
26
Some states do not allow the exclusion or limitation of incidental or consequential damages, or limitations on how long an implied warranty lasts. Therefore, the above
exclusions or limitations may not apply to you. This warranty gives you specific legal rights and you may also have other rights, which vary from state to state.
DOUBLE YOUR PRODUCT WARRANTY
To double your product warranty, register your product online at: http://register.bydash.com
27
For more information, please visit bydash.com
Customer Support 1-800-898-6970
28