1
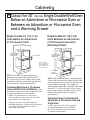
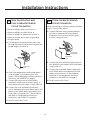
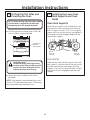
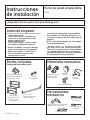
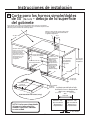
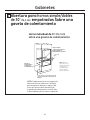
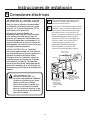
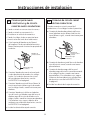
Installation Instructions
B
Electrical Connections
ATTENTION INSTALLER
B1
All electric wall ovens must be hard wired
(direct wired) into an approved junction box. A
plug and receptacle is NOT permitted on these
products.
B2
DO NOT shorten the flexible conduit. The
conduit strain relief clamp must be securely
attached to the junction box and the flexible
conduit must be securely attached to the
clamp. If the flexible conduit will not fit within
the clamp, do not install the oven until a clamp
of the proper size is obtained.
Turn off the circuit breaker or remove
fuses to the oven branch circuit.
With the oven supported on a table or
platform in front of the cabinet opening,
connect the flexible conduit to the
electrical junction box as shown below.
Position the conduit in such a manner that
it will lie in a natural loop, in the conduit
pocket behind the unit, when the oven
is installed. You will need to purchase
an appropriate strain relief clamp to
complete the connection of the conduit to
the junction box.
Junction Box
Location
NOTE TO ELECTRICIAN: The 3 power leads
supplied with this appliance are UL recognized
for connection to heavier gauge household
wiring. The insulation of these 3 leads is
rated at temperatures much higher than the
temperature rating of household wiring. The
current carrying capacity of the conductor
is governed by the wire gauge and the
temperature rating of the insulation around
the wire.
Conduit
BARE
GROUND
RED
WHITE
BLACK
WARNING: Improper
connection of aluminum house
wiring to copper leads can result
in an electrical hazard or fire.
Use only connectors designed
for joining copper to aluminum
and follow the manufacturer’s
recommended procedure closely.
Place oven on a
support to assist
in connecting
conduit, must
support 200lbs
(91kg).
8
Strain Relief Clamp
(not included)
must be used at
Junction Box.