1
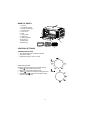
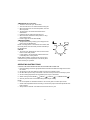
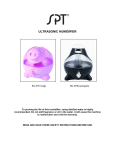
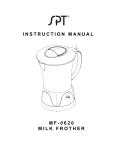
INSTRUCTION MANUAL
F
SO-1006
CONVECTION COUNTERTOP OVEN
IMPORTANT SAFEGUARDS
When using electrical appliances, basic safety precautions should always be followed, including
the following:
1. Read all the instructions.
2. Do not touch hot surfaces. Use handles or knobs.
3. To protect against electrical hazards, do not immerse cord, plug, or the appliance in water or
any other liquid.
4. Close supervision is necessary when any appliance is used by or near children.
5. Unplug from outlet when not in use and before cleaning. Allow to cool before putting on or
taking off parts; and before cleaning the appliance.
6. Do not operate any appliance with a damaged cord or plug; or after the appliance
mal-functions or has been damaged in any manner. Contact Sunpentown for examination,
repair or adjustment.
7. The use of accessories not recommended by the manufacturer may cause injuries.
8. Do not use outdoors.
9. Do not let cord hang over edge of table or counter or touch hot surfaces.
10. Do not place near a hot gas or electric burner or in a heated oven.
11. Extreme caution must be used when moving an appliance.
12. To disconnect, turn any control to “OFF”, then unplug from wall outlet.
13. This appliance is for Household Use Only. Do not use appliance for other than intended use.
14. Do not place oversize foods or metal utensils inside the toaster-oven as they may create a
fire or risk of electric shock.
15. A fire may occur if the toaster-oven is covered or touching flammable material, including
curtains, draperies, walls and the like, when in operation. Do not store/place any item on top
of the appliance when in operation.
16. Do not clean with metal scouring pads. Pieces can break off the pad and touch electrical
parts resulting a risk of electric shock.
17. Extreme caution should be exercised when using containers constructed of other than metal
or glass.
18. Do not store any materials, other than manufacturers recommended accessories, in this
oven when not in use.
19. Do not place flammable material in the oven, such as: paper, cardboard, plastic, etc.
20. Do not cover crumb tray or any part of the oven with metal foil. This will cause overheating of
the oven.
21. This appliance is not intended for use by persons (including children) with reduced physical,
sensory or mental capabilities. Or lack of experience and knowledge unless they have been
given supervision or instruction concerning use of the appliance by a person responsible for
their safety.
22. Do not leave unit unattended while in use.
23. Children should be supervised to ensure that they do not play with the appliance.
2
24. The appliance is not intended to be operated by means of an external timer or separate
remote-control system.
25. The rear surface of appliance shall be placed against a wall.
SAVE THESE INSTRUCTIONS
HOUSEHOLD USE ONLY
SHORT CORD INSTRUCTIONS
1. A short power-supply is provided to reduce risks resulting from entanglement or tripping over
a longer cord.
2. Longer detachable power cords or extension cords are available and may be used if care is
exercised in their use.
3. If a longer extension cord is used:
a. The marked electrical rating of the detachable power supply cord or extension cord should
be at least as great as the electrical rating of the appliance.
b. Arrange the longer cord so that it will not drape over the countertop or table top where it
can be pulled on by children or tripped over unintentionally.
CAUTION: This appliance has a polarized plug (one blade is wider than the other). As a safety
feature to reduce the risk of electric shock, this plug will fit in a polarized outlet only one way. If
the plug does not fit fully in the outlet, reverse the plug. If it still does not fit, contact a qualified
electrician. Do not attempt to defeat this safety feature.
CAUTION: HOT SURFACE
BEFORE FIRST USE
1. Remove all accessories and shipping materials packed inside the oven.
2. Wash the rack and pan in warm soapy water. Wipe the inside of the oven with a damp cloth or
sponge. Blot dry with paper towels to be sure the unit is dry before using.
3. Place oven on a flat counter or other stable surface. DO NOT OPERATE ON THE SAME
CIRCUIT WITH ANOTHER APPLIANCE.
4. Position oven so that it is at least 2 inches from any surrounding object. Ensure nothing is
placed on top of the oven.
5. Make sure the crumb tray is properly installed before using.
For the first time only, set the temperature knob to MAX, the function setting on toast and the
timer to 15 minutes. This will burn off any oils that remained from production.
NOTE: the oven may smoke during this process. This is normal for a new oven and will not last
more than 10-15 minutes
3
NAME OF PARTS
1
1. Housing
2. Temperature knob
3. Power indicator light
4. Function knob
5. Timer knob
6. Foot
7. Door handle
8. Glass door
9. Heating element
10. Crumb tray
11. Baking rack
12. Baking tray
CONTROL SETTINGS
9
2
4
8
3
5
7
6
11
10
12
TEMPERATURE SETTING
• Turn temperature knob clockwise to desired
temperature setting.
• Temperature range is 150°F to 450°F.
F
FUNCTION SETTING
4 different operating functions for versatile cooking:
: lower heating element only
• BAKE
: upper heating element only
• BROIL
: both lower and upper heating elements
• TOAST
: both lower and upper heating
• CONVECTION
elements with motor fan.
4
TIME SETTING (0-120 minutes)
• The timer can be set up to 120 minutes.
• The oven will not turn on without the timer being set.
• When the timer knob is in the OFF position, the oven
will not operate.
• To set the time, turn the knob clockwise to the
desired time.
• Indicator is lit only when time has been set.
• When the timer reaches the OFF position, a “ding”
sound will be heard.
• Power supply will cut off automatically.
TIME ADJUSTMENT
• To adjust timer during cooking cycle, simply turn the
knob to the new desired time.
NOTE: if cooking time is to be less than 40 minutes, first
turn knob past 40, then turn back (counter-clockwise) to
the desired time.
STAY ON
• To use the oven without timer control, turn the Timer
knob to “STAY ON” position.
• In this position, unit will operate until the timer knob
is manually set to “OFF” position.
NOTE: When toasting, food items may catch on fire if
cooked too long. Close supervision is necessary when
used in the Stay on operation.
OPERATING INSTRUCTIONS
CAUTION: THE OVEN SURFACES ARE HOT DURING AND AFTER USE.
1. Place the baking rack in the appropriate slot that will accommodate the height of the food to
be cooked.
2. Set the food on the rack. Make sure that an ovenproof container is used.
3. DO NOT allow juices to drip onto bottom of the oven. Always have the Crumb tray in place.
4. Set the cooking temperature as suggested by the recipe or as desired.
5. Select cooking function: BAKE (
), BROIL (
), TOAST (
), or CONVECTION (
).
6. Securely shut the door and set the cooking time to begin cooking.
NOTE:
• Do not use plastic or cardboard containers. Do not use glass or ceramic pans or lids.
• Check food temperatures before removing to ensure the proper internal temperatures have
been reached.
• Always remove food with oven mitts. Food and oven are very hot.
5
CLEANING:
Always unplug from wall outlet before cleaning and allow unit to cool completely.
1. Wash accessories with mild, soapy water (Rack, Baking Tray, Crumb Tray)
2. Do not use abrasive cleaners, scrubbing brushes or chemical cleaners as they will cause
damage to the non-stick coating of the Baking Tray.
3. Use a damp cloth to wipe the inside of the oven.
4. Door can be cleaned with a wet cloth saturated with mild detergent. Wipe clean.
5. Never immerse this oven in water or place in dishwasher. Make sure the electrical
connections do not get wet.
TECHNICAL SPECIFICATIONS:
Power:
Main voltage:
Capacity:
Unit dimension:
Cavity dimension:
1,500W
120V ~ 60Hz
25 Liters
18.90” W x 15.28” D x 10.83”H
13.29” W x 12.74” D x 9.45”H
ENVIROMENT:
Dispose packaging materials, such as plastic and carton, in the appropriate waste bins.
When this product reaches the end of its useful life, do not dispose with general household waste.
For the correct collection and treatment of this product, take them to the collection point for reuse
of electrical and electronic equipment. Contact your local authority for the appropriate collection
point in your neighborhood.
6
Yo u r
G u a r a n t e e
If this product is found to be faulty as a result of faulty materials or workmanship within one year from date of
purchase, it will be repaired free of charge.
This guarantee is subject to the following terms:
•
Sunpentown must be notified of the fault.
•
Proof of purchase must be presented to Sunpentown’s nominated representative.
•
The warranty will be void if the product if modified, misused or repaired by an unauthorized person.
•
The warranty after repair will not be extended beyond the original one-year period.
•
All replacement parts will be new or reconditioned.
•
Parts, which are replaced, become the property of Sunpentown.
•
The warranty applies for the use of the product in the USA only.
What is NOT COVERED:
•
Warranty does not include freight charges.
•
Incidental or consequential damage caused by possible defects with this product.
•
Damage to product caused by improper power supply voltage, accident, fire, floods or acts of nature.
•
Failure of product resulting from unauthorized modifications to the product.
•
Improper installation or failure to perform the necessary maintenance.
This GUARANTEE is in addition to your Statutory Rights
SUNPENTOWN INTERNATIONAL INC.
14625 Clark Ave. City of Industry, CA 91745
Tel: 800-330-0388
[email protected]
www.sunpentown.com
7