1
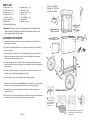
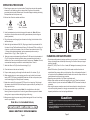
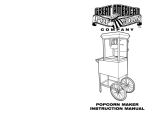
T.M.
C O M P A N Y
POPCORN MAKER
INSTRUCTION MANUAL
IMPORTANT SAFEGUARDS
• READ ALL INSTRUCTIONS BEFORE USING YOUR POPCORN MACHINE.
• Do not touch hot surfaces. Always use handles or knobs to operate.
• To avoid any risk of electrical shock, do not immerse cord or plug into water or other
liquid.
• Close supervision is necessary when it is being used near children.
• Unplug main power cord from outlet while not in use and before cleaning.
• Allow hot parts to cool down before moving.
• Do not operate the appliance with damaged cord or plug, malfunction or with any
mechanical damages.
• Send the unit to the nearest authorized service center for examination and repair.
(ONLY technicians should open up the unit)
• It may cause injury by using any accessories or attachments not provided or
recommended by manufacturer.
Congratulations! You have purchased our best selling
popcorn popper for your home or business.
This industrial-strength popper is the same one used by
sport stadiums, convenience stores and mini-marts.
We use only the finest grade material and workmanship
when manufacturing our poppers. If for any reason our
popper dosen’t live up to these standards described, please
write us at [email protected].
• Do not pop the kernels in a dry pot (without oil).
• Do not immerse popping pot into water.
• Pot surface is HOT and should NOT be touched during popping or just after use.
• Unplug, clean and cover the unit and store in a dry and safe place if not being used
for long periods of time.
• Do not leave the power cord hanging over edge of table or counter.
• DO NOT place the unit on or near a hot gas or electric burner or in a heated oven.
• Extreme caution must be paid when moving the appliance containing hot oil or other
hot liquids.
• Turn ALL switches to "OFF" position before disconnecting power plug from the wall
supply outlet.
• Not recommended for outdoor use.
• Do not use appliance for anything other than the indicated usage.
• To avoid overheating, always have oil and kernels ready before operating.
• Extreme caution must be used when unloading heat pot, always use oven mitt.
• Always place the unit over a counter-top so that residual hot oil or water running out
will not cause injury.
• KEEP OUT OF REACH OF CHILDREN.
• Do not clean using any abrasive material.
• Never force any parts or brackets into position.
• No parts are intended for the dishwasher.
• Save these instructions for future reference.
Page 1.
PARTS LIST
A. Main unit x 1 pc.
C. Block Plate x 1 pc.
E. Handrail x 1 pc.
G. Kernel Tray x 1 pc.
I. Cabinet x 1 pcs.
K. Long Stand x 1 pc.
M.Wheel Axle
O. Measuring Cup/Scoop
B. Popping pot x 1 pc.
D. Platform x 1 pc.
F. Kernel Filter x 1 pc.
H. Door x 1 pc.
J. Short Stand x 1 pc.
L. Square Pole
N. Wheels x 2 pcs.
Model No.: UE40043
Voltage: AC 120V-60Hz
Input Power: 600W
A
B
G
Please Note: First time use, clean inside glass and wipe inside area with
damp sponge. Thoroughly wipe inside of stainless steel pot with clean
damp sponge before heat is applied.
ASSEMBLY PROCEDURE
D
C
E
F
1. Use bolts & washers provided to connect the Long stand (K) and the 2 pcs
square pole (L) together.
2. Connect the completed above (step 1) with the short stand (J) by the bolts &
washers provided.
3. Insert axle (M) into short stand (J). Place wheels (N) on each end of axle (M).
Next place washers provided onto each side of wheels (N) and then attach
round cap nuts by wrenches provided.
H
I
O
N
K
J
4. Turn the storage cabinet (I) up side down for convenient assembling. Insert
both ends of the short and long stand onto the bottom of cabinet and attach by
bolts provided.
L
5. Turn the completed unit back to up-right position. Install the handrail (E) onto
the side with nuts and bolts with washers included.
M
6. Place the main unit (A) onto the topside of the storage cabinet. (Caution: Power
cord outlet should be inserted into the u-shape position).
7. Place the pot (B) onto the hanger. (Note: Roller bar should be on the door side
and also check if gears between pot and ceiling are perfectly matched).
8. Connect the power plug from the main unit ceiling with the socket on the
bottom of the pot.
ASSEMBLE KETTLE
9. Open the door of the storage cabinet and release the two spring shafts beneath
the main unit in order to fix the main unit with the storage base.
A. Screw the stirrer
and spacer onto
the gear box.
Page 2.
B. Hold kettle on the support brace
and insert pin. Lock into place with
pin provided.
OPERATING PROCEDURE
1. Place the corn popper on a dry, level surface. Protect from rain and other weather
elements. Do not install near pool or water outlets. Plug the unit into suitable
grounded electrical outlet.(Please check if the outlet voltage is matching with rating
label specified next to the power cord).
2. Main unit has 2 function switches as follows:
(I)
(II)
Spot light
& warmer
Figure 1
Figure 2
Figure 3
Figure 4
Stirrer Pot Heater
3. Hook the stainless steel pot onto the hanger of the main unit. (Note: Roller bar
should be on the door side and also check if gears between pot and ceiling are
perfectly matched).
4. Plug in the power cord (hanging from the main unit ceiling) into the bottom of the
stainless steel pot.
5. Switch the light and heater to ON(I & ll). Popping pot should be pre-heated for 3 to
5 minutes. If using The Great American Popcorn Co. Gourmet Tri-Pak, cut off top of
oil section on pouch and squeeze oil into pot. Allow a few minutes to melt oil. (Fig.
1) If using other suitable ingredients, have pre-measured portions ready in
advance. Add oil. (Fig. 1). (Max. 15g/.48 oz. oil)
6. Next pour popcorn and seasoning from Gourmet Tri-Pak pouch into pre-heated oil.
(Fig, 2) If using other suitable ingredients, have pre-measured portions ready in
advance.(4 oz. max. uncooked popcorn kernels). Add popcorn. Caution: Lid is hot,
recommended wearing oven mitten to contact metal pieces. Close lid.
7. Switch the Stirrer to ON (II) so that it starts stirring.(Fig. 3)
8. Close the doors on the main unit carefully.
9. Popcorn starts popping out through the lid after about 2 to 3 minutes. (Fig. 4)
10. When popping stops (no more popping sound from pot), switch the stirrer and
heater to OFF (II) Popping is completed. Rotate the roller bar on the pot and pour
out all remaining popcorn. Gently shake if necessary.
11. Heater stirrer switch (II) must remain OFF if the unit is not popping. Only the spot
light warmer should be left ON, this will keep the popcorn warm, dry and tasty for a
longer period of time.
12. Serve popcorn with scoop provided. Note: Do not add butter or other liquid
flavoring in main unit popcorn bin. Avoid a big mess! Remove popcorn to suitable
serving bowl or popcorn before adding this type of flavoring.
13. Always remove plug from power supply before cleaning and if the unit is not being
used for a period time.
Order Now - For Immediate Delivery
Page 4.
CLEANING AND MAINTENANCE
• To maintain quality taste and popping conditions in your popper, it is recommended
that you thoroughly clean the heat pot after using 3 to 4 times or before prolonged
periods of storage.
• Switch OFF (II & Ill). Pour 6 to 10 oz. of water (NO detergent is necessary) into inner
pot.
• Switch ON the stirrer (II) and heater (III) to boil the water and allow the stirrer to
rotate that will help remove debris on kettle surface. Pour out the water after about 1
to 2 minutes of boiling. Caution: Hot kettle! Handle with oven mitts. Keep children at
a safe distance from popper during procedure.
• Repeat the same procedure 2 to 3 times to get better result.
• Switch off the machine and wait for the popping pot to cool. Clean the inside and
outside of the pot by brush and wet towel. Caution: DO NOT immerse the heat pot
into water.)
• After using the popcorn machine, users should use wet towel to clean up the main
unit, main body and glasses; It is strongly recommended to tidy up rubbish tray
frequently so that there is no food spoilage left behind.
Caution
• After popping cycle is complete, the popping pot will be very hot. Use extreme care when
handling.
• Remember to turn the heat switch to off position after the finish of the pop cycle.
• Unplug unit BEFORE removing heat pot from hanger. Use caution not to bump heat lamp
bulb during pot removal.
Page 5.