1
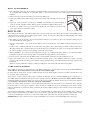
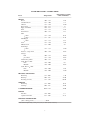
HOW TO ASSEMBLE 1. Place unit upside down on an elevated surface for handle assembly. An elevated surface is necessary to prevent placing pressure on one handle while installing the second handle. Failure to use an elevated surface may result in damage to the first handle installed. 2. Remove the four screws from mounting projections on the skillet body. Fig. A 3. Position the handles on the skillet, lining up holes in the handles with mounting projections on the skillet. 4. Replace the screws and fasten securely, Fig. A. Caution: Overtightening can result in stripping of screws or cracking of handles and legs. When properly assembled, the skillet should sit level. 5. To attach cover handle, remove the screws from the handle, place the handle over the holes in the cover, replace the screws and fasten securely. HOW TO USE Before using for the first time, wash skillet in dishwasher or in warm, sudsy water, rinse and dry. Do not immerse Control Master heat control or let the heat control come in contact with any liquid. “Season” the nonstick cooking surface by rubbing lightly with cooking oil. Remove excess oil with paper towel. 1. Place skillet on a dry, level surface. To prevent possible heat damage to your counter top, place a heat resistant counter protector, such as aluminum foil, under appliance. 2. Insert the Control Master heat control into the skillet so the two electrical pins on the skillet are fully inserted into the heat control. 3. Connect cord to a polarized outlet only. As a safety feature, this appliance has a polarized plug (one blade is wider than the other). This plug will only fit in a polarized outlet one way. If the plug does not fit fully in the outlet, reverse the plug. If it still does not fit, contact a qualified electrician. Do not attempt to defeat this safety feature. 4. Turn Control Master heat control to desired temperature (see page 3 for cooking temperatures). Remove cover and preheat skillet. Pilot light goes off when selected temperature is reached (this takes approximately 10 to 15 minutes). 5. Prepare food for cooking. Because the skillet features a nonstick finish, food may be prepared with little or no oil. 6. Place food in skillet and cook according to temperature-timetable (page 3). Heat should be adjusted according to personal preference and particular food being cooked. During cooking, pilot light will go on and off indicating desired temperature is being maintained. 7. Turn heat control to OFF when cooking is completed. Unplug heat control from wall outlet then from appliance. CARE AND CLEANING Before initial use and after each subsequent use, wash skillet in dishwasher or in warm sudsy water, rinse and dry. Do not immerse Control Master heat control in water or let it come in contact with any liquid. For best results use nylon, plastic, wooden, or rubber utensils. Do not use metal utensils as they may scratch the nonstick surface. Do not cut foods on the cooking surface. After each use, clean the nonstick surface with a non-metal cleaning pad, such as Scotch-Brite Multi-Purpose Scrub Sponge* or Scotch-Brite Dobie Cleaning Pad*. Firm pressure can be applied, if necessary. Do not use steel wool or abrasive kitchen cleaners. Soaking the skillet to loosen food residue is not necessary. If, however, soaking the skillet is desired, do not soak for more than two hours. Soaking for more than two hours may damage the nonstick finish. In time, the nonstick finish may darken over the heating element. To remove this discoloration, use a commercial cleaner designed for cleaning surfaces, such as dip-it destainer**. These cleaners are available at most grocery and hardware stores. For best results, follow the manufacturer’s instructions, being careful that any cleaning solution coming in contact with the exterior of the appliance is wiped off. After treating the skillet with a commercial cleaner, it is recommended that the cooking surface be wiped lightly with a cooking oil before using. The outside finish of the skillet is easy to keep attractive and looking new. Simply wipe away spills and drips as they occur. If food should happen to burn on, it can be removed with warm, sudsy water and a cleaning pad. Rinse and wipe dry. IMPORTANT: To ensure continued accuracy of the Control Master heat control, avoid rough handling in use and storage. *Scotch Brite and Dobie are trademarks of 3M. ** dip-it is a registered trademark of Ecolab, Inc. 2