1
 Instructions for Models:
SA-1 302
Need Help?
For additional assistance or service call:
SPEAKMAN Company
400 Anchor Mill Road
New Castle, DE 19720
PHONE: 800-537-2107
EMAIL: [email protected]
WEB: www.speakmancompany.com
92-333 1-R2
What You Need To Know:
Tools:
Required:
*Phillips Screwdriver *Pencil
*Drill with 1/4” Bit * Small Flathead
Screwdriver
Helpful:
* 1/4" Tile Drill Bit *Level
Important Notes:
Be sure to read instructions thoroughly before
beginning installation. Do not overtighten any
connections or damage may occur.
Safety Tips:
This item is NOT designed for use as a grab bar.
Do not mount in locations where product is likely
to be used as a grab bar.
Use caution when drilling into walls to avoid
electrical and plumbing lines hidden within wall.
Maintenance:
Clean with a soft, damp cloth only. Do not use
scrub pads, detergents or cleansers as they may
harm the protective finish of your Slide Bar
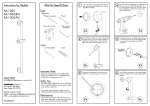
and remove Mounting Brackets from both ends
(1) Loosen Set Screws with small Flathead Screwdriver,
of Slide Bar assembly.
Drill 1/4" hole in marked locations. If drilling into
tile, be sure to use a drill bit designated for tile.
If mounting directly into stud or wood wall, secure
lower end bracket to wall with mounting screws
without drilling holes.
a
£1)
(2) Place Slide Bar assembly on to wall in the desired
mounting position. Take care that the Slide Bar is
oriented in a vertical position. Using a pencil,
lightly trace outline of end brackets on to wall.
(5) Insert Plastic Anchors into drilled holes and press
in until flush with wall. Secure Mounting Brackets
to wall with Mounting Screws using Phillips
screwdriver.
Center Mounting Bracket within traced outline.
Mark the 2 mounting locations with a pencil.
Mounting
Bracket
(6) Instal Slide Bar assembly over Mounting Bracket,
and secure with Set Screws using small Flathead
Screwdriver.
N
je] -
в.
"4
a Ú =
A
©
©
— — | RPG05-0893
Й
AD © UN
7 y
—
3 и
28 TT
[60mm]
À} À
— ;
3 и
28
[60mm] 3
4 —
> [70mm]
Y»
3 и
205" 2g
[540mm] [603mm]
3 ’
43 - >
[111mm]
3 …. 000
a D 4 31
[20mm] 8 BD
| [79mm]
y NC
y 0
8-32 UNC-2A THREAD =
SET SCREW