1
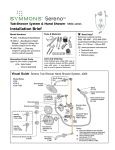
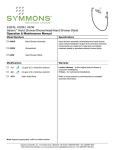
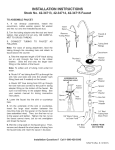
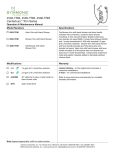
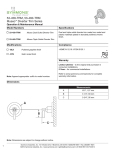
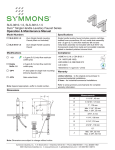
4303-TRM, 4305-TRM, 4306-TRM
Sereno™ Trim Series
Operation & Maintenance Manual
Model Numbers
Specifications
4303-TRM
Hand Shower Trim
4305-TRM
Shower Trim with Hand Shower
4306-TRM
Tub/Shower Trim with Hand Shower
Modifications
Tub/shower trim with hand shower and lever handle
includes wall connection, cradle for hand shower
mounting, in-line vacuum breaker, flexible metal hose,
non-diverter tub spout, 1 mode hand shower and
1 mode showerhead with standard 2.5 gpm (9.5 L/min)
flow restrictor. Shower trim with hand shower and lever
handle includes all of the above less non-diverter tub
spout. Valve trim with hand shower and lever handle
includes all of the above less non-diverter tub spout and
3 mode showerhead. Components made from metal
and nonmetallic materials plated in standard polished
chrome finish.
Warranty
-1.5 1.5 gpm (5.7 L/min) flow restrictor
-2.0 2.0 gpm (7.6 L/min) flow restrictor
-432HSB 30" slide bar in place of wall cradle on
hand shower units
-SS Slip spout on any tub and shower unit
-STN
Satin nickel finish
Limited Lifetime - to the original end purchaser in
consumer installations.
5 Years - for commercial installations.
Refer to www.symmons.com/warranty for complete
warranty information.
Note: Append appropriate -suffix to model number.
Symmons Industries, Inc. ■ 31 Brooks Drive ■ Braintree, MA 02184 ■ (800)796-6667 ■ Fax: (800)961-9621
©2014 Symmons Industries, Inc.■ www.symmons.com ■ [email protected] ■ ZV-3055 REV 0 09/04/14
Dimensions
Measurements
B
A
D
E
C
F
I
G
J
H
M
L
K
Q
P
N
O
A
Ø 2 1/4", 57 mm
B
Ø 2 1/4", 57 mm
C
6", 152 mm
D
9 1/4", 235 mm
E
Female 1/2" IPS thread
must be recessed 7/8" from
finished wall
F
6", 152 mm right or left
G
7", 178 mm
H
5", 127 mm
I
77", 1956 mm
J
4 3/4", 121 mm
K
5 3/4", 146 mm
L
9 1/4", 235 mm
M
10", 254 mm
N
Ø 2 3/8", 60 mm
O
32", 813 mm
(4306-TRM)
42", 1067 mm
(4303-TRM, 4305-TRM)
P
12", 305 mm
Q
4 1/2", 114 mm
R
3 1/4", 83 mm
S
1/2" NPT
T
1/2", 13 mm
U
(Rough in)
2 3/8" ± 1/2", 60 mm ± 13 mm
V
8 1/2", 216 mm
R
U
S
T
V
Floor
Notes:
1) All dimensions measured from nominal rough-in (see U as reference).
2) Dimensions are subject to change without notice.
2
Symmons Industries, Inc. ■ 31 Brooks Drive ■ Braintree, MA 02184 ■ (800)796-6667 ■ Fax: (800)961-9621
©2014 Symmons Industries, Inc.■ www.symmons.com ■ [email protected] ■ ZV-3055 REV 0 09/04/14
Parts Breakdown
Replacement Parts
C
F
E
B
Q
P
A
D
R
M
H
V
L
K
J
I
L
H
I
J
U
Y
G
S
O
N
G
T
K
W
X
Item
Description
Part Number
A
X
Vacuum Breaker
60" Hose
EF-104
B
C
Wall Elbow
Flange
T-444-KIT
D
Showerhead
432SH
E
F
Shower Arm
Flange
300
G
H
I
J
Star Washer
Handle
Plug Button
Set Screw
T-251
K
L
Lock Nut
Dome Cover
T-19/20-PL
N
M
O
Mounting Plate
Mounting Screws
Diverter Escutcheon
T-529
P
Q
R
S
T
Cradle Mount
Cradle Mount Screws
Washer
Cradle Arm
Set Screw
T-545
U
Y
Shower Escutcheon
Mounting Screws
T-249
V
Hand Shower
432W
W
Tub Spout
432TS
Notes:
1) Append -STN to part number for satin nickel finish.
2) Append -1.5 or -2.0 to showerhead or hand shower
for low flow.
Required for Installation
Adjustable wrench
Phillips head screwdriver
Plumber tape
3
Symmons Industries, Inc. ■ 31 Brooks Drive ■ Braintree, MA 02184 ■ (800)796-6667 ■ Fax: (800)961-9621
©2014 Symmons Industries, Inc.■ www.symmons.com ■ [email protected] ■ ZV-3055 REV 0 09/04/14
Installation
Note:
Four valve body installation, please
see valve body installation guides.
4) Install shower and diverter dome
covers (L) to valves. Secure with
lock nut (K).
1
1) Install shower escutcheon (U) to
shower valve. Secure with two
screws (Y).
6) Install tub spout (W) to pipe fitting.
Turn clockwise to secure.
L
1
W
U
2
1
K
Y
1
7) Install wall elbow (B) and flange (C)
to recessed pipe fitting. Turn elbow
clockwise to tighten.
2
2
1
2) A
ttach mounting plate (O) to
diverter valve (4305-TRM and
4306-TRM only). Secure with two
screws (M).
5) Install diverter handle (4305-TRM
and 4306-TRM only) and shower
handle (H) to valves. Secure
handle(s) with star washer (G)
and screw (J). Attach
plug button (I) to handle(s).
2
C
B
8) Press tab to remove mounting
plate (P2) from cradle mount
cover (P1).
O
1
M
K
1
J
1
2
P2
H
P1
2
3) Attach diverter escutcheon (N) to
plastic mounting plate (O).
1
Note: Mounting plate (P2) center
tabs must be horizontal for removal.
N
I
Note: Tabs should snap into place.
4
3
O
2
Notes: Handles should be facing
the 6 o'clock position.
Symmons Industries, Inc. ■ 31 Brooks Drive ■ Braintree, MA 02184 ■ (800)796-6667 ■ Fax: (800)961-9621
©2014 Symmons Industries, Inc.■ www.symmons.com ■ [email protected] ■ ZV-3055 REV 0 09/04/14
Installation
9) Place mounting plate (P2) in
position, mark and drill 1/8" pilot
holes into stud.
11) Attach cradle arm (S) and
washer (R) to cradle mount (P).
Secure with set screw (T).
1
P
2
1
P2
R
2
S
Option: Place mounting plate (P2) in
position, mark and drill 3/16" holes
into wall. Install anchors.
14) Attach large end of hand shower
hose (X) to hand shower (V).
Attach small end of hand shower
hose (X) and gasket to in-line
vacuum breaker (A). Connect
in-line vacuum breaker to wall
elbow (B). Turn clockwise to
tighten.
V
T
2
12) Attach shower arm (E) and flange
(F) to vertical shower pipe turning
clockwise to tighten.
1
X
1
P2
B
1
2
3
F
A
E
X
3
2
10) Install mounting plate (P2).
Secure with two screws (Q).
Replace cradle mount cover (P1).
1
P2
13) Install showerhead (D) to shower
arm (E) turning clockwise to
tighten.
Q
E
2
1
P2
2
D
3
P1
Note: Mounting plate (P2) center
tabs must be horizontal for
installation.
5
Symmons Industries, Inc. ■ 31 Brooks Drive ■ Braintree, MA 02184 ■ (800)796-6667 ■ Fax: (800)961-9621
©2014 Symmons Industries, Inc.■ www.symmons.com ■ [email protected] ■ ZV-3055 REV 0 09/04/14
4
Operation
Diverter Control
Temperature Control
1) Turn shower handle counterclockwise approximately
1/4 turn to put valve in cold position.
2) T
urn shower handle counterclockwise approximately
1/2 turn to put valve in warm position.
1) Diverter
handle facing straight down is for diverter
function 1.
2) 4303-TRM & 4305-TRM: Turn diverter handle
counterclockwise one full revolution for diverter
function 2.
306-TRM: Turn diverter handle counterclockwise 1/4
4
turn for diverter function 2.
4305-TRM
3) T
urn shower handle counterclockwise approximately
3/4 turn to put valve in hot position.
4306-TRM
3) 4
306-TRM: Turn diverter handle counterclockwise 3/4
turn for diverter function 3.
Care and Cleaning
1) Clean finished trim area with a soft cloth using mild soap and water or a non-abrasive cleaner and then quickly rinse
with water.
Troubleshooting Chart
6
Problem
Cause
Solution
Finish is spotting.
Elements in water supply may cause
water staining on finish.
Clean finished trim area with a soft
cloth using mild soap and water or a
non-abrasive cleaner and then
quickly rinse with water.
Symmons Industries, Inc. ■ 31 Brooks Drive ■ Braintree, MA 02184 ■ (800)796-6667 ■ Fax: (800)961-9621
©2014 Symmons Industries, Inc.■ www.symmons.com ■ [email protected] ■ ZV-3055 REV 0 09/04/14