1
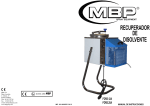
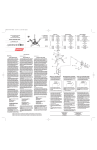
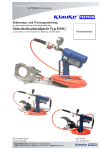
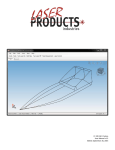
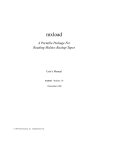
GRIPP Grab Bar Installation, Warranty, Safety and Care Instruction Guide
GB3200 (1(1-1/4” diameter) and GB3800 Series (1(1-1/2” diameter)
diameter)
Thank you for purchasing the nie wieder bohren (German for “no drilling required”) heavy duty grab bars. nie wieder bohren Germany is an innovation leader in fastening technology. These bars have been engineered to exceed ASTM (American Society for
Testing and Materials) requirements and offer the ability to mount using the internationally patented nie wieder bohren - no
drilling required -technology on premium surfaces such as tile, stone, glass and metal. The nie wieder bohren – no drilling
required -adapter system allows for ease of installation, durability, performance and no holes in the walls! Another advantage of
this innovative approach on fastening technology is that the system can be removed, if needed, with no damage to the surface.
Moreover, with an additional set of adapters, the bar can be re-installed in minutes anywhere you like as long as the surface is
suitable for the nie wieder bohren – no drilling required -system.
Choosing and Positioning a Wall Mounted Grab Bar
Wall mounted grab bars come in several lengths. Deciding which length to install depends on how the grab bar will be used. If you
are planning to put a main grab bar on the side wall of a bathroom tub enclosure, the National Kitchen and Bath Association
recommends using a grab bar of at least 24 inches. If you also want to add a second grab bar for further support on the shower
head wall, it should be at least 12 inches long. Before deciding whether to install a grab bar horizontally, diagonally or vertically
the following needs to be taken into consideration: Horizontal grab bars offer better leverage to a person getting up from the
bathtub or up and down from a toilet, whereas a grab bar placed at a 45 degree angle to the toilet or bathtub rim is easier for
people of differing heights to reach. Horizontal grab bars should be located 33 to 36 inches above the finished floor around toilets,
33 to 36 inches above the floor of the bathtub and close enough to the shower head wall in order to support a person adjusting
water temperature. Vertical mount is ideally wall mounted on the entrance to the tub and directly under the shower head to assist
with safe entry and to prevent from falling while showering. The nie wieder bohren grab bars are also ideal to mount directly to the
tub edge to aid children in safe entry and exit from the bathtub.
1
Mounting:
nie wieder bohren - no drilling required technology mounting system: (recommended
(recommended for Tile, Natural Stone, Glass,
Glass, Metal and
Most Plastics*)
Components:
Tools required:
-Grab bar
-GB00002-NDR (mounting kit)
-Level
-Clean dry cloth
Note: Failure to follow the instruction sheet completely may result in a product failure and will void the warranty. Please be sure
to carefully read and follow the instructions for optimum results and safety.
1.
2.
3.
4.
5.
6.
7.
8.
9.
10.
11.
12.
13.
GB00002-NDR Adapter Set: 2 Adapters, 3 Adhesive Tubes, 3 Red Tube Keys, 6 Stainless Steel Machine Screws, 6 Spacers,
1 Allen Wrench, 1 Alcohol Cleaning Cloth (see pic. 1)
Clean Surface with alcohol cleaning cloth; allow to dry completely. After surface is completely dry, wipe area thoroughly
with a clean dry cloth to remove any residue from the alcohol wipe. Do not use household cleaners as they can leave a
residue and be sure surface has completely dried prior to installation. If tiles had been waxed or treated with a sealant,
any residue needs to be removed prior to installation by using pure acetone (see pic. 2).
Slide grab bar end cover ring away to expose the three hole base plate. Slide a spacer over each machine screw and preattach the adapters to the grab bar by using the allen wrench (see pic. 3 and 4). If the wall cover ring cannot be easily
removed from the grab bar, simply tap bar end in the cup of your hand to pop it loose.
Identify desired location of bar. If needed, use level and mark location for bar placement.
Carefully remove the adapters’ protective film from foam rings on both sides. Be careful not to tear the foam ring and do
not touch the adhesive on foam rings! Carefully press the grab bar into place in the desired location for 5 seconds. The
foam adhesive rings are meant to only temporarily hold the adapters in place to ensure safe insertion of the special
adhesive. Therefore, do not apply too much pressure on the grab bar! Once the adapter makes contact with surface, it
cannot be removed without damaging ring. Be sure you have clearly marked location before attaching to surface. (See pic.
5 and 6)
Remove the grab bar from the adapters again by removing the screws and spacers. If you are mounting horizontally or
vertically, remove the screws and spacers on the lower end first to prevent potential injury. After removal of all screws
and spacers, the adapters are now fixed to the wall in the proper location location (see pic. 7).
To open the black adhesive tube, carefully pierce the seal with the pointed end of the red tube key (see pic. 8).
Slide the slotted portion of the red tube key over tube end and engage folded end of tube. It may be easier to slightly
unfold the tube end before inserting into the red tube key (see pic. 9). Be careful not to squeeze or advance the glue from
tube before next step.
Put tube into the center hole of the adapter and very slowly turn the tube key to insert the adhesive. Continue to insert
until the adhesive beads up from each of the three vent holes. Do not disturb or apply pressure on the adpater after
inserting the adhesive for 24 hours! (See pics. 10, 11 and 12) Should adhesive tube be empty before it beads up from each
vent hole, please open another tube and continue insertion as described. Do not attempt to wipe off any excess adhesive
right after insertion into the adapter. The beads can be easily removed once adhesive has dried completely.
After adhesive has cured (hardened) for 24 hours, remove the excess vent hole beads as shown in picture 13. There is no
need to remove the excess from the center hole as it will not affect the mounting.
Reattach grab bar to the adapters using the machine screws and spacers (see pic. 4). If holes do not line up, flip grab bar
over as this proper orientation is key to alignment. Loosely attach all screws first before tightening.
Slide cover ring over mounting flange after having ensured tightness of all screws. Turn in one direction until the ring is
properly aligned and assure a snug fit. Please make sure that there is a small, even gap between the wall and the end
cover ring to assure proper drainage of water. Pointer: the plate is easily attached if it is turned to the proper position and
then snapped on. The ring is concentric and works best when "dialed in place”(see pic. 14).
Test for proper installation to be sure bar is firmly mounted by applying some pressure.
2
2
6
7
11
12
3
4
5
8
9
10
13
14
Adapter Removal:
The nie wieder bohren adapter system can be removed from any hard surface by applying torsion
I
1.
Remove grab bar from the adapters by taking out the screws and spacers (see pic. 7).
2.
Use channel locks and firmly turn the adapter applying consistent pressure (see pic. 15).
3.
Remove residual adhesive from surface using a razor knife and wipe with acetone remover as needed. For rough
surfaces, a coarse brush can also be used. When using a coarse brush, please wear protective goggles to protect
your eyes (see pic. 17)
II 1.
You can also remove the adapters without adjustable pliers by taking advantage of the leverage effect of the grib
bar itself. The first step is to unscrew one end of the grab bar.
2.
Grab the grab bar and carefully turn it applying consistent pressure in order to remove the adapter still attached
to the grab bar and surface (see pic. 16).
3.
After you have removed the first adapter, reattach the other side of the grab bar to the second adapter still
attached to the surface.
4.
Grab the grab bar and carefully turn it in order to remove the adapter as described in step II.2.
5.
Remove residual adhesive from surface using a razor knife and wipe with acetone remover as needed. For rough
surfaces, a coarse brush can also be used. When using a coarse brush, please wear protective goggles to protect
your eyes (see pic. 17)
Caution! Use care not to scar the surface with the grips or razor knife when removing the adapter.
15
16
17
3
Safety Warning:
-
Follow instructions carefully to ensure proper performance as well as to reduce the chance of injury.
-
When installed properly on a sturdy surface, the nie wieder bohren system exceeds the ADA (Americans with Disabilities
Act) requirements for a weight capacity of 250lbs.However, grab bars are not designed to support a person’s total weight
and rather to provide for stability and assistance. Do not stand or sit on the grab bar!
-
It is recommended to routinely check your grab bar in order to make sure it is properly secured and no looseness or wall
damage noted.
-
The GB00002-NDR adapter kit contains small parts which should be kept out of reach of CHILDREN, PETS and those NOT
APPRISED in the use of this product at all times in order to avoid injuries such as from swallowing or eye contact.
-
Do not substitute any other adhesive for use with the nie wieder bohren system. This is a professional grade adhesive
which was especially designed for this adapter.
-
Dispose of adhesive tube directly into trash after use.
-
When using cleaners and chemicals like acetone, please observe the manufacturer’s specific safety regulations.
If you have purchased the nie wieder bohren adapter, be sure to check the stability of the wall prior to mounting. If the
existing wall is old or has any visible water damage or weakness, the performance of the grab bar could be affected
negatively.
The alcohol cleaning cloth should only be used for its intended purpose. It can only perform sufficiently if opened directly
before use.
First Aid:
Skin: Avoid long term contact with the skin. Rinse with running water and soap. Apply replenishing cream. Change all
contaminated clothing.
Eyes: Avoid contact with the eyes as well as with other mucous membranes. Wash with plenty of water immediately and
continue for several minutes, holding eyelid open. Consult a doctor.
If ingested, Seek medical advice immediately and show this container or label and/or contact poison control
For further information call 800-961-5804 or go to
http://www.niewiederbohren.de/media/raw/Safety_Data_Sheet_nwb2011_en.pdf for a copy of the MSDS (Material
Safety Data Sheet)
Lifetime
Lifetime Limited Warranty:
Warranty
-
If this product fails in form, finish or function due to materials or workmanship at any time during the life of the product,
Innovative Product Sales International LLC will replace this free of charge. This does not include any claim arising from
installation error, abuse, damage, alteration, misuse or normal wear. Contact us at 7345 West Friendly Ave Suite C,
Greensboro, NC 27410
Limitation of Liability
-
OTHER THAN THE LIFETIME LIMITED WARRRANY STATED ABOVE, TO THE EXTENT PERMITTED BY LAW, IPSI DISCLAIMS
ALL OTHER IMPLIED OR EXPRESS WARRANTIES, INCLUDING ALL WARRANTIES OF MERCHANTABILITLY AND/OR FITNESS
FOR A PARTICULAR PURPOSE. THIS WARRANTY IS YOUR SOLE REMEDY AND IPSI SHALL NOT BE LIABLE FOR ANY
DAMAGES, WHETHER DIRECT, INDIRECT, INCIDENTAL, SPECIAL, CONSEQUENTIAL, EXEMPLARY, OR OTHERWISE,
INCLUDING LOST REVENUES ARISING OUT OF ANY THEORY OR RECOVERY, INCLUDING STATUTORY, CONTRACT OR TORT.
NOTWITHSTANDING THE TERM OF ANY LIMITED OR IMPLIED WARRANTY, OR IN THE EVENT THAT ANY LIMITED
WARRANTY FAILS OF ITS ESSENTIAL PURPOSE, IN NO EVENT WILL IPSI’s ENTIRE LIABILITY EXCEED THE PURCHASE
PRICE OF THIS PRODUCT. SOME STATES AND PROVINCES DO NOT ALLOW THE EXCLUSION OR LIMITATION OF
INCIDENTAL OR CONSEQUENTIAL DAMAGES SO THE ABOVE LIMITATIONS OR EXCLUSIONS MAY NOT APPLY TO YOU. THIS
LIMITED WARRANTY GIVES YOU SPECIFIC LEGAL RIGHTS, AND YOU MAY ALSO HAVE OTHER RIGHTS WHICH VARY FROM
STATE TO STATE AND PROVINCE TO PROVINCE.
Care and Maintenance
1.
2.
Use mild soap and water to clean the grab bars. Do not use abrasive materials as they could damage the finish and void
the warranty.
Check routinely that the grab bar is secure and tighten as necessary.
4
Frequently Asked Questions
>What
What kind of surfaces is the nie wieder bohren system suitable for?
Almost any smooth or rough surface is suitable if it is firm and able to bear the load in question. The nie wieder bohren system is
perfect for high-quality materials that one does not want to damage by drilling. nie wieder bohren is suitable with ceramic
(tiles), stone, marble, granite, glass, concrete, metal, wood and many plastics. Based on load bearing for grab bars, it is
recommended that you use this only on tile, stone and heavy duty glass. Unsuitable surfaces, on the other hand, include soft
plaster, wallpaper, sheetrock and textiles (such as carpets), which do not provide sufficient firmness and support for surface
attachments. There is no adhesion to polyethylene (PE), polypropylene (PP) and
polytetrafluoroethylene (PTFE, Teflon). These surfaces are rarely found in tub surrounds or bath enclosures.
Although we have described as many examples as possible, our instructions can cover only some of the many surfaces and
surface treatments that are suitable. The user is therefore advised to make preliminary tests when considering other types
of surface. Although the system will work on most plastics and fiberglass, the actual load capacity will vary based on
plastic material type, manufacture and wall thickness. For this reason we can not guarantee 250lb load capacity for these
surfaces. We do not offer lifetime guarantee for these surfaces.
>Will
Will the system work on rough surfaces too?
Surface texture is not a factor that affects the bonding strength of the nie wieder bohren adhesive. However, the surface must
be flat to match the adapter and should not have any large gaps that would let adhesive escape from underneath the adapter
ring. In fact, a slightly roughened surface affords even better adhesion owing to the improved mechanical contact. To
completely remove the silicone-like adhesive from the gaps and pores of rough surfaces, it is necessary to use a silicone
remover, pure alcohol and a coarse brush.
>Can
Can I use the system outdoors as well?
Yes! The adhesive will not decay, withstands UV radiation, is water-resistant and not damaged by freezing (however, it should
be applied at a temperature between 41 and 104°F (+5 and +40°C).
>Will
Will the system fail over time?
Absolutely not! Once the nie wieder bohren system has been properly attached, its special single-component adhesive will
ensure a permanent bond. Moreover, it will retain its elasticity and not fray the way many textile adhesive tapes do after only a
few weeks. Moreover, short impact loads will not cause the adhesive surface to crack, as often happens with two-component
adhesives that harden to form a crystalline connection. The nie wieder bohren system is a totally new experience in bonding
technology!
>II followed the instructions carefully, but the adapter still fell from the wall. Why did that
that happen?
According to our experience, if the nie wieder bohren system fails to deliver what we promise, it is usually for one of the three
reasons listed below. Each of these reasons is caused by improper conditions for bonding. From the so-called fracture pattern
of the adhesive on the back of the adapter, one can easily determine what the problem is.
1.
Cavities in the adhesive - caused by disturbing (e.g. pressing down) the adapter after inserting adhesive which
causes air pockets and limits the bond.
2. Insufficient curing time - caused by trying to mount the accessory prior to the suggested curing time of 12 hours
(Grab bars recommend 24 hours).
3. Separation at surface - caused by not cleaning surface properly prior to installation. Be sure to use rubbing alcohol
only and allow to dry completely to be sure the surface is free of all household cleaners, grease, soap deposits etc.
>Can
Can the adhesive cause damage to surfaces?
No. We know of no load-bearing material that would be harmed by the chemical substances in the nie wieder bohren adhesive.
5
>Is
Is the adhesive toxic?
No. Contact with skin is harmless. After use, rinse off with soap and water. In case of contact with eyes, rinse thoroughly with
water for several minutes, keeping the eyelid open. If adhesive is swallowed consult a doctor immediately.
>Is
Is the adhesive free of formaldehyde?
Yes.
>How
How should I dispose of the adhesive?
You can put hardened or dried adhesive remnants right into the household trash. The same applies to the adapter after
dismantling.
>How
How long will the adhesive keep in the tube?
The adhesive itself is non-decaying, so theoretically it keeps forever. However, since it is difficult to process the adhesive and
put it in storage without bringing it into contact with air, it may gradually harden in the tube over a long time. We therefore
guarantee a minimum durability of 18 months. The end date of this 18 month-period is imprinted on the top fold of the tube in
the format DD/MM/YY. If you find you have a tube which has expired, contact us for a replacement.
>Is
Is the adapter reusable?
No. The adapter is designed to be used only one time based on the patented “pass through” technology needed for curing. To
remount your accessories it will be necessary to purchase another adapter kit.
>Can
Can one use the system to attach objects other than those that are supplied together with the nie wieder bohren system?
The system is designed to be used only with the nie wieder bohren accessories. We now carry many different types of products
which offer this technology. These include bath accessories, grab bars, hooks, kitchen rail accessories and door stops.
For recommended placement, troubleshooting tips and/ or replacement adapters: www.nodrillingrequired.com
Failure to follow the instructions could lead to adhesion failure and cause injury
Innovative Product Sales International LLC
7345 West Friendly Ave. Suite C
Greensboro, NC 27410
800-961-5804
[email protected]
www.innovativeproductsinc.com
*Actual performance varies on plastics and fiberglass and does not meet ADA specifications for load bearing. Lifetime guarantee
does not apply if used on these surfaces.
The nie wieder bohren system will work on most plastics but the actual load capacity is less than ADA requirements and has
varied in testing. Lifetime performance is not guaranteed if used on plastics
6
Guía de Instalación, Garantía, Seguridad e Instrucciones de Cuidado para
Las Barras de Apoyo GRIPP
Serie GB3200 (1(1-1/4’’de
1/4’’de diámetro) y la serie GB3800 (1(1-1/2" de diámetro)
Gracias por la compra de la barra de alta resistencia nie wieder bohren (en alemán "nunca perfore de nuevo")- Alemania es líder
en innovación de la tecnología de fijación. Estas barras han sido diseñadas para superar las normas y requisitos de ASTM
(American Society for Testing and Materials) y ofrecen la habilidad de ser montadas usando la patente internacional y tecnología
de nie wieder bohren – nunca perfore de nuevo- sobre superficies de alta calidad, como azulejo, piedra, vidrio y metal. El sistema
adaptador de las barras nie wieder bohren - nunca perfore de nuevo- permite facilidad de instalación, durabilidad,
funcionamiento y paredes sin agujeros! Otra ventaja de este enfoque innovador en la tecnología de fijación es que el sistema se
puede quitar, si es necesario, sin dañar la superficie. Además, con el juego adicional de adaptadores, la barra se puede volver a
instalar en cualquier lugar que desee, en tan solo unos minutos, siempre y cuando la superficie sea adecuada para el sistema de
barras de apoyo nie wieder bohren - nunca perfore de nuevo.
Selección y Posición de Barras de Apoyo para el Montaje de Pared
Las barras de apoyo para el montaje de pared vienen en varias longitudes. La decisión de cual longitud se debe instalar depende
de como va a ser usada la barra. Si usted está planeando poner una barra principal de apoyo en la pared lateral del área donde se
encuentra de la bañera, La Asociación Nacional de Baños y Cocina (NKBA) recomienda el uso de una barra de apoyo de al menos
24 pulgadas. Si usted desea agregar, para aún más apoyo, una segunda barra en la pared donde se encuentra la cabeza de la
ducha, esta debe ser de por lo menos 12 pulgadas de largo. Antes de decidir si desea instalar una barra de apoyo horizontal,
diagonal o verticalmente es necesario tener en cuenta lo siguientes: Las barras instaladas horizontalmente ofrecen un mejor
apalancamiento a una persona que se levante de la bañera o al sentarse y pararse del inodoro, mientras que una barra de apoyo
colocada a un ángulo de 45 grados, para el mismo uso, facilita el alcance de la barra a personas de diferentes alturas. Las barras
que son colocadas horizontalmente deben ser ubicadas a una altura de 33 a 36 pulgadas desde el piso donde se encuentra el
inodoro, de 33 a 36 pulgadas de altura desde el piso donde está la bañera y lo suficientemente cerca de la pared donde se
encuentra instalada la cabeza de la ducha, con el fin de dar apoyo a la persona mientras ajusta la temperatura del agua. Para
instalar la barra verticalmente, lo ideal es que se monte en la pared a la entrada de la bañera y directamente debajo de la ducha
para asistir con la entrada segura a esta área y evitar caídas. Las barras nie wieder bohren también son ideales para montarse
directamente en el borde de la bañera ayudando así a los niños a entrar y salir seguramente de la bañera.
7
Montaje:
nie wieder bohren
azulejo,
zulejo, piedra natural, vidrio, metal y la mayoría de
bohren - sistema de nunca perforar de nuevo: (Recomendado para a
los plásticos*)
Componentes:
Herramientas necesarias:
- Barra de Apoyo
- GB00002-NDR (kit de montaje)
- Nivel
- Paño Limpio y Seco
Nota: El no cumplir todos los pasos que indica la hoja de instrucciones puede proporcionar la falla del producto y así anulando la
garantía. Por favor, asegúrese de leer y seguir cuidadosamente las instrucciones para obtener resultados óptimos y seguridad
1. Set de Adaptadores GB00002-NDR: 2 adaptadores, 3 tubos de adhesivo, 3 llaves para el tubo rojo, 6 tornillos de máquina de
acero inoxidable, 6 espaciadores, 1 llave Allen, 1 paño para limpiar alcohol (ver fig 1).
2. Limpie la superficie con el paño de limpiar alcohol, deje secar por completo. Después de que la superficie esté
completamente seca, limpie el área con un paño limpio y seco para eliminar cualquier residuo del alcohol.. No utilice
productos de limpieza, ya que pueden dejar residuos y esté seguro de la superficie se haya secado completamente antes
de la instalación. Si las baldosas han sido tratadas con cera o con algún tipo de sellador, elimine todo residuo con acetona
pura antes de la instalación (ver fig. 2).
3. Deslice el anillo que cubre el extremo de la barra para exponer la placa de base, de tres agujeros previamente perforados.
Deslice un espaciador sobre cada tornillo y pre-conecte los adaptadores a la barra usando la llave allen (ver fotos 3 y 4). Si
el anillo que cubre el extremo de la barra no se puede quitar fácilmente, simplemente coloque el extremo de la barra sobre
la copa de su mano y golpee ligeramente para que el anillo se suelte.
4. Identifique la ubicación deseada de la barra. Si es necesario, utilice el nivel y marque la ubicación donde desea colocar la
barra.
5. Retire con cuidado la cinta protectora de los adaptadores, de los anillos de espuma en ambos lados. Tenga cuidado de no
romper los anillos de espuma y no toque el adhesivo de los anillos de espuma! Cuidadosamente presione la barra, por 5
segundos, sobre el lugar deseado. Los anillos de espuma adhesiva están diseñados para sujetar temporalmente a los
adaptadores y asegurar la inserción segura del adhesivo especial. Por lo tanto, no ponga
ponga demasiada presión sobre la barra
de apoyo! Una vez que el adaptador esté en contacto con la superficie, no se podrá quitar sin dañar el anillo. Asegúrese de
que haber marcado claramente la ubicación de la barra antes de adherirse a la superficie. (Ver fotos 5 y 6)
6. Retire de nuevo la barra de los adaptadores, eliminando los tornillos y los espaciadores. Si va a montar horizontal o
verticalmente, quite los tornillos y los espaciadores en el extremo inferior primero para evitar posibles lesiones. Después
de la eliminación de todos los tornillos y los espaciadores, los adaptadores estarán fijados a la pared en el lugar adecuado
(ver fig. 7).
7. Para abrir el tubo negro de adhesivo, cuidadosamente perfore el sello con la punta de la llave del tubo rojo (ver fig. 8).
8. Deslice la parte ranurada de la llave del tubo rojo sobre el extremo del tubo, encaje y doble el extremo. Puede ser más fácil
de desdoblar un poco el extremo del tubo antes de introducirlo en la llave del tubo rojo (ver fig. 9). Tenga cuidado de no
apretar o avanzar el pegamento del tubo antes del siguiente paso.
9. Coloque el tubo en el orificio central del adaptador y muy lentamente gire la llave del tubo para introducir el adhesivo. Siga
introduciendo el adhesivo hasta que un exceso se asome frente a cada uno de los tres orificios de ventilación. No toque ni
haga presión sobre el adaptador después de haber introducido el adhesivo, durante un período de 24 horas! (Ver fotos. 10,
11 y 12) En caso de que se le acabe el adhesivo antes de que se formen gotas de exceso, por cada orificio de ventilación,
por favor abra otro tubo y continúe introduciendo como se describe. No trate de limpiar ningún exceso de adhesivo después
de la inserción en el adaptador. El exceso se puede quitar fácilmente una vez que el adhesivo se haya secado
completamente.
10.Después de que el adhesivo se haya secado (endurecido) por 24 horas, retire el exceso que quede en los agujeros de
ventilación como se muestra en la figura 13. No es necesario eliminar el exceso del agujero del centro, ya que no afectará el
montaje.
11.Vuelva a colocar la barra a los adaptadores con los tornillos de máquina de acero inoxidable y los espaciadores. Si los
agujeros no se alinean, de vuelta a la barra, ya que la orientación adecuada es la clave para la alineación (ver fig. 4). Sujete
sin apretar todos los tornillos antes de apretar completamente.
12.Deslice el anillo nuevamente en posición, cubriendo el borde, después de haber asegurado fijamente todos los tornillos. De
vuelta al anillo en una dirección hasta que esté correcta y cómodamente a nivel de la superficie y asegure un ajuste
perfecto. Por favor, asegúrese de que haya un espacio pequeño y nivelado, entre la pared y el anillo que cubre el extremo
8
de la barra para asegurar el drenaje adecuado del agua.
agua. Recomendación: la placa se fija fácilmente si se gira en la posición
correcta y luego adjunta. El anillo es concéntrico y funciona mejor cuando se "gira en su lugar" (ver fig. 14).
13.Prueba la instalación firme y correcta de la barra, aplicando un poco de presión.
Como Quitar el Adaptador:
El sistema adaptador nie wieder bohren se puede quitar de cualquier superficie dura, mediante la aplicación de torsión
I
1.
2.
3.
II
1.
2.
3.
4.
5.
Remueva la barra de los adaptadores sacando los tornillos y espaciadores (ver fig. 7).
Utilice una herramienta de bloqueo de canal, y con firmeza de vuelta al adaptador aplicando presión constante.
(Ver fig. 15)
Elimine residuos de adhesivo en la superficie con un cuchillo de afeitar y limpiar con acetona según sea
necesario. Para superficies ásperas, también se puede utilizar un cepillo grueso. Cuando utilice un cepillo
grueso, por favor, use gafas de protección para proteger sus ojos (ver fig. 17)
También puede quitar los adaptadores sin necesidad de usar pinzas, aprovechando el efecto de palanca de la
misma barra. El primer paso es desatornillar un extremo de la barra.
Agarre la barra y con cuidado déle vuelta aplicando presión constante con el fin de remove el adaptador que
sigue conectado a la barra y a la superficie (ver fig. 16).
Después de haber quitado el primer adaptador, vuelva a conectar el otro lado de la barra al segundo adaptador
todavía unido a la superficie.
Agarre la barra y con cuidado déle vuelta con el fin de quitar el adaptador como se describe en el paso II.2.
Elimine residuos de adhesivo en la superficie con un cuchillo de afeitar y limpiar con acetona según sea
necesario. Para superficies ásperas, también se puede utilizar un cepillo grueso. Cuando utilice un cepillo
grueso, por favor, use gafas de protección para proteger sus ojos (ver fig. 17).
¡Cuidado! Tenga cuidado de no dejar marcas en las superficie con las herramientas o cuchillos al quitar el adaptador.
Advertencia de Seguridad:
-
-
Siga las instrucciones cuidadosamente para asegurar su correcto funcionamiento, así como para reducir el riesgo de
lesiones.
Si usted ha comprado el adaptador de la nie wieder bohren, asegúrese de comprobar la estabilidad de la pared antes de
su montaje. Si la pared existente es vieja o tiene algún daño visible de agua o está débil, la función de la barra podría ser
afectada negativamente.
Cuando se instala correctamente sobre una superficie sólida, el sistema nie wieder bohren excede la ADA (Americans
with Disabilities Act) y una capacidad de peso de 250 lbs. Sin embargo, las barras de apoyo no están diseñadas para
soportar el peso total de una persona, más bien para dar estabilidad y asistencia. No se pare ni se siente en la barra de
apoyo!
Se recomienda revisar periódicamente su barra de apoyo con el fin de asegurarse de que esté bien sujeta y no haya
flojedad o daño en la pared.
El kit adaptador GB00002-NDR contiene piezas pequeñas que deben mantenerse fuera del alcance de los NIÑOS, las
MASCOTAS y todo aquel que NO esté INFORMADO sobre el uso de este producto en todo momento con el fin de evitar
lesiones como la ingestión o el contacto con los ojos.
No sustituya cualquier otro adhesivo para su uso con el sistema nie wieder bohren. Este es un adhesivo de calidad
profesional, diseñado especialmente para este adaptador.
Disponga el de tubo de adhesivo directamente a la basura después de usarlo.
El paño de limpieza de alcohol sólo se debe utilizar para los fines previstos. Este podrá cumplir su función si se abre sólo
antes de usar.
Cuando utilice productos de limpieza y productos químicos como la acetona, se deben observar normas específicas de
seguridad del fabricante.
Primeros auxilios:
Piel: Evite el contacto prolongado con la piel. Lavar con agua corriente y jabón. Aplicar crema nutritiva. Cambiar la ropa
contaminada.
Ojos: Evite el contacto con los ojos, así como con otras membranas mucosas. Lavar con abundante agua inmediatamente
y continuar durante varios minutos, manteniendo los párpados abiertos. Consulte a un médico.
Si se ingiere, consultar inmediatamente al médico y muéstrele la etiqueta o el envase y / o póngase en contacto con la
agencia de control de venenos.
Para más información llame al 800-961-5804 o vaya a http://www.niewiederbohren.de/media/raw/Safety_Data_Sheet_
nwb2011_en.pdf para obtener una copia de la MSDS (Material Safety Data Sheet).
9
Garantía de por Vida Limitada
-
Si el producto falla en su forma, acabado o su función debido a los materiales o mano de obra en cualquier momento
durante la vida útil del producto, Innovative Product Sales LLC le reemplazará el producto de forma gratuita. Esto no
incluye cualquier reclamo que surja de un error de instalación, abuso, daño, alteración, mal uso o desgaste normal.
Contáctenos a 7345 West Friendly Ave. Suite C, Greensboro, NC 27410
Limitación de Responsabilidad
-
OTRO QUE SEA LA GARANTÍA DE POR VIDA LIMITADA YA DICHA, EN LA MEDIDA PERMITIDA POR LA LEY, IPSI NIEGA
CUALQUIER OTRA GARANTÍA EXPRESADA O IMPLICADA, INCLUYENDO TODAS LAS GARANTÍAS DE COMERCIABILIDAD Y / O
IDONEIDAD PARA UN PROPÓSITO PARTICULAR. ESTA GARANTÍA ES LA ÚNICA Y IPSI NO SE HACE RESPONSABLE POR LOS
DAÑOS DIRECTOS, INDIRECTOS, ACCIDENTALES, ESPECIALES, INDIRECTOS, EJEMPLARES, O CUALQUIER OTRA FORMA,
INCLUYENDO INGRESOS DERIVADOS DE CUALQUIER OTRA TEORÍA O RECUPERACION, INCLUYENDO CONTRATOS
LEGALES, O DE AGRAVIO. A PESAR DE LA VIGENCIA DE CUALQUIER GARANTÍA O IMPLÍCITA, O EN EL CASO DE QUE LA
GARANTÍA NO CUMPLA SUS OBJETIVOS BÁSICOS, EN NINGÚN CASO LA RESPONSABILIDAD TOTAL DE IPSI SUPERARA EL
PRECIO DE COMPRA DE ESTE PRODUCTO. ALGUNOS ESTADOS Y PROVINCIAS NO PERMITEN LA EXCLUSIÓN O LIMITACIÓN
DE DAÑOS DIRECTOS O INDIRECTOS POR LO QUE LAS LIMITACIONES ANTERIORES NO SE APLIQUEN EN SU CASO. ESTA
GARANTÍA LIMITADA LE OTORGA DERECHOS LEGALES, Y USTED PUEDE TENER OTROS DERECHOS QUE PUEDEN VARIAR
DE ESTADO Y DE PROVINCIA.
Cuidado y Mantenimiento
1.
2.
Use un jabón suave y agua para limpiar las barras de apoyo. No utilice materiales abrasivos ya que podrían dañar el
acabado y anular la garantía.
Compruebe regularmente que la barra de apoyo es seguro y ajuste según sea necesario.
Preguntas más Frecuentes
> ¿Qué tipo de superficies son adecuada para el sistema de nie wieder bohren
bohren?
Casi cualquier superficie lisa o áspera es adecuada siempre y cuando sea firme y capaz de soportar la carga en cuestión. El
sistema nie wieder bohren es ideal para materiales de alta calidad a los cuales uno no quiera dañar al someterlos a
perforación. nie wieder bohren es adecuado para cerámica (baldosas), piedra, mármol, granito, vidrio, cemento, madera,
metal y muchos plásticos. Basada en la carga que soportan estas barras, se recomienda que se utilicen sólo en azulejo
(cerámica, baldosa), piedra y vidrio de alta resistencia. Superficies inadecuadas como yeso suave, empapelados de pared,
placas de yeso y productos textiles (tales como alfombras),no proporcionan suficiente firmeza y soporte para el montaje de
estos accesorios. No hay adherencia al polietileno (PE), polipropileno (PP) y
politetrafluoroetileno (PTFE, Teflón). Estas superficies se encuentran rara vez en los recintos o tinas de baño.
A pesar de que hemos descrito con los más ejemplos posibles, nuestras instrucciones pueden cubrir tan sólo algunas de las
muchas superficies y los tratamientos de superficie que son adecuados para el use de este producto. Por lo tanto, se
recomienda al usuario hacer pruebas previas cuando considere otros tipos de superficie. Aunque este sistema funciona con
la mayoría de plásticos y fibra de vidrio, la capacidad actual de carga puede variar según el tipo de material plástico, la
fabricación y el espesor de la pared. Por esta razón no podemos garantizar la capacidad de carga de 250 libras para estas
superficies. Nosotros no ofrecemos garantía de por vida para estas superficies.
> ¿Funcionará el Sistema También Sobre Superficies Asperas?
La textura de la superficie no es un factor que afecta la fuerza de unión del adhesivo nie wieder bohren. Sin embargo, la
superficie debe ser plana para que coincida con el adaptador y no debe tener ningunos vacíos grandes que dejen escapar el
adhesivo por debajo del anillo adaptador. De hecho, una superficie ligeramente áspera, ofrece incluso una mejor adherencia
debido a un contacto mecánico mejorado. Para remover completamente pegamento como la silicona, de los vacíos y los poros
de las superficies ásperas, es necesario usar un removedor de silicona, alcohol puro y un cepillo grueso.
10
> ¿Puedo También Utilizar el Sistema al Aire
Aire Libre?
¡Sí! El adhesivo no se descompondrá, es resistente a la radiación UV, es resistente al agua y no dañado por congelación (sin
embargo, se debe aplicar a una temperatura entre 41°F y 104°F (+5°C y +40°C).
> ¿Puede El sistema Fallar con el Tiempo?
Por supuesto que no! Una vez que el sistema de nie wieder bohren haya sido montado correctamente, el componente único de
su adhesivo especial, garantiza un enlace permanente. Por otra parte, mantendrá su elasticidad y no se desgastará de la forma
en que muchas cintas adhesivas textiles hacen después de sólo unas pocas semanas. Por otra parte, las cargas de corto
impacto no harán que la superficie adhesiva se agriete, como sucede a menudo con adhesivos de dos componentes que se
endurecen para formar una conexión cristalina. El sistema nie wieder bohren es una experiencia totalmente nueva en la
tecnología de unión!
> He seguido las Instrucciones con Cuidado, pero sin embargo el Adaptador se cayó de la pared. ¿Por qué sucedió esto?
De acuerdo con nuestra experiencia, si el sistema nie wieder bohren no puede cumplir lo que promete, por lo general es de una
de las tres razones siguientes. Cada una de estas razones se debe a condiciones inadecuadas para la unión. Por el llamado
patrón de fractura del adhesivo en la parte posterior del adaptador, se puede fácilmente determinar cuál es el problema.
1. Cavidades en el adhesivo - causada por molestar (por ejemplo, presionando hacia abajo) el adaptador después de la
inserción del adhesivo que hace que se formen bolsas de aire limitando la unión.
2. La falta de tiempo de curación - causado por tratar de montar el accesorio antes del tiempo de curación recomendado
de 12 horas (para barras se recomienda 24 horas).
3. Separación en la superficie - causado por no limpiar adecuadamente la superficie antes de la instalación. Asegúrese
de usar sólo alcohol y dejar que se seque por completo para asegurarse que la superficie esté libre de todos los
productos de limpieza, grasa, depósitos de jabón, etc
> ¿Puede el Adhesivo causar
causar daños a las superficies?
No. No sabemos de ningún material de carga que se verían perjudicados por las sustancias químicas en el adhesivo nie wieder
bohren.
> ¿Es el pegamento tóxico?
No. El contacto con la piel es inofensivo. Después del uso, enjuague con agua y jabón. En caso de contacto con los ojos, lavar
con abundante agua durante varios minutos, manteniendo los párpados abiertos. Si el adhesivo es ingerido, consulte a un
médico inmediatamente.
> ¿Es el pegamento libre de formol?
Sí.
> ¿Cómo me deshago
deshago del adhesivo?
Usted puede poner los residuos endurecidos o secos del adhesivo, derecho en la basura de la casa. Lo mismo sucede con el
adaptador después de ser desmontado.
> ¿Cuánto tiempo se puede mantener el adhesivo en el tubo?
El propio adhesivo no es decadente, lo que en teoría significa, se mantiene para siempre. Sin embargo, ya que es difícil de
procesar el adhesivo y almacenarlo, sin ponerlo en contacto con el aire, poco a poco se puede endurecer en el tubo durante un
largo tiempo. Por lo tanto, garantizamos una duración mínima de 18 meses. La fecha final de este período de 18 meses se
imprime en el pliegue superior del tubo en el formato DD / MM / AA. Si usted encuentra que tiene un tubo que ha expirado,
póngase en contacto con nosotros para obtener un reemplazo.
11
> ¿Es el adaptador rere-utilizable?
No. El adaptador está diseñado para ser utilizado sólo una vez sobre la base de la tecnología patentada "pass through"
tecnología necesaria para la curación. Para volver a montar sus accesorios será necesario comprar otro kit adaptador.
> ¿Se puede utilizar el sistema para sujetar objetos distintos de los que se suministran junto con el sistema nie wieder bohren?
El sistema está diseñado para ser utilizado sólo con los accesorios nie wieder bohren. Ahora llevamos muchos tipos diferentes
de productos que ofrecen esta tecnología. Estos incluyen accesorios de baño, barras de sujeción, ganchos, accesorios de
cocina y paradores de puertas.
Para recomendaciones de montaje, sugerencias para solucionar problemas y / o adaptadores de reemplazo:
www.nodrillingrequired.com
El incumplimiento de las instrucciones puede causar pérdida de adhesión y causar lesiones
Innovative Product Sales International LLC
7345 West Friendly Ave. Suite C
Greensboro, NC 27410
800-961-5804
[email protected]
www.innovativeproductsinc.com
*El rendimiento actual varía sobre plásticos y fibra de vidrio y no cumple con las especificaciones de carga de la ADA. No se aplica
la garantía de por vida si se utiliza sobre estas superficies.
El sistema nie wieder bohren funciona con la mayoría de los plásticos, pero la capacidad actual de carga es menor a de los
requisitos de la ADA y ha variado en las pruebas sometidas. El rendimiento de por vida no está garantizado si se utiliza sobre
plásticos
12