Transcript
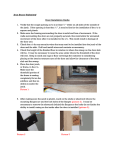
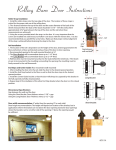
Grab Bar Installation Instructions (GB Series)
1. Adapter Set- 2 Adapters, 3adhesive tubes, 3-Red Keys, 6
stainless screws, 6 screw
sleeves, 1 alcohol cleaning pad
2. Clean surface with alcohol pad,
let dry fully. Wipe any residual off
with dry clean cloth. Do not clean
with household cleaners!
4. Carefully remove cover ring from each side. Foam ring will hold
adapters in place on wall and provide a border for the adhesive when
inserted. Press bar at desired location firmly for 5 seconds. Remove bar.
Foam ring will hold adapter in desired position.
6. Allow adhesive to cure for 24
hours undisturbed. Important not
to disturb the adapter after
inserting glue.
7. After adhesive has cured for 24
hours, remove the three beads of
glue from the small vent holes
3. Align adapter and pre-attach to bar with screws & sleeves. This steps
provides for easy alignment and eliminates the need to measure from post to
post. Be sure to mark walls for desired height prior to pre-setting to wall.
5. Pierce adhesive tube with red key and then slide tube end into slit in tube.
Insert tube end firmly into center hole in adapter and slowly insert adhesive by
turning red key. Continue until all three vent holes show a white bead as
pictured. Do not press on adapter after inserting glue!
8. Attach bar to adapters using the screws & sleeves included. Make sure
to re-attach in same position as originally set to be sure screws align
properly. Tighten firmly. Slide cover ring over base and turn clockwise until
properly aligned and turn to lock in place. Job complete!
Not intended for Sheetrock, Plaster, Wall Paper
or Painted Surfaces