1
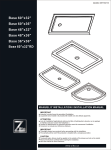
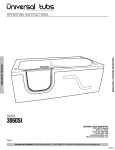
Ariel
Walk-In Bathtubs
Installation Guide
~~~~~~~~~~
Table of Contents
GENERAL INFORMATION………………………………..…Page 1
SAFETY INSTRUCTIONS………………………………..…. Page 1
ROUGH / DRAWING DIAGRAMS………..………….……...Page 2
GETTING STARTED (1) (2) (3)…………………….…….…..Page 3
INSTALLATION……………………………………......…...Page 4-5
OPERATION GUIDE…………………………………….....…Page 5
WARRANTY…………………………………………..………Page 6
APPROVAL……………………………………………..…Page 7-12
Ariel Walkin Bathtub
[
Installation Guide ]
Page 1
GENERAL INFORMATION
SAVE THIS MANUAL: RETAIN FOR CONSUMER USE
Read these instructions completely before installing the product: If you have any questions call:
(800) 304-3598
You must follow all instruction in this manual:
Failure to do so will result in your assumption of liability that may occur.
Failure to comply with all instructions can result in product and personal injury.
RESPONSIBILITY OF THE INTALLER
The installer must inspect and water test the product prior to installation to ensure the unit is free of defect or damage.
of a problem, the unit must not be installed.
If the crate or product has been damaged please call immediately:
In the event
(800) 304-3598
This product is designed to be installed by a licensed tradesperson, licensed plumbers and electricians should be employed to
insure proper installation. Installers assume all liability for the correct installation procedures.
Only accessories authorized by the manufacturer should be used with this product.
SAFETY INSTRUCTIONS
IMPORTANT SAFETY INSTRUCTIONS
1.
When using this product, basic precautions should always be followed. Read and follow all instructions pertaining to risk of fire,
electric shock, or injury to persons.
2.
Use this unit only for its intended purposes or as described in this manual .Use only attachments recommended by the
manufacturer.
3.
Risk of hyperthermia and possible drowning: Water temperature in excess of 100°F (38°C) may be injurious to your health.
Check and adjust temperature before use.
READ AND FOLLOW ALL INSTRUCTIONS
1.
Danger: To reduce the risk of injury, do not permit children or persons with infirmities to use this product unless they are closely
supervised at all times.
2.
To avoid injury, exercise caution when entering or exiting the tub.
3.
Never drop or insert any objects into any openings.
4.
Risk of electrical shock; connect only to a separate circuit protected by a ground fault circuit interrupter (GFCI).
5.
Warning: Risk of electric shock, do not permit electric appliances (such as a hair dryer, lamp, telephone, radio or television)
within 5-feet (1.5M) of this hydro massage bathtub.
6.
This unit must be connected to a circuit interrupter (GFCI) .Such a circuit is provided by the installer and should be tested on a
routine basis. To test the GFCI push the test button, the GFCI should interrupt power. Push the RESET button, power should be
restored. If the GFCI fails to operate in this manner, there is a ground current flowing, indicating the possibility of an electrical
shock. Do not use this unit. Disconnect the unit and have the problem corrected before using.
7.
Traction enhanced-textured tub button must remain clean to minimize slippage.
8.
Risk of electrical shock, all pumps and heaters must be connected to a ground fault circuit interrupter (GFCI) protected outlets.
9.
Avoid use of alcohol, drugs, or medication while using your tub.
10. Consult your physician before using the whirlpool/air system if you are pregnant and/or have heart conditions.
11. All units must be water tested before installation.
Ariel Walkin Bathtub
[
Installation Guide ]
Page 2
Drawings for the tubs
Ariel-265138 (660mm W x 1300mm L x 960mm H)
Ariel-305439 (760mm W x 1370mm L x 990mm H)
Ariel Walkin Bathtub
[
Installation Guide ]
Page 3
GETTING STARTED (1)
UNPACKING THE UNIT
1.
Inspect the carton, if carton damage is noted: take a picture if possible, notify the deliverer, write “DAMAGED” on the Proof of
Delivery (P.O.D), and call:
(800) 304-3598
2.
NEVER LIFT THE TUB BY THE PLUMBING. Doing so can result in leaks, for which the installer is responsible.
3.
Immediately inspect the unit for damage even if there is no carton damage. Once the unit is accepted surface damages will be
assumed to be installation related if not reported within 72 hours of delivery. Installers are responsible for damage that occurs
once the unit is placed in its niche.
4.
Inspect the plumbing for any loose fittings.
5.
Remove all packaging material except for the protective plastic. This has been placed on the tub at the factory to eliminate
abrasions from handling. This should only be removed at final clean up.
GETTING STARTED (2)
TESTING YOUR SAFETY TUB BEFORE INSTALLATION
1.
All Tubs 100% water tested at the factory and certified to be free of leaks. Transportation and mishandling may cause leaks. It is
necessary to test the bath while there is access to all sides of the bath.
2.
This unit should be both static and operationally tested with water. It is best to test the unit outside by filling with a garden hose.
A.
Place the tub on a completely flat surface in an area where it may be drained after testing.
B.
Seal the drain (can be sealed with tape for test) and fill the tub three inches above the jets or to a normal level if it’s a
soaking tub.
C.
Allow the water to stand in tub for 10 minutes and then inspect all plumbing and seals for leaks.
D.
Insure all jets are open and working (every hydro jet is adjustable for both flow rate and direction of flow, depending on the
jet, the water flow is adjusted by either turning the outside ring or the nozzle clockwise and counter clockwise).
GETTING STARTED (3)
NOTE:
If the pumps do not operate:
A.
Check the breaker to insure power is on and the cable connecting the controls to the pump is attached.
B.
If an optional heater is present, check the indicator light on the heater to insure that power is present.
Do not run any pumps or heaters unless the tub is filled with water to proper usage level, 4-inches (10cm) above the highest jet
fixture. Damage due to dry-running pumps (running pumps without proper water level height) is not covered under any stated
warranty.
Failure to perform these tests before installation will make the installer liable for future repair costs.
Ariel Walkin Bathtub
[
Installation Guide ]
Page 4
INSTALLATION
INSTALLATION PREPERATION
1 Check the floor area where the tub is to be installed.
A
Clean the area of any debris or trash.
B
Use a 5 or 6-foot level and determine if the floor is level. If the floor is not level, adjust all 4 leveling feet to perfectly level the
tub. Note: it is important that ALL leveling feet are completely touching the floor and level for the door system to work
properly.
2 Check to insure the drain rough has been placed at the proper location. See spec sheets attached for you unit.
3 Insure that the proper electrical service has been installed at the pump location. See electrical requirements below.
ELECTRICAL REQUIREMENTS
Equipment utilized on these baths requires individual dedicated service for each feature unless otherwise stated on the actual
product.
Each electrical service must be a dedicated 20 amp, 110-125 volts alternating current service that is GFCI protected.
1.
Hydro Jet Massage Systems require one 15 amp, 110 volt service that is GFCI protected.
2.
Hydro Air-Massage Systems require one 15 amp, 110 volt service that is GFCI protected.
3.
Dual Massage Systems require two dedicated electrical circuits: 20 amps, 110 volt, GFCI for the pump and blower.
* IN-LINE HEATER WILL ALWAYS REQUIRE ITS OWN DEDICATED 20 AMP, 110 VOLT GFCI PROTECTED CIRCUIT.
ELECTRICAL INSTALLATION
All electrical connections must be carried out by a certified electrician in accordance with the local electrical requirements and codes.
INSTALLATION PROCEDURES
WARNING: When installing jet massage baths, air massage baths, or dual massage baths, basic precautions should be followed,
including the following:
Danger: Risk of electrical shock. Connect only to a separate circuit protected by a ground fault circuit interrupter (GFCI)
Installation must provide access for servicing pump/ motor (all Tubs come with an access panel for the pump/motor and faucet).
1.
Install tub waste according to instructions provided with fitting.
2.
Install faucet. If spout and supply lines are to be installed on deck of tub, mark the locations and drill pilot holes from the side of
product. Using proper size hole-saw, drill spout, hand shower and supply lines from side of the product.
3.
Standard installation – After framing is complete, set product in place to check fit and make certain that the tub can be properly
leveled. (Caution: if walk in bathtub is not resting on ALL leveling feet, water will not drain properly and may cause the door to
leak).
Warning: Never allow the weight of the tub to be supported by wood support stringers and do not use tile flange on the 60x32 to screw or nail in place,
as this will result in product failure and void the warranty.
Ariel Walkin Bathtub
[
Installation Guide ]
Page 5
4.
Verify the product is completely level by checking tub surface and ensure ALL leveling feet are touching the ground.
5.
Electrical connection is made by simply plugging pump cord (shipped with cord and plug) into specified dedicated 120V, 20A,
GFCI outlet.
6.
After plumbing and electrical connections have been made the tub should be cleaned of dirt and debris.
7.
Installation is not complete until the bath has been tested in place.
OPERATION GUIDE
OPERATION GUIDE
A.
When the bathtub is full of water. Turn on the water pump and/or the air pump, by pressing the pneumatic button(s) on the
sidewall of the bathtub.
B.
The working condition of the water pump, air pump, and heat pump, is contingent on the presence of adequate power supply,
secure connections of the pneumatic tubes and components, and adequate water level.
C.
The heat pump contains safety devices which only allow it to turn on when, a) water pressure is present from the running water
pump, and b) the water temperature is below 104-degrees Fahrenheit.
D.
The heat pump is designed to add heat to a body of flowing water, and is only designed to keep warm water warmer longer.
Warning!
A.
Make sure the power wires are complying to the installation diagram before turn the electrical system on.
B.
Do not turn on the Air pump, Water pump, and Heater without water.
C.
Make sure the power supply has adequate load capacity and a ground wire.
D.
Turn off power when working with any wiring connections.
RUN CONDITON
A.
Power: AC110V, 50/60 Hz
B.
Water pump: AC110V, 6.0-7.0 Amps
C.
Air pump: AC110V, 4.0-5.0 Amps
D.
Heater: AC110V, 12-14 Amps, 1500w
Page 6
Ariel Walkin Bathtub
[
Installation Guide ]
WARRANTY
Limited Warranty Coverage
All items manufactured by Ariel Walk in Bathtub are warranted in accordance with the following warranty.
This warranty is extended to the first purchaser does not extend to products previously used as display
models or products that have been modified or repaired by anyone else but Ariel Walk in Bathtub unless
approved by Ariel. Ariel walk in bathtub comes with a 3 year warranty on walk in bathtub and components
only.
Warranty Limitations
In the event of a defect in the material or workmanship of a product, defective product(s) will be repaired or
replaced by Ariel Walk in bathtub. Ariel Walk in bathtub shall not be liable for the expense of removing
defective products, installing replacement products, or the expense of adjoining components such as tile,
marble, wall panels, ceilings etc. No liability shall exit for incidental or consequential damages caused in
whole or part by any defect in Ariel Walk in Bathtub products. No warranty, expressed or implied, including
any warranty of merchantability or fitness for a particular purpose, shall apply after the warranty period
described above. This warranty does not cover defects or damage caused by the common carrier or installer
from, without limitation, any of the following: careless handling, lifting whirlpools by the piping, modification of
the product for any reason, improper installation (including installation not in accordance with instructions
provided with the unit).
Page 7
Ariel Walkin Bathtub
[
Installation Guide ]
Page 8
Ariel Walkin Bathtub
[
Installation Guide ]
Page 9
Ariel Walkin Bathtub
[
Installation Guide ]
Page 10
Ariel Walkin Bathtub
[
Installation Guide ]