1
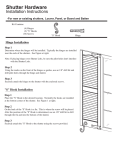
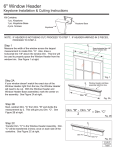
6" Window Header
Header Installation Instructions
Kit Contains:
1 pc. Window Header
1 pc. Window Header Base
12 pcs. Shutter Loks
Screws (quantity is dependent on header length)
Window Header Base
Window Header
*Optional Keystone also available for reducing size, joining 2 units, or for decorative detail.
Step 1
Begin by removing the Window Header from the Window
Header Base. This can be accomplished by disengaging the
locking tabs. Figure 1 at right shows the location of these tabs.
Note: Depending on the size of your Window Header Kit, there
may be more or less locking tabs. To release the locks, start in
the middle of the Header Assembly and pull the wall of the
Header away from the Header Base. Continue this process
working your way to the ends of the Window Header Assembly.
Fig. 1
Step 2
Remove the Window Header from the Window Header Base by
disengaging the lock tabs. See Figure above. Draw a
horizontal line 1/8" above the window trim. This line will be
used to properly space the Window Header from the window
trim. See Figure 2 at right.
Draw horizontal line 1/8"
above window trim
Fig. 2
01-24-01
PAPC9166
I-0055
Step 3
Center the Window Header Base over the
window and spaced 1/8" above the window
trim. Use the elongated slots in the Header
Base and attach the base to the house using
the screws provided. Alternatively, the
preferred method is to use Shutter Loks.
The raised portions of the Header Base with
the round holes receive the Shutter Loks.
Attach Shutter Loks by drilling 1/4" holes into
the wall. Be sure not to fasten the screws or
Shutter Loks too tightly to allow for
expansion and contraction. See Figures 3A
and 3B at right.
Length
33 5/8
37 5/8
43 5/8
65 5/8
73 5/8
Fig. 3B
Fig. 3A
Screw Application
Shutter Lok Application
Min. # of screws
6
8
8
10
10
Note:
Figures 4A & 4B at right show cross sections of the Window
Header in place. In some instances the Window Header may
rock on the high point of the siding. To overcome this problem,
insert the screws or Shutter Loks into the wall evenly. See Figure
4A at right. Insert the screws or Shutter Loks evenly, working
between top and bottom.
CORRECT
Fig. 4A
INCORRECT
Fig. 4B
Step 4
With the Window Header Base securely fastened to the wall,
attach the Window Header by snapping it into place. See Figure
5 at right.
Fig. 5