Transcript
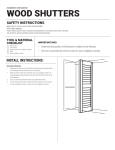
installation instructions: CASING/CHAIR/PANEL SAFETY INSTRUCTIONS Make sure to use the correct tools recommended. Wear safety goggles. Follow fixture, power tools, and paint manufacturers’ instructions and users manuals. Use common sense and follow good construction practices. Medallions are not load‐ bearing. Do not use them to support electrical fixtures or ceiling fans. TOOL & MATERIAL CHECKLIST construction adhesive elastomeric adhesive caulk caulking gun finishing nails miter saw putty knife chalk line box & pencil 1. 2. 3. 4. IMPORTANT INFO • It is highly recommended that you paint or finish moulding before you install it. • Once installed, you can apply any necessary touch‐up paint or finish. Note: A high quality exterior grade latex paint is recommended. • Place moulding in room 2 to 3 days prior to installation. This allows the moulding to adjust to the temperature of the room. • Clean installation surface and back of moulding of all dirt and dust with a clean cloth or sponge. Make sure that the surface and the back of the moulding are completely dry before attempting installation. Apply a continuous 1/2” bead of construction adhesive along the back of moulding lengths. Press moulding against wall at the desired location. Use finishing nails to secure moulding intoplace. Apply caulk in remaining gaps and smooth with finger or putty knife. Use caulk or lightweightspackle to fill in holes left from finishing nails. Touch‐up moulding as needed using high quality latex paint. CONSTRUCTION ADHESIVE WALL PANEL MOULDING