1
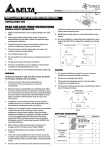
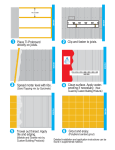
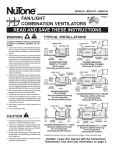
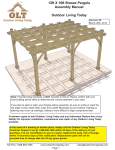
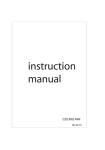
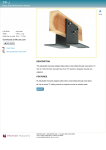
Battic Door Attic Access Hatch
Insulation dams
prevent loose-fill Hatch lid pushes up and
pen out of the way for access
access Air seal Home Energy Conservation Products
( sket
E-Z Hatch Attic Access Door System
www. batticdoor.com Tel. 508.320.9082
INSTALLATION GUIDE
|) Read instructions carefully and completely
r seal before beginning installation
г,
Ai
gasket
e Installer should be experienced in the construction or modification of structural framing
supports. Improper installation can result in collapse and bodily injury.
* Determine the location of electrical lines or plumbing before cutting ceiling.
| WARNING д helper may be needed to lift the frame into the ceiling rough opening.
TOOLS AND Drill, tape measure, wood shims, ladder, lumber with same dimensions as joists,
MATERIALS keyhole saw or utility knife to cut ceiling material, 8 - 12 pcs. #12x3" wood screws.
REQUIRED
BEFORE Confirm that this attic access door and its installation meet all applicable building codes.
INSTALLATION * Inspect unit for any damage.
1. Select location to install door. Closet or hallway is typical.
2. Inspect location of ceiling joists or roof trusses in attic to ensure door
can be installed in desired location.
UM 10
Locating Door
S
T
E
=
Preparing the 3. Cut the rough opening through the ceiling material.
Opening
1. Study drawing below.
2. Mark out the rough opening 22-1/2" wide x 30-1/2" long between the
roof trusses or ceiling joists.
€ trusses or joists 24" o.c.
и 24"
„и install header
— 7 7 A 30-12" x
nu header | — cut center joist
joists 16 o.c.
16" + 16"
30-172"
remove center joist
— 22-112"
TT
|
2212" — — —=
| — cut center joist
= "4 nm a a a .
existing wood joists \ Z 3/16" clearance existing wood joists /
install header
о т
1. If installation is between joists or trusses spaced 24" o.c,, install access
door with long side parallel to joists or trusses. Install 2 x 6" or 2 x 8”
“headers”. These headers will form the box frame into which the access
door will be secured.
2. If installation 15 between joists spaced 16" o.c., install access door with
Framing the short side parallel to joists. Cut and remove the center joist and tie in to
Opening other joists with 2 x 6" or 2 x 8" headers”. These headers will form the box
frame into which the access door will be secured.
,
WARNING
UM-0
Installing the
Access Hatch
Door Frame
« Before cutting any joists, watch out for electrical wiring.
о [If your attic is constructed using trusses, DO NOT CUT CEILING JOISTS
WITHOUT CONSULTING AN ENGINEER AND OBTAINING APPROVAL.
e It is recommended that DOUBLE HEADERS and JOIST BRACES be used for
greater strength and safety.
a ra Nr a „и
A „=“
a р,
AE JOIST BRACE
pe er
ry a ож”
oa a“ „” r
e = В ra
x = a;
a - a
A LT
== ad -~
Typical framing with joists 16” o.c., center joist cut, and headers added.
1. Remove door from frame. Have a helper below lift frame up into rough
opening, compressing the weatherstrip so the trim is tight against the ceiling.
2. Square access door in rough opening.
3. Shim and anchor access door frame to joists / trusses and headers. Use
sufficient number and size of screws (8 - 12 #12 x 3" screws suggested and
not provided) to adequately secure access door frame. Screws must be
installed flush with inner surface of access door frame.
1. Drop door into frame from attic. Door rests on weatherstripping on
inside of trim.
2. Remove any fingerprints or dirt with a moist towel or rag.
UM 0
Installing the
Access Hatch
Door
LIMITED WARANTY
Battic Door warrants that the unit will be free from any defects in material and workmanship for one year from
purchase date provided the access door is installed in compliance with the preceding instructions and operated and
maintained in accordance with these instructions and applicable warnings.
This warranty specifically excludes any and all non-defect damage, injuries and losses arising from improper
installation of product, unreasonable use, and any and all labor charges incurred for removing or reinstalling a
repaired access door unit or any of its components.
During the warranty period stated, should the access door exhibit a manufacturing defect please first call Battic
Door at 508.320.9082 before removing product in order to determine the extent of the defect and what course of
action needs to be taken to correct the problem. A proof of purchase will be required in all cases.
ADDITIONAL EXCLUSIONS
Battic Door's above-stated limited warranty is being made in lieu of all implied warranties of any kind, including
those as provided by the Uniform Commercial Code for merchantability of the product and for fitness of the product
for a particular purpose. All such implied warranties, including those of merchantability and/or fitness for a
particular purpose, are excluded and disclaimed. Furthermore, all claims for consequential damages and for
incidental damages that may arise from a breach of the above-mentioned express warranty are also excluded. In
no event shall Battic Door be liable for any breach of warranty and/or for any negligence and/or for any strict liability
which would exceed in damage amount the cost of the attic access door unit.
No representative or person is authorized to assume for Battic Door any responsibility which would be either an
alternative to or in addition to the express product warranty as stated above. This warranty gives you certain specific
legal rights as were set forth above and any other rights that may vary from state to state. If any portion of this express
warranty is deemed to be unenforceable at any time hereafter, any such provision shall be severed from this
agreement, but all other terms, conditions and provisions shall remain in full force and effect.
Battic Door Energy Conservation Products
Р.О. Вох 15
Mansfield, MA 02048 U.S.A.
Tel: 508.320.9082
Website: www .batticdoor.com
Email: [email protected]
THANK YOU FOR YOUR PURCHASE