1
PRIVACY AND SHADOWBOX FENCE KIT INSTALLATION INSTRUCTIONS, CONTINUED
Installing fences on sloped landscapes
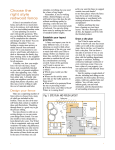
Fences are installed on slopes using one of two methods
(figs. 1a and 1b). The step method gradually steps up the slope
with the rails level, rather than parallel, to the slope. With loose
components, you have the option to use the parallel method.
The top and bottom rails are installed based on the degree
of the slope.
Digging postholes
Step method
fig. 1a
Parallel method
fig. 1b
A general rule of thumb is to place 1/3 of the post into the ground.
Check local regulations for any special requirements. The fence
will be stronger if end, corner and gate posts are set at least 6"
deeper than line posts. Using a posthole digger or power auger,
dig the holes 10-12" wide and 6" deeper than needed. Backfill the
holes with 6" of gravel to drain water away from the bottom of the
posts (fig. 2). Keep the height of your fence panels in mind when
digging your postholes.
Setting posts
Install end and corner posts first. Tie a string between the posts
along the fence line. This establishes a reference, ensuring the
posts are properly aligned (fig. 3).
Brace the posts using 2x4s nailed to both the posts and stakes
in the ground. This will keep them straight while the concrete
sets. Check for plumb (90° angle) on two adjacent sides prior
to pouring concrete. Fill hole with ready-mix concrete, following
the package instructions. Tamp the concrete to remove any air
pockets. Overfill the holes at the top and slope the concrete
away from the post to keep water from pooling. Recheck plumb
and alignment of all posts and allow concrete to cure for 24 to
48 hours (or a timeframe established in the manufacturer's
instructions).
Cement
6" Gravel
10" - 12"
fig. 2
Cutting posts to proper heights
An easy method to ensure your post tops are level is to run a
string from corner post to corner post at the desired height,
keeping the string taut (fig. 3). Mark each post at the string line
and cut off the tops of the posts. Finish off your posts with
optional decorative finial tops or post caps.
fig. 3
©2014 Universal Forest Products, Inc. All rights reserved.
50415 Herbert Street, Granger, IN 46530 574.277.7670 7934_10/14
www.ufpi.com