1
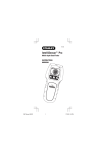
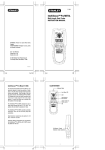
LATTICE TOP
VINYL FENCE PANEL
PANEL DE CERCA DE VINILO
Actual size:
70 in high
gh x
68 in wide
Tamaño real:
70 pulg largo x
68 pulg ancho
To complete your project, you will also need:
1 – 5x5-96" post per panel
1 – 5x5-96" post to end a fence run
1 – 5x5-96" post per gate
2 – bracket kits per panel (73013798)
1 – post top per post
Gravel and concrete as required
Para completar su proyecto, usted también necesita:
1 – Poste de 5x5-96" por cada panel
1 – Poste de 5x5-96" para el final de la cerca
1 – Poste de 5x5-96" por cada puerta
2 – Juegos de soporte por cada panel (73013798)
1 – Tapa de poste por cada poste
Grava y concreto según se necesite
www.homedepot.com
Scan Now
Discover the many benefits of Veranda
vinyl fencing
Model #73002118
0
40933 02118
• Low Maintenance
• Easy To Install
• Transferable Limited Lifetime Warranty
5
©2012 Barrette Outdoor Living, All rights reserved.
Veranda is a registered trademark of Homer TLC, Inc.
©2012 Barrette Outdoor Living. Todos los derechos
reservados. Veranda es una marca comercial registrada
de Homer TLC, Inc.
Get free scanner at homedepot.com/scan
Scan this code for more information
or text HDScan to 43588
on Veranda Vinyl Fencing.
Descubra los muchos beneficios de las cercas de vinil Veranda
• El vinilo requiere poco mantenimiento
• Fácil de instalar
• Garantía de por vida limitada y transferible
Escaneé el código para obtener más
información sobre las cercas de vinil
Veranda.
Get the free mobile app at
getscanlife.com
Obtenga gratis la aplicación para su
celular en getscanlife.com
73002118UPC V1 11/11
Please read all instructions before beginning
1
2
Post Location
Lea las instrucciones antes de comenzar
1
Figure
1
Measure the width of the fence panel
(X) plus ½" for brackets, add the width
of the post (Y). This is the general
on center measurement for post hole
location. It is highly recommended to
dig enough holes to install 3-4 sections
of fence at a time to ensure proper post
hole placement
22"
Frost
Line
Post Installation
a) Dig post hole 12" in diameter 30"
deep
b) Add 8" of gravel for post drainage
c) Insert post in center of post hole
d) Level and plumb post
e) Fill remainder of first hole with
concrete according to manufacturers
instructions
f) Recheck level and plumb Always
allow approximately 2" of ground
clearance under panel
8"
12"
X+½"+Y
General post hole location
Ubicación general del agujero para poste
22"
2
8"
12"
*Installation if Frost Line
exceeds 30"
*Instalación si la profundidad
de penetración del congelamiento excede 30"
Ubicación del poste
Mida el ancho del panel de valla (X) más
½" para soportes, y añádale el ancho del
poste (Y). Esta es la mida general para
la ubicación del agujero del poste.
Recomendamos ampliamente que cave
suficientes agujeros para instalar 3 ó 4
secciones de valla a la vez para asegurar
que la colocación de los agujeros para
los postes sea la adecuada.
Instalación del poste
a) Cave un agujero para poste de 12" de
diámetro y 30" de profundidad
b) Agregue 8" de grava para el drenaje
del poste
c) Inserte el poste en el centro del
agujero para poste
d) Nivele y aplome el poste
e) Rellene el resto del primero
agujero con concreto, según las
instrucciones del fabricante
f) Compruebe de nuevo el nivel y
aplomo del poste. Deje siempre un
espacio de aprox. 2" entre el suelo y
el panel.
Figure
Tips:
– Add concrete to next post hole
after panel is installed
– *If frost line exceeds 30"
(Figure 1) Dig hole to the appropriate
depth. Add 8" of gravel for post
drainage. Add concrete until a
depth of 22" remains. Follow above
instructions from step (c).
3
2
Decorative Top Rail
Travesaño superior
decorativo
Mid Rail
Travesaño intermedio
B
Rail Bracket Location
Measure the distance from the bottom
of the panel to the bottom of the lower
horizontal rail (A) and add 2". This is
the location of the bottom bracket.
Measure from the bottom of the lower
horizontal rail to the bottom of the mid
rail (B). This is the location of the mid
bracket. Use the same process for the
top bracket.
Lower Horizontal Rail
Travesaño horizontal
inferior
Use all screw holes
Use todos los orificios para
tornillos
A
Bracket Kit
73013798
When the rail = 11⁄2" use spacer in bracket.
When the rail = 13⁄4" spacer is not needed.
Kits de
soporte
73013798
Cuando el travesaño mide 11⁄2", utilice el espaciador
en el soporte. Cuando el travesaño mide 13⁄4", no es
necesario utilizar el espaciador.
Figure
4
Panel Installation
3
Set panel into the brackets on
the first pre-set post
a) Set panel into the brackets on the
first pre-set post (Figure 3)
b) Place the next post (with brackets)
in the hole on the opposite end of
the panel without any concrete in the
hole
c) Ensure posts are against panel and
secure all screws into the panel in
the center of the bracket slots
d) Level and plumb post
e) Horizontally level panel
f) Add concrete according to
manufacturers instructions
g) Cut the height of the post to the
desired look, and install post tops
h) Continue installing all other panels
using above instructions
Coloque el panel en los
soportes en el primer poste
previamente colocado
LIMITED LIFETIME WARRANTY
REGISTRATION
Please take a moment to register your product to
ensure receipt of all warranty benefits. Please be
sure to retain your original store receipt.
After panel is attached to
opposite side, level, plumb
and add concrete to post hole
Después de fijar el panel en
el extremo opuesto, nivele,
aplome y añada concreto al
agujero del poste
Name: ____________________________
Address:___________________________
__________________________________
Zip: ___________
Email: ____________________________
Product Purchased: _________________
_________________________________
_________________________________
REGISTRO PARA LA GARANTÍA
LIMITADA DE POR VIDA
Tómese un momento para registrar su producto
y así asegurar que reciba todas las ventajas
de su garantía. Recuerde conservar el recibo
original de la compra
Nombre: __________________________
Dirección:__________________________
Estado: __________Código postal: _____
Place the next post (with
brackets) in the hole on the
opposite end of the panel
without any concrete in the hole
Coloque el siguiente poste (con soportes)
en el agujero en el extremo opuesto del
panel sin concreto en el agujero
Dirección electrónica:________________
_________________________________
Producto comprado: ________________
2"
_________________________________
_________________________________
_________________________________
_________________________________
Date of Purchase: ___________________
Fecha de compra: ___________________
Location of Purchase: _______________
Lugar de compra:___________________
Date of Install: _____________________
Fecha de instalación _________________
Installation Company: _______________
Empresa que realizó la instalación: _____
_________________________________
Barrette Outdoor Living
7830 Freeway Circle
Middleburg Heights, OH 44130
U.S.A.
a) Coloque el panel en los soportes en
el primer poste previamente colocado
(Figura 3)
b) Coloque el siguiente poste (con
soportes) en el agujero en el extremo
opuesto del panel sin concreto en el
agujero
c) Compruebe que los postes estén
junto al panel y apriete los tornillos
en el panel en la parte intermedia del
soporte
d) Nivele y aplome el poste
e) Nivele el panel horizontalmente
f) Agregue concreto de acuerdo con las
instrucciones del fabricante
g) Continúe instalando los demás
paneles usando las instrucciones
anteriores
h) La apariencia final muestra la tapa del
poste de 2" por encima del panel de la
valla.
Ciudad:____________________________
_________________________________
Mail completed registration card to:
4
Mida la distancia de la parte inferior del
panel a la parte inferior del travesaño
horizontal inferior (A) y añada 2". Esta
es la ubicación del soporte inferior.
Mida de la parte inferior del travesaño
horizontal inferior a la parte inferior
del travesaño intermedio (B). Esta es
la ubicación del soporte intermedio.
Aplique el mismo proceso en el soporte
superior.
Instalación del panel
__________________________________
City: ______________________________
State: ___________
3
Puntas:
– Añada concreto al siguiente agujero
para poste después de instalar el
panel
– *Si la profundidad de penetración del
congelamiento excede 30" (Figura 1),
cave el agujero hasta alcanzar la
profundidad indicada Agregue 6" de
grava para el drenaje del poste
Agregue concreto hasta que quede
una profundidad de 22" Siga las
instrucciones del paso (c) anterior
Ubicación del soporte de
travesaño
_________________________________
For online registration and
product information please visit:
www.BarretteOutdoorLiving.com
or scan the code provided with
your mobile device.
Para el registro por internet y
para obtener información sobre el
producto, visite:
www.BarretteOutdoorLiving.com
o escanee el código incluido
usando su dispositivo móvil.
Envíe la tarjeta de registro completada a:
Barrette Outdoor Living
7830 Freeway Circle
Middleburg Heights, OH 44130
U.S.A.