Transcript
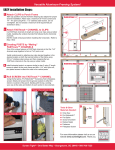
Low Profile Aluminum Framing System!
EASY Installation Steps:
1. Attach SCREW/CLIPS to Porch Frame
Measure, pre-mark, and pre-drill screw/clip locations on the frame
with a level ruler or string to keep the screw/clips aligned at desired
location on the frame for proper channel installation. Place screw/clips
2” from the corners and every 8“ - 10” evenly spaced apart. Do not
overtighten. (Do not exceed a maximum of 40 square feet per
screened in area.)
A
2. Attach MINItrack™ CHANNEL to SCREW/CLIPS
Now MINItrack Channel pieces should be cut to desired lengths.
Install the left & right channel vertical’s by just “snapping” them over
clips directly attached to the frame using a rubber mallet.
Next, install both the top and bottom MINItrack channel horizontal’s
(See A Diagrams for details)
Do not overtighten.
Step 2 - Side View
3. Roll SCREEN into MINItrack™ CHANNEL
Now using the spline, Rollerknife™ Screening Tool & screen mesh
material, simply roll the spline into the groove of the MINItrack
channel to hold in the fabric. Starting with the top, working your
way to the sides and bottom of each section to be screened.
Detail of Steps
A
MINItrack
Channel
4. Simply trim off the excess screen mesh and you’re done!
Attach Clips to Frame
4.
Screw/Clip
2.
Step 1
Porch
Frame
Step 2
Screw/Clips
2.
Attach Channels to Clips
1.
Screw/Clips
Steps 3 & 4
Do not
overtighten
Tools & Other Materials Needed:
Attach Horizontals 1st, Verticals 2nd
Chop Saw
Rollerknife™
Spline
Screw Driver/Drill
Rubber Mallet
Fasteners
Fiberglass Screen
For more information please visit us on our
website www.screentight.com. Thank you.
Screen Tight™ • One Better Way • Georgetown, SC 29440 • 800-768 7325
Fiberglass
Screen
Steps 3 & 4
4.
RO
LL
ER
K