Transcript
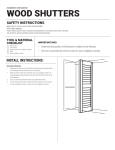
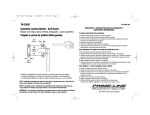
installation instructions:
COMPOSITE SHUTTERS
SAFETY INSTRUCTIONS
Make sure to use the correct tools recommended.
Wear safety goggles.
Follow fixture, power tools, and paint manufacturers’ instructions and users manuals.
Use common sense and follow good construction practices.
TOOL & MATERIAL
CHECKLIST
electric drill
1/8” & 1/4” drill bit
shutter harwardware
proper screws for installation surface
screw driver
level
pencil, marker, or chalk
IMPORTANT INFO
•
Determine the position of the Pintel on the Window casement. Measure the depth of the
surface that the Pintel will be mounted on and the adjacent wall surface. This will determine
the Pintel height and Hinge combination that best fits the application.
•
Shims are available to adjust the pinter projection.
Decorative Hardware
1. Determine the position for the mounting brackets by matching up the top
and bottom of the shutter with the window and mark its position.
2. Using a level set the bottom bracket in place and fasten using the correct
screws for your installation surface. (Note: At this point it is recommended you place the shutter in place and double check your marking for the
top bracket.)
3. Using a level set the top bracket in place and fasten using the correct
screws for your installation surface.
4. If installing shutters larger than 55” fasten with center “L” brackets (A).
5. Set the shutter in place, mark the position of the holes on the shutter.
Remove the shutter and drill pilot holes using a 1/8” bit.
6. Place the shutters back in place and fasten the shutter in place using
screws being sure not to over-tighten the screws.
4
4
WIN DO W
2
2
6