1
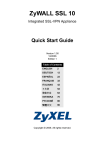
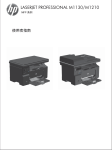
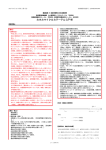
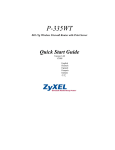
G-3000H
802.11g Wireless Access Point
Quick Start Guide
Version 3.50
11/2005
Table of Contents
ENGLISH
3
DEUTSCH
13
ESPAÑOL
25
FRANÇAIS
37
ITALIANO
47
繁體中文
59
ENGLISH
ENGLISH
Overview
The ZyAIR G-3000H offers highly secured wireless connectivity to your wired network with IEEE 802.1x, Wi-Fi
Protected Access, WEP data encryption and MAC address filtering. This Quick Start Guide shows how to set
up and configure the ZyAIR to allow wireless clients to access your wired network. See your User’s Guide for
more information.
The following lists what you need to do:
1. Hardware Connections
4. Hardware Installation
2. Accessing the Web Configurator
5. Power over Ethernet (optional)
3. Internet Access Setup
6. Troubleshooting
1 Hardware Connections
Note: You may need your Internet access information.
3
ENGLISH
Do the following to make hardware connections for
initial setup.
1 Using an Ethernet cable, connect the ETHERNET
port to a computer for initial configuration.
2 Connect the POWER 12VDC socket to a power
source using only the included power adaptor for
your region.
Note: Connect the ZyAIR ETHERNET port to an
Ethernet jack with Internet access after you
have completed the initial configuration.
1.1 The LEDs
The PWR and the ZyAIR LEDs turn on when the power
is connected. The ETHN LED turns on, if the
ETHERNET port is properly connected.
See the ZyAIR Front Panel LED Description table in the
User’s Guide for more information.
2 Accessing the Web configurator
Use Internet Explorer 6.0 and later or Netscape
Navigator 7.0 and later versions with JavaScript
enabled.
4
ENGLISH
2.1 Set Up Your Computer’s IP Address
This section shows you how to assign your computer a static IP address in the 192.168.1.2 to 192.168.1.254
range with a subnet mask of 255.255.255.0. This ensures that your computer can communicate with your
ZyAIR. The following instructions are for the Windows 2000, Windows NT and Windows XP operating
systems.
1 In Windows XP, click Start, Control Panel.
In Windows 2000/NT, click Start, Settings, Control Panel.
2 In Windows XP, click Network Connections.
In Windows 2000/NT, click Network and Dial-up
Connections.
3 Right-click Local Area Connection and then click
Properties.
4 Select Internet Protocol (TCP/IP) (under the General
tab in Windows XP) and click Properties.
5 The Internet Protocol TCP/IP Properties screen opens
(the General tab in Windows XP).
6 Select Use the following IP address and fill in the IP
address (choose one from192.168.1.3 to
192.168.1.254), Subnet mask (255.255.255.0), and
Default gateway (192.168.1.2) fields.
7 Click OK to close the Internet Protocol (TCP/IP)
Properties window.
8 Click Close (OK in Windows 2000/NT) to close the
Local Area Connection Properties window.
Close the Network Connections screen.
5
ENGLISH
Note: Even though you can connect to the ZyAIR wirelessly, it is recommended that you connect your
computer to the ETHERNET port for initial configuration.
1 Launch your web browser. Enter 192.168.1.2 (the
ZyAIR’s default IP address) as the address.
2 Click Login (the default password 1234 is already
entered).
3 Change the login password by entering a new
password and clicking Apply.
4 Click Apply to create a certificate using your
ZyAIR’s MAC address that will be specific to this
device; alternatively click Ignore to proceed if you
do not want to change the certificate now.
6
ENGLISH
5 Click WIZARD SETUP in the MAIN MENU screen.
3 Internet Access Setup
Use the setup wizard to configure your ZyAIR for wireless stations to access your wired LAN.
Note: Click Next in each screen to continue or click Back to return to the previous screen.
Your settings are not saved when you click Back.
1 This screen is optional. You can just click Next.
System Name is for identifying the
ZyAIR. You can enter your
computer's "Computer Name".
Domain Name: Enter a domain name
if your ISP requires one for
authentication; otherwise you can
leave it blank or set to whatever may
have displayed automatically.
2 Use the second wizard screen to set up the wireless LAN.
7
ENGLISH
Note: The wireless stations and ZyAIR must use the same SSID, channel ID and WEP encryption key
(if WEP is enabled) for wireless communication.
Enter a descriptive name to identify the
ZyAIR in the wireless LAN.
Click Scan to have the ZyAIR
automatically select a channel and
display it in the Channel ID field.
Select 64-bit or 128-bit to encrypt data
frames before transmitting them over
the wireless network.
Select Disable to turn off WEP data
encryption.
Select ASCII or HEX WEP key input
method and then follow the on-screen
instructions to set up the WEP keys.
Click Next to continue.
3 Fill in the fields in the last wizard configuration screen.
If you have an IP address to use, select
Use fixed IP address and enter it
along with the subnet mask and
gateway IP address.
Click Finish.
Note: If you change the ZyAIR’s IP
address, you must use the
new IP address if you want
to access the web
configurator again.
8
ENGLISH
4 Change the wireless parameter settings in the wireless stations to match those of the ZyAIR. Refer to your
wireless adapter’s documentation.
This is the final wizard screen. You may
return to the MAIN MENU and continue
to configure your ZyAIR.
4 Hardware Installation
4.1 Attaching Antennas
Note: When facing the front of the ZyAIR, the right antenna (main antenna) transmits and receives, the
left antenna only receives.
Follow the steps below to connect the supplied antennas.
1 Locate the antenna connectors on
the sides of your ZyAIR.
2 Screw the antennas clockwise onto
the antenna connectors. The
antennas should be perpendicular
to the ground and parallel to each
other.
Note: Make sure the antennas are
securely screwed onto the
antenna connectors.
4.2 Hardware Mounting Installation
In general, the best location for the access point is at the center of your intended wireless coverage area. For
better performance, mount the ZyAIR high up free of obstructions.
9
ENGLISH
Free-standing
Place your ZyAIR on a flat, level surface (on a desk or shelf) that is strong enough to support the weight of the
ZyAIR with connection cables.
Wall-mounted
Follow the steps to attach your ZyAIR to a wall.
1 Locate a high position on the wall that is free of obstructions.
2 Connect two screws (not included) in the wall 60mm apart. You can use the diagram at the end of this
guide to help you mark the screw holes correctly. Use screws with 6mm ~ 8mm (0.24" ~ 0.31") wide heads.
Do not screw the screws all the way in to the wall. Leave a small gap between the head of the screw and
the wall. The gap must be big enough for the screw heads to slide into the screw slots and the connection
cables to run down the back of the ZyAIR.
Note: Make sure the screws are securely fixed to the wall and strong enough to hold the weight of the
ZyAIR with the connection cables.
3 Adjust the cables.
Run the connection cables down the back of the ZyAIR as shown in the following figure.
OR:
Run the connection cables upward and along the edge of the ceiling.
10
ENGLISH
4 Align the holes on the back
of the ZyAIR with the screws
on the wall. Hang the ZyAIR
on the screws.
5 Power over Ethernet (PoE)
Power over Ethernet (PoE) is the
ability to provide power to your ZyAIR
via an 8-pin CAT 5 Ethernet cable,
eliminating the need for a nearby
power source.
An injector or PoE device (not
included) is also needed to supply the
Ethernet cable with power. This
feature allows increased flexibility in
the locating of your ZyAIR.
6 Troubleshooting
Problem
Corrective Action
The PWR LED is off.
Make sure you are using the correct power adaptor and the power adaptor is plugged
into an appropriate power supply.
Unplug the power adaptor and plug it in again. If the error persists, you may have a
hardware problem. In this case, you should contact your vendor.
11
ENGLISH
Problem
Corrective Action
The ETHN LED is off.
Check the cable connection to the ZyAIR ETHERNET port. Make sure your computer’s
network card is working properly.
I cannot access the
web configurator.
Make sure the IP addresses and subnet masks of the ZyAIR and the computer are in
the same IP address range. (For example, if the ZyAIR is using the default IP address
and subnet mask, check that the IP address of the computer is in the range 192.168.1.3
~192.168.1.254 and the subnet mask is 255.255.255.0). Refer to the Set Up Your
Computer’s IP Address section.
If you changed the ZyAIR default IP address, then enter the new IP address as the web
site address.
The default password is “1234”. If you have changed the password and have now
forgotten it, you will need to reset the ZyAIR. Refer to the User’s Guide for how to use
the RESET button.
Make sure the ZyAIR is connected to the network.
Make sure you entered your username correctly. A username may be case-sensitive.
I cannot ping any
computer on the
wireless LAN.
If the ETHN LED is off, check the cables between the ZyAIR and your computer or hub.
Verify that the IP address and the subnet mask of the ZyAIR and the computers are in
the same range.
6.1 Procedure to View a Product’s Certification(s)
1 Go to www.zyxel.com.
2 Select your product from the drop-down list box on the ZyXEL home page to go to that product's page.
3 Select the certification you wish to view from this page.
12
DEUTSCH
DEUTSCH
Übersicht
Der ZyAIR G-3000H bietet eine sehr gute Sicherung Ihrer Verbindungen mit verkabelten Netzwerken mit Hilfe
von IEEE 802.1x, Wi-Fi Protected Access, WEP-Datenverschlüsselung und MAC-Adressenfiltern. In dieser
Kurzanleitung erfahren Sie, wie Sie den ZyAIR installieren und konfigurieren müssen, damit drahtlose Clients
auf das verkabelte Netzwerk zugreifen können. Weitere Informationen finden Sie im Benutzerhandbuch.
Im folgenden sind die notwendigen Schritte aufgeführt.
1. Anschließen der Hardware
4. Hardwareinstallation
2. Zugriff auf den Web-Konfigurator
5. Power over Ethernet (optional)
3. Einrichten des Internetzugriffs
6. Problembeseitigung
1 Anschließen der Hardware
Note: Bitte halten Sie die Daten für Ihren Internetzugang bereit
13
DEUTSCH
Wenn Sie das Gerät installieren, müssen Sie die
Hardwaregeräte folgendermaßen anschließen.
1 Verbinden Sie für die Erstkonfiguration den
ETHERNET-Anschluss mit einem Ethernet-Kabel mit
dem Computer.
2 Verbinden Sie die 12VDC-Netzanschlussbuchse
POWER das Gerät mit dem mitgelieferten
Netzadapter an das Stromnetz an.
Note: Wenn Sie die Erstkonfiguration ausgeführt
haben, verbinden Sie den ZyAIR ETHERNETAnschluss mit einem Ethernetanschluss.
1.1 Die LED-Anzeigen
Die LED-Anzeigen PWR und ZyAIR beginnen zu
leuchten, sobald das Gerät mit Strom versorgt wird. Die
LED-Anzeige ETHN beginnt zu leuchten, wenn der
ETHERNET-Anschluss richtig angeschlossen ist.
Eine genauere Beschreibung finden Sie im
Benutzerhandbuch in der Beschreibung der BedienfeldLEDs des ZyAIR.
2 Zugriff auf den Web-Konfigurator
Verwenden Sie den Internet Explorer 6.0 und neuere
Versionen oder den Netscape Navigator 7.0 und neuere
Versionen mit aktiviertem JavaScript.
14
DEUTSCH
2.1 Einrichten der IP-Adresse des Computers
In diesem Abschnitt wird beschrieben, wie Sie Ihrem Computer eine statische IP-Adresse im Bereich
192.168.1.2 bis 192.168.1.254 mit einer Subnetz-Mask von 255.255.255.0 zuweisen können. Nur auf diese
Weise kann Ihr Computer mit dem ZyAIR kommunizieren. Die folgende Beschreibung betrifft die
Betriebssysteme Windows 2000, Windows NT und Windows XP.
1 Klicken Sie bei Windows XP auf Start (Start), Control
Panel (Systemsteuerung).
Klicken Sie bei Windows 2000/NT auf Start (Start),
Settings (Einstellungen), Control Panel
(Systemsteuerung).
2 Klicken Sie bei Windows XP auf Network Connections
(Netzwerkverbindungen).
Klicken Sie bei Windows 2000/NT auf Network and Dialup Connections (Netzwerk und DFÜ-Verbindungen).
3 Klicken Sie mit der rechten Maustaste auf Local Area
Connection (LAN-Verbindung) und dann auf Porperties
(Eigenschaften).
4 Wählen Sie Internet Protocol (TCP/IP) (bei
Windows XP auf der Registerkarte General (Allgemein)
und klicken Sie auf Properties (Eigenschaften).
5 Auf dem Bildschirm erscheint das Dialogfeld Internet
Protocol TCP/IP Properties (Eigenschaften von
Internet Protocol TCP/IP) (bei Windows XP die
Registerkarte Allgemein).
6 Wählen Sie die Optoin Use the following IP address (Folgende IP-Adresse verwenden) und geben Sie
die IP address (IP-Adresse) ein (wählen Sie eine Adresse zwischen 192.168.1.3 und 192.168.1.254),
Subnet mask (Subnetz-Maske) (255.255.255.0) und ein Default gateway (Standard-Gateway)
(192.168.1.2) ein.
7 Klicken Sie auf OK, um das Fenster Eigenschaften von Internetprotokolle (TCP/IP) zu schließen.
8 Klicken Sie auf Schließen (bei Windows 2000/NT auf OK), um das Fenster Eigenschaften von LANVerbindung zu schließen.
Schließen Sie das Fenster Netzwerkverbindungen.
15
DEUTSCH
Note: Auch wenn Sie eine drahtlose Verbindung zum ZyAIR herstellen können, wird empfohlen, das
Gerät für die Erstkonfiguration über den ETHERNET-Anschluss an den Computer
anzuschließen.
1 Starten Sie Ihren Internetbrowser. Geben Sie als
Adresse 192.168.1.1 (die IP-Standardadresse
des ZyAIR) ein.
2 Klicken Sie auf Login (Einloggen) (das
Standardpasswort 1234 ist bereits vorgegeben).
3 Ändern Sie das Passwort, indem Sie ein neues
Passwort eingeben und auf Apply (Übernehmen)
klicken.
4 Klicken Sie auf Apply (Übernehmen), um mit der
MAC-Adresse des ZyAIR ein für dieses Gerät
spezifisches Zertifikat zu erzeugen. Wenn Sie das
Zertifikat jetzt nicht ändern möchten, klicken Sie
auf Ignore (Übergehen).
16
DEUTSCH
5 Klicken Sie im Fenster MAIN MENU (Hauptmenü) auf WIZARD SETUP (Setup mit Assistent) .
3 Einrichten des Internetzugriffs
Mit dem Setup-Assistenten können Drahtlosstationen mit dem ZyAIR auf das verkabelte LAN zugreifen.
Note: Klicken Sie zum Fortfahren im nächsten Fenster auf Next (Weiter) oder klicken Sie auf Back
(Zurück), um zum vorhergehenden Fenster zurückzukehren.
Wenn Sie auf Back (Zurück) klicken, werden Ihre Einstellungen nicht gespeichert.
17
DEUTSCH
1 Dieses Fenster ist optional. Sie können einfach auf Next (Weiter) klicken.
Der System Name (Systemname)
wird für die Identifikation des ZyAIR
benötigt. Geben Sie den Namen des
Computers "Computernme" ein
Domain Name(Domainname): Geben
Sie einen Domainnamen ein, wenn
der Internetdienstanbieter (ISP)
diesen für die Authentifizierung
benötigt. Anderenfalls können Sie
dieses Feld frei lassen oder die
Einträge beibehalten, die
automatisch vorgegeben wurden.
2 Das Wireless-LAN wird im zweiten Fenster des Assistenten eingerichtet.
Note: Die Wireless-Stations und der ZyAIR müssen für die drahtlose Kommunikation dieselbe SSID,
Channel-ID und dieselbe WEP-Verschlüsselung (wenn WEP aktiviert ist) verwenden.
Geben Sie einen Namen ein, mit dem
der ZyAIR im Wireless-Lan eindeutig
identifiziert wird.
Klicken Sie auf Scan (Suchen), damit
der ZyAIR automatisch einen Kanal
auswählen und diesen im Feld
Channel ID (Kanal-ID) anzeigen kann.
Wählen Sie für die Verschlüsselung
der Datenpakete die Optionen 64-bit
oder 128-bit, bevor sei über das
Drahtlosnetzwerk übertragen werden.
Wählen Sie Disable (Deaktivieren),
um die WEP-Datenverschlüsselung
auszuschalten.
Wählen Sie die für die Eingabe des
WEP-Schlüssels ASCII oder HEX und
führen Sie dann die Anweisungen auf
dem Bildschirm aus, um die WEPSchlüssel einzurichten.
Klicken Sie zum Fortfahren auf Next
(Weiter).
18
DEUTSCH
3 Füllen Sie die Felder im letzten Fenster des Konfigurationsassistenten aus.
Wenn Sie eine IP-Adresse haben,
wählen Sie die Option Use fixed IP
address (Feste IP-Adresse
verwenden) und geben Sie sie
zusammen mit der Subnetz-Maske und
der Gateway-IP-Adresse ein.
Klicken Sie auf Finish (Fertig stellen).
Note: Wenn Sie die IP-Adresse
des ZyAIR ändern, müssen
Sie beim nächsten Zugriff
auf den Web-Konfigurator
die neue IP-Adresse
verwenden.
4 Ändern Sie die Einstellungen der Drahtlosparameter der Wireless Stations, damit diese mit denen des
ZyAIR übereinstimmen. Lesen Sie dazu die Dokumentation des Drahtlosadapters.
Dieses ist das letzte Fenster des
Konfigurationsassistenten. Hier können
Sie zum Hauptmenü (MAIN MENU)
zurückkehren und die Konfiguration des
ZyAIR fortsetzen.
4 Hardwareinstallation
4.1 Anschließen der Antennen
Note: Wenn Sie die Vorderseite des ZyAIR vor sich haben, ist die rechte Antenne (Hauptantenne) die,
die Daten sendet und empfängt, und die linke Antenne, die Daten nur empfängt.
19
DEUTSCH
Führen Sie die nachfolgend beschriebenen Schritte aus, um die mitgelieferten Antennen anzuschließen.
1 Die Antennenanschlüsse befinden
sich an beiden Seiten des ZyAIR.
2 Schrauben Sie die Antennen im
Uhrzeigersinn in die
Antennenanschlüsse. Die Antennen
müssen senkrecht zum Boden und
parallel zueinander stehen.
Note: Stellen Sie sicher, dass die
Antennen fest in die
Anschlüsse eingeschraubt
sind.
4.2 Aufstellen/Montieren der Hardware
Im allgemeinen ist die Mitte des Bereichs, der für die Drahtlosverbindungen vorgesehen ist, die günstigste
Position für den Access Point. Eine bessere Leistungsfähigkeit kann erreicht werden, wenn Sie den ZyAIR in
der Höhe montieren und die Datenübertragung durch keine Hindernisse gestört wird.
Frei stehend
Stellen Sie den ZyAIR auf eine flache, ebene Unterlage (auf einen Tisch oder in ein Regal), den ZyAIR mit den
Anschlusskabeln tragen kann.
An einer Wand montiert
Führen Sei die nachfolgenden Schritte aus, um den ZyAIR an einer Wand zu montieren.
1 Verwenden Sie eine Stelle an einer Wand, die sehr hoch liegt und an der die Datenübertragung nicht durch
Hinernisse gestört werden kann.
2 Schrauben Sie zwei Schrauben (nicht mitgeliefert) in einem Abstand von 60 mm in die Wand. Sie können
die Zeichnung am Ende dieses Handbuchs verwenden, damit die Schraublöcher den richtigen Abstand
haben. Verwenden Sie Schrauben mit 6 - 8 mm breiten Köpfen (0,24 - 0,31"). Schrauben Sie die
Schrauben nicht vollständig in die Wand. Lassen Sie einen kleinen Abstand zwischen Schraubenkopf und
Wand. Der Abstand muss so groß sein, dass Sie das den ZyAIR, dessen Schraublöcher sich an der
Rückseite befinden, in den Schraubköpfen eingehängt werden kann.
Note: Stellen Sie sicher, dass die Schrauben fest in der Wand eingeschraubt und stark genug sind, um
das Gewicht des ZyAIR mit den Anschlusskabeln zu tragen.
3 Richten Sie die Kabel.
Führen Sie die Anschlusskabel entlang der Rückseite des ZyAIR (siehe Abbildung).
20
DEUTSCH
ODER:
Führen Sie die Anschlusskabel nach oben entlang der Decke.
4 Richten Sie die
Montagelöcher an der
Rückseite des ZyAIR an den
Schrauben in der Wand aus.
Hängen Sie den ZyAIR in die
Schrauben ein.
21
DEUTSCH
5 Power over Ethernet (PoE)
Power over Ethernet (PoE) ist die
Fähigkeit, den ZyAIR über ein 8poliges CAT 5 Ethernet-Kabel mit
Strom zu versorgen, sodass keine
zusätzliche Stromquelle benötigt wird.
Um das Ethernet-Kabel mit Strom zu
versorgen, wird zudem ein Einspeiseoder PoE-Gerät (nicht im
Lieferumfang enthalten) benötigt.
Dieses Leistungsmerkmal erhöht die
Flexibilität in der Positionswahl des
ZyAIR.
6 Problembeseitigung
Problem
Lösungsmöglichkeit
Die PWR-LED leuchtet Stellen Sie sicher, dass Sie den richtigen Netzadapter verwenden, und dass dieser
nicht.
richtig an einer geeigneten Netzsteckdose angeschlossen ist.
Trennen Sie den Netzadapter ab und schließen Sie ihn wieder an. Wenn der Fehler
weiterhin nicht behoben ist, besteht möglicherweise ein Problem mit der Hardware. In
diesem Fall sollten Sie sich an Ihren Händler wenden.
Die ETHN-LED
leuchtet nicht.
Prüfen Sie die Kabelverbindung am ETHERNET-Anschluss des ZyAIR. Stellen Sie
sicher, dass die Netzwerkkarte des Computers installiert ist und einwandfrei funktioniert.
Ich kann nicht auf den
Web-Konfigurator
zugreifen.
Stellen Sie sicher, dass sich die IP-Adresse und die Subnetz-Maske des ZyAIR und des
Computers im selben Bereich befinden. (Wenn z.B. der ZyAIR die Standard-IP-Adresse
und Standard-Subnetz-Maske verwendet, muss sich die IP-Adresse des Computers im
Bereich 192.168.1.3 bis 192.168.1.254 befinden und die Subnetz-Maske muss
255.255.255.0 sein). Lesen Sie nach im Abschnitt Einrichten der IP-Adresse des
Computers.
Wenn Sie die IP-Standardadresse des ZyAIR geändert haben, geben Sie die neue IPAdresse als Website-Adresse ein.
Das Standardkennwort ist "234". Wenn das Kennwort geändert wurde und Sie es
vergessen haben, muss der ZyAIR zurückgesetzt werden. Lesen Sie im
Benutzerhandbuch nach, wie die RESET-Taste verwendet wird.
Stellen Sie sicher, dass der ZyAIR an das Netzwerk angeschlossen ist.
Stellen Sie sicher, dass der Benutzername richtig eingegeben wurde. Achten Sie beim
Benutzernamen auf Groß- und Kleinschreibung.
22
DEUTSCH
Problem
Lösungsmöglichkeit
Ich kann im WirelessLAN keinen Compuer
anwählen.
Wenn die ETHN-LED nicht leuchtet, prüfen Sie die Kabelverbindung zwischen dem
ZyAIR, dem Computer und dem Hub.
Stellen Sie sicher, dass sich die IP-Adresse und Subnetz-Maske des ZyWALL und der
LAN-Computer im gleichen Adressbereich befinden.
6.1 Schritte zum Ansehen von Produktzertifizierung(en)
1 Besuchen Sie www.zyxel.com.
2 Wählen Sie auf der ZyXEL-Homepage aus der Liste der Produkte Ihr Produkt aus.
3 Wählen Sie auf dieser die Zertifizierung aus, die Sie gerne angezeigt haben möchten.
23
DEUTSCH
24
ESPAÑOL
ESPAÑOL
Vista previa
El ZyAIR G-3000H ofrece una conectividad inalámbrica de alta seguridad a su red con cables con IEEE
802.1x, Acceso protegido a Wi-Fi, cifrado de datos WEP y filtrado de dirección MAC. Esta Guía de inicio
rápido muestra cómo configurar el ZyAIR para permitir que clientes inalámbricos accedan a su red con
cables. Vea su Guía del usuario para más información.
A continuación se detalla lo que necesita hacer:
1. Conexiones del hardware
4. Instalación del hardware
2. Acceso al configurador Web
5. Corriente sobre Ethernet (opcional)
3. Configuración del acceso a Internet
6. Solución de problemas
1 Conexiones del hardware
Nota: Puede que necesite su acceso a Internet para más información.
25
ESPAÑOL
Realice lo siguiente para crear conexiones de hardware
para la configuración inicial.
1 Con un cable Ethernet, conecte el puerto
ETHERNET a un ordenador para la configuración
inicial.
2 Conecte el zócalo POWER 12VDC a una toma de
corriente utilizando únicamente el adaptador de
corriente incluido para su región.
Nota: Conecte el puerto ETHERNET del ZyAIR a
una clavija Ethernet con acceso a Internet tras
haber completado la configuración inicial.
1.1 Los LEDs
Los LEDs PWR y ZyAIR se encienden cuando la
corriente está conectada. El LED ETHN se enciende si
el puerto ETHERNET está correctamente conectado.
Vea la tabla Descripción de los LEDs del panel frontal
del ZyAIR en la Guía del usuario para más información.
2 Acceder al configurador Web
Utilice Internet Explorer 6.0 o superior o Netscape
Navigator 7.0 o una versión superior con JavaScript
activado.
26
ESPAÑOL
2.1 Configurar la dirección IP de su ordenador
Esta sección muestra cómo asignar a su ordenador una dirección IP estática en el rango 192.168.1.2 a
192.168.1.254 con una máscara de subred 255.255.255.0. Esto asegura que su ordenador pueda conectarse
con su ZyAIR. Las siguientes instrucciones sirven para los sistemas operativos Windows 2000, Windows NT
y Windows XP.
1 En Windows XP, haga clic en Start (Inicio), Control
Panel (Panel de control).
En Windows 2000/NT, haga clic en Start (Inicio), Settings
(Configuración), Control Panel (Panel de control).
2 En Windows XP, haga clic en Network Connections
(Conexiones de red).
En Windows 2000/NT, haga clic en Network and Dial-up
Connections (Conexiones de red y marcación).
3 Haga clic con el botón derecho en Local Area
Conexion (Conexión de área local) y haga clic en
Properties (Propiedades).
4 Seleccione PInternet Protocol (Protocolo Internet)
(TCP/IP) (en la ficha General (General) en Windows
XP) y haga clic en Properties (Propiedades).
5 La pantalla Propiedades de Protocolo Internet TCP/IP
se abrirá (ficha General en Windows XP).
6 Seleccione Usar la siguiente dirección IP y rellene los
campos Dirección IP (elija una de 192.168.1.3 a
192.168.1.254), Máscara de subred (255.255.255.0) y
Puerta de enlace predeterminada (192.168.1.2).
7 Haga clic en Aceptar para cerrar la ventana Propiedades de Protocolo Internet (TCP/IP).
8 Haga clic en Cerrar (Aceptar en Windows 2000/NT) para cerrar la ventana Propiedades de conexión de
área local.
Cierre la pantalla Conexiones de red.
27
ESPAÑOL
Nota: Aunque puede conectarse con el ZyAIR de forma inalámbrica, se recomienda que conecte el
ordenador al puerto ETHERNET para la configuración inicial.
1 Abra su explorador de web. Introduzca
192.168.1.2 (la dirección IP predeterminada del
ZyAIR) como dirección.
2 Haga clic en Login (Acceso) (la contraseña
predeterminada es 1234 ya está introducida).
3 Cambie la contraseña de acceso introduciendo
una nueva contraseña y haciendo clic en Apply
(aplicar).
4 Haga clic en Apply (Aplicar) para crear un
certificado usando la dirección MAC de su ZyAIR
que será específica para este dispositivo; o bien,
haga clic en Ignore (Ignorar) para proceder si no
desea cambiar el certificado en este momento.
28
ESPAÑOL
5 Haga clic en WIZARD SETUP (ASISTENTE PARA LA CONFIGURACIÓN) en la pantalla MAIN MENU
(MENÚ PRINCIPAL).
3 Configuración del acceso a Internet
Utilice el asistente para la configuración para configurar su ZyAIR para estaciones inalámbricas para acceder
a su LAN con cables.
Nota: Haga clic en Next (Siguiente) en cada pantalla para continuar o haga clic en Back (Atrás) para
regresar a la pantalla anterior.
Su configuración no se grabará cuando haga clic en Back (atrás).
29
ESPAÑOL
1 Esta pantalla es opcional. Puede hacer clic en Next (Siguiente).
System Name (Nombre del
sistema) es para identificar el
ZyAIR. Puede escribir el "Computer
Name" (Nombre de ordenador) de
su ordenador.
Domain Name (Nombre de
dominio): Escriba un nombre de
dominio si su ISP requiere uno para la
autenticación; de lo contrario, puede
dejarlo en blanco o ajustarlo a lo que
haya aparecido automáticamente.
2 Utilice la segunda pantalla del asistente para configurar la LAN inalámbrica.
Nota: Las estaciones inalámbricas y el ZyAIR deben usar el mismo SSID, identificador de canal y clave
de cifrado WEP (si WEP está activado) para la comunicación inalámbrica.
Introduzca un nombre descriptivo para
identificar a el ZyAIR en la LAN
inalámbrica.
Haga clic en Scan (Buscar) para que
el ZyAIR seleccione automáticamente
un canal y mostrarlo en el campo
Channel ID (Identificador de canal).
Seleccione 64-bit o 128-bit para cifrar
los cuadros de datos antes de
transmitirlos sobre la red inalámbrica.
Seleccione Disable (Deshabilitar)
para apagar el cifrado de datos WEP.
Seleccione el método de entrada de
clave WEP ASCII o HEX y siga las
instrucciones en pantalla para
configurar las claves WEP.
Haga clic en Next (Siguiente) para
continuar.
30
ESPAÑOL
3 Rellene los campos en la última pantalla del asistente para la configuración.
Si tiene una dirección IP para usar,
seleccione Use fixed IP address
(Utilizar dirección IP fija) e
introdúzcala junto con su máscara de
subred y puerta de enlace IP.
Haga clic en Finalizar.
Nota: Si cambia la dirección IP del
ZyAIR, deberá usar la nueva
dirección IP si desea
acceder al configurador web
de nuevo.
4 Cambie la configuración de los parámetros inalámbricos en las estaciones inalámbricas para que
coincidan con los del ZyAIR. Consulte la documentación de su adaptador inalámbrico.
Esta es la última pantalla del asistente.
Puede regresar al MAIN MENU (MENÚ
PRINCIPAL) y continuar la
configuración de su ZyAIR.
4 Instalación del hardware
4.1 Conectar las antenas
Nota: Si mira frontalmente al ZyAIR, la antena derecha (antena principal) transmite y recibe, la antena
izquierda sólo recibe.
31
ESPAÑOL
Siga estos pasos para conectar las antenas incluidas.
1 Localice los conectores de la
antena en los laterales de su
ZyAIR.
2 Atornille las antenas en sentido
horario en los conectores para
antenas. Las antenas deberían
estar perpendiculares al suelo y
paralelas entre ellas.
Nota: Asegúrese de que las antenas
estén bien atornilladas en los
conectores para antena.
4.2 Instalación del montaje para hardware
En general, la mejor ubicación para el punto de acceso es en el centro del área de cobertura. Para un mejor
rendimiento, monte el ZyAIR hacia arriba sin obstrucciones.
Libre y de pie
Coloque su ZyAIR en una superficie plana, nivelada (en una mesa o estante) lo suficientemente fuerte como
para soportar el peso del ZyAIR con sus cables de conexión.
Montaje en pared
Siga estos pasos para montar su ZyAIR en una pared.
1 Localice una posición alta en la pared libre de obstáculos.
2 Conecte dos tornillos (no incluidos) en la pared separados por 60mm. Puede usar el diagrama al final de
esta guía para ayudarle a marcar los agujeros de los tornillos correctamente. Use los tornillos con cabezas
de 6mm a 8mm (0.24" a 0.31") de ancho. No inserte los tornillos hasta el fondo en la pared. Deje un
pequeño espacio entre la cabeza del tornillo y la pared. El hueco debe ser lo suficientemente grande para
que las cabezas de los tornillos puedan entrar en las ranuras de los tornillos y los cables de conexión
quepan a través de la parte posterior del ZyAIR.
Nota: Compruebe que los tornillos estén bien fijos en la pared y sean lo suficientemente fuertes como
para soportar el peso del ZyAIR con los cables de conexión.
3 Ajuste los cables.
Pase los cables de conexión por la parte posterior del ZyAIR hacia abajo como aparece en la siguiente figura.
O:
32
ESPAÑOL
Pase los cables de conexión por la parte posterior hacia arriba o por el borde del techo.
4 Alinee los agujeros en la
parte posterior del ZyAIR
con los tornillos en la pared.
Cuelgue el ZyAIR con los
tornillos.
33
ESPAÑOL
5 Corriente sobre Ethernet (PoE)
La Corriente sobre Ethernet (PoE) es
la capacidad de suministrar
alimentación a su ZyAIR a través de
un cable Ethernet CAT 5 de 8
contactos, eliminando la necesidad
de una toma de corriente cercana.
También necesitará un dispositivo
inyector o PoE (no incluido) para
suministrar corriente al cable
Ethernet. Esta característica permite
una mayor flexibilidad para la
ubicación de su ZyAIR.
6 Solución de problemas
Problema
Solución
El LED PWR está
apagado.
Compruebe si utiliza el adaptador de corriente correcto y si el adaptador de corriente
está correctamente enchufado en una toma de corriente.
Desenchufe el adaptador de corriente y vuelva a enchufarlo. Si el error persiste, puede
que tenga un problema de hardware. En este caso, debería contactar con su vendedor.
El LED ETHN está
apagado.
Compruebe el cable de conexión al puerto ETHERNET del ZyAIR. Compruebe si la
tarjeta de red de su ordenador funciona correctamente.
No puedo acceder al
configurador web.
Compruebe si las direcciones IP y máscaras de subred del ZyAIR y del ordenador
están en el mismo rango de dirección IP. (Por ejemplo, si el ZyAIR está utilizando la
dirección IP y máscara de subred predeterminadas, compruebe si la dirección IP del
ordenador está en el rango 192.168.1.3 a 192.168.1.254 y la máscara de subred es
255.255.255.0). Consulte la sección Configurar la dirección IP de su ordenador.
Si ha cambiado la dirección IP predeterminada del ZyAIR, introduzca la nueva dirección
IP como dirección de sitio web.
La contraseña predeterminada es "234" Si ha cambiado la contraseña y la ha olvidado,
necesitará reiniciar el ZyAIR. Consulte la Guía del usuario para saber cómo usar el
botón RESET (REINICIAR).
Asegúrese de que el ZyAIR esté conectado a la red.
Asegúrese de haber introducido su nombre de usuario correctamente. Un nombre de
usuario puede diferenciar entre mayúsculas y minúsculas.
34
ESPAÑOL
Problema
Solución
No puedo realizar un
ping a otro ordenador
en la LAN inalámbrica.
Si el LED ETHN está apagado, compruebe los cables en el ZyAIR y en su ordenador o
hub.
Verifique si la dirección IP y la máscara de subred del ZyAIR y de los ordenadores
están en el mismo rango.
6.1 Procedimiento para ver la(s) certificación(es) del producto
1 Vaya a www.zyxel.com.
2 Seleccione su producto de la lista desplegable en la página inicial de ZyXEL para ir a la página de ese
producto.
3 Seleccione la certificación que desee visualizar en esta página.
35
ESPAÑOL
36
FRANÇAIS
FRANÇAIS
Présentation
Le ZyAIR G-3000H offre une connectivité sans fil hautement sécurisée à votre réseau câblé avec IEEE
802.1x, WPA (Wi-Fi Protected Access), cryptage de données WEP et filtrage d’adresse MAC. Ce guide
d'installation indique comment installer et configurer le ZyAIR pour permettre aux clients sans fil d’accéder à
votre réseau câblé. Consultez votre Guide de l'utilisateur pour plus d'informations.
Voici la liste de ce que vous devez faire :
1. Connexions matérielles
4. Installation matérielle
2. Accéder au configurateur Web
5. PoE (Alimentation électrique par câble Ethernet) (optionnel)
3. Installation de l'accès à Internet
6. Dépannage
1 Connexions matérielles
Note: Vous aurez peut-être besoin de vos informations d'accès à Internet.
37
FRANÇAIS
Procédez comme suit pour effectuer les connexions
matérielles pour l'installation initiale.
1 Utiliser un câble Ethernet, connecter le port
ETHERNET à un ordinateur pour la configuration
initiale.
2 Connectez la prise d’alimentation 12VDC à une
source de courant en utilisant uniquement
l’adaptateur d’alimentation inclus pour votre région.
Note: Connectez le port ETHERNET du ZyAIR à
une prise Ethernet avec accès à Internet
après avoir terminé la configuration initiale.
1.1 Les LED
Les LED PWR et ZyAIR s’allument quand l’alimentation
est connectée. La LED ETHN s'allume si le port
ETHERNET est correctement connecté.
Voir le tableau de description des LED du panneau
avant du ZyAIR dans le Guide de l’utilisateur pour plus
d’informations.
2 Accéder au configurateur Web
Utilisez Internet Explorer 6.0 et plus récent ou Netscape
Navigator 7.0 et les versions plus récentes avec
JavaScript activé.
38
FRANÇAIS
2.1 Paramétrez l'adresse IP de votre ordinateur
Cette section vous indique comment attribuer une adresse IP statique à votre ordinateur dans la plage
192.168.1.2 à 192.168.1.254 avec un masque de sous-réseau de 255.255.255.0. Cela assure que votre
ordinateur peut communiquer avec votre ZyAIR. Les instructions suivantes concernent les systèmes
d’exploitation Windows 2000, Windows NT et Windows XP.
1 Dans Windows XP, cliquez sur Démarrer, Panneau de
configuration.
Dans Windows 2000/NT, cliquez sur Démarrer,
Paramètres, Panneau de configuration.
2 Dans Windows XP, cliquez sur Connexions réseau.
Dans Windows 2000/NT, cliquez sur Connexions réseau
et accès à distance.
3 Cliquez avec le bouton droit de la souris sur Connexion
de réseau local et cliquez sur Propriétés.
4 Sélectionnez Protocole Internet (TCP/IP) (dans l'onglet
Général dans Windows XP) et cliquez sur Propriétés.
5 L'écran Propriétés TCP/IP de Protocole Internet
s'ouvre l'onglet Général dans Windows XP.
6 Sélectionnez Utiliser l’adresse IP suivante et
remplissez les champs Adresse IP (choisissez en une
entre 192.168.1.3 et 192.168.1.254), Masque de sousréseau (255.255.255.0), et Passerelle par défaut
(192.168.1.2).
7 Cliquez sur OK pour fermer la fenêtre de Propriétés de
protocole (TCP/IP) Internet.
8 Cliquez sur Fermer (OK dans Windows 2000/NT) pour fermer la fenêtre de Propriétés de connexion au
réseau local.
Fermez l'écran de Connexion réseau.
39
FRANÇAIS
Note: Même si vous pouvez vous connecter au ZyAIR sans fil, il est recommandé de connecter votre
ordinateur au port ETHERNET pour la configuration initiale.
1 Lancez votre navigateur web. Entrez 192.168.1.2
(l'adresse IP par défaut du ZyAIR) comme
adresse.
2 Cliquez sur Ouverture de session (le mot de
passe par défaut 1234 est déjà entré).
3 Changez le mot de passe d'ouverture de session
en entrant un nouveau mot de passe et cliquez sur
Appliquer.
4 Cliquez sur Appliquer pour créer un certificat à
l'aide de l'adresse MAC de votre ZyAIR qui sera
spécifique à ce matériel ; vous pouvez aussi
cliquer sur Ignorer pour continuer si vous ne
voulez pas changer le certificat maintenant.
40
FRANÇAIS
5 Cliquez sur ASSISTANT D’INSTALLATION dans l’écran MENU PRINCIPAL.
3 Installation de l'accès à Internet
Utilisez l’assistant d’installation pour configurer votre ZyAIR pour permettre aux stations sans fil d’accéder à
votre LAN câblé.
Note: Cliquez sur Suivant dans chaque écran pour continuer ou cliquez sur Retour pour retourner à
l’écran précédent.
Vos paramètres ne sont pas enregistrés quand vous cliquez sur Retour.
1 Cet écran est optionnel. Cliquez simplement sur Suivant.
Le nom du système sert à identifier
le ZyAIR. Vous pouvez saisir le
"Nom d'ordinateur" de votre
ordinateur.
Nom de domaine : Entrez un nom
de domaine si votre ISP en demande
un pour l’authentification ; autrement
vous pouvez laisser le champ vide ou
le paramétrer avec ce qui est affiché
automatiquement.
41
FRANÇAIS
2 Utilisez le second écran de l’assistant pour installer le LAN sans fil.
Note: Les stations sans fil et ZyAIR doivent utiliser le même SSID, ID de canal et clé de cryptage WEP
(si WEP est activé) pour la communication sans fil.
Saisissez un nom descriptif pour
identifier le ZyAIR dans le LAN sans fil.
Cliquez sur Balayer pour que le ZyAIR
sélectionne automatiquement un canal
et l’affiche dans le champ ID de Canal.
Sélectionnez 64 bits ou 128 bits pour
crypter les trames de données avant
de les transmettre par le réseau sans
fil.
Sélectionnez Désactiver pour
désactiver le cryptage de données
WEP.
Sélectionnez la méthode d’entrée de
clé WEP ASCII ou HEX et suivez
ensuite les instructions à l’écran pour
installer les clés WEP.
Cliquez sur Suivant pour continuer.
3 Remplissez les champs dans le dernier écran de configuration de l’assistant.
Si vous avez une adresse IP à utiliser,
sélectionnez Utiliser une adresse IP
fixe et entrez-la avec le masque de
sous-réseau et l’adresse IP de
passerelle.
Cliquez sur Terminer.
Note: Si vous changez l’adresse IP
du ZyAIR, vous devez
utiliser la nouvelle adresse
IP si vous voulez accéder à
nouveau au configurateur
web.
42
FRANÇAIS
4 Changez les paramètres sans fil dans les stations sans fil pour qu’ils correspondent à ceux du ZyAIR.
Consultez la documentation de votre adaptateur sans fil.
Ceci est l’écran final de l’assistant. Vous
pouvez retourner au MENU PRINCIPAL
et continuer à configurer votre ZyAIR.
4 Installation matérielle
4.1 Connecter les antennes
Note: Quand vous faites face à l’avant du ZyAIR, l’antenne de droite (antenne principale) transmet et
reçoit, l’antenne de gauche reçoit seulement.
Suivez les étapes ci-dessous pour connecter les antennes fournies.
1 Localisez les connecteurs des
antennes sur les côtés de votre
ZyAIR.
2 Vissez les antennes dans le sens
des aiguilles d’une montre sur les
connecteurs de l’antenne. Les
antennes doivent être
perpendiculaires au sol et parallèles
entre elles.
Note: Vérifiez que les antennes sont
correctement vissées sur les
connecteurs d’antenne.
4.2 Installation de montage matériel
En général, le meilleur emplacement pour le point d’accès est au centre de votre zone de couverture sans fil.
Pour obtenir de meilleures performances, montez le ZyAIR sur un point élevé et sans obstructions.
43
FRANÇAIS
Auto-stable
Placez votre ZyAIR sur une surface plane, de niveau (sur un bureau ou une étagère) assez solide pour
supporter le poids du ZyAIR avec les câbles de connexion.
Montage mural
Suivez les étapes suivantes pour fixer votre ZyAIR à un mur.
1 Repérez une position élevée sur le mur ne comportant pas d’obstructions.
2 Connectez deux vis (non fournies) dans le mur à 60mm l’une de l’autre. Vous pouvez utiliser le schéma à
la fin de ce guide pour vous aider à marquer correctement les trous de vis. Utilisez des vis de 6mm ~ 8mm
(0,24" ~ 0,31") à grande tête. Ne vissez pas les vis sur toute leur longueur dans le mur. Laissez un petit
espace entre la tête de la vis et le mur. L’espace doit être assez grand pour permettre aux têtes de vis de
glissez dans les logements de vis et faire passer les câbles de connexion vers le bas au dos du ZyAIR.
Note: Vérifiez que les vis sont correctement fixées au mur et assez solides pour supporter le poids du
ZyAIR avec les câbles de connexion.
3 Ajustez les câbles.
Faites passer les câbles de connexion derrière le dos du ZyAIR comme indiqué dans la figure suivante.
OU :
Faites passer les câbles de connexion vers le haut et le long du bord du plafond.
44
FRANÇAIS
4 Alignez les trous au dos du
ZyAIR avec les vis sur le
mur. Suspendez le ZyAIR
aux vis.
5 PoE (Alimentation électrique par câble Ethernet)
PoE (Power over Ethernet) est la
possibilité de fournir l’alimentation à
votre ZyAIR via un câble Ethernet
CAT 5 8 broches, éliminant la
nécessité d’une prise courant proche.
Un injecteur ou matériel PoE (non
fourni) est aussi requis pour fournir le
câble Ethernet avec l’alimentation.
Cette fonctionnalité augmente aussi
la flexibilité dans l’emplacement de
votre ZyAIR.
45
FRANÇAIS
6 Dépannage
Problème
Action corrective
La LED PWR est
éteinte.
Vérifiez que vous utilisez correctement l'adaptateur d'alimentation et que l’adaptateur
d’alimentation est branché dans une prise de courant appropriée.
Débranchez l’adaptateur d’alimentation et rebranchez-le. Si l'erreur persiste, il est
possible que vous ayez un problème matériel. Dans ce cas, vous devez contacter votre
vendeur.
La LED ETHN est
éteinte.
Vérifiez la connexion par câble au port ETHERNET du ZyAIR. Vérifiez que la carte
réseau de votre ordinateur fonctionne correctement.
Je ne peux pas
accéder au
configurateur web.
Vérifiez que les adresses IP et les masques de sous-réseau du ZyAIR et de l’ordinateur
sont dans la même plage d’adresse IP.. (Par exemple, si le ZyAIR utilise l’adresse IP et
le masque de sous-réseau par défaut, vérifiez que l’adresse IP de l’ordinateur est dans
la plage 192.168.1.3 ~192.168.1.254 et que le masque de sous-réseau est
255.255.255.0). Reportez-vous à la section Paramétrez l’adresse IP de votre
ordinateur.
Si vous avez changé l’adresse IP par défaut de votre ZyAIR, alors entrez la nouvelle
adresse IP comme adresse du site web.
Le mot de passe par défaut est 1234. Si vous avez changé le mot de passe et que vous
l’avez oublié, vous devrez réinitialiser le ZyAIR. Reportez-vous au Guide de l’utilisateur
pour la manière d’utiliser le bouton RÉINITIALISER.
Vérifiez que le ZyAIR est connecté au réseau.
Vérifiez que vous avez entré correctement votre nom d’utilisateur. Respectez la casse
pour le nom d'utilisateur.
Je ne peux pas
envoyer de ping aux
autres ordinateurs sur
le LAN sans fil.
Si la LED ETHN est éteinte, vérifiez que les câbles entre le ZyAIR et votre ordinateur ou
hub.
Vérifiez que l'adresse IP et le masque de sous-réseau du ZyAIR et de l'ordinateur sont
dans la même plage.
6.1 Procédure pour afficher la (les) certification(s) d'un produit
1 Allez à www.zyxel.com.
2 Sélectionner votre produit sur la liste du menu déroulant de la page d'accueil de ZyXEL pour accéder à la
page de ce produit.
3 Sélectionnez la certification que vous désirez consulter dans cette page.
46
ITALIANO
ITALIANO
Cenni generali
ZyAIR G-3000H consente una connettività wireless ad alta protezione per la rete collegata per mezzo di IEEE
802.1x, accesso Wi-Fi protetto, codifica dati WEP e filtro indirizzi MAC. La presente guida introduttiva fornisce
informazioni sull’impostazione e la configurazione di ZyAIR al fine di consentire ai client wireless di accedere
alla rete. Consultare la propria Guida utente per ulteriori informazioni. Consultare la propria Guida utente per
ulteriori informazioni.
L'elenco che segue riporta le operazioni da eseguire.
1. Collegamenti hardware
4. Installazione Hardware
2. Accesso allo strumento di
configurazione Web
5. Power over Ethernet (opzionale)
3. Configurazione dell'accesso a Internet 6. Risoluzione dei problemi
1 Collegamenti hardware
Note: È possibile che occorra reperire le informazioni sul proprio accesso a Internet.
47
ITALIANO
Di seguito sono illustrati i collegamenti hardware per
l'installazione iniziale.
1 Per mezzo di un cavo Ethernet, collegare la porta
ETHERNET ad un computer per la configurazione
iniziale.
2 Collegare la presa POWER 12VDC ad una fonte di
alimentazione utilizzando esclusivamente il
trasformatore in dotazione per la propria regione.
Note: collegare la porta ETHERNET ZyAIR ad uno
spinotto Ethernet con accesso ad Internet
dopo aver completato la configurazione
iniziale.
1.1 Indicatori LED
Quando viene collegata l’alimentazione i LED PWR
ZyAIR si accendono. Il LED ETHN si accende solo se la
porta ETHERNET è correttamente collegata.
Per ulteriori informazioni, consultare la tabella di
descrizione dei LED del pannello anteriore ZyAIR.
2 Accesso allo strumento di
configurazione Web
Utilizzare Internet Explorer 6.0 o versione successiva
oppure Netscape Navigator 7.0 o versione successiva
con JavaScript abilitato.
48
ITALIANO
2.1 Impostare l'indirizzo IP del computer
Questa sezione mostra come assegnare al computer un indirizzo IP statico nell’intervallo tra 192.168.1.2 e
192.168.1.254 con un subnet mask di 255.255.255.0. In questo modo ci si assicura che il computer possa
comunicare con lo ZyAIR. Le seguenti istruzioni riguardano i sistemi operativi Windows 2000, Windows NT e
Windows XP.
1 In Windows XP, fare clic su Start, Pannello di controllo.
In Windows 2000/NT, fare clic su Start, Impostazioni,
Pannello di controllo.
2 In Windows XP, fare clic su Connessioni di rete.
In Windows 2000/NT, fare clic su Reti e connessioni
remote.
3 Fare clic con il pulsante destro del mouse su
Connessione alla rete locale e scegliere Proprietà.
4 Selezionare Protocollo Internet (TCP/IP) (sotto la
scheda Generale in Windows XP) e fare clic su
Proprietà.
5 Viene aperta la schermataProprietà – Protocollo
Internet (la scheda Generale in Windows XP).
6 Selezionare Utilizza il seguente indirizzo IP e inserire i
dati nel campo Indirizzo IP (sceglierne uno da
192.168.1.3 a 192.168.1.254), Subnet mask
(255.255.255.0), e Gateway predefinito (192.168.1.2).
7 Fare clic su OK per chiudere la finestra Protocollo
Internet (TCP/IP) - Proprietà.
8 Fare clic su Chiudi (OK in Windows 2000/NT) per chiudere la finestra Connessione alla rete locale Proprietà.
Chiudere la schermata Connessioni di rete.
49
ITALIANO
Note: sebbene sia possibile eseguire il collegamento a ZyAIR in modalità wireless, si consiglia di
collegare il computer alla porta ETHERNET per la configurazione iniziale.
1 Avviare il browser. Immettere 192.168.1.2
(l'indirizzo IP predefinito dello ZyWALL) nella
barra dell'indirizzo.
2 Fare clic su Login (accedi)(la password
predefinita 1234 è già immessa).
3 Cambiare la password di accesso immettendo una
nuova password e facendo clic su Apply
(applica).
4 Fare clic su Apply (applica) per creare un
certificato utilizzando l’indirizzo MAC ZyAIR che
diventerà specifico per il dispositivo; altrimenti fare
clic su Ignore (ignora) per continuare se non si
desidera modificare il certificato in questo
momento.
50
ITALIANO
5 Fare clic su WIZARD SETUP (procedura guidata di installazione) nella schermata MAIN MENU (menu
principale).
3 Configurazione dell'accesso a Internet
Utilizzare la procedura guidata di installazione per configurare ZyAIR al fine di consentire alle stazioni
wireless l’accesso alla LAN.
Note: Fare clic su Next (successivo) in ogni schermata per continuare oppure fare clic su Back
(indietro) per tornare alla schermata precedente.
Le impostazioni non vengono salvate quando si fa clic su Back (Indietro).
51
ITALIANO
1 Questa schermata è opzionale. È unicamente possibile fare clic su Next (avanti).
System Name (nome di sistema)
consente di indentificare il Prestige. È
possibile immettere il "Nome
computer" del proprio PC.
Domain Name (nome dominio):
immettere un nome di dominio se il
proprio fornitore di accesso ad
Internet ne richiede uno per
l’autenticazione,altrimenti è possibile
lasciarlo vuoto o lasciare
l’impostazione predefinita.
2 altrimenti è possibile lasciarlo vuoto o lasciare l’impostazione predefinita.
Note: Le stazioni wireless e ZyAIR devono utilizzare i medesimi SSID, ID canale e chiave di codifica
WEP (se WEP è abilitato) per la comunicazione wireless.
Immettere un nome univoco per
identificare il Prestige nella LAN
wireless.
Fare clic su Scan (scansione) per
consentire la selezione automatica di
un canale da parte di ZyAIR e
visualizzarlo nel Channel ID (ID
canale).
Selezionare 64-bit o 128-bit per la
codifica dei pacchetti di dati prima della
trasmissione sulla rete wireless.
Selezionare Disable (disabilita) per
disattivare la codifica dati WEP.
Selezionare il metodo di immissione
della chiave WEP ASCII o HEX e
seguire le istruzioni riportate sullo
schermo per impostare le chiavi WEP.
Fare clic su Next (successivo) per
continuare.
52
ITALIANO
3 Riempire i campi nell’ultima schermata di configurazione guidata.
Se si dispone di un indirizzo IP da
utilizzare, selezionare Use fixed IP
address (utilizza indirizzo IP fisso) e
specificarlo unitamente al subnet mask
e all’indirizzo IP gateway.
Fare clic su Fine.
Note: se si modifica l’indirizzo IP di
ZyAIR, è necessario
utilizzare il nuovo indirizzo IP
per accedere nuovamente
all’utilità di configurazione
Web (Web configurator).
4 Modificare i parametri wireless nelle stazioni wireless per farle corrispondere a quelle di ZyAIR. Fare
riferimento alla documentazione dell’adattatore wireless.
Questa è l’ultima schermata della
procedura guidata. È possibile tornare al
MAIN MENU (menu principale) e
continuare a configurare ZyAIR.
4 Installazione hardware
4.1 Collegamento delle antenne
Note: Rivolgendosi di fronte a ZyAIR, l’antenna destra (antenna principale) trasmette e riceve,
l’antenna sinistra riceve solamente.
53
ITALIANO
Seguire le istruzioni presentate di seguito per eseguire il collegamento alle antenne in dotazione.
1 Individuare le prese delle antenne
presso i lati di ZyAIR.
2 Individuare le prese delle antenne
presso i lati di ZyAIR. Le antenne
devono essere perpendicolari al
suolo e parallele una con l’altra.
Note: assicurarsi che le antenne
siano accuratamente serrate
sulle apposite prese.
4.2 Montaggio dell’hardware
In generale, la posizione migliore per il punto di accesso è al centro dell’area di copertura wireless. Per
prestazioni ottimali, montare il dispositivo ZyAIR in posizione soprelevata, senza ostacoli. Per prestazioni
ottimali, montare il dispositivo ZyAIR in posizione soprelevata, senza ostacoli.
Posizione libera
Posizionare il dispositivo ZyAIR su una superficie piana e stabile (una scrivania o una mensola), forte
abbastanza da sostenere il peso del dispositivo con i cavi di connessione.
Montaggio a muro
Seguire i seguenti punti per applicare ZyAIR ad una parete.
1 Individuare una posizione elevata sul muro che sia esente da ostacoli.
2 Inserire due viti (non in dotazione) nella parete a 60mm si distanza. È possibile utilizzare lo schema al
termine della presente guida per facilitare il contrassegno dei fori delle viti. Usare viti con testa da 6mm ~
8mm. Non serrare le viti fino in fondo nella parete. Lasciare un piccolo spazio tra la testa della vite e il
muro. Lo spazio deve essere abbastanza grande da consentire alle teste delle viti di scorrere nelle
apposite fessure e ai cavi di connessione di scorrere lungo la parte posteriore di ZyAIR.
Note: assicurarsi che le viti siano saldamente fissate alla parete e che siano abbastanza robuste per
sostenere il peso di ZyAIR con i cavi di collegamento.
3 Regolare i cavi.
Far scorrere i cavi di collegamento lungo la parte posteriore di ZyAIR come mostrato nella figura seguente.
oppure
54
ITALIANO
far scorrere i cavi di collegamento verso l’alto e lungo il bordo della parte superiore.
4 Allineare i fori presso la parte
posteriore di ZyAIR con le
viti sulla parete. Appendere
ZyAIR sulle viti.
55
ITALIANO
5 Power over Ethernet (PoE)
Power over Ethernet (PoE) consente
di fornire elettricità a ZyAIR per
mezzo di un cavo Ethernet CAT 5 a 8
poli, eliminando la necessità di
disporre di una sorgente di
alimentazione nelle vicinanze.
Un iniettore o un dispositivo PoE (non
in dotazione) è necessario per fornire
corrente al cavo Ethernet. Questa
funzionalità consente una maggiore
flessibilità per il posizionamento del
dispositivo ZyAIR.
6 Risoluzione dei problemi
Problema
Azione correttiva
Il LED PWR è spento.
Assicurarsi di utilizzare l’alimentatore corretto e che l’alimentatore sia collegato ad una
presa di corrente attiva.
Scollegare l’alimentatore e ricollegarlo. Se l'errore persiste, è possibile che vi sia un
problema hardware. In questo caso, è opportuno rivolgersi al rivenditore locale.
Il LED ETHN è spento. Controllare il collegamento del cavo alla porta ETHERNET ZyAIR. Verificare che la
scheda di rete del computer sia correttamente funzionante.
Impossibile accedere al Verificare che gli indirizzi IP e i subnet mask di ZyAIR e del computer siano nel
Web configurator
medesimo intervallo di indirizzi IP. Per esempio, se ZyAIR sta utilizzando l’indirizzo IP e
(configurazione Web). la subnet mask predefinita, verificare che l’indirizzo IP del computer sia nell’intervallo
192.168.1.3 ~192.168.1.254 e la subnet mask sia 255.255.255.0). Fare riferimento alla
sezione relativa all’impostazione dell’indirizzo IP del computer.
Se l’indirizzo IP ZyAIR predefinito è stato modificato, immettere il nuovo indirizzo IP
quale indirizzo del sito Web.
La password predefinita è 1234. Se è stata modificata la password ed è stata
dimenticata, è necessario reimpostare il dispositivo ZyAIR. Fare riferimento alla Guida
utente per informazioni sull’uso del pulsante RESET.
Assicurarsi che ZyAIR sia collegato alla rete.
Assicurarsi di avere immesso il nome utente correttamente. Il nome utente è sensibile
alle minuscole/maiuscole.
56
ITALIANO
Problema
Azione correttiva
Non è possibile
eseguire il ping ad
alcun computer sulla
LAN wireless.
Se il LED ETHN è spento, controllare i cavi tra il dispositivo ZyAIR e il computer o hub.
Verificare che l’indirizzo IP e la subnet mask di ZyAIR e del computer siano nel
medesimo intervallo.
6.1 Procedura per visualizzare le certificazioni di un prodotto
1 Aprire la pagina www.zyxel.com.
2 Selezionare il prodotto dall'elenco di riepilogo a discesa nella Home Page di ZyXEL per passare alla
pagina del prodotto in questione.
3 Selezionare da questa pagina la certificazione che si desidera visualizzare.
57
ITALIANO
58
繁體中文
繁體中文
概覽
ZyAIR G-3000H 無線網路基地台提供 IEEE 802.1x 使用者認證、Wi-Fi 保護接取 (WPA)、WEP 資料加密以及
MAC 位址過濾等功能強大的安全機制,是有線網路環境最佳的高安全性無線連接解決方案。本 《快速入門指引》
介紹如何安裝和設定 ZyAIR,以便無線用戶端接取有線網路。請參閱 《使用手冊》,取得詳細資訊。
以下列出您必須執行的動作:
1. 硬體連接
4. 硬體安裝
2. 使用網頁設定介面
5. 乙太網路供電 ( 選擇性 )
3. 網際網路接取設定
6. 疑難排解
1 硬體連接
Note: 您可能需要準備網際網路連線資訊。
59
繁體中文
進行初步設定時請執行以下硬體連接。
1 使用乙太網路線,將 ETHERNET 埠連接到電腦。
2 使用符合當地電壓的隨附電源轉接器,將 POWER 12VDC
插槽連接到電源。
Note: 完成初步設定後,再將 ZyAIR ETHERNET 埠連
接到可以接取網際網路的乙太網路插孔。
1.1 LED 指示燈
連接電源時,PWR 和 ZyAIR LED 指示燈會亮起。如果
ETHERNET 埠連接正確,ETHN LED 指示燈會亮起。
如需詳細資訊,請參閱 《使用手冊》中關於 ZyAIR 前面
板 LED 指示燈說明表。
2 使用網頁設定介面
請使用具有 JavaScript 功能的 Internet Explorer 6.0
( 和更新版本 ) 或 Netscape Navigator 7.0 ( 和更新版
本 )。
60
繁體中文
2.1 設定電腦的 IP 位址
本節介紹如何將電腦的靜態 IP 位址配置在 192.168.1.2 至 192.168.1.254 之間,以及將子網路遮罩配置為
255.255.255.0。這項作業可以確保您的電腦能和 ZyAIR 裝置通訊。以下指令適用於 Windows 2000、Windows
NT 和 Windows XP 作業系統。
1 在 Windows XP 中,按一下開始,然後按一下控制台。
在 Windows 2000/NT 中,依序按下開始、設定和控制台。
2 在 Windows XP 中,按一下網路連線。
在 Windows 2000/NT 中,按一下網路和撥號連線。
3 在區域連線上按一下滑鼠右鍵,然後按內容。
4 選取 Internet Protocol (TCP/IP) ( 在 Win XP 中位於
一般索引標籤上 ),然後按一下內容。
5 會開啟 Internet Protocol TCP/IP 內容畫面 ( 在 Win
XP 中位於一般索引標籤上 )。
6 選取使用下列的 IP 位址並填入 IP 位址 ( 在
192.168.1.3 到 192.168.1.254 之間選一個位址 )、子網
路遮罩 (255.255.255.0),以及預設閘道 (192.168.1.2)
欄位。
7 按一下確定,關閉 Internet Protocol (TCP/IP) 內容視
窗。
8 按一下關閉 ( 在 Windows 2000/NT 中為確定 ),關閉區域
連線內容視窗。
關閉網路連線畫面。
Note: 即使已能無線連接 ZyAIR,但仍建議在初步設定中先將電腦連接到 ETHERNET 埠。
1 啟動您的網頁瀏覽器 輸入位址 192.168.1.2
(ZyWALL 的預設 IP 位址 )。
2 按一下 Login ( 登入 ) ( 已經輸入預設的密碼
1234)。
61
繁體中文
3 輸入新的密碼,然後按一下 Apply ( 套用 ),變更
登入密碼。
4 按一下 Apply ( 套用 ),建立使用此裝置專有
ZyAIR 的 MAC 位址的檢定資訊;如果您不想變更目
前的檢定資訊,按一下 Ignore ( 忽略 ) 繼續進行
下一步驟。
5 在 MAIN MENU ( 主選單 ) 畫面中按一下 WIZARD SETUP ( 精靈設定 )。
62
繁體中文
3 網際網路接取設定
使用設定精靈設定 ZyAIR,以使無線站台接取有線區域網路。
Note: 在畫面中按一下 Next ( 下一步 ) 繼續進行下一步驟或按一下 Back ( 上一步 ) 返回上一個畫
面。
如果按 Back ( 上一步 ),將不會儲存您的設定。
1 本畫面是非必要的。您可以直接按一下 Next ( 下一步 ) 。
System Name ( 系統名稱 ) 是用來識
別本台 ZyAIR。您可以輸入您的電腦
的 「電腦名稱」。
Domain Name ( 網域名稱 ):如果 ISP
要求輸入網域名稱進行認證,請輸入
一個網域名稱,否則可空白不填, 或
設定為自動顯示。
2 使用第二個精靈畫面設定無線區域網路。
Note: 無線站台和 ZyAIR 必須使用相同的 SSID、頻道 ID 和 WEP 加密金鑰 ( 若有啟用 WEP) 才能進行
無線通訊。
輸入一個描述性名稱以便在無線區域網
路內識別本台 ZyAIR。
按一下 Scan ( 掃描 ) 使 ZyAIR 自動
選取頻道並在 Channel ID ( 頻道 ID)
欄位中顯示所選頻道。
透過無線網路傳送資料訊框之前,請先
選取 64-bit (64 位元 ) 或 128-bit
(128 位元 ) 加密要傳送的訊框。
選取 Disable ( 停用 ) 可關閉 WEP 資
料加密功能。
選取 ASCII 或 HEX WEP 金鑰輸入方法
再依照畫面指示設定 WEP 金鑰。
按一下 Next ( 下一步 ) 繼續進行下一
步驟。
63
繁體中文
3 填寫最後一個精靈設定畫面中的欄位。
如果已有預定要使用的 IP 位址,請選
取 Use fixed IP address ( 使用固定
IP 位址 ),並輸入該 IP 位址以及子網
路遮罩和閘道 IP 位址。
按一下 Finish ( 完成 )。
Note: 如果變更 ZyAIR 的 IP 位
址,則必須使用新的 IP 位
址才能再使用網頁設定介面。
4 變更無線站台的無線參數設定,使之與 ZyAIR 的無線參數設定相符。請參閱無線網路配接器的使用說明。
這是最後一個精靈畫面。您可以返回
MAIN MENU ( 主選單 ) 繼續設定 ZyAIR。
4 硬體安裝
4.1 安裝天線
Note: 面向 ZyAIR 前端,右側天線 ( 主要天線 ) 負責傳送和接收訊號,左側天線則只接收訊號。
64
繁體中文
依照以下步驟連接隨附的天線。
1 將天線連接器固定在 ZyAIR 兩側。
2 將天線順時鐘旋入天線連接器。兩側
天線應相互平行並與地面垂直。
Note: 確認天線已確實旋入天線連接
器。
4.2 硬體安裝
一般而言,無線網路基地台最好的放置地點是無線網路覆蓋區域的中央。若要使 ZyAIR 發揮較佳效能,請將它
安裝在高處沒有障礙物的地方。
直立式安裝
將 ZyAIR 放置在平坦的水平表面 ( 桌面或架上 ),此表面必須能夠支撐 ZyAIR 和連接纜線的全部重量。
壁掛式安裝
依照以下步驟將 ZyAIR 固定在牆面上。
1 在牆上找出一個沒有障礙物干擾的高處位置。
2 在該位置鎖上兩支螺絲釘 ( 非隨附 ),兩者距離須相隔 60mm。您可以利用本手冊最後面的圖示正確標出螺絲
鑽孔的位置。請使用螺絲頭直徑在 6mm ~ 8mm (0.24" ~ 0.31") 之間的螺絲釘。不要把螺絲釘全部旋入牆
中, 螺絲頭與牆面之間須留一小段空隙, 此空隙必須足以讓螺絲頭放進螺絲槽,並讓連接纜線可從 ZyAIR
背面拉出。
Note: 確認螺絲釘已確實固定在牆上,可支撐 ZyAIR 和連接纜線的全部重量。
3 調整纜線。
將連接纜線從 ZyAIR 背面拉出,如下圖所示。
或:
65
繁體中文
將連接纜線往上拉沿著天花板邊緣繞行。
4 使 ZyAIR 背面的孔洞對齊牆
面上的螺絲釘。將 ZyAIR 掛
在螺絲釘上。
66
繁體中文
5 乙太網路供電 (PoE)
乙太網路供電 (Power over Ethernet,
PoE) 功能可透過一條 8 接腳的 CAT 5
型乙太網路線供電給 ZyAIR,即使附近
沒有電源也不會影響 ZyAIR 的安裝。
除此之外,還需要餽電器或 PoE 裝置
( 非隨附 ) 乙太網路線才可供應電源。
這項功能大幅提高了 ZyAIR 安裝位置
的變動彈性。
6 疑難排解
問題
修正動作
PWR LED 指示燈熄滅。 確定使用正確的電源轉接器,以及電源轉接器插入符合規定的電源供應器。
拔除電源轉接器再重新插入一次。如果錯誤持續發生,硬體可能有問題。若此情況發
生,請聯絡當地的供應商。
ETHN LED 指示燈熄
滅。
檢查纜線是否確實連接到 ZyAIR 的 ETHERNET 埠。確認電腦網路配接器能夠正常運作。
無法使用網頁設定介
面。
確認 ZyAIR 與電腦的 IP 位址和子網路遮罩位於同一 IP 位址範圍中 ( 例如,如果
ZyAIR 使用預設的 IP 位址和子網路遮罩,則檢查電腦的 IP 位址是否位於
192.168.1.3 ~192.168.1.254 之間,子網路遮罩是否為 255.255.255.0)。請參閱設定
電腦 IP 位址一節 。
如果變更 ZyAIR 的預設 IP 位址,則網站位址請輸入新 IP 位址。
預設密碼是 ?234? 如果變更了密碼卻又忘記變更後的密碼,則需重新設定 ZyAIR。請參
閱 《使用手冊》了解如何使用 RESET ( 重設 ) 按鈕。
確認 ZyAIR 已連線至網路。
確認使用者名稱輸入正確。使用者名稱可能區分大小寫。
無法在無線區域網路上
偵測到任何電腦。
如果 ETHN LED 指示燈熄滅,請檢查 ZyAIR 和電腦或集線器之間的纜線。
確認 ZyAIR 的 IP 位址與子網路遮罩,和電腦位於相同的 IP 位址範圍。
6.1 如何查看產品認證資料
1 前往 www.zyxel.com。
2 在 ZyXEL 首頁的下拉式清單方塊選取您的產品,進入該產品的網頁。
3 在此頁選取您想查看的認證資料。
67