1
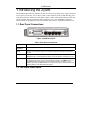
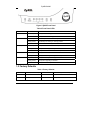
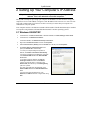
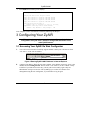
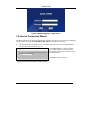
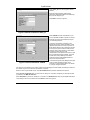
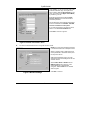
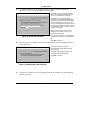
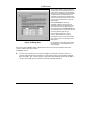
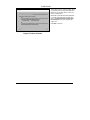
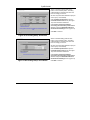
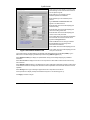
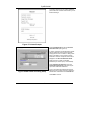
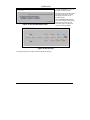
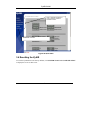
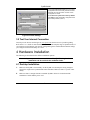
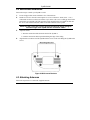
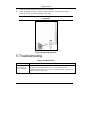
ZyAIR B-4000
Hot Spot Gateway
Quick Installation Guide
Version 1.04
March 2004
ZyAIR B-4000
Table of Contents
1 Introducing the ZyAIR .................................................................................................................. 3
1.1 Rear Panel Connections............................................................................................................. 3
1.2 The Front Panel LEDs............................................................................................................... 3
1.3 Factory Defaults ........................................................................................................................ 4
2 Setting Up Your Computer’s IP Address..................................................................................... 5
2.1 Windows 2000/NT/XP .............................................................................................................. 5
2.2 Checking/Updating Your Computer’s IP Address .................................................................... 6
2.3 Testing the Connection to the ZyAIR........................................................................................ 6
3 Configuring Your ZyAIR .............................................................................................................. 7
3.1 Accessing Your ZyAIR Via Web Configurator ........................................................................ 7
3.2 Internet Connection Wizard ...................................................................................................... 8
3.3 Introducing the Web Configurator .......................................................................................... 18
3.4 Resetting the ZyAIR................................................................................................................ 19
3.5 Test Your Internet Connection ................................................................................................ 20
4 Hardware Installation.................................................................................................................. 20
4.1 Desktop Installation................................................................................................................. 20
4.2 Wall-mount Installation........................................................................................................... 21
4.3 Attaching Antennas ................................................................................................................. 21
5 Troubleshooting............................................................................................................................ 22
2
ZyAIR B-4000
1 Introducing the ZyAIR
The ZyAIR Hot Spot Gateway combines an 802.11b wireless access point, router, 4-port switch and
service gateway in one box. An “exclusive printer” connects directly to the ZyAIR, allowing you to
easily print subscriber statements. The ZyAIR is ideal for offices, coffee shops, libraries, hotels and
airport terminals catering to subscribers that seek Internet access. You should have an Internet
account already set up and have been given usernames, passwords etc. required for Internet access.
1.1 Rear Panel Connections
Figure 1 ZyAIR Rear Panel
Table 1 Rear Panel Connections
LABEL
DESCRIPTION
ONE-CLICK
PRINTER
Use the printer cable to connect the included printer (“exclusive printer”) to this port.
WAN
Connect your broadband modem to this port with the Ethernet cable that came with your
modem.
LAN 1-4
These ports are auto-crossover, (”auto MDI/MDI-X”) which means you can use either a
straight-through or crossover Ethernet cable to connect the ZyAIR to a computer or a hub.
Power
After you’ve made the above connections, connect the ZyAIR’s included power adaptor to
the ZyAIR’s power socket. Use only the included power adaptor. The PWR LED turns on.
The SYS LED blinks while performing system testing and then turns steady on if the
testing is successful. A LAN LED turns on if a LAN port is properly connected. Refer to the
following table for more detailed LED descriptions.
1.2 The Front Panel LEDs
3
ZyAIR B-4000
Figure 2 ZyAIR Front Panel
Table 2 Front Panel LEDs
LED
PWR
WAN
LAN (1-4)
WIRELESS
SYS
STATUS
DESCRIPTION
On (Green)
The ZyAIR is receiving power.
Off
The ZyAIR is not receiving power.
On (Green)
The WAN port has a connection to your cable or DSL modem.
Blinking (Green)
The WAN port is sending or receiving packets.
Off
The WAN link is not ready, or has failed.
On (Green)
The port is connected to a 10/100Mbps Ethernet device.
Blinking (Green)
The port is receiving or sending data.
Off
The port is not connected to a 10/100Mbps Ethernet device.
On (Green)
The ZyAIR has established a wireless LAN connection.
Blinking (Green)
The ZyAIR is sending/receiving data through the wireless LAN.
On (Green)
The ZyAIR is ready and running.
Blinking (Green)
The ZyAIR is upgrading its firmware.
Off
The ZyAIR is not ready or has failed.
1.3 Factory Defaults
Table 3 Factory Defaults
Username
“admin” (case sensitive)
WAN IP Address
DHCP Client (dynamic WAN IP)
Password
“1234”
LAN IP Address
192.168.1.1
LAN DHCP
Server
4
ZyAIR B-4000
2 Setting Up Your Computer’s IP Address
Skip this section if your computer is already set up to accept a dynamic IP
address. This is the default for most new computers.
The ZyAIR is already set up to assign your computer an IP address. Use this section to set up your
computer to receive an IP address or assign it a static IP address in the 192.168.1.2 to 192.168.1.254
range with a subnet mask of 255.255.255.0. This is necessary to ensure that your computer can
communicate with your ZyAIR.
Your computer must have an Ethernet card and TCP/IP installed. TCP/IP should already be installed
on computers using Windows NT/2000/XP, Macintosh OS 7 and later operating systems.
2.1 Windows 2000/NT/XP
1.
2.
In Windows XP, click start, Control Panel. In Windows 2000/NT, click Start, Settings, Control Panel.
In Windows XP, click Network Connections.
In Windows 2000/NT, click Network and Dial-up Connections.
3.
Right-click Local Area Connection and then click Properties.
4.
Select Internet Protocol (TCP/IP) (under the General tab in Win XP) and click Properties.
5.
The Internet Protocol TCP/IP Properties screen
opens (the General tab in Windows XP).
- To have your computer assigned a dynamic IP
address, click Obtain an IP address automatically.
If you know your DNS sever IP address(es), type them
in the Preferred DNS server and/or Alternate DNS
server fields.
-To configure a static IP address, click Use the
following IP Address and fill in the IP address
(choose one from192.168.1.2 to 192.168.1.254),
Subnet mask (255.255.255.0), and Default gateway
(192.168.1.1) fields.
Then enter your DNS server IP address(es) in the
Preferred DNS server and/or Alternate DNS server
fields.
If you have more than two DNS servers, click
Advanced, the DNS tab and then configure them using
Add.
5
ZyAIR B-4000
6.
Click Advanced. Remove any previously installed
gateways in the IP Settings tab and click OK to go back
to the Internet Protocol TCP/IP Properties screen.
7.
Click OK to close the Internet Protocol (TCP/IP)
Properties window.
8.
Click OK to close the Local Area Connection
Properties window.
2.2 Checking/Updating Your Computer’s IP Address
1.
In the computer, click Start, (All) Programs, Accessories and then Command Prompt.
2.
In the Command Prompt window, type "ipconfig" and then press ENTER to verify that your computer’s IP
address is in the correct range (192.168.1.2 to 192.168.1.255) with subnet mask 255.255.255.0. This is
necessary in order to communicate with the ZyAIR.
Refer to your User’s Guide for detailed IP address configuration for other Windows and Macintosh
computer operating systems.
2.3 Testing the Connection to the ZyAIR
1.
Click Start, (All) Programs, Accessories and then Command Prompt.
2.
In the Command Prompt window, type "ping” followed by a space and the IP address of the ZyAIR
(192.168.1.1 is the default).
6
ZyAIR B-4000
3.
Press ENTER and the following screen displays.
C:\>ping 192.168.1.1
Pinging 192.168.1.1 with 32 bytes of data:
Reply
Reply
Reply
Reply
from
from
from
from
192.168.1.1:
192.168.1.1:
192.168.1.1:
192.168.1.1:
bytes=32
bytes=32
bytes=32
bytes=32
time=10ms
time<10ms
time<10ms
time<10ms
TTL=254
TTL=254
TTL=254
TTL=254
Ping statistics for 192.168.1.1:
Packets: Sent = 4, Received = 4, Lost = 0 (0% loss),
Approximate round trip times in milli-seconds:
Minimum = 0ms, Maximum = 10ms, Average = 2ms
Your computer can now communicate with the ZyAIR using a LAN port.
3 Configuring Your ZyAIR
This guide shows you how to use the web configurator for initial
configuration. See your User’s Guide for background information on all
other ZyAIR features.
3.1 Accessing Your ZyAIR Via Web Configurator
1.
Your web browser must have JavaScript support enabled. Launch your web browser. Enter
“192.168.1.1” as the web site address.
Web site address
Figure 3 Entering ZyAIR LAN IP Address in Internet Explorer
2.
A login screen displays. Enter the user name (“admin” is the default), password (“1234” is the
default) and click Getting Started. The user name is case sensitive, so enter “admin” exactly
as shown. If you make an incorrect entry, refresh your browser and try again. Only one
administrator can log in at one time. The ZyAIR logs you out after five minutes of no
management using the web configurator, so you then have to log in again.
7
ZyAIR B-4000
Figure 4 Web Configurator: Login Screen
3.2 Internet Connection Wizard
The Wizard Setup screens appear by default after login only the first time you access the ZyAIR and
run the wizard. After that, the SYSTEM QUICK VIEW screen appears after login.
1.
The first Wizard screen displays after your initial login. This first screen varies depending on
the type of Internet connection you use.
Select DHCP Client if your ISP did not assign
you a fixed IP address. Your ISP assigns the
ZyAIR’s WAN port a dynamic IP address. This is
the default selection.
Click Next to continue to Figure 9.
Figure 5 Internet Connection: DHCP Client
8
ZyAIR B-4000
Select Static_IP If the ISP assigned a fixed IP
address.
Enter the WAN IP address, subnet mask,
gateway IP address and DNS server address(s)
that your ISP assigned you.
Click Next to continue to Figure 9.
Figure 6 Internet Connection: Static_IP
Select PPPoE If the ISP uses PPPoE for your
account (PPPoE simulates a dial-up connection).
Enter the user name and password exactly as
your ISP assigned them.
A maximum transmission unit (MTU) is the
largest size packet or frame, specified in octets
(eight-bit bytes) that can be sent in a packet- or
frame-based network. The Transmission Control
Protocol (TCP) uses the MTU to determine the
maximum size of each packet in a transmission.
Too large an MTU size may mean
retransmissions if the packet encounters a router
that can't handle that large a packet. Too small
an MTU size means relatively more header
overhead and more acknowledgements that
have to be sent and handled.
Figure 7 Internet Connection: PPPoE
The maximum segment size (MSS) is the largest
amount of data, specified in bytes, that a
computer or communications device can handle
in a single, unfragmented piece.
For optimum communications, the number of bytes in the data segment and the header must add up to less than
the number of bytes in the maximum transmission unit (MTU).
Enter the name of your PPPoE server, in the Service Name field if provided; otherwise leave it blank.
Select Connect on Demand when you don't want an “always-on” connection and specify an inactivity time limit
(in minutes) in the Max Idle Time field.
Select Keep Alive if you want an “always-on” connection. The Redial Period is how long the ZyAIR waits before
reconnecting in the event of a disconnect. Click Next to continue to Figure 9.
9
ZyAIR B-4000
Select PPTP if your service provider uses a DSL
terminator with PPTP login. The ZyAIR must
have a static IP address (My IP Address) in this
case, and a subnet mask (My IP Subnet Mask)
if provided by your ISP.
Enter the DSL terminator IP address (PPTP
Server IP Address) and a username with an
associated password.
See the description of the PPPoE encapsulation
screen for information on PPP MTU, TCP MSS,
Connect On Demand and Keep alive.
If your ISP has provided a connection ID name,
enter it in the Connection ID/Name field.
Click Next to continue to Figure 9.
Figure 8 Internet Connection: PPTP
2.
Use the second wizard screen to set up the wireless LAN.
ESSID is a unique name to identify the ZyAIR
in the wireless LAN. Enter a descriptive name.
Select a channel (range of radio frequencies
used by IEEE 802.11b wireless devices) from
the drop-down list box.
WEP (Wired Equivalent Privacy) encrypts
data frames before transmitting them over the
wireless network.
Select 64 Bit, 128 Bit or 256 Bit from the
WEP Encryption and enter a key of the
appropriate length to activate WEP
encryption. Select Disable to turn off WEP
data encryption.
Click Next to continue.
Figure 9 Wireless Settings
10
ZyAIR B-4000
3.
Use the third wizard screen to configure a backup e-mail server in the event that the
subscriber’s e-mail server is unreachable from the ZyAIR.
Select No to not have the ZyAIR redirect email in the event that a subscriber’s e-mail
server is unreachable from the ZyAIR.
Select Yes to have the ZyAIR redirect
subscribers’ e-mail to the designated SMTP
server (must be reachable from the ZyAIR) in
the event that the subscriber’s own e-mail
server is unreachable from the ZyAIR. E-mail
recipients see messages as if they came from
the subscriber’s regular e-mail server not the
“backup” e-mail server.
When you select Yes, enter the e-mail
(SMTP) server’s domain name (up to 50
characters) or IP address.
Enter the port number (25, or between 2500
and 2599) for the mail server. The default is
25.
Figure 10 E-mail Service Setup
Click Next to continue.
4.
Use this screen to set whether or not the ZyAIR authenticates users before allowing them to
access the Internet.
Select Yes to require the ZyAIR to
authenticate subscribers before allowing
Internet access.
Select No to allow Internet access for all
subscribers without authentication.
Click Next to continue.
Figure 11 Authentication Service Setup
5.
Use the next wizard screen to set up a billing profile for the ZyAIR to use when generating
subscriber accounts.
11
ZyAIR B-4000
Select Time to Finish to allow subscribers a
one-time login. Once a subscriber logs in, the
system starts counting down the pre-defined
usage even if the subscriber stops the Internet
access before the time period finishes. If a
subscriber logs out before the allocated time
expires, the subscriber does not have to enter
the user name and password to access the
Internet again.
Select Accumulation to allow each
subscriber multiple re-login until the time
allocated is used up. If a subscriber logs out
and accesses the Internet again within the
time period specified in the Idle Timeout field,
the subscriber does not have to enter the user
name and password again to log in.
Enter the appropriate currency unit or
currency symbol. Define the number of
decimal places (up to 3) to be used for billing.
Enter a name (up to 12 characters) for each
billing profile.
Figure 12 Billing Setup
Set the duration of each billing period. When
this period expires, the subscriber’s access
will be stopped.
Select a time period (minutes, hours, or days) and enter the time unit in the field provided to define each
“profile’s” maximum Internet access time.
Click Next to continue.
6.
Use the next wizard screens to set up the ZyAIR to use either the “exclusive printer” to
generate and print subscriber statements or generate them in the web configurator and print
them from there. The “exclusive printer” is the printer that attaches directly to the ZyAIR. It
can have the ZyAIR generate subscriber statements and then print them.
12
ZyAIR B-4000
Select Yes to use the “exclusive printer” when
you generate and print subscriber statements.
Select the type of printer that you have (onebutton or three-button).
Select No to generate subscriber statements
in the web configurator and print them from
there. The Web-based Account Generator
Panel Settings screen then appears next
(Figure 18).
Click Next to continue.
Figure 13 Printer Selection
13
ZyAIR B-4000
Select a subscriber “billing profile” for the
button on the “exclusive printer”. The billing
profile defines the maximum Internet access
time and charge per time unit.
Set how many subscriber statement copies you
want to print (1 is the default).
Click Customize printout text to open the
Customize Printout Text screen (see Figure
16) to tailor subscriber statements.
Click I want to setup the web-based
accounting now if exclusive printer cannot
work to configure the Web-based Account
Generator Panel Settings screen (Figure 18).
Click Next to continue.
Figure 14 Accounting Setup: One-button
Select a subscriber billing profile for each
button on the “exclusive printer”. The billing
profile defines the maximum Internet access
time and charge per time unit.
Set how many subscriber statement copies you
want to print (1 is the default).
Click Customize printout text to open the
Customize Printout Text screen (see Figure
16) to tailor subscriber statements.
Click I want to setup the web-based
accounting now if exclusive printer cannot
work to configure the Web-based Account
Generator Panel Settings screen (Figure 18).
Figure 15 Accounting Setup: Three-button
14
Click Next to continue.
ZyAIR B-4000
Select this check box to display your logo on the
subscriber login screen. See the User’s Guide for
how to upload a logo file.
Enter a title (up to 24 characters) for the
statement printout in the Title field.
Enter a subtitle (up to 80 characters) for the
printout.
Type Username and Password labels that
appear in the statement here.
Enter the label name for the field displaying the
method for billing.
Enter the label name for the field displaying the
name for the billing profile used.
Enter the label name for the field displaying the
number of time units purchased.
Type a label name for the maximum time allowed
for a subscriber to access the Internet via the
ZyAIR in the Usage Time field.
Select the Price check box and type a label for
the field displaying the total charge to the
subscriber in the statement.
Enter a label name for the field displaying the tax.
Figure 16 Customize Printout Text
Enter a label name for the field displaying the sum
of the price and the tax.
Type a label name for the field displaying the wireless LAN’s Extended Service Set Identifier (ESSID). Type a
label name for the field displaying the Wired Equivalent Privacy (WEP Encryption) key.
Select Additional Label(es) to display the specified label name(s) for the field(s) displaying any additional
information.
Select Print out Time to display the time an account is printed out. Select date and time formats from the dropdown list boxes.
Select Expiration Time to display (in the statement) the ending subscription validity date and time and then select
a date and time format from the drop-down list boxes. Enter an explanation for the subscriber about the account’s
expiration.
Select Ending and then type a message to appear at the end of the printout in the text box
Click a preview link to display a sample of the statement layout in a new window (Figure 17).
Click Apply to save the changes.
15
ZyAIR B-4000
This screen shows how your custom statement
printout will look. Close the window when you are
finished viewing it.
Figure 17 Printout Example
Click Preview/Operate to open the Account
Generator Panel (see Figure 19).
A “button” represents a subscriber billing profile
defining maximum Internet access time and
charge per time unit. The button A settings also
apply to the button on the “exclusive printer”.
The button numbers correspond to the buttons
displayed in the Account Generator Panel.
Select how many copies of subscriber
statements you want to print (1 is the default).
Click Customize printout text to open the
Customize Printout Text screen (see Figure
16) to tailor subscriber statements.
Figure 18 Web-based Accounting Setup
Type a user name and password for the webbased accounting system manager. Retype the
password for confirmation in the Confirm field.
Click Next to continue.
16
ZyAIR B-4000
Click Preview/Operate in Figure 18
to display this pop-up screen.
Each button is the subscriber “profile”
you defined. The button 1 settings
also apply to the button on the
“exclusive printer”.
Figure 19 Account Generator Panel
Figure 20 Account List
Close this pop-up screen when you have finished viewing it.
17
Click the View Account List link in
this screen to display another pop-up
screen showing current account
information (Figure 20). Close this
pop-up screen when finished.
ZyAIR B-4000
7.
It is highly recommended you change the default user name and password.
Type your new user name and password in the
Username and Password fields; type the
password again in the Confirm field
Click Get from my Computer to have the ZyAIR
retrieve the date and time from your computer.
Select All if you want to allow management of the
ZyAIR from any IP address.
Select Selected and type the IP address of a
“trusted” computer to allow access to the ZyAIR
web configurator from that computer only. If the
computer you are currently using is not the
“trusted” computer, you will not be able to access
the ZyAIR web configurator again from your current
computer.
Figure 21 System Setting
Click Finish to save your settings to the ZyAIR.
Wait 30 seconds while the ZyAIR restarts.
3.3 Introducing the Web Configurator
Click a navigation panel link to open that link’s list of links to individual screens. After you run the
wizard, you first see the SYSTEM QUICK VIEW screen after login.
18
ZyAIR B-4000
Click a navigation panel link to
open a submenu of links to
individual screens.
Quick View is selected.
Figure 22 Quick View
3.4 Resetting the ZyAIR
To reset the ZyAIR back to the factory defaults, click SYSTEM TOOLS and CONFIGURATION
to display the screen as shown next.
19
ZyAIR B-4000
Select Keep subscriber profiles to set the system
configuration back to the factory defaults but retain
subscriber account information. All other custom
configuration is erased.
Under Reset the system back to factory defaults
Click Apply to reset the ZyAIR’s configuration back
to the factory defaults (Table 3).
Figure 23 Default Settings
3.5 Test Your Internet Connection
Launch your web browser and navigate to www.zyxel.com. Internet access is just the beginning.
Refer to the User’s Guide for more detailed information on the complete range of ZyAIR features. If
you cannot access the Internet, open the web configurator again to confirm that the Internet settings
you configured in the Wizard Setup are correct.
4 Hardware Installation
The following sections describe the different installation options.
Leave adequate space on the rear and sides of the ZyAIR during hardware
installation and do not block the ventilation holes.
4.1 Desktop Installation
1.
Make sure the ZyAIR is clean and dry. Set the ZyAIR on a smooth space strong enough to
support the weight of the ZyAIR and the connected cables. Make sure there is a power outlet
nearby.
2.
Make sure there is enough clearance around the ZyAIR to allow air circulation and the
attachment of cables and the power cord.
20
ZyAIR B-4000
4.2 Wall-mount Installation
Follow these steps to attach your ZyAIR to a wall.
1.
Locate a high position on the wall that is free of obstructions.
2.
Install two screws in the wall 123mm apart. Use screws with 6mm ~ 8mm (0.24" ~ 0.31")
wide heads. Do not screw the screws all the way in to the wall. Leave a small gap between the
head of the screw and the wall. The gap must be big enough for the screw heads to slide into
the screw slots and the connection cables to run down the back of the ZyAIR.
Make sure the screws are securely fixed to the wall and strong enough to
hold the weight of the ZyAIR with the connection cables.
3.
Adjust the cables.
a. Run the connection cables down the back of the ZyAIR or
b. Run the connection cables upward and along the edge of the ceiling.
4.
Align the holes on the back of the ZyAIR with the screws on the wall. Hang the ZyAIR on the
screws.
Figure 24 Wall-mount Brackets
4.3 Attaching Antennas
Follow the steps below to connect the supplied antennas.
21
ZyAIR B-4000
1.
Locate the antenna connectors on the rear of your ZyAIR.
2.
Screw the antennas clockwise onto the antenna connectors. The antennas should be
perpendicular to the ground and parallel to each other.
Make sure the antennas are securely screwed onto the antenna
connectors.
Figure 25 Attaching Antennas
5 Troubleshooting
Table 4 Troubleshooting
PROBLEM
None of the LEDs
turn on when you
turn on the ZyAIR.
CORRECTIVE ACTION
Make sure that you have the correct power adaptor connected to the ZyAIR and
plugged in to an appropriate power source. Check all cable connections.
If the LEDs still do not turn on, you may have a hardware problem. In this case, you
should contact your local vendor.
22
ZyAIR B-4000
Table 4 Troubleshooting
PROBLEM
Cannot access the
ZyAIR from the LAN.
CORRECTIVE ACTION
Check the cable connection between the ZyAIR and your computer or hub. Refer to
section 1.1 for details.
Ping the ZyAIR from a LAN computer. Make sure your computer’s Ethernet adapter
is installed and functioning properly.
Make sure that the IP address and the subnet mask of the ZyAIR and your
computer(s) are on the same subnet.
Cannot ping any
computer on the
LAN.
If the LAN LEDs are all off, check the cable connections between the ZyAIR and your
LAN computers.
Cannot ping any
computer on the
WLAN
Make sure the wireless card is properly inserted in the ZyAIR and the WIRELESS
LED is on.
Verify that the IP address, subnet mask of the ZyAIR and the LAN computers are in
the same IP address range.
Make sure the wireless card on the wireless client is working properly.
Check that both the ZyAIR and wireless client(s) are using the same ESSID, channel
and WEP key (if WEP encryption is activated).
Cannot get a WAN
IP address from the
ISP.
Cannot access the
Internet.
Check your Internet connection settings (refer to section 3.2).
You need a user name and password if you’re using PPPoE or PPPoA
encapsulation. Make sure that you have entered the correct Service Name (PPPoE
encapsulation only), User Name and Password (the username and password are
case sensitive). Refer to section 3.2 for more information.
Check your Internet connection settings (refer to section 3.2).
Make sure you entered the correct user name and password.
For wireless clients, check that both the ZyAIR and wireless client(s) are using the
same ESSID, channel and WEP keys (if WEP encryption is activated).
23