1
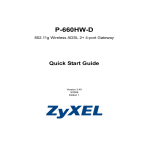
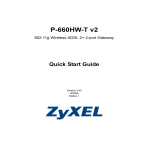
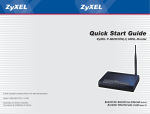
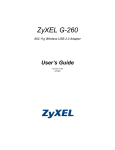
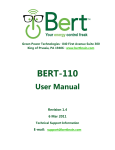
P-662HW-D Series
ADSL2+ 4-Port Wireless Security Gateway
Quick Start Guide
Version 3.40
Edition 2
12/2008
P-662HW-D Series Quick Start Guide
Overview
Use the included CD or follow the directions in this Quick Start Guide to set up your P-662HW-D.
How to Use the Included CD
This CD provides multi-media animations that help you set up your P-662HW-D.
1 On the included CD, click Multimedia Auto Provisioner > Installation Tutorial.
2 At the end of the tutorial, click Configuration Genie.
1 Hardware Connections
1 DSL: Use a telephone wire (and telephone adaptors, if provided with your P-662HW-D) to connect your P662HW-D to a telephone jack.
2 ETHERNET: Use an Ethernet cable to connect a computer to the ETHERNET port for initial configuration
and/or Internet access.
3 POWER: Use the power adaptor provided with your P-662HW-D to connect an appropriate power source
to the POWER socket.
4 Push in the POWER button. Look at the lights on the front panel.
• The POWER light blinks green while your P-662HW-D starts up and stays green once it is ready.
• The DSL light is on if a DSL connection is established.
• Each ETHERNET light stays on if the corresponding Ethernet port is properly connected and blinks when there
is traffic.
• The WLAN light is on if the wireless network is on.
2
P-662HW-D Series Quick Start Guide
If the lights are not on, check your connections, and inspect your cables for damage. If you still have
problems, contact your local vendor.
2 Status Page
1 In your browser, go to http://192.168.1.1.
2 Enter the default password user to go
directly to the Status screen.
If your browser cannot find this screen,
check its security settings. See
Troubleshooting for details.
3
P-662HW-D Series Quick Start Guide
3 See the User’s Guide for field descriptions of the Status screen.
3 Internet Setup
1 Open your web browser, and go to http://www.zyxel.com.
Your P-662HW-D tries to detect your Internet connection. This takes about two minutes. If any other screens
appear, follow the directions in the screen.
If the web page opens correctly, your P-662HW-D is ready to use. If the web page does not open, follow the rest
of the steps. You should have the information provided by your ISP.
2 In your browser, go to http://192.168.1.1
4
P-662HW-D Series Quick Start Guide
3 Enter the admin password 1234 to set up your
internet and wireless connections and security
settings. Click Login. If your browser cannot find
the login screen, check its security settings. See
Troubleshooting for details..
4 Follow the directions in this screen.
5 Click Apply to replace the factory default
certificate. This creates a unique certificate for
your P-662HW-D. If you click Ignore, this prompt
will show up every time you login.
6 Select Go to Wizard setup and click Apply.
5
P-662HW-D Series Quick Start Guide
7 Click INTERNET / WIRELESS
SETUP. Wait while your P662HW-D tries to detect your
DSL connection.
8 Follow the directions in the
wizard. Do not change default
settings if your ISP did not
provide them.
OTIST
ZyXEL's One-Touch Intelligent Security Technology (OTIST) feature allows you to automatically configure the
SSID and WPA-PSK on all OTIST-equipped wireless clients within range of the P-662HW-D.
Note: If you enable OTIST but select Disable wireless security using the wireless wizard, the P662HW-D will create a WPA-PSK automatically.
If you enable OTIST and select Manually assign a WEP key using the wireless wizard, the P662HW-D will replace the WEP key with a WPA-PSK.
Enable OTIST only if your wireless clients support WPA and OTIST.
You must enable OTIST on the P-662HW-D and all wireless clients within three minutes in any order.
To start OTIST on the P-662HW-D, hold in the RESET button for one to five seconds. Do not hold the RESET
button in for too long, as this will reset the P-662HW-D to the factory defaults.
To enable OTIST on wireless clients, click Start in the Adapter screen. The Setup Key is 01234567 by default.
If you have previously saved a setup key on the P-662HW-D, use it instead of the default.
For more information, see Wireless LAN in the User's Guide.
Troubleshooting
1 If you cannot access the web configurator using Internet Explorer in Windows XP or Windows Server 2003,
make sure you allow pop-up windows, JavaScript and Java permission or set the Internet security level to
any level lower than High in Internet Explorer (in Internet Explorer, click Tools > Internet Options >
Security > Custom Level...). See the appendix in the User’s Guide for more information.
2 If you cannot access the Internet when your computer is connected to the ETHERNET port, follow these
steps.
6
P-662HW-D Series Quick Start Guide
A) Check the lights on the front panel. If they are different from what is described in section 1, make sure
the connections are correct. (See section 1.) If the lights are still different, turn off the device, wait a few
seconds, and turn it on again.
B) Follow the steps in section 3 again. Make sure you enter the correct information. For example, if your
account has a user name and password, make sure you type it correctly. In addition, if you are not sure
which encapsulation your ISP uses, contact your ISP.
C) If you are using a new Internet account, contact your ISP to make sure it is active.
D) If you still have problems, see Troubleshooting in the User’s Guide.
3 If you cannot access the Internet using the wireless network, follow these steps.
A) On a computer in the wireless network, open your browser, and go to http://192.168.1.1. If you see the
screen in step 3 of section 3, follow suggestions A - D above. If you do not, go to the next step.
B) Make sure your P-662HW-D and your computer are using the same settings. Follow the steps in section
3.
Viewing Your Product’s Certifications
1 Go to www.zyxel.com.
2 Select your product from the drop-down list box on the ZyXEL home page to go to that product's page.
3 Select the certification you wish to view from this page.
7