1
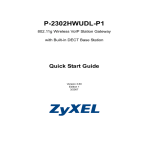
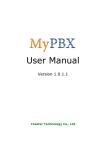
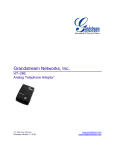
P-2602HWNLI
802.11g Wireless ADSL2+ 4-port VoIP IAD
Quick Start Guide
Version 3.40
5/2006
Edition 1
P-2602HWNLI Quick Start Guide
Overview
Your P-2602HWNLI Integrated Access Device allows you to make phone calls over the Internet (Voice over
Internet, or VoIP) as well as regular analog (PSTN) or digital (ISDN) phone calls. It also provides Internet
access for your network.
The P-2602HWNLI also allows wired and wireless clients to safely access the Internet. It can connect up to
four Ethernet devices, and includes wireless networking capability.
The following figure shows your P-2602HWNLI, labeled A, connecting your computer to the Internet and
providing firewall protection. The telephones connected to the P-2602HWNLI can also make calls over the
Internet. See the User's Guide for more information on all features.
Note: When you set up your P-2602HWNLI you may need your Internet access and (SIP-based) voice
account information.
2
P-2602HWNLI Quick Start Guide
1 Connect Your P-2602HWNLI
1 DSL: Use the gray ADSL cable to connect the DSL port to a telephone jack or the DSL (or MODEM) jack
on a splitter.
2 Do one of the following to connect one or more telephones to the P-2602HWNLI. These are also known as
Foreign eXchange Station (FXS) connections.
PHONE: Use telephone wire (and any included telephone adaptors) to connect analog telephones to these
ports. Use the PHONE 1 port first.
3
P-2602HWNLI Quick Start Guide
Note: When the P-2602HWNLI does not have power, only the phone connected to the
PHONE 1 port can be used for making calls. Ensure you know which phone this is, so
that in case of emergency you can make outgoing calls.
ISDN PHONE: Use telephone wire to connect one or more ISDN telephones or an ISDN PBX to this port.
3 PSTN/ISDN: You can connect either a PSTN or an ISDN line to this port. This is a Foreign eXchange Office
(FXO) port. Use the included green PSTN cable or ISDN cable to connect the PSTN/ISDN port to the
telephone jack or the TEL or PHONE jack on a splitter.
Connect the PSTN line cable’s larger end to the PSTN/ISDN port.
The ISDN line cable’s connectors are of equal size. Connect either end to the PSTN/ISDN port.
Note: If you are using T-ISDN (UR-2), connect the green wire to a TAE connector before connecting it
to the telephone splitter's "phone" jack or a telephone wall jack.
4 ETHERNET: Use an Ethernet cable to connect a computer to an Ethernet port for initial configuration and/
or Internet access.
5 POWER: Use the included power adaptor to connect the POWER socket to an appropriate power source
(see the User’s Guide for details of power adaptors by region).
6 Push in the POWER button and look at the lights on either side.
• The POWER light blinks during start-up and stays on once the P-2602HWNLI is
ready.
• The DSL light blinks during start-up, and stays on once the P-2602HWNLI is
ready. If the DSL light is off, there is a problem with the hardware or the phone line
connection to the ISP.
• The ETHERNET lights blink once on startup, and remain on if there is an active
Ethernet connection. When the P-2602HWNLI is sending/receiving data on an
active Ethernet connection, the light blinks.
• The WLAN light turns steady green when the wireless LAN is ready. It blinks when
the P-2602HWNLI is sending/receiving data through the wireless LAN.
• Use the following sections in this guide to get to the screens where you configure
Internet access, wireless and VoIP settings.
4
P-2602HWNLI Quick Start Guide
2 Initial Configuration
Open your web browser, and go to http://www.zyxel.com.
Your P-2602HWNLI tries to detect your Internet connection. This takes about two minutes. If any other
screens appear, follow the directions in the screen.
If http://www.zyxel.com opens correctly, your Internet access is ready. If the web page does not open, use the
following steps. You should have information provided by your ISP.
1 Enter 192.168.1.1 as the web site address
in your browser.
2 Click Login (the default password 1234 is already entered).
3 Type (and retype) a new password and
click Apply.
5
P-2602HWNLI Quick Start Guide
4 Select Go to Wizard setup and click
Apply.
5 Click INTERNET/WIRELESS SETUP
to configure your Internet access
and/or wireless settings. Follow the
directions in the screens and enter
your Internet access information
exactly as it was given to you.
6 Click VOICE OVER INTERNET
SETUP to configure your VoIP
account settings. See Section 2.1.
6
P-2602HWNLI Quick Start Guide
2.1 Voice Setup
Note: You should have a voice account already set up.
Fill in the fields with information from your
voice service provider. Leave the default
settings in fields for which no information
was provided (except if otherwise
specified).
If you have a SIP account like
[email protected],“1234” would
be the SIP Number and “VoIPprovider.com” would be the SIP Service
Domain.
This screen configures SIP account 1.
Select the check box if you have a second
SIP account that you want to use.
2.2 Regular Phone Line Configuration
When one of your VoIP accounts is registered, the P-2602HWNLI normally uses the Internet (not the regular
phone line) to make phone calls. Follow the directions in this section to make sure you can also use the
regular phone line while one of your VoIP accounts is registered.
Note: When the P-2602HWNLI does not have power, only the phone connected to the
PHONE 1 port can be used for making calls. Ensure you know which phone this is, so
that in case of emergency you can make outgoing calls.
In the main screen, click VoIP > PSTN Line (or ISDN Line if you want to configure for an ISDN phone).
PSTN (or ISDN) Line Pre-fix Number: If you want to make a
regular phone call after one of your VoIP accounts has been
registered you have to dial this number before you dial the
phone number.
Relay to PSTN (or ISDN) Line: Enter phone numbers for
regular phone calls (that do not use the Internet) that you
always want to dial without the prefix number. For example,
enter emergency phone numbers here.
Click Apply.
7
P-2602HWNLI Quick Start Guide
2.3 Make Calls Through the Internet
When a PHONE light turns on, your SIP account is registered successfully. Dial a numerical SIP number (like
“12345” for example) on your phone’s keypad. Use your voice service provider’s dialing plan to make calls
through the Internet to regular telephone numbers. See your User’s Guide if you need to make peer-to-peer
VoIP calls or calls to SIP numbers that use letters.
3 Troubleshooting
If you cannot access the Internet, follow these steps.
1 Check the device’s lights. If they are different from what is described in Section 1, make sure the
connections are correct. If the lights are still different, turn off the device, wait a few seconds, and turn it on
again.
2 Follow the steps in Section 2 again. Make sure you enter the correct information. For example, if your
account has a user name and password, make sure you type it correctly. In addition, if you are not sure
which encapsulation your ISP uses, contact your ISP.
3 If you are using a new Internet account, contact your ISP to make sure it is active.
4 If you still have problems, see Troubleshooting in the User’s Guide.
If you can access the Internet, but you cannot make calls through the Internet, follow these steps.
1 Make sure the VOICE OVER INTERNET SETUP wizard screens are properly configured (see Section 2.1).
2 One of the PHONE lights should come on. Make sure that your telephone is connected to the
corresponding PHONE or ISDN PHONE port.
3 You can also check the VoIP status in the Status screen.
Viewing Your Product’s Certifications
1 Go to www.zyxel.com.
2 Select your product from the drop-down list box on the ZyXEL home page to go to that product's page.
3 Select the certification you wish to view from this page.
8