1
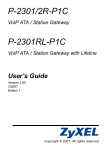
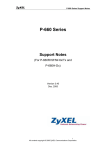
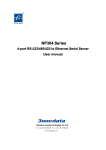
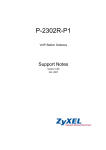
P-2302R-P1 Series
VoIP ATA / Station Gateway
Quick Start Guide
Version 3.60
Edition 1
5/2006
P-2302R-P1 Series Quick Start Guide
Overview
This guide explains how to set up your P-2302R-P1 Series device (“P-2302R-P1“) to make phone calls over
the Internet. For the P-2302RL-P1, it also explains how to set up regular phone services that do not use the
Internet.
The following figure shows a typical way to use your P-2302R-P1.
A
B
D
C
When you make a phone call over the Internet, you use one of your telephones (A) to dial the number. The
telephones are connected to your P-2302R-P1 (C), which is connected to the broadband modem or router that
provides Internet access (D).
When you want to use the Internet, you use your computer (B). Your computer is connected to your P-2302RP1 (C), which is connected to the broadband modem or router that provides Internet access (D).
When you want to configure the P-2302R-P1 (C), you also use your computer (B).
1 Requirements
Make sure you have the following things before you set up your P-2302R-P1.
• Internet access - account information provided by your ISP, such as user name, password, and so on.
• VoIP account - You need the account information provided by your VoIP service provider (the company that lets
you make phone calls over the Internet). This information might include your URI, number, and so on.
• Internet Explorer 6.0 or later or Netscape Navigator 7.0 or later, with JavaScript enabled.
2
P-2302R-P1 Series Quick Start Guide
2 Hardware Connections
1 LINE (P-2302RL-P1 only): Use a telephone cable to connect the telephone jack to this port.
2 PHONE 1-2: Use a telephone cable (and any telephone adaptors provided with your P-2302R-P1) to
connect your telephones to these ports. If you only have one telephone, you should only use one port.
3 ETHERNET: Use an Ethernet cable to connect your computer to this port.
4 WAN: Use an Ethernet cable to connect your broadband modem or router to this port.
5 POWER: Use the power adaptor provided with your P-2302R-P1 to connect an appropriate power source
to this port.
On the front panel, the POWER light flashes green while your P-2302R-P1 starts up and stays green once it is
ready. The WAN and ETHERNET lights turn on if the WAN and ETHERNET ports are properly connected.
These lights flash when the P-2302R-P1 is sending or receiving data.
3
P-2302R-P1 Series Quick Start Guide
3 Initial Configuration
Use a web browser on your computer to set up your P-2302R-P1. See Troubleshooting if you have any
problems.
3.1 Open the Wizard Setup Screen
1 Launch your web browser.
2 Enter http://192.168.1.1 as the address or URL.
3 Click Login.
4 Type a new password, re-type it to confirm, and
click Apply. (The next time you log in, you should
not see this screen.)
5 Click Go to Advanced setup.
6 In the main screen, click the Wizard icon
upper right corner.
If the INTERNET light is green, go to section 3.3. Otherwise, go to section 3.2.
4
in the
P-2302R-P1 Series Quick Start Guide
3.2 Connection Wizard
If you subscribe to a Roadrunner service, you cannot use the Connection Wizard to set up your Internet
connection. In this case, please see the User’s Guide for instructions.
Note: You must have Internet access before you can complete this section.
1 In the Wizard Setup screen, click Connection
Wizard.
2 Click Next.
3 System Name is used to identify the P-2302R-P1
in the network. Use the default value, unless you
know the name is already used in the network.
4 This screen has different fields, depending on the
connection type (encapsulation) your ISP uses.
Select Ethernet or PPP over Ethernet (PPPoE). If
you are not sure and if your ISP gave you a user
name and password, select PPP over Ethernet.
Then, follow the instructions in the appropriate
section below.
Domain Name (optional): Enter the appropriate
name, if there is one, or use the default value.
Click Next.
5
P-2302R-P1 Series Quick Start Guide
3.2.1 Connection Wizard (Ethernet)
Follow these steps if your ISP uses an Ethernet connection.
1 Click Next.
2 Select Get automatically from your ISP if your
ISP did not give you a static IP address. Then,
click Next, and go to step 4 below.
Select Use fixed IP address provided by your ISP
if your ISP gave you a static IP address. Then, click
Next.
3 Enter the information provided by your ISP. Use the
default values if your ISP did not provide the
requested information. Then, click Next.
4 Select Factory default, unless your ISP has told
you to spoof your computer’s MAC address. Then,
click Apply.
5 Click Finish.
6 Launch another web browser, and go to any web site
(for example, http://www.zyxel.com). If you cannot
access the Internet, see Troubleshooting.
6
P-2302R-P1 Series Quick Start Guide
3.2.2 Connection Wizard (PPP over Ethernet)
Follow these steps if your ISP uses a PPP over Ethernet (PPPoE) connection.
1 Enter the information provided by your ISP. Use the
default values if your ISP did not provide the
requested information. Then, click Next.
2 Select Get automatically from your ISP if your
ISP did not give you an IP address. Then, click
Next, and go to step 4.
Select Use fixed IP address provided by your ISP
if your ISP gave you a static IP address. Then, click
Next., and go to step 3.
3 Enter the information provided by your ISP. Use the
default values if your ISP did not provide the
requested information. Then, click Next.
4 Select Factory default, unless your ISP has told
you to spoof your computer’s MAC address. Then,
click Apply.
5 Click Finish.
6 Launch another web browser, and go to any web site
(for example, http://www.zyxel.com). If you cannot
access the Internet, see Troubleshooting.
7
P-2302R-P1 Series Quick Start Guide
3.3 VoIP Setup Wizard
Note: You must have Internet access and a VoIP account before you can complete this section.
1 In the Wizard Setup screen, click VoIP Setup.
2 Enter the information provided by your VoIP
service provider. If you have a VoIP account like
[email protected], the SIP Number is
1234, and the SIP Service Domain is VoIPprovider.com. Use the default values if your VoIP
service provider did not provide the requested
information.
Select Check here to set up SIP2 settings if you
want to set up the second VoIP account in the P2302R-P1 now. In this case, enter the information for
the first VoIP account, click Apply, and enter the
information for the second VoIP account. You can
also set up the second account later. See the User’s
Guide for instructions.
Click Apply.
3 Wait while the P-2302R-P1 tries to register the
VoIP account(s).
4 Click Finish. The PHONE light should be green.
3.4 Bandwidth Management Wizard (Optional)
If you want to use the Bandwidth Management Wizard, please see the User’s Guide for instructions.
8
P-2302R-P1 Series Quick Start Guide
3.5 Regular Phone Line Configuration (P-2302RL-P1 only)
When one of your VoIP accounts is registered, the P-2302R-P1 normally uses the Internet (not the regular
phone line) to make phone calls. Follow the directions in this section to make sure you can also use the
regular phone line while one of your VoIP accounts is registered.
In the main screen, click VoIP > PSTN Line.
PSTN Line Pre-fix Number: If you want to make a regular phone call while one of your VoIP accounts is
registered, you have to dial this number before you dial the phone number.
Relay to PSTN Line: Enter phone numbers for regular phone calls (that do not use the Internet) that you
always want to dial without the prefix number. For example, enter emergency phone numbers here.
Click Apply.
3.6 Bridge Mode
The P-2302R-P1 supports two modes, Router and Bridge. Usually, you should use Router mode because it
supports all the features available in the P-2302R-P1. However, you might use Bridge mode in the following
situation:
• There is another router or gateway in the network; and
• You only want to use the P-2302R-P1 for VoIP and Internet access. You do not want to use other features, such
as the firewall, even with their default settings.
If you want to use Bridge mode, follow these steps.
9
P-2302R-P1 Series Quick Start Guide
1 In the main screen, click Maintenance > System > General.
2 In the Mode field, select Bridge.
3 In the Management IP Address field, enter the IP address you want to use to access the P-2302R-P1 in
Bridge mode. For example, enter 192.168.5.1.
4 Click Apply.
The P-2302R-P1 automatically restarts. When the POWER light stops blinking and stays on, follow the
directions in section 3.1 to log in to the web configurator again. However, use the Management IP Address
you set up in step 3, instead of http://192.168.1.1. If your computer’s IP address is in a different subnet, follow
the directions in the appropriate appendix of the User’s Guide to change your computer’s IP address.
See the User’s Guide for more details about Bridge mode.
4 Phone Calls
Follow these directions to make calls over the Internet.
• If you want to dial a SIP number that only uses numbers (for example, “12345”), dial the number on your
phone’s keypad. You can also set up a speed-dial entry, if you want. See the User’s Guide for instructions.
• If you want to dial a SIP number that uses letters or if you want to make a peer-to-peer call, set up a speed-dial
entry first. See the User’s Guide for instructions. Then, dial the speed-dial number to make the call.
• If you want to call regular telephone numbers, use your VoIP service provider’s dialing plan.
For the P-2302RL-P1, follow these directions to make phone calls that do not use the Internet.
• If you set up the phone number in the Relay to PSTN section (section 3.5), just dial the phone number.
• If the PHONE light is off, just dial the phone number.
• Otherwise, first dial the prefix you set in section 3.5, and then dial the phone number.
Note: If the P-2302RL-P1 is turned off, you can only use the phone that is connected to the PHONE1
port to make phone calls (regardless of the settings in any screen). Make sure you know which
phone this is, in case you want to make an emergency call.
10
P-2302R-P1 Series Quick Start Guide
Follow these directions to call the phone that is connected to the P-2302R-P1.
• (P-2302R-P1) Use your VoIP service provider’s dialing plan. The P-2302R-P1 must be on.
• (P-2302RL-P1) Use your VoIP service provider’s dialing plan, or just dial the phone number.
Troubleshooting
PROBLEM
CORRECTIVE ACTION
None of the lights turn Make sure that you are using the power adaptor provided with the P-2302R-P1.
on when I plug in the Check all the connections you made in section 2.
P-2302R-P1.
Make sure the power source is turned on and has power.
If the problem continues, contact your local vendor.
The POWER light is
red.
Unplug the device, and plug it in again.
If the problem continues, contact your local vendor.
I can open the web
Make sure your web browser meets the requirements identified in section 1.
browser, but I cannot Check the connection between your computer and the P-2302R-P1. See section 2.
see the Login screen.
Make sure your computer’s IP address is in the same subnet as the P-2302R-P1’s IP
address.
•
If your P-2302R-P1 is in Router mode, let the P-2302R-P1 assign an IP address to
your computer. See Setting Up Your Computer’s IP Address.
• If your P-2302R-P1 is in Bridge mode, set up a static IP address for your computer.
For example, if you set the Management IP Address to 192.168.5.1, set up a static
IP address of 192.168.5.34 on your computer. See the appropriate appendix in the
User’s Guide for instructions. When you finish, set up the original settings again.
Make sure your computer’s Ethernet adapter is installed and functioning properly.
If you changed the P-2302R-P1’s mode or IP address, make sure you use the new IP
address in the Address or URL field in the web browser. (Note: This Quick Start Guide
does not explain how to change the P-2302R-P1’s IP address.)
If the problem continues, contact your local vendor.
My password is not
working.
I forgot my password
for the P-2302R-P1.
Make sure you enter the password correctly. It is case-sensitive.
If you changed the password in section 3.1 and then forgot it, you can reset the device.
This changes all the settings to their original values, and you have to make all of your
changes again. To reset the device,
1 Press the RESET button until the POWER light starts to blink. (This usually takes
ten seconds or less.)
2 Release the RESET button.
Afterwards, the P-2302R-P1 is in Router mode, its IP address is 192.168.1.1, and the
password is “1234”. See your User’s Guide for more information.
11
P-2302R-P1 Series Quick Start Guide
PROBLEM
CORRECTIVE ACTION
The web configurator
returns to the Login
screen when I try to
do something.
By default, the web configurator times out in five minutes. Log in again. You can change
this setting. Click Maintenance > System > General, and change the Administrator
Inactivity Timer.
There is no dial tone.
Check the connection between your telephone and the P-2302R-P1. See section 2.
Test the telephone wire.
1 Connect the wire to a telephone and a regular telephone outlet.
2 If you cannot hear the dial tone, the wire might be bad. Use a different one.
If the problem continues, contact your local vendor.
I cannot make VoIP
phone calls.
Log in to the P-2302R-P1. Select Go to Advanced setup. The Status screen appears.
In the VoIP Status section (at the bottom), make sure at least one of the VoIP accounts is
The dial tone beeps or registered. If neither account is registered, click Register for the VoIP account(s) that you
set up in section 3.3. If you cannot register your VoIP account(s), see the Troubleshooting
pulses.
suggestions for this problem below.
If the problem continues, contact your local vendor.
I cannot register my
VoIP account(s).
Make sure you provided the right information in the VoIP Setup Wizard. See section 3.3.
Make sure you can access the Internet through the P-2302R-P1. Launch your web
browser, and go to any web site (for example, http://www.zyxel.com). If you cannot open
the web site, see the Troubleshooting suggestions for that problem.
Make sure your VoIP account uses SIP. Your P-2302R-P1 only supports SIP. If you are
not sure, contact your VoIP service provider.
If the problem continues, contact your VoIP service provider.
I cannot access the
Internet through the
P-2302R-P1.
Make sure you provided the correct information in the Connection Wizard. If you are not
sure which connection type (encapsulation) your ISP uses, try selecting the other one in
the Connection Wizard. See section 3.2.
Make sure you provided the correct user name and password if you are using PPPoE.
Check the connections between the P-2302R-P1 and the modem or router you use to
access the Internet. See section 2.
If this is a new Internet account, contact your ISP.
If the problem continues, contact your local vendor.
Setting Up Your Computer’s IP Address
Note: Follow these instructions only if you are following a suggestion in Troubleshooting.
This section shows you how to set up your Windows NT/2000/XP computer to automatically get an IP address
from the P-2302R-P1. See your User’s Guide for detailed IP address configuration for other Windows and
Macintosh computer operating systems.
12
P-2302R-P1 Series Quick Start Guide
1 In Windows XP, click Start > Control Panel.
In Windows 2000/NT, click Start > Settings > Control Panel.
2 In Windows XP, click Network Connections.
In Windows 2000/NT, click Network and Dial-up Connections.
3 Right-click on your network connection (for example, Local Area Connection). A menu appears, like the
one shown here.
4 In the menu, click Properties. The network connection’s properties screen appears.
5 In the list in the middle of the screen, look for Internet Protocol (TCP/IP), and select it.
6 Click Properties underneath the list. The Internet Protocol (TCP/IP) Properties screen appears.
7 Select Obtain an IP address automatically.
13
P-2302R-P1 Series Quick Start Guide
8 Select Obtain DNS server address automatically.
9 Click OK.
10Close the other windows.
Viewing Your Product’s Certifications
1 Go to http://www.zyxel.com.
2 Select your product from the drop-down list box on the ZyXEL home page to go to that product's page.
3 Select the certification you wish to view from this page.
14