1
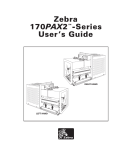
Zebra Technologies Corporation 333 Corporate Woods Parkway Vernon Hills, Illinois 60061.3109 U.S.A. Telephone +1 847.634.6700 Facsimile +1 847.913.8766 Zebra Technologies Europe Limited PA400 P O R T A B L E P R I N T E R S Zebra House The Valley Centre, Gordon Road High Wycombe Buckinghamshire HP13 6EQ, UK Telephone +44 (0)1494 472872 Facsimile +44 (0)1494 450103 Customer order #52600L Manufacturer part #52600LB ' Zebra Technologies Corporation Users ' Guide Customer order #52600L Manufacturer part #52600LB Rev. 1 User's Guide Proprietary Statement This manual contains proprietary information of Zebra Technologies Corporation. It is intended solely for the information and use of parties operating and maintaining the equipment described herein. Such proprietary information may not be used, reproduced, or disclosed to any other parties for any other purpose without the expressed written permission of Zebra Technologies Corporation. Product Improvements Continuous improvement of products is a policy of Zebra Technologies Corporation. All specifications and signs are subject to change without notice. FCC Compliance Statement NOTE: This equipment has been tested and found to comply with the limits for a Class B digital device, pursuant to Part 15 of the FCC Rules. These limits are designed to provide reasonable protection against harmful interference in a residential installation. This equipment generates, uses and can radiate radio frequency energy and, if not installed and used in accordance with the instructions, may cause harmful interference to radio communications. However, there is no guarantee that the interference will not occur in a particular installation. If this equipment does cause harmful interference to radio or television reception, which can be determined by turning the equipment off and on, the user is encouraged to try to correct the interference by one or more of the following measures: • Reorient or relocate the receiving antenna. • Increase the separation between the equipment and the receiver. • Connect the equipment into an outlet on a circuit different from that to which the receiver is connected. • Consult the dealer or an experienced Radio/TV technician for help. NOTE: This unit was tested with shielded cables on the peripheral devices. Shielded cables must be used with the unit to insure compliance. “The user is cautioned that any changes or modifications not expressly approved by Zebra Technologies Corporation could void the user’s authority to operate the equipment.” Canadian DOC Compliance Statement This digital apparatus does not exceed the Class A limits for radio noise emissions from digital apparatus as set out in the radio interference regulations of the Canadian Department of Communications. Liability Disclaimer Zebra Technologies Corporation takes steps to assure that its published Engineering Specifications and Manuals are correct; however, errors do occur. Zebra Technologies Corporation reserves the right to correct any such errors and disclaims liability resulting therefrom. No Liability for Consequential Damage In no event shall Zebra Technologies corporation or anyone else involved in the creation, production, or delivery of the accompanying product (including hardware and software) be liable for any damages whatsoever (including, without limitation, damages for loss of business profits, business interruption, loss of business information, or other pecuniary loss) arising out of the use of or the results of use of or inability to use such product, even if Zebra Technologies Corporation has been advised of the possibility of such damages. Because some states do not allow the exclusion or limitation of liability for consequential or incidental damages, the above limitation may not apply to you. Copyrights This copyrighted manual and the label printer described herein are owned by Zebra Technologies Corporation. All rights are reserved. Unauthorized reproduction of this manual or the software in the label printer may result in imprisonment of up to one year and fines of up to $10,000 (17 U.S.C.506). Copyright violators may be subject to civil liability. All products and brand names are trademarks of their respective companies. All rights reserved. © 1999 Zebra Technologies Corporation I have determined that the Zebra printers identified as the Zebra® Portable Line™ PA400 and PT400 manufactured by: Zebra Technologies Corporation 333 Corporate Woods Parkway Vernon Hills, Illinois 60061-3109 U.S.A. have been shown to comply with the applicable technical standards of the FCC for Home, Office, Commercial, and Industrial use if no unauthorized change is made in the equipment, and if the equipment is properly maintained and operated. Contents Introduction Hello! . . . . . . . . . . . . . . . . . . . . . . . . . . . . . . . . . . 1 Unpacking and Inspection . . . . . . . . . . . . . . . . . . . . . . . . 1 Reporting Damage . . . . . . . . . . . . . . . . . . . . . . . . . . 1 Getting Ready to Print Battery . . . . . . . . . . . . . . . . . . . . . . . . . . . . . . . . . . 3 Installing the Battery . . . . . . . . . . . . . . . . . . . . . . . . . 3 Charging the Battery . . . . . . . . . . . . . . . . . . . . . . . . . 4 Loading the Media. . . . . . . . . . . . . . . . . . . . . . . . . . . . 5 Tear-Off Mode . . . . . . . . . . . . . . . . . . . . . . . . . . . . 5 Peel-Off Mode . . . . . . . . . . . . . . . . . . . . . . . . . . . 10 Fanfold Media . . . . . . . . . . . . . . . . . . . . . . . . . . . 13 Loading the Ribbon . . . . . . . . . . . . . . . . . . . . . . . . . . 16 Operator Controls . . . . . . . . . . . . . . . . . . . . . . . . . . . 18 Power Button . . . . . . . . . . . . . . . . . . . . . . . . . . . . 18 Feed Button . . . . . . . . . . . . . . . . . . . . . . . . . . . . . 18 Indicator LEDs . . . . . . . . . . . . . . . . . . . . . . . . . . . . . 19 Power LED . . . . . . . . . . . . . . . . . . . . . . . . . . . . . 19 Error LED . . . . . . . . . . . . . . . . . . . . . . . . . . . . . . 19 Battery Charging LED . . . . . . . . . . . . . . . . . . . . . . . 19 Printing a Test Label . . . . . . . . . . . . . . . . . . . . . . . . . . 20 Connecting the Printer and Computer . . . . . . . . . . . . . . . . . 20 Communicating with the Printer . . . . . . . . . . . . . . . . . . . . 22 Setting the Communication Parameters . . . . . . . . . . . . . . 22 Setting Up the Software . . . . . . . . . . . . . . . . . . . . . . . . 22 Adjusting the Print Width . . . . . . . . . . . . . . . . . . . . . . . 22 Adjusting the Print Darkness. . . . . . . . . . . . . . . . . . . . . . 22 i Adjusting the Printhead Pressure. Adjusting the Strap . . . . . . . . Hand/Shoulder Strap . . . . . Adjustable Shoulder Strap . . . . . . . . . . . . . . . . . . . . . . . . . . . . . . . . . . . . . . . . . . . . . . . . . . . . . . . . . . . . . . . . . . . . . . . . . . . . . . 23 24 24 26 Calibration Auto Calibration . . . . . . . . . . . . . . . . . . . . . . . . . . . . 27 Manual Calibration . . . . . . . . . . . . . . . . . . . . . . . . . . . 28 Preventive Maintenance Cleaning . . . . . . . . Lubrication . . . . . . . Extending Battery Life . Battery Disposal . . . . . . . . . . . . . . . . . . . . . . . . . . . . . . . . . . . . . . . . . . . . . . . . . . . . . . . . . . . . . . . . . . . . . . . . . . . . . . . . . . . . . . . . . . . . . . . . . . 29 30 30 31 Help! The LEDs are On/Off/Flashing! . Print Quality Problems . . . . . . . . . . Troubleshooting Tests . . . . . . . . . . Printing a Configuration Label . . . . Recalibration . . . . . . . . . . . . . Resetting the Factory Default Values. Communications Diagnostics . . . . . Feed Button Modes . . . . . . . . . . . . . . . . . . . . . . . . . . . . . . . . . . . . . . . . . . . . . . . . . . . . . . . . . . . . . . . . . . . . . . . . . . . . . . . . . . . . . . . . . . . . . . . . . . . . . . . . . . . . . . . . . . . . . . . . . . . . . . . . . . 33 35 37 37 37 37 37 39 . . . . . . . . . . . . . . . . . . . . . . . . . . . . . . . . . . . . . . . . . . . . . . . . . . . . . . . . . . . . 41 41 42 42 Troubleshooting Specifications Printing . . . . . . . . . . Ribbon Cartridge . . . . . Label . . . . . . . . . . . Memory/Communications ii . . . . . . . . . . . . . . . . . . . . . . . . . . . . . . . . Font/Bar Code . . . . . . . . . . . Physical/Environmental/Electrical . Agency Approvals . . . . . . . . . Options . . . . . . . . . . . . . . . Adapter Cable Pinouts . . . . . . . RJ45 Connector Pin Identification . Null Modem Cable Pinouts . . . . . . . . . . . . . . . . . . . . . . . . . . . . . . . . . . . . . . . . . . . . . . . . . . . . . . . . . . . . . . . . . . . . . . . . . . . . . . . . . . . . . . . . . . . . . . . . . . . . . . . . . . . . . . . . . . . . . . . . . . . . . . . . . . 43 43 44 44 45 45 46 Index iii iv Introduction Hello! Thank you for choosing our Zebra Portable Printer. Don’t let its size fool you - this rugged little printer is sure to become a productive and efficient addition to your workplace. And it’s no wonder, because it’s made by Zebra Technologies Corporation - your number one source for bar code printers, software, and supplies! • This user’s guide gives you all the information you’ll need to operate the printer. • To create and print label formats, take a look at the ZPL II Programming Guide (part #46530L) for information about Zebra’s label design programming language, better known as “ZPL II.” If one was not ordered with your printer, simply call your reseller or Zebra Technologies Corporation or visit the Zebra web site. If you’d like to use a different label preparation software, contact your reseller or Zebra for advice and information. • The PA400/PT400 Maintenance Manual (part #505142L) contains all the information you’ll need to properly maintain the printer. Unpacking and Inspection Inspect the printer for possible shipping damage: • Check all exterior surfaces for damage. • Raise the media access door (refer to “Loading the Media” in Getting Ready to Print) and inspect the media compartment for damage. In case shipping is required, save the carton and all packing material. Reporting Damage If you discover shipping damage: • Immediately notify and file a damage report with the shipping company. Zebra Technologies Corporation is not responsible for any damage incurred during shipment of the printer and will not cover the repair of this damage under its warranty policy. • Keep the carton and all packing material for inspection. • Notify your authorized Zebra reseller. 1 1 15 2 3 5 6 4 8 9 10 11 12 14 7 13 1 Top Cover 2 Error LED 3 Power LED 4 Printhead Pressure Adjuster 5 Power Button 6 Feed Button 7 Ribbon Cartridge 78 Printhead 89 Platen Roller 9 Media Guides 10 10 11 Media Hangers 11 12 Media Access Door 12 13 Battery Compartment 13 14 Media Compartment 14 15 Strap 15 16 Communications Port 16 17 Battery Charging Receptacle 17 18 Battery Charging LED 18 19 Charging Station Connector 19 20 Peel Bar 16 17 18 20 Figure 1 2 19 Getting Ready to Print Battery Installing the Battery NOTE: Batteries are shipped uncharged. 1. Slide up the battery compartment door. 2. Insert the battery into the printer as shown in Figure 2, with the silver-colored battery contacts facing up. 3. After the battery is completely inserted, slide down the battery compartment door. When the battery is first installed, the Power and Error LEDs will light for approximately two seconds and then go off. If these lights do not go on, the battery is not fully charged (see “Charging the Battery”). Battery Compartment Door Silver-colored Battery Contacts Battery Figure 2 3 Charging the Battery Refer to Figure 3 (your battery charger may look slightly different than the ones illustrated). If you are using a 120 VAC battery charger: 1. With the battery installed in the printer, insert the connector of the battery charger into the receptacle on the side of the printer. 2. Plug the battery charger into an appropriate 120 VAC electrical outlet. 3. The battery charging LED will briefly flash and then stay on. When the battery is fully charged (approximately one hour for the standard battery; two hours for the extended life battery), the light will go off. 4. You may either remove the battery charger from the printer or leave it connected for a continuous maintenance charge. If you are using a universal battery charger: 1. With the battery installed in the printer, insert the connector of the battery charger into the receptacle on the side of the printer. 2. Make sure the supplied power cord is inserted in the battery charger. 3. Plug the other end of the cord into an appropriate AC electrical outlet. Power Cord Plug Varies by Country 120 VAC Charger Universal Charger Figure 3 4 4. The battery charging LED will briefly flash and then stay on. When the battery is fully charged (approximately one hour for the standard battery; two hours for the extended life battery), the light will go off. 5. You may either remove the battery charger from the printer or leave it connected for a continuous maintenance charge. Loading the Media You can operate this printer in one of two different modes: Tear-Off or Peel-Off. Tear-Off mode allows you to tear off each label (or a strip of labels) after it is printed. In Peel-Off mode, the backing material is peeled away from the label as it is printed. After you remove this label, the next one is printed. Tear-Off Mode NOTE: If ribbon is loaded (PT400 only), remove the ribbon cartridge before loading the media. 1. Refer to Figure 4. Raise the media access door by lifting at the notch until it unhooks from the top cover. Top Cover Notch Media Access Door Figure 4 5 2. Refer to Figure 5. Swing the media access door open to expose the media compartment. 3. Pivot the top cover to reveal the printhead. 4. Lift the printhead until you feel it “lock” into place. Be careful not to force the printhead past this position! WARNING: NEVER touch the thermal print elements on the underside of the printhead. Under certain conditions, they can be very hot! Also, dirt or moisture from your hands can damage the printhead! Media Compartment Printhead Media Guides Media Hangers Figure 5 6 5. Refer to Figures 5 and 6. Thread the media into the printer until it extends approximately 1” (25.4 mm) past the printhead. 6. Separate and hold open the media hangers. 7. Place the media roll onto the media hangers, making sure it is tightly wound. 8. Release the media hangers so the media locks into the correct position. Make sure the media is threaded under both media guides. Media Guides 1“ Past Printhead Media Hangers Unwind this direction Media Roll Figure 6 7 9. Refer to Figure 7. If it’s not already in place, install the tear bar in the media access door. Gently lift the tab on the bar to move it over the protrusion on the door. Make sure the lip of the bar (inset, Figure 7) faces out of the printer. If you’re using direct thermal media, continue on with step 10. However, if you’re using thermal transfer media, you must also install a ribbon cartridge. Proceed to “Loading the Ribbon” in this chapter. 10. Close the printhead and the top cover. Tab Protrusion Lip Figure 7 8 11. Swing up the media access door, ensuring that the media extends over the tear bar (refer to Figure 8). 12. Lift to hook the top of the media access door over the top cover. 13. Push in the bottom of the media access door to close. 14. Turn on the printer or press the Feed button if the printer is already on. Tear Bar Figure 8 9 Peel-Off Mode NOTES: Your authorized Zebra reseller can recommend the correct ribbon and peel-off media for your application. If ribbon is loaded (PT400 only), remove the ribbon cartridge before loading the media. 1. Refer to Figure 4. Raise the media access door by lifting at the notch until it unhooks from the top cover. 2. Refer to Figure 5. Swing the media access door open to expose the media compartment. 3. Pivot the top cover to reveal the printhead. 4. Lift the printhead until you feel it “lock” into place. Use caution not to force the printhead past this position! WARNING: NEVER touch the thermal print elements on the underside of the printhead. Under certain conditions, they can be very hot! Also, dirt or moisture from your hands can damage the printhead! 5. Refer to Figures 5 and 6. Remove approximately 6” (152.4 mm) of labels from the media roll. Then, thread the media into the printer until it extends approximately 1” (25.4 mm) past the printhead. 6. Separate and hold open the media hangers. 7. Place the media roll onto the media hangers, making sure it is tightly wound. 8. Release the media hangers to lock the media into the correct position. Ensure that the media is threaded under both media guides. 10 9. The tear bar should not be installed in the printer. If it is, gently lift the tab on the bar to get it over the protrusion on the door (reverse the procedure shown in Figure 7). Then, pull the bar out of the printer. NOTE: When not in use, the tear bar may be stored on the inside of the media access door. Refer to Figure 9. With the lip of the bar facing the inside of the door, simply align the notches of the bar with the tabs on the door. Press and slide the bar toward the door’s hinged end. If you’re using direct thermal media, continue on with step 10. However, if you’re using thermal transfer media, you must also install a ribbon cartridge. Proceed to “Loading the Ribbon” in this chapter. Door Tab Door Tab Tear Bar Notch Tear Bar Notch Figure 9 11 10. Close the printhead and the top cover. 11. Swing up the media access door, ensuring that the media liner is threaded through the wide slot in the media access door (refer to Figure 10). 12. Lift to hook the top of the media access door over the top cover. 13. Push in the bottom of the media access door to close. 14. Turn on the printer or press the Feed button if the printer is already on. NOTES: To ensure optimal print quality, make sure that the backing material is flush against the peel bar (as shown in Figure 10). If it starts to “loop” away from the peel bar, gently pull down on the backing material. With certain types of media, it may be necessary to reduce the print speed to 1.5” (38.1 mm) per second to produce consistent peel operation. Consult your authorized Zebra reseller for advice and information. Label Backing Material Wide Slot Figure 10 12 Fanfold Media (optional vibration mount required) NOTE: If ribbon is loaded (PT400 only), remove the ribbon cartridge before loading the media. 1. Raise the media access door by lifting at the notch until it unhooks from the top cover (refer to Figure 4). 2. Swing the media access door open to expose the media compartment (refer to Figure 5). 3. Pivot the top cover to reveal the printhead. 4. Lift the printhead until you feel it “lock” into place. Be careful not to force the printhead past this position! WARNING: NEVER touch the thermal print elements on the underside of the printhead. Under certain conditions, they can be very hot! Also, dirt or moisture from your hands can damage the printhead! 5. Separate and hold open the media hangers (refer to Figure 11). 6. Place the plastic media core (refer to Figure 11) onto the media hangers. Media Guides Media Hangers Plastic Media Core Figure 11 13 NOTE: The plastic media core can be obtained from an authorized Zebra supplies reseller. 7. Release the media hangers so the plastic media core locks into the correct position. 8. Place the fanfold media in the fanfold media tray. 9. Swing up the media access door. Thread the fanfold media through the slot beneath the notch on the media access door (refer to Figure 12). 10. Swing open the media access door. Continue to insert the media into the printer and under the plastic media core until it appears beneath the printhead. Make sure the media is threaded under both media guides. If you’re using direct thermal media, continue on with step 11. However, if you’re using thermal transfer media, you must also install a ribbon cartridge. Proceed to “Loading the Ribbon” in this chapter. 11. Swing up the media access door, ensuring that the media extends over the tear bar (refer to Figure 13). 12. Lift to hook the top of the media access door over the top cover. 13. Push in the bottom of the media access door to close. 14. Turn on the printer or press the Feed button if the printer is already on. 14 Notch Fanfold Media Slot Figure 12 Media Figure 13 15 Loading the Ribbon (PT400 only) 1. If the printhead is not already open, lift it until you feel it “lock” into place. WARNING: NEVER touch the thermal print elements on the underside of the printhead. Under certain conditions, they can be very hot! Also, dirt or moisture from your hands can damage the printhead! 2. Hold the ribbon cartridge as shown in Figure 14. The placement arrows should be visible and pointing toward the back of the printer. 3. Align the lower protrusions on both sides of the ribbon cartridge with the channels in the left and right frames (refer to Figure 14). 4. Slide the ribbon cartridge past the printhead (refer to Figure 15). It will automatically move into the correct operating position. 5. Close the printhead (refer to Figure 16) and the top cover. Swing up the media access door, ensuring that the media is properly extending out of the printer (see Figure 8 for Tear-Off, or Figure 10 for Peel-Off). 6. Lift to hook the top of the media access door over the top cover. Push in the bottom of the media access door to close. 7. Turn on the printer or press the Feed button if the printer is already on. Channel Printhead Arrows Ribbon Cartridge Lower Protrusion Figure 14 16 To remove the ribbon cartridge, simply lift the printhead and pull the ribbon cartridge from the printer. Printhead Ribbon Cartridge Figure 15 Close Printhead Ribbon Figure 16 17 Operator Controls Refer to Figure 17. Power Button • Press to turn on the printer. • To turn off the printer, press and hold until the Power LED flashes once. (Holding the button for approximately two seconds acts as a safeguard. That way, no data will be lost if the button is accidentally pressed or bumped.) CAUTION: The power should be turned off before connecting or disconnecting the communications cable. Feed Button • Forces the printer to feed one blank label. • Takes the printer out of a “pause” condition. (The printer is put into “pause” by either a software command or an error condition.) See Troubleshooting. • Used for printer setup and status (see “Feed Button Modes” in Troubleshooting). Feed Button Error LED Power LED Figure 17 18 Power Button Indicator LEDs Refer to Figures 17 and 18. Power LED (Green) • “On” during normal printer operation. • Functions as a printer operational/battery status indicator (see “Help! The LEDs are On/Off/Flashing!” in Troubleshooting). Error LED (Orange) • “Off” during normal printer operation. • Functions as a printer operational status indicator (see “Help! The LEDs are On/Off/Flashing!” in Troubleshooting). Battery Charging LED (Yellow) • Functions as a battery charging status indicator. • “On” while the battery is fast charging. • “Flashing” when the printer is preparing the battery for fast charging or the battery overheats while charging. • “Off” if the battery is fully charged or the battery charger is not plugged in. Receptacle Battery Charging LED Figure 18 19 Printing a Test Label Before you connect the printer to your computer or portable data terminal, make sure that the printer is in proper working order. You can do this by printing a configuration label (refer to “Feed Button Modes” in Troubleshooting). If you can’t get this label to print, refer to Troubleshooting. Connecting the Printer and Computer CAUTION: The power should be turned off before connecting or disconnecting the communications cable. This printer is configured as Data Terminal Equipment (DTE). There are two types of cables available for the printer. The straight through printer adapter cable connects to a null modem cable, which connects to the computer or a portable data terminal (PDT). Consult your computer/PDT reseller for the appropriate DB-9 null modem cable for your device. Refer to Figure 19. 1. Plug the null modem cable into the serial data port of the computer. 2. Plug the other end of the null modem cable into the connector of the printer adapter cable. NOTE: The adapter cable maintains interface compatability with the full line of Zebra printers. 3. Plug the adapter cable into the printer’s communications port (see Figure 1). Null modem cables are also available for many popular portable data terminal models. Consult your authorized Zebra reseller for available data cables. Refer to Figure 20. 1. Turn off the portable data terminal and the printer. 2. Plug the communications cable into the communications port of both the portable data terminal and the printer. A ferrite is built into the cable near the connector that plugs into the printer. 3. Turn on the portable data terminal and the printer. For pinout and cabling information, refer to Specifications. 20 Computer Communications Ports Adapter Cable 10101 10101 10101 10101 Null Modem Cable Figure 19 Ferrite Communications Cable Figure 20 21 Communicating with the Printer Setting the Communication Parameters When using the printer’s serial port to transfer data, you will need to make sure that the printer and the computer have identical communication parameter settings. To initialize the communication parameters for the printer: • Press and hold the Feed button until the Error LED flashes once, then twice, then three times. Release the button. The baud rate for the printer will be reset to 9600 baud, 8 bits per character, no parity, and 1 stop bit using software handshaking (XON/XOFF). Then, set the communication parameters on your computer to match this. • Some computer programs use different settings than the default modes (for example, computers operating in MS-DOS use hardware handshaking instead of XON/XOFF). To use different settings than the defaults and save these settings permanently, refer to your label preparation software user’s manual. Setting Up the Software In order to create labels, you must decide whether you will use ZPL II or a commercial label preparation system. To use ZPL II, refer to the ZPL II Programming Guide. If you choose to use a label preparation system, follow the installation instructions included in the package. Adjusting the Print Width Print width must be calibrated when you are using the printer for the first time and whenever there is a change in the width of the media you are using. Print width can be set via the software (consult your label preparation software user’s manual) or refer to “Feed Button Modes” in Troubleshooting. Adjusting the Print Darkness The relative darkness setting is software controlled. Follow the instructions in your label preparation software user’s manual. 22 Adjusting the Printhead Pressure Adjust printhead pressure if print darkness is inconsistent across the label. NOTE: In general, use a higher setting for wide labels and a lower setting for narrow labels. There are four printhead pressure settings (see Figure 21). Depending on whether you want to increase or decrease the printhead pressure, slide the printhead pressure adjuster toward the back or front of the printer. Then, print another test label. Repeat this procedure until you achieve the desired results. WARNING: NEVER tighten or loosen the two screws that secure the printhead to the bracket! They are not used to adjust printhead pressure! Printhead Pressure Adjuster Screws Securing Highest Lowest Printhead Pressure Pressure to the Setting Setting Bracket Figure 21 23 Adjusting the Strap Hand/Shoulder Strap To lengthen the strap: Refer to Figure 22. 1. With the printer in front of you, unwrap the padded handle by lifting up the loose end of the handle. 2. Unlatch the buckle by squeezing both sides of the fastener. 3. Let the loose end of the strap fall to the side. 4. Pull up the handle. 1 4 Handle 2 (Pull Up) Fastener Buckle 3 Figure 22 24 To shorten the strap: Refer to Figure 23. 1. Pull the buckle until the strap is taut. 2. Latch by inserting the fastener into the buckle. 3. Wrap and secure the padded handle around the strap. 2 3 Handle Buckle Fastener 2 1 Figure 23 25 Adjustable Shoulder Strap Refer to Figure 24. Slide the two buckles toward either the printer or shoulder pad until you achieve the desired length. Grip Buckle Here Pull Strap Here to Shorten Shoulder Pad Pull Strap Here to Lengthen Figure 24 26 Calibration Auto Calibration NOTE: The printer will not auto calibrate when you are using pre-printed labels or pre-printed label backing. If you are using this type of media, see “Manual Calibration.” By default, this printer automatically sets the sensor levels for, and determines the length of, the label you are using. To auto calibrate: 1. Load the media according to the instructions in “Loading the Media” in Getting Ready to Print. 2. Turn on the printer or press the Feed button if the printer is already on. 3. Some blank labels will feed, completing auto calibration. 4. If the Error LED begins flashing, refer to “Manual Calibration.” Hints: • Auto calibration only works when you are using non-continuous media (a gap, notch, or black mark separates each label). • When auto calibration is selected, it occurs when the printer is turned on (if the printhead has been opened), whenever an error is cleared, or if the battery (or other power source) has been removed. 27 Manual Calibration A manual calibration should be performed whenever you are using pre-printed labels (or label backing) or if the printer will not auto calibrate. 1. Turn on the printer power. 2. Remove 4-6” (102-152 mm) of labels from a section of backing material. Load the media so that only the backing material is threaded through the printer and under the printhead. 3. Press and hold the Feed button until the Error LED flashes once, then twice. Release the button. 4. The printer will set the media sensor for the label backing you are using. After it is done making this adjustment, the roll will automatically feed until a label is positioned at the printhead. 5. A profile of the media sensor settings will print (similar to the example in Figure 25). Upon completion, the printer will save the new settings in memory and the printer is ready for normal operation. 6. Press the Feed button. One entire blank label should feed. If this doesn’t happen, try defaulting (refer to “Feed Button Modes” in Troubleshooting) and recalibrating the printer. NOTE: Performing a manual calibration disables the auto calibration function. To return to auto calibration, either default the printer (see “Feed Button Modes” in Troubleshooting) or refer to your label preparation software user’s manual. NOTE: When using non-continuous media, set the appropriate software command (see your label preparation software user’s manual) before you perform a manual calibration. Figure 25 28 Preventive Maintenance WARNING: To avoid possible personal injury or damage to the printer, never insert any pointed or sharp objects into the printer. Cleaning CAUTION: Use only the cleaning agents indicated. Zebra Technologies Corporation will not be responsible for damage caused by any other cleaning materials used on this printer. Area Printhead (Figure 1) Method Use 70% isopropyl alcohol on a cotton swab to clean the print elements from end to end (the print elements are located in the thin gray line on the printhead). Note: You do not have to turn off the printer to do this. If print quality has not improved after performing this procedure, try cleaning the printhead with Save-a-Printhead cleaning film. This specially coated material removes contamination buildup without damaging the printhead. Call your authorized Zebra reseller for more information. Interval After every five rolls of media or three ribbon cartridges (or more often, if needed) Platen roller (Figure 1) With the printer turned off, rotate the platen roller and clean it thoroughly with 70% isopropyl alcohol and a cotton swab or lint-free cloth. Head open sensor plate (Figure 26) With the printer power turned off and battery removed, press down on the top of the printhead. Then, clean the area beneath the screw with 70% isopropyl alcohol and a cotton swab. Caution: Do not turn the screw. Peel bar (Figure 1) Clean it thoroughly with 70% isopropyl alcohol and a cotton swab. As needed Tear bar (Figure 8) Clean it thoroughly with 70% isopropyl alcohol and a cotton swab. As needed Exterior Water-dampened cloth As needed Interior Brush/air blow As needed 29 PRESS DOWN Head Open Sensor Plate Clean under screw Figure 26 Lubrication CAUTION: No lubricating agents of any kind should be used on this printer! Some commercially available lubricants, if used, will damage the finish and the mechanical parts inside the printer. Extending Battery Life • Never expose the battery to direct sunlight or temperatures over 104° F • • • • • 30 (40° C). Choose the media or ribbon that is easiest to “burn.” An authorized Zebra reseller can help you determine this. Make sure you’re using the optimal ribbon/media combination for your application. An authorized Zebra reseller can help you determine this. If you print the same text or graphic on every label, consider using a pre-printed label. Choose the correct print darkness, print speed, and printhead pressure for your media and ribbon. Use software handshaking (XON/XOFF) whenever possible. • Select Tear-Off mode whenever possible (Peel-Off mode uses more power). • Pull the battery out of the printer if the printer won’t be used for a day or more and you’re not performing a maintenance charge. • Completely discharge the battery before recharging. Wait until you get a “battery under voltage - level 1” indication (Error LED off and Power LED flashing) before you recharge. • Consider purchasing an extended life battery, which offers double the life of a standard battery. Battery Disposal The EPA certified RBRC Battery Recycling Seal on the nickel-cadmium (Ni-Cd) battery indicates Zebra Technologies Corporation is voluntarily participating in an industry program to collect and recycle these batteries at the end of their useful life, when taken out of service in the United States or Canada. The RBRC program provides a convenient alternative to placing used Ni-Cd batteries into the trash or the municipal waste stream, which may be illegal in your area. Please call 1-800-8-BATTERY for information on Ni-Cd battery recycling and disposal bans/restrictions in your area. Zebra Technologies Corporation’s involvement in this program is part of our commitment to preserving our environment and conserving our natural resources. Outside North America, please follow local battery recycling guidelines. 31 32 Troubleshooting Try as you may, you can’t seem to get the label to look right. Or, the LEDs are on or flashing when they’re normally off. This is the section of the User’s Guide that can help you solve your printer’s problems! If, after reading this section, you’re still having difficulty getting your printer to print, contact a qualified Zebra service technician. Help! The LEDs are On/Off/Flashing! Error LED (Orange) Power LED (Green) Printer Status For a Resolution, Refer to: Off Off Off 1 Flashing On Stopped 2 Double Flashing On Paused 3 On On On 4 On On Stopped 5 Off Flashing On 6 Off Flashing Stopped 7 Alternate Flashing Needs Service 8 Simultaneous Flashing Various 2 and 6 On Flashing On 4 and 6 On Flashing Various 5 and 6 Double Flashing Flashing Yes 3 and 7 Resolutions: 1. The printer is not receiving power. • Have you turned on the printer power? • Ensure that the battery is fully charged. Follow the instructions in “Charging the Battery” in Getting Ready to Print. • Make sure the battery is properly installed. Refer to “Installing the Battery” in Getting Ready to Print. 33 2. The printhead is open. • Close the top cover and media access door. Then, press the Feed button to resume printing. The media is out. • Load a roll of media, following the instructions in “Loading the Media” in Getting Ready to Print. Then, press the Feed button to resume priting. The ribbon is out (PT400 only). • Load the ribbon, following the instructions in “Loading the Ribbon” in Getting Ready to Print. Then, press the Feed button to resume printing. The head open sensor plate is dirty. • Clean the head open sensor plate according to the instructions in Preventive Maintenance. 3. The printer is paused. • Press the Feed button to resume printing. 4. The printhead is under temperature. • Continue printing while the printhead reaches the correct operating temperature. 5. The printhead is over temperature. • Printing automatically stops until the printhead cools to an acceptable printing temperature; then, the printer automatically resumes operation. The battery is over temperature. • Printing automatically stops until the printer and battery cool to an acceptable operating temperature; then, the printer automatically resumes operation. 6. The battery is under voltage (level 1). • Wait until the current label finishes printing, then plug the battery charger into the printer (you don’t have to turn off the printer to do this). 34 7. The battery is under voltage (level 2). • The battery may not have enough power to print the next label and can reset the printer, losing formats in the printer. Plug the battery charger into the printer (you don’t have to turn off the printer to do this). After the battery is charged, press the Feed button. 8. FLASH memory is not programmed. • Return the printer to an authorized Zebra reseller. Print Quality Problems No print on the label. • If you aren’t using ribbon, make sure the correct media (direct thermal) is loaded. Try this: Quickly rub your nail or a blunt object over the label surface. If it doesn’t produce dark marks, the wrong media (thermal transfer) is loaded. • Are the media and ribbon loaded correctly? Follow the instructions in “Loading the Media” and “Loading the Ribbon” in Getting Ready to Print. • You may be trying to use the printer outside of its environmental limits. The correct operating temperature range for this printer is between 32° F and 104° F (0° to 40° C). The printed image doesn’t look right. • The printhead is dirty. Clean the printhead according to the instructions • • • • • in Preventive Maintenance. Printhead pressure needs to be adjusted. Follow the steps in “Adjusting the Printhead Pressure” in Getting Ready to Print. The print darkness needs to be adjusted. See “Adjusting the Print Darkness” in Getting Ready to Print. The print mode may be incompatible with the media you are using. If your printer is set for thermal transfer mode, you must use thermal transfer, rather than direct thermal, media and a ribbon cartridge. The media being used is incompatible with the printer. Be sure to use the Zebra-recommended media for your application. Battery voltage is low. See “Charging the Battery” in Getting Ready to Print. 35 There are long tracks of missing print (blank vertical lines) on several labels. • The printhead is dirty. Clean the printhead according to the instructions in Preventive Maintenance. • The printhead elements are damaged. Call a qualified service technician to replace the printhead. Misregistration of labels (the printing does not start at the top of the label) and misprinting of 1 to 3 labels. • The media may not be threaded under the media guides. Refer to “Loading the Media” in Getting Ready to Print. • The printer needs to be calibrated. Refer to Calibration. • Printhead pressure needs to be adjusted. Follow the instructions in “Adjusting the Printhead Pressure” in Getting Ready to Print. • The correct media sensor may not be activated. In manual calibration, select the media sensing method for the labels you are using (refer to your label preparation software user’s manual). A label format was sent to, but not recognized by, the printer. • Is the printer in pause mode? If so, press the Feed button. • If the LEDs are on or flashing, refer to “Help! The LEDs are On/Off/Flashing!” in Troubleshooting. • Make sure the data cable is installed correctly. Also, make sure you are using a null modem cable between the printer’s adapter cable and the computer (see Figure 19), or the appropriate null modem cable. • A communications problem has occurred. First, make sure that the correct communications port on the computer is selected. Next, verify that the same handshaking is in use by both the printer and the computer. Then, ensure that the communication parameters of the printer and the computer match. Refer to “Communicating with the Printer” in Getting Ready to Print. 36 Troubleshooting Tests Printing a Configuration Label To print out a listing of the printer’s current configuration (a sample is shown in Figure 27), refer to “Feed Button Modes” in this chapter. Recalibration Recalibrate the printer if it starts to display unusual symptoms, such as skipping labels. See Calibration. Resetting the Factory Default Values Sometimes, resetting the printer to the factory defaults solves some printer problems. Follow the instructions in “Feed Button Modes” in this chapter. Communications Diagnostics If there’s a problem transferring data between the computer and printer, try putting the printer in the Communications Diagnostics mode. The printer will print the ASCII characters and their respective hexidecimal values for any data received from the host computer (see Figure 28). To find out how, refer to “Feed Button Modes” in this chapter. 37 Figure 27 Figure 28 38 Feed Button Modes Power Off Mode (Communications Diagnostics Mode) With the printer power off, press and hold the Feed button while you turn on the power. The printer prints out a listing of its current configuration (see Figure 27). After printing the label, the printer will automatically enter a diagnostic mode in which the printer prints out a literal representation (see Figure 28) of all data subsequently received. Power On Modes With the printer power on, printhead closed, and Error LED off, press and hold the Feed button for several seconds. The Error LED will flash a number of times in sequence. The explanation at the right (Action) shows what happens when you release the key after the specific number of flashes. Flash Sequence Action * A configuration label prints. * ** The media sensor calibrates and a media sensor profile prints (see Calibration and Figure 25). * ** *** The serial communication parameters are reset to 9600 baud, 8 bits per character, no parity, 1 stop bit, and XON/XOFF. * ** *** **** Resets the factory defaults, auto calibrates, and saves settings into memory. * ** *** **** ***** The print width is calibrating. While the Error LED rapidly flashes, a series of stacking rectangles prints on the label. When the rectangle prints to the outer edges of the label, press and release the Feed button. The label width and current communication parameters will be saved into memory. If the Feed button is held down for six flashes and quickly released, the printer will ignore the button. For additional information, refer to the maintenance manual. 39 40 Specifications NOTE: Printer specifications are subject to change without notice. Printing Specifications Print Density 203 dots/inch (8 dots/mm) Print Width Up to 4.1” (104 mm) Print Speed 1.5” or 2” per second (38.1 mm or 50.8 mm per second) Horizontal Registration Tolerance Vertical Distance from Center Print Element to Center of Label +/- 0.059” (+/- 1.5 mm) ü +/- 0.0393” (+/- 1.0 mm) on media >2” (50.8 mm) in height ü +/- 0.1180” (+/- 3.0 mm) on media < 2” (50.8 mm) in height unless they are run without backfeed +/- 0.0393” (+/- 1.0 mm) ü Up to 18% black per batch Maximum Duty Cycle ü Up to 60 linear inches of media per batch ü Up to four batches per hour Ribbon Cartridge Specifications (PT400) Ribbon Width 4.33” (110 mm) Ribbon Outer Diameter .66” (16.8 mm) 41 Label Specifications Label/Tag Width 1” to 4.25” (25.4 mm to 108 mm) Fanfold Width 3.5” to 4.25” (89 mm to 108 mm) Label/Tag Length 0.5” to 10” (12.7 mm to 254 mm) Interlabel Gap .08” to .16” (.12” preferred) 2 mm to 4 mm (3 mm preferred) Label/Tag Thickness .0030” to .0106” (.076 mm to .269 mm) Max. Outer Label Roll Diameter Size Inner Core 2.1” (53.3 mm) 1” (25.4 mm) ü Use Zebra-brand direct thermal or thermal transfer roll media that is outside wound. Media may be reflective (black mark) sensing or transmissive sensing, die-cut, notched, or continuous. ü For die-cut labels, use only full auto dies. Media Requirements ü Notched media must have a 0.5” (12.7 mm) wide x 0.094” (2.4 mm) long cutout located in the center of the roll. The reflective media black marks must be located in the center of the roll. Minimum Black Mark Dimensions: ü Mark width: 0.5” (12.7 mm) perpendicular to the edge of the media. ü Mark length: 0.094” (2.4 mm) parallel to the edge of the media. Memory/Communications Specifications ROM Memory 8 megabit flash (512 kilobyte x 16 data bit width) RAM Memory 4 megabit DRAM (256 kilobyte x 16 data bit width) Communications RS-232 serial port (RJ45 connector) 42 Font/Bar Code Specifications Fonts Available ü CG Triumvirate Bold Condensed scalable smooth ü Zebra fonts A, B, C, D, E, H, GS ü Codabar (supports ratios of 2:1 to 3:1) ü Industrial 2 of 5 ü Code 11 ü Interleaved 2 of 5 (supports ratios of 2:1 to 3:1, Modulus 10 Check Digit) ü Code 128/USD 8 (supports serialization in all subsets and UCC Case Codes) 1D Bar Codes Available ü Code 39 (supports ratios of 2:1 to 3:1) ü Code 93 ü LOGMARS ü MSI ü Plessey ü POSTNET ü EAN 8/JAN 8 ü UPC E ü EAN 13/JAN 13 ü UPC/EAN Extensions ü EAN 14/UPCA 2D Bar Codes Available ü Standard 2 of 5 ü Codablock ü MicroPDF417 ü Code 49 ü PDF 417 ü Data Matrix ü QRcode ü MaxiCode Rotation Angles 0°, 90°, 180°, and 270° Physical/Environmental/Electrical Specifications Physical Size (L x W x H) 2.8” x 9.2” x 7.9” 72 mm x 233 mm x 200 mm Weight (without battery) Temperature Range Relative Humidity Electrical 3.5 lbs. 1.6 kg. Operating 32° to 104° F 0° to 40° C Storage (w/battery) -22° to 122° F -30° to 50° C Storage (w/o battery) -40° to 140° F -40° to 60° C Operation Storage 10% to 90% (non-condensing) 5% to 95% (non-condensing) External 120 or 230 VAC battery charger, depending on which model you order. Additional custom line cords may also be available. 43 Agency Approvals • UL 544 Medical Equipment Standard Part 42.5 • CSA 22.2 number 950 Canadian Safety Standard • IEC 950/EN 60950 International Safety Standard • FCC Part 15 Subpart B Class B Electromagnetic Radiation Standard • UL 1950 Domestic Safety Standard • Canadian DOC Class A • SOR/88-475 Canadian Electromagnetic Radiation Standard • EN50082-1 International Immunity Standard • EN55022 Class B European Electromagnetic Radiation Standard Options • Hand/shoulder strap • Adjustable shoulder strap • Weather-resistant protective case • Vibration mount, U-arm bracket, and media catch tray • Standard battery • Extended life battery • 120 VAC battery charger • Universal switching battery charger • Battery eliminator • Data cables For details, call your authorized Zebra reseller. 44 9-Pin D to RJ45 Connection Table DB-9S Connector to Null Modem Cable 1 2 3 4 5 6 7 8 9 UNUSED RXD TXD DTR GND DSR RTS UNUSED RJ45 Connector to Printer 1 2 3 4 5 6 7 8 Adapter Cable Pinouts Pin 1 Pin 8 RJ45 Connector Pin Identification 45 25-Pin D to 9-Pin D Null Modem Cable DB-25S Connector to P.C. 2 3 4 5 6 7 8 20 TXD RXD RTS CTS DSR GND DCD DTR DB-9P Connector to Adapter Cable DCD RXD TXD DTR GND DSR RTS CTS 1 2 3 4 5 6 7 8 9-Pin D to 9-Pin D Null Modem Cable DB-9S Connector to P.C. 1 2 3 4 5 6 7 8 DCD RXD TXD DTR GND DSR RTS CTS DB-9P Connector to Adapter Cable DCD RXD TXD DTR GND DSR RTS CTS Null Modem Cable Pinouts 46 1 2 3 4 5 6 7 8 Index A Adapter cable . . . . . Adapter cable pinouts . Adjusting the strap . . Adjustments Print darkness . . . Print width . . . . Printhead pressure. Agency approvals . . . . . . . . 20 . . . . . 45 . . . . . 24 . . . . . . . . . . . . . . . . . . . . 22 22 23 44 B Battery charging LED. . . . . . 19 Battery disposal . . . . . . . . . 31 Battery life, tips . . . . . . . . . 30 Battery, charging . . . . . . . . . 4 Battery, installing . . . . . . . . 3 C Calibration, automatic . . Calibration, manual . . . . Cleaning Exterior . . . . . . . . Head open sensor plate Interior . . . . . . . . Peel bar . . . . . . . . Platen roller . . . . . . Printhead . . . . . . . Tear bar . . . . . . . . . . . 27 . . . 28 . . . . . . . . . . . . . . . . . . . . . 29 29 29 29 29 29 29 Communication parameters, setting . . . . . . . . . . . . . 22 Communications diagnostics . . 37 Configuration label . . . . . . . 37 D Damage, shipping . . . . . . . . 1 Darkness, adjusting . . . . . . . 22 Data Terminal Equipment (DTE) . . . . . . . . . . . . . 20 Defaulting the printer . . . . . . 39 E Error LED. . . . . . . . . . 19, 33 F Factory defaults, resetting Fanfold media. . . . . . . Feed button . . . . . . . . Feed button modes . . . . . . . . . . . . . . . . 37 13 18 39 H Handshaking . . . . . . . . . . 22 I Indicator LEDs . . . . . . . . . 19 Inspection . . . . . . . . . . . . 1 47 L R Loading the media Fanfold media . . . . . . . . 13 Peel-off mode . . . . . . . . 10 Tear-off mode . . . . . . . . 5 Loading the ribbon . . . . . . . 16 Lubrication . . . . . . . . . . . 30 Reporting damage, shipping . . . 1 Ribbon loading . . . . . . . . . 16 RJ45 connector pin identification . . . . . . . . . 45 M Null modem cable. . . . . . . . 20 Null modem cable pinouts . . . 46 Software. . . . . . . . . . . . Specifications Font/bar code . . . . . . . Label . . . . . . . . . . . Memory/communications . Physical/environmenal/ electrical. . . . . . . . . Printing . . . . . . . . . . Ribbon cartridge . . . . . Strap, adjusting Hand/shoulder strap . . . . Adjustable shoulder strap . O T Operator controls . . . . . . . . 18 Options . . . . . . . . . . . . . 44 Tear-off mode . . . . . . . . . . 5 Troubleshooting. . . . . . . . . 33 Troubleshooting tests . . . . . . 37 Maintenance manual . . . . . . . 1 Media loading Fanfold media . . . . . . . . 13 Peel-off mode . . . . . . . . 10 Tear-off mode . . . . . . . . 5 N P Peel-off mode . . . . . . . . Power button . . . . . . . . Power LED . . . . . . . . . Print darkness, adjusting . . Print width, adjusting . . . . Printhead pressure, adjusting 48 . . 10 . . 18 19, 33 . . 22 22, 39 . . 23 S . 22 . 43 . 42 . 42 . 43 . 41 . 41 . 24 . 26 U Unpacking . . . . . . . . . . . . 1 Z ZPL II . . . . . . . . . . . . 1, 22 ZPL II Programming Guide, ordering . . . . . . . . . . . . 1 Zebra Technologies Corporation 333 Corporate Woods Parkway Vernon Hills, Illinois 60061.3109 U.S.A. Telephone +1 847.634.6700 Facsimile +1 847.913.8766 Zebra Technologies Europe Limited PA400 P O R T A B L E P R I N T E R S Zebra House The Valley Centre, Gordon Road High Wycombe Buckinghamshire HP13 6EQ, UK Telephone +44 (0)1494 472872 Facsimile +44 (0)1494 450103 Customer order #52600L Manufacturer part #52600LB ' Zebra Technologies Corporation Users ' Guide