1
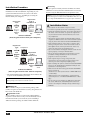
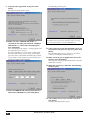
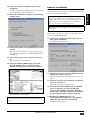
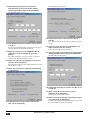
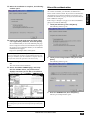
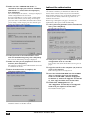
ENGLISH
Add-On Effects Installation Guide
Please read this first.
Thank you for choosing a Yamaha Add-On Effects package.
Add-On Effects are software packages that install additional high-quality effects programs on digital consoles.
Please read this installation guide thoroughly before using the package so you can take full advantage of the AddOn Effects for a long period of time.
FRANÇAIS
DEUTSCH
Add-On Effects-Installationshandbuch
Guide d’installation des Add-On Effects
Guía de instalación de Add-On Effects
Vielen Dank, dass Sie sich für die „Add-On Effects” von Yamaha entschieden haben.
„Add-On Effects” sind hochwertige Effektprogramme, mit denen man sein Digital-Pult nachrüsten kann. Bitte
lesen Sie sich dieses Installationshandbuch vollständig durch, um die Zusatzeffekte auch wirklich nutzen zu können.
Veuillez commencer par lire ce guide.
Merci d’avoir choisi des “Add-On Effects” de Yamaha.
Les “Add-On Effects” sont des effets de haute qualité pour consoles numériques. Pour profiter pleinement et
durablement de ces effets additionnels, veuillez lire entièrement ce guide d’installation avant de les utiliser.
Lea esto en primer lugar.
Gracias por elegir el paquete Add-On Effects de Yamaha.
Add-On Effects son paquetes de software que instalan programas de efectos adicionales de gran calidad en consolas
digitales. Antes de utilizar el paquete, lea este manual de instalación por completo para aprovechar plenamente las
ventajas de los efectos Add-On durante mucho tiempo.
Add-On Effects Installation Guide
1
ESPAÑOL
Bitte zuerst lesen.
Special Notices
• The software and this installation guide are the exclusive
copyrights of Yamaha Corporation.
• Use of the software and this installation guide is governed
by the Software Licensing Agreement which the purchaser
fully agrees to upon breaking the seal of the software
packaging. (Carefully read the agreement at the end of this
installation guide before installing the software.)
• Copying of the software or reproduction of this
installation guide in whole or in part by any means is
expressly forbidden without the written consent of the
manufacturer.
• Yamaha makes no representations or warranties with
regard to the use of the software and documentation and
cannot be held responsible for the results of the use of this
installation guide and the software.
• This disc is a CD-ROM. Do not attempt to play the disc
on an audio CD player. Doing so may result in irreparable
damage to your audio CD player.
• Copying of the commercially available music sequence
data and/or digital audio files is strictly prohibited except
for your personal use.
• The screen displays as illustrated in this installation guide
are for instructional purposes, and may appear somewhat
different from the screens which appear on your
computer.
• Future upgrades of application and system software and
any changes in specifications and functions will be
announced separately.
• Specifications and descriptions in this installation guide
are for information purposes only. Yamaha Corp. reserves
the right to change or modify specifications at any time
without prior notice. Since specifications may not be the
same in every locale, please check with your Yamaha
dealer.
• The company names and product names in this
installation guide are the trademarks or registered
trademarks of their respective companies.
* OMS is a trademark of Opcode Systems, Inc.
Contents
About the Package ........................................
Package Contents .................................................
Contents of Manuals ............................................
CD-ROM Contents ..............................................
Installing Add-On Effects............................... 3
System Requirements ........................................... 3
Installation Procedure.......................................... 4
Direct installation................................................. 5
Indirect installation .............................................. 7
Direct De-authorization....................................... 9
Indirect De-authorization.................................. 10
Error Message List ....................................... 11
Troubleshooting .......................................... 12
SOFTWARE LICENSING AGREEMENT.......... 13
Yamaha Professional Audio web site:
http://www.yamahaproaudio.com/
2
3
3
3
3
Add-On Effects Installation Guide
Installing Add-On Effects
Package Contents
System Requirements
Your Add-On Effects package contains the following items.
Please confirm that all items are included before you start
using the Add-On Effects.
• One CD-ROM
• Add-On Effects Installation Guide (this book)
To install Add-On Effects packages successfully, you must
have a computer and access to the Internet in satisfaction of
the following requirements:
Contents of Manuals
Add-On Effects Installation Guide (this book)
First, check the package contents, system requirements, and
procedure for installing the Add-On Effects.
Add-On Effects Owner’s Manuals (PDF format)
These PDF format manuals explain the Effects programs
included in your package. These manuals are included in the
English folder inside the Useguide_ folder. Refer to the
Owner’s Manual that came with your console for
information on general operation of the Effects.
CD-ROM Contents
Yamaha USB-MIDI Driver
This driver enables the computer and the console to
communicate with each other via their USB ports. Install this
driver before you install the Add-On Effects. Mac OS 9 users
must first install OMS, then install the Yamaha USB-MIDI
Driver.
See the Studio Manager Installation Guide for more
information on installing drivers.
NOTE: Some operating systems may have to satisfy other
requirements in addition to those described below.
NOTE: The system software for your mixing console must be
version 2.0 or later. The required system software version,
however, is different for each Add-On Effects package.
Windows
OS:
Windows 98SE, Me, 2000, XP Home
Edition, XP Professional
Computer:
PC that features a USB port and an Intel
Pentium or Celeron-family processor of 433
MHz or higher
Memory:
128 MB or more
Hard disk:
Available space of 10 MB or more
Display:
1024 x 768 pixels, 256 colors or more
(High Color 16-bit or more recommended)
Other
requirements:
Access to Internet, Internet Explorer 5.0 or
later
Macintosh
OS:
Mac OS 9.0 - 9.2.2, Mac OS X 10.2 or later
Installer (System Software Installer)
The installer installs the Add-On Effects on your console.
Computer:
Power Macintosh G3/233 MHz or better
that features a USB port
Add-On Effects Owner’s Manuals (PDF format)
The Useguide_ folder contains a PDF version of each Effects
program manual.
Memory:
Available memory of 16 MB or more
(Turn off virtual memory.)
Hard disk:
Available space of 10 MB or more
Display:
1024 x 768 pixels, 256 colors or more
(32,000 colors or more recommended)
Other
requirements:
Access to the Internet
OMS 2.3.3 or later (for Mac OS 9)
NOTE: Adobe Reader (available free of charge) must be installed
in your computer in order to view the PDF manual. If you don’t
have Adobe Reader, use the weblink given below to open the
Adobe Corporation website, and download Adobe Reader. This
is not necessary if you are using Mac OS X.
http://www.adobe.com
NOTE: Mac OS 9.0 users must update URL Access. For more
information, visit the Apple Computer website.
Add-On Effects Installation Guide
3
ENGLISH
About the Package
Installation Procedure
Choose one of the following installation procedures (direct
installation or indirect installation) depending on your
system environment. In most cases, choose the direct
installation procedure (i.e., installing by accessing the
Internet from your computer).
Registration
code &
PRODUCT ID
2
Registration
code
1
Internet
USB
Console
4
Access
key
3
Access
Authentication
key
server
Computer
Direct installation
(Accessing the Internet from your computer)
Registration
code
Computer #1
1
USB
Console
Registration
code &
PRODUCT ID
2
4
Access
key
Internet
Computer #2
3
Access Authentication
key
server
Indirect installation
(Accessing the Internet from another computer)
* The circled numbers in the illustrations above indicate the
sequence of the installation procedure.
NOTE: You can de-authorize the license of the installed Add-On
Effects package, then install it on another console.
PRODUCT ID
This is a number unique to each software package. This
number is required to obtain the access key. It is printed on a
label on the CD-ROM case.
Access key
This is required to install your Add-On Effects. You must
obtain the access key from the authentication server via the
Internet using the PRODUCT ID and registration code.
NOTE: If you lose the registration code or access key, you can
obtain them again. You will need the PRODUCT ID to do so. Be
sure to keep the PRODUCT ID in a safe place after installation.
Installation Notes
• The software can be installed on only one console.
• You will be responsible for the entire installation procedure.
• During the installation procedure, do not turn off the power to
the console, remove the cables, or operate the computer in a
way not instructed in this manual. Otherwise, the console
may malfunction.
• This software program installs the Add-On Effects from the
computer via USB connection. You cannot install the software
using any driver other than the Yamaha USB-MIDI Driver.
• If the installation fails for reasons such as a defective cable,
turning on the power to the console will start the console in
Flash Update mode, instead of normal mode. In this case,
replace the cable and try the installation again.
• If a second installation attempt fails and the console does not
operate properly, consult your Yamaha dealer.
• Exit or quit all open application programs before you start
installation. During installation, do not execute other
programs or activate any windows.
• If the computer sleeps in energy saving mode, data
transmission to the console may be stopped. Cancel such
modes to prevent the computer from falling asleep.
• Before installing the software, install the Yamaha USB-MIDI
Driver. See the Studio Manager Installation Guide for more
information on installing drivers.
• Make sure that the Thru setting of the Yamaha USB-MIDI
Driver is turned off.
(Windows users: Select [Control Panel → MIDI-USB Driver
→ Thru OFF].)
(Macintosh users: Select [Apple Menu → Control Panels
(System Preferences) → Yamaha USB MIDI Patch → Thru
Off].)
• Do not connect to the computer any USB devices other than
the console, USB mouse, and USB keyboard. Connect the
console to the computer’s USB port directly without using a
USB hub.
Registration code
This is a number unique to each console. This number is
required to obtain the access key. It is automatically created
from the data inside your console. If you are installing a
different software package, its number will be different.
4
Add-On Effects Installation Guide
Direct installation
The installer window opens.
ENGLISH
If you can access the Internet directly from your computer,
follow the steps below to install the software. See page 7 if
you access the Internet from a different computer.
NOTE: The following instruction refers to the installation of the
software in the 02R96 from a connected computer that runs
Windows 98SE. However, the basic installation procedure also
applies to any OS or console. Steps that vary with different
operating systems will be explained separately.
NOTE: If an error message appears, refer to the Error Message
list on page 11.
1 Start the computer and check to see if the
following steps are complete.
• Installing the Yamaha USB-MIDI Driver in the
computer (See the included Studio Manager
Installation Guide.)
• Accessing the Internet from the computer
• The console’s system software has been updated to
version 2.0 or later (You don’t need to check this on
the PM5D).
7 Select [Authorize], then click [Next].
The following window opens.
NOTE: Don’t connect your computer to the console yet.
2 While holding down the following key on the
console, turn on the power of the console.
Continue holding down the key until the display blinks
“FLASH UPDATE.”
DM2000: Transport [REC] key
02R96: MACHINE CONTROL [REC] key
DM1000: MONITOR [CLEAR] key
01V96: SOLO [CLEAR] key
PM5D: SCENE MEMORY [RECALL] key
3 Make sure that the display indicates “FLASH
UPDATE,” and then use a USB cable to connect
your computer to the console.
8 Select [Get access key from authentication
server], then click [Next].
The following window opens.
4 Insert the included CD-ROM into the CD-ROM
drive.
5 Locate the Upgrade folder on the CD-ROM
(“Mac OS 9: Upgrade” for Mac OS 9; “Mac OS
X: Upgrade” for Mac OS X), then copy the
folder onto the hard disk.
6 Double-click “DMUpgrade.exe” (or
“AE***UpgradeE” for Mac OS) in the Upgrade
folder that you copied to the hard disk.
Add-On Effects Installation Guide
5
9 Select [Create registration code], then click
The following window opens.
[Next].
The I/O port setting window opens.
10 Make sure that “YAMAHA USB IN 0-1” is
selected for the Input port and that “YAMAHA
USB OUT 0-1” is selected for the output port,
then click [Next].
The “Connecting to the console...” message appears and
the registration code is created.
If you are using Mac OS 9, select “xxxx-1 (xxxx will be
the name of the console you are using)” for the Input
port, and “xxxx-1 (xxxx will be the name of the console
you are using)” for the output port. Note that the port
names vary with the OMS setup files.
NOTE: Keep the PRODUCT ID in a safe place after you enter
the number. Even if you lose the registration code or access key,
you can install the software using the PRODUCT ID.
12 Select [Connect to the authentication server on
the Internet and get access key now], then click
[Next].
The window indicates “To get access key, get ready to
connect to the Internet and click [Next].”
13 Make sure that you are prepared to access the
Internet, then click [Next].
The computer connects to the authentication server and
obtains the access key.
14 When the access key is obtained, the following
window opens:
11 Enter the PRODUCT ID number printed on the
label on the CD-ROM case, then click [Next].
15 Select [Write access key in console now], then
click [Next].
The I/O port setting window opens.
6
Add-On Effects Installation Guide
click [Next].
A window indicating the installation progress opens, and
the Add-On Effects package is installed.
17 When the installation is complete, the following
window opens.
Indirect installation
If you access the Internet from another computer (#2), not
from the computer (#1) connected to the console, follow the
steps below to install the software.
NOTE: The following instruction refers to the installation of the
software in the 02R96 from a connected computer that runs
Windows 98SE. However, the basic installation procedure also
applies to any OS or console. Steps that vary with different
operating systems will be explained separately.
NOTE: If an error message appears, refer to the Error Message
list on page 11.
Follow Steps 1 through 11 (on page 5) using computer #1,
then proceed with the following.
12 Select [Save registration code to get access key
later.], then click [Next].
The following window opens.
18 Select [Start online user registration], then click
[Finish].
The browser starts and the user registration page opens.
User registration entitles you to additional information
and support.
19 Turn off the power to the console, then turn it
on.
The console starts in normal mode.
20 Access the EFFECT LIBRARY page, and verify
that the Add-On Effects you purchased are
displayed and that you are able to recall them.
13 Click [Save in file] to save the PRODUCT ID and
registration code as a text file.
You can also write down the ID and code on a piece of
paper.
14 Copy the text file to the computer (#2) that has
access to the Internet.
Follow the steps below on computer #2.
15 Insert the included CD-ROM into the CD-ROM
drive on computer #2, locate the Upgrade
folder on the CD-ROM (“Mac OS 9: Upgrade”
for Mac OS 9; “Mac OS X: Upgrade” for Mac OS
X), then copy the folder onto the hard disk.
The installation is now complete.
NOTE: If you want to continue installing other add-on effects,
you must power-cycle the console and repeat the procedure from
step 2.
16 Double-click “DMUpgrade.exe” (or
“AE***UpgradeE” for Mac OS) in the Upgrade
folder that you copied to the hard disk.
The installer window opens.
Add-On Effects Installation Guide
7
ENGLISH
16 Select the I/O ports specified in Step 8, then
17 Select [Authorize], [Get access key from
The following window opens.
authentication server], then [Have already
created registration code], then click [Next].
The following window opens.
23 Click [Save in file] to save the access key as a
18 Click [Read from file] to read the text file saved
in Step 13.
If you wrote down the ID and code on a piece of paper,
enter the ID and code from the keyboard.
19 Make sure that the correct PRODUCT ID and
registration code are displayed, then click
[Next].
The window indicates “To get access key, get ready to
connect to the Internet and click [Next].”
text file.
You can also write down the access key displayed on the
screen.
24 Copy the saved text file to the computer (#1)
that is connected to the console.
Follow the steps below on computer #1.
25 Start the installer, select [Authorize], then [Have
already obtained access key], then click [Next].
The following window opens.
20 Make sure that you are prepared to access the
Internet, then click [Next].
The computer connects to the authentication server and
obtains the access key.
21 When the access key is obtained, the following
window opens:
26 Click [Read from file] to read the text file saved
in Step 23.
27 Make sure that the correct access key is
displayed, then click [Next].
The I/O port setting window opens.
28 Make sure that the I/O ports specified in Step 9
22 Select [Save access key to write into console
later.], then click [Next].
8
are selected, then click [Next].
A window indicating the installation progress opens, and
the Add-On Effects package is installed.
Add-On Effects Installation Guide
window opens.
Direct De-authorization
If you wish to move the license of the Add-On Effects from
one console to another, you must first de-authorize the
license on the current console. If you can access the Internet
directly from your computer, follow the steps below to deauthorize the software. See page 10 if you access the Internet
from a different computer.
Follow Steps 1 through 6 (on page 5) for direct installation,
then proceed with the following.
7 Select [De-authorize], then click [Next].
The following window opens.
30 Remove the check mark from the [Start online
user registration] check box, then click [Finish].
We recommend that you access the following web page
from a computer connected to the Internet and register
the product. User registration entitles you to additional
information and support.
http://www.yamahaproaudio.com/register/
NOTE: After the installation is complete, the registration code and
access key will become invalid. To avoid problems that may occur
during re-installation, after the installation is complete, delete the
text files that contain the registration code and access key.
31 Turn off the power to the console, then turn it
8 Select [Create unregistration code], then click
[Next].
The following window opens.
on.
The console starts in normal mode.
32 Access the EFFECT LIBRARY page, and verify
that the Add-On Effects you purchased are
displayed and that you are able to recall them.
9 Enter the PRODUCT ID, then click [Next].
The I/O port setting window opens.
The installation is now complete.
NOTE: If you want to continue installing other add-on effects,
you must power-cycle the console and repeat the procedure from
step 2.
Add-On Effects Installation Guide
9
ENGLISH
29 When the installation is complete, the following
10 Make sure that “YAMAHA USB IN 0-1” is
selected for the Input port and that “YAMAHA
USB OUT 0-1” is selected for the output port,
then click [Next].
The “Connecting to the console...” message is displayed
and the unregistration code is created.
If you are using Mac OS 9, select “xxxx-1 (xxxx will be
the name of the console you are using)” for the Input
port, and “xxxx-1 (xxxx will be the name of the console
you are using)” for the output port. Note that the port
names vary with the OMS setup files.
Indirect De-authorization
If you wish to move the license of the Add-On Effects from
one console to another, you must first de-authorize the
license on the current console. If you access the Internet
from another computer (#2), not from the computer (#1)
connected to the console, follow the steps below to deauthorize the software.
Follow Steps 1 through 10 (on page 9) for direct deauthorization, then proceed with the following.
11 Select [Save unregistration code to de-authorize
later.], then click [Next].
The following window opens.
11 Select [Connect to the authentication server
and start deauthorizing now], then click [Next].
The “Start de-authorizing” message is displayed.
12 Make sure that you are prepared to access the
Internet, then click [Next].
The computer connects to the authentication server and
de-authorizes the license.
13 When de-authorization is complete, the
following window opens.
12 Click [Save in file] to save the PRODUCT ID and
unregistration code as a text file.
You can also write down the ID and code on a piece of
paper.
13 Copy the text file to the computer (#2) that has
access to the Internet.
Follow the steps below on computer #2.
14 Insert the included CD-ROM into the CD-ROM
drive on computer #2, locate the Upgrade
folder on the CD-ROM (“Mac OS 9: Upgrade”
for Mac OS 9; “Mac OS X: Upgrade” for Mac OS
X), then copy the folder onto the hard disk.
15 Double-click “DMUpgrade.exe” (or
“AE***UpgradeE” for Mac OS) in the Upgrade
folder that you copied to the hard disk.
The installer window opens.
The de-authorization is now complete. You can now
install the software on another console.
10
Add-On Effects Installation Guide
16 Select [De-authorize], then [Have already
created unregistration code], then click [Next].
The following window opens.
Error Message List
• PRODUCT ID is wrong.
• Registration code is wrong.
• Unregistration code is wrong.
• Access key is wrong.
→ Make sure that you have entered the correct PRODUCT
ID, registration code, unregistration code, or access key.
• Content of the file is not correct data.
→ Make sure that the text file contains the registration code,
unregistration code, or access key. The file may have been
corrupted. Save the file again.
Errors in connection to the console
17 Click [Read from file] to read the text file saved
in Step 12.
If you wrote down the PRODUCT ID and unregistration
code on a piece of paper, enter the ID and code from the
keyboard.
18 Make sure that the correct PRODUCT ID and
unregistration code are displayed, then click
[Next].
The “Start de-authorizing” message is displayed.
19 Make sure that you are prepared to access the
Internet, then click [Next].
The computer connects to the authentication server and
de-authorizes the license.
20 When de-authorization is complete, the
following window opens.
• Unable to connect to the console.
→ Make sure that the power to the console is turned on and
that the console and the computer are connected via the
USB cable. If the console is in normal operation mode,
follow Step 2 on page 5 to place the console in Flash
Update mode. If the error persists, turn off and on the
power to the console and restart the installer.
• This version has already been installed. No need to
install.
→ To cancel installation, click [Do not install]. To install
and overwrite the current software, click [Reinstall].
Cancel installation if there is no problem in operating the
console.
• This application is not compatible with the console.
→ Your console does not support this Add-On Effects
package. Make sure that the console’s system software is
version 2.0 or later (You don’t need to check this on the
PM5D). The required system software version, however,
is different for each Add-On Effects package.
Updating the system software to the latest version may
enable you to install and use this Add-On Effects package.
• Unable to initialize license management information
in console.
• Failed to create registration code.
→ Install the software again.
• Unable to initialize license management information
in console.
→ Make sure that you are installing the software in the
console for which you obtained the registration code,
then try to install the software again.
The de-authorization is now complete. You can now install
the software on another console.
• Access key cannot be written to console.
→ Make sure that the PRODUCT ID and access key are
correct, then try to install again.
Add-On Effects Installation Guide
11
ENGLISH
Input errors
• Cannot delete access key from console. It is not the
PRODUCT ID used for getting access key. Check
PRODUCT ID and retry de-authorization.
→ Make sure that the same PRODUCT ID was used to
obtain the access key, then try to de-authorize again.
Errors in connection to the authentication
server
• Unable to connect to the authentication server.
→ Make sure that the computer is connected to the Internet.
The authentication server may be very busy now. Try to
connect to the server later.
• Access key cannot be issued because the PRODUCT ID
is wrong.
• Access key cannot be issued because registration code
is wrong.
→ Make sure that the PRODUCT ID or the registration
code is correct, then try to install the software again.
• New access key cannot be issued because this
PRODUCT ID has already issued access key.
→ The license for this PRODUCT ID has already been used
on a different console. If you wish to install the software
in another console, you must de-authorize the software
license on the current console.
• Unable to de-authorize because unregistration code
is not in agreement with the information when access
key was issued.
• Cannot de-authorize as unregistration code is
wrong.
→ Make sure that the unregistration code is correct, then try
to de-authorize the software again.
• De-authorization is not required as access key has
not been issued for this PRODUCT ID.
→ Check the PRODUCT ID that was used to install the
software, then try to de-authorize the software again.
Error Messages on the Console
The following message is displayed if the console’s system
software has not been installed completely (except for the
PM5D).
• “Protocol Error”
• “Vendor Error”
→ This message appears when the installer is checking the
Flash Update version. This is not a malfunction.
• “Please grant authority”
→ The access key for the system software has not been
written. Completing the installation of the system
software will enable you to install the Add-On Effects
package.
12
Troubleshooting
Q: The computer does not communicate with
the console.
A: The installer does not function with any driver other
than the Yamaha USB-MIDI Driver. You must first
install the Yamaha USB-MIDI Driver. Then, when the
console screen indicates FLASH UPDATE, use a USB
cable to connect the console to your computer.
A: Mac OS 9 users must install and set up OMS. Also, make
sure that you have specified the correct ports.
A: If there is no problem with the settings described above,
turn off and on the power to the console.
Q: The computer cannot access the
authentication server.
A: Make sure that the computer is connected to the
Internet.
A: URL Access that comes with Mac OS 9.0 may not work
in some cases. Update URL Access by downloading it
from the Apple Computer website.
A: Windows users must select in Internet Explorer [Tools
→ Internet Options... → Advanced], then select one or
more of “Use SSL 2.0,” “Use SSL 3.0,” and “Use TSL
1.0.” (One or more have already been selected as the
default setting.)
Q: The access key, registration code,
unregistration code, or PRODUCT ID is
incorrect.
A: The code is different for each console and each software
package. Make sure that you are entering the correct
code for the correct console and correct package.
Q: You lost the access key.
A: You can obtain the access key again. Check the
PRODUCT ID printed on the label on the CD-ROM
case, then try to install the software again.
Q: You wish to install the software in a
different console.
A: You can de-authorize the license of the installed Add-On
Effects, then install it on another console.
Q: You are unable to acquire an access key
from the authentication server even after
checking your system and following the
steps described in the Error Message list
and Troubleshooting section.
A: Contact Yamaha at the following e-mail address. Please
send the e-mail in English.
[email protected]
Add-On Effects Installation Guide
The following is a legal agreement between you, the end user, and Yamaha Corporation (“Yamaha”). The enclosed Yamaha
software program is licensed by Yamaha to the original purchaser for use only on the terms set forth herein. Please read this
licensing agreement with care. Opening this package indicates that you accept all terms outlined herein. If you do not agree to
the terms, return this package unopened to Yamaha for a full refund. In the event that you obtained the enclosed Yamaha
software program(s) as a part of a software package or software bundled with a hardware product, you may not return the
enclosed Yamaha software program(s) to Yamaha.
1. GRANT OF LICENSE AND COPYRIGHT
Yamaha grants you, the original purchaser, the right to use one copy of the enclosed software program and data (“SOFTWARE”)
on a single console. You may not use it on more than one console. The SOFTWARE is owned by Yamaha and is protected by
Japanese copyright laws and all applicable international treaty provisions. You are entitled to claim ownership of the media in
which the SOFTWARE is included. Therefore, you must treat the SOFTWARE like any other copyrighted materials.
2. RESTRICTIONS
The SOFTWARE program is copyrighted. You may not engage in reverse engineer-ing or reproduction of the SOFTWARE by
other conceivable methods. You may not reproduce, modify, change, rent, lease, resell, or distribute the SOFTWARE in whole or
in part, or create derivative works from the SOFTWARE. You may not transmit or network the SOFTWARE with other
computers. You may transfer ownership of the SOFTWARE and the accompanying written materials on a permanent basis
provided that you retain no copies and the recipient agrees to the terms of the licensing agreement.
3. TERMINATION
The licensing condition of the software program becomes effective on the day that you receive the SOFTWARE. If any one of the
copyright laws or clauses of the licensing conditions is violated, the licensing agreement shall be terminated automatically
without notice from Yamaha. In this case, you must destroy the licensed SOFTWARE and its copies immediately.
4. PRODUCT WARRANTY
Yamaha warrants to the original purchaser that if the SOFTWARE, when used in normal conditions, will not perform the
functions described in the manual provided by Yamaha, the sole remedy will be that Yamaha will replace any media which
proves defective in materials or workmanship on an exchange basis without charge. Except as expressly set forth above, the
SOFTWARE is provided “as is,” and no other war-ranties, either expressed or implied, are made with respect to this software,
including, without limitation the implied warranties of merchantability and fitness for a particular purpose.
5. LIMITED LIABILITY
Your sole remedies and Yamaha’s entire liability are as set forth above. In no event will Yamaha be liable to you or any other
person for any damages, including without limitation any incidental or consequential damages, expenses, lost profits, lost savings
or other damages arising out of the use or inability to use such SOFTWARE even if Yamaha or an authorized dealer has been
advised of the possibility of such damages, or for any claim by any other party.
6. GENERAL
This license agreement shall be interpreted according to and governed by Japanese laws.
Add-On Effects Installation Guide
13
ENGLISH
SOFTWARE LICENSING AGREEMENT
Yamaha Manual Library
http://www2.yamaha.co.jp/manual/english/
This document is printed on recycled
chlorine free (ECF) paper with soy ink.
U.R.G., Pro Audio & Digital Musical Instrument Division, Yamaha Corporation
© 2004 Yamaha Corporation
WE05110 407IPAPX.X-01A0
Printed in Japan