1
Scanning
Scanning to a Folder
This section includes:
• Scanning to the Public Folder ....................................................................................................................................134
• Scanning to a Private Folder ......................................................................................................................................135
• Creating a Private Folder.............................................................................................................................................135
• Retrieving Scan Files .....................................................................................................................................................136
Scanning to a folder is the simplest scanning method. When you scan an image at the printer, the scan
file is stored in a folder on the internal hard drive. You then use CentreWare Internet Services to retrieve
the stored scan file to your computer.
The default settings create a 1-sided color portable document format (.pdf) file. You can change these
settings using the printer control panel, or using CentreWare Internet Services at your computer. Control
panel selections override the settings in CentreWare Internet Services.
Scanning to the Public Folder
The printer provides a public folder to store scanned images. You do not need a password to scan images
to the public folder, or to retrieve them. All users can view scanned documents in the public folder. You
can also create a password-protected private folder. For details, see Creating a Private Folder on page
135.
To scan an image to the public folder:
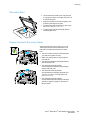
1. Load the original on the document glass or in the document feeder.
2. Press the Services Home button, then touch Workflow Scanning.
3. Touch the Down arrow, then select All Templates from the menu.
4. From the list, select the Default folder.
5. To change any of the scan settings, use the options at the bottom of the touch screen.
For details, see Changing the Basic Scan Settings on page 140.
6. For more options, touch the Advanced Settings tab. For details, see Selecting Advanced Settings on
page 140.
7. Press the green Start button. The Job Progress screen appears, and the original is scanned. The file is
stored on the printer hard drive.
8. Use CentreWare Internet Services to move the file to your computer. For details, see Retrieving Scan
Files on page 136.
134
®
®
Xerox WorkCentre 7970 Multifunction Printer
User Guide