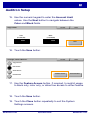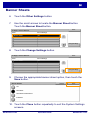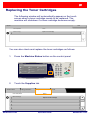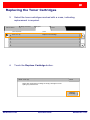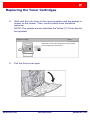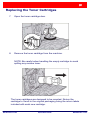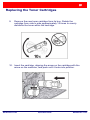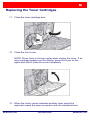
1
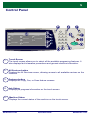
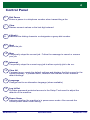
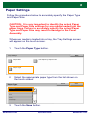
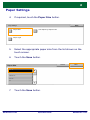
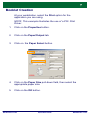
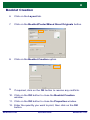
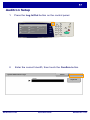
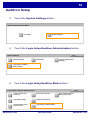
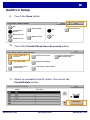
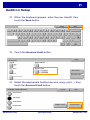
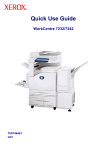
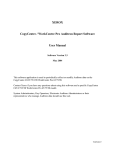
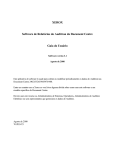
Quick Use Guide
WorkCentre 7132
701P44859
May 2006
Microsoft, MS-DOS, Windows, Windows NT, Microsoft Network, and Windows Server
are either trademarks or registered trademarks of Microsoft Corporation in the United
States and/or other countries.
Novell, NetWare, IntranetWare and NDS are registered trademarks of Novell, Inc. in
the United States and other countries.
Adobe, Acrobat, PostScript, PostScript3, and PostScript Logo are trademarks of
Adobe Systems Incorporated.
Apple, AppleTalk, EtherTalk, LocalTalk, Macintosh, MacOS and TrueType are
trademarks of Apple Computer, Inc., registered in the U.S. and other countries.
HP, HPGL, HPGL/2, and HP-UX are registered trademarks of Hewlett-Packard
Corporation.
All product/brand names are trademarks or registered trademarks of the respective
holders.
The data saved in the hard disk of the machine may be lost if there is any problem in
the hard disk. Xerox is not responsible for any direct and indirect damages arising from
or caused by such data loss.Xerox is not responsible for any breakdown of machines
due to infection of computer virus or computer hacking.
Important(1) This manual is copyrighted with all rights reserved. Under the copyright
laws, this manual may not be copied or modified in whole or part, without the written
consent of the publisher.(2) Parts of this manual are subject to change without prior
notice.(3) We welcome any comments on ambiguities, errors, omissions, or missing
pages.(4) Never attempt any procedure on the machine that is not specifically
described in this manual. Unauthorized operation can cause faults or accidents.
Xerox is not liable for any problems resulting from unauthorized operation of the
equipment.
An export of this product is strictly controlled in accordance with Laws concerning
Foreign Exchange and Foreign Trade of Japan and/or the export control regulations of
the United States.
Xerox and Ethernet are registered trademarks.
NOTE: BLUE title is for IT administrator type personnel, GREEN for end users and
RED means machine needs attention. Depending on the configuration of the
machine, some User Interface screens may vary.
Table of Contents
Control Panel
3
Paper Settings
5
Booklet Creation
7
Secure Print
9
Simple Faxing (Option)
13
Printing the Settings List
15
Auditron Setup
17
Banner Sheets
23
Replacing the Toner Cartridges
25
WorkCentre 7132
Quick Use Guide
WorkCentre 7132
Control Panel
All Services
Copy
Email
Internet Fax
Fax
Network Scan
Scan to FTP / SMB
Scan to Mailbox
Check Mailbox
1
2
4
5
6
7
8
9
*
0
#
-
C
3
1.
Touch Screen
The touch screen allows you to select all the available programing features. It
also displays fault clearance procedures and general machine information.
2.
All Services button
Displays the All Services screen, allowing access to all available services on the
machine.
3.
Features button
Displays the Copy, Fax, or Scan feature screens.
4.
Job Status
Displays job progress information on the touch screen.
5.
Machine Status
Displays the current status of the machine on the touch screen.
WorkCentre 7132
Quick Use Guide
WorkCentre 7132
Control Panel
6.
Dial Pause
Enters a pause in a telephone number when transmitting a fax.
7.
Clear
Deletes numeric values or the last digit entered.
8.
# (Hash)
Indicates the dialing character or designates a group dial number.
9.
Start
Starts the job.
10. Stop
Temporarily stops the current job. Follow the message to cancel or resume
your job.
11. Interrupt
Temporarily stops the current copy job to allow a priority job to be run.
12. Clear All
If pressed once, resets the default settings and displays the first screen for the
current pathway. If pressed twice, resets all the features to their machine
default settings.
13. Language
Changes text to an alternative language (when available).
14. Log In/Out
Provides password protected access to the Setup Tools used to adjust the
defaults of the machine.
15. Power Saver
Indicates whether the machine is in power saver mode. Also cancels the
current power saver mode setting.
WorkCentre 7132
Quick Use Guide
WorkCentre 7132
Paper Settings
Follow the procedure below to accurately specify the Paper Type
and Paper Size:
CAUTION: It is very important to identify the actual Paper
Type and Paper Size settings for any media loaded into the
paper trays. Failure to accurately specify the actual Paper
Type and Paper Size may result in damage to the Fuser
Assembly.
Whenever media is loaded into a tray, the Tray Settings screen
will appear on the touch screen.
1.
Touch the Paper Type button.
Save
Tray Settings
Paper Size
Auto Paper by Output Color
Paper Type
2.
Select the appropriate paper type from the list shown on
the touch screen.
Cancel
Paper Type
Save
Plain Paper
Pre-Printed
Bond
Glossy
Heavyweight
3.
Touch the Save button.
WorkCentre 7132
Quick Use Guide
WorkCentre 7132
Paper Settings
4.
If required, touch the Paper Size button.
Tray Settings
Paper Size
Save
Auto Paper by Output Color
Paper Type
5.
Select the appropriate paper size from the list shown on the
touch screen.
6.
Touch the Save button.
Cancel
Paper Size
Save
8.5 x 11"
8.5 x 14"
215x315 mm
5.5 x 8.5"
A3
7.
Touch the Save button.
WorkCentre 7132
Quick Use Guide
WorkCentre 7132
Booklet Creation
At your workstation, select the Print option for the
application you are using.
NOTE: This example illustrates the use of a PCL Print
Driver.
1.
Click on the Properties button.
2.
Click on the Paper/Output tab.
3.
Click on the Paper Select button.
Paper/Output
Image Options
Layout
Watermark/Forms
Job Type:
Detailed Settings Fax
2 Sided Copy
2 Sided Copy
Normal
Settings
Stapling
Paper Summary
No Staples
11x17"
Collated
Staples
Paper Select
Output Location
None
Reduce
Save
Edit...
Output Sheets:
None
Output Color
Quantity
Auto
Defaults
OK
Cancel
Help
4.
Click on the Paper Size pull-down field, then select the
appropriate paper size.
5.
Click on the OK button.
WorkCentre 7132
Quick Use Guide
WorkCentre 7132
Booklet Creation
6.
Click on the Layout tab.
7.
Click on the Booklet/Poster/Mixed Sized Originals button.
Paper/Output
Image Options
Layout
Watermark/Forms
Detailed Settings Fax
Image Orientation
Portrait
Multiple Up
Both pages
Booklet/Poster/Mixed Sized Originals
Fit to New Paper Size
11" x 17"
Defaults
Image Shift Presets
OK
8.
Cancel
Help
Click on the Booklet Creation option.
Off
Poster
Booklet Creation
Image Rotation
None
OK
9.
Cancel
Defaults
Help
If required, click on the OK button to resolve any conflicts.
10. Click on the OK button to close the Booklet Creation
window.
11. Click on the OK button to close the Properties window.
12. Enter the quantity you want to print, then click on the OK
button.
WorkCentre 7132
Quick Use Guide
WorkCentre 7132
Secure Print
At your workstation, select the Print option for the
application you are using.
NOTE: This example illustrates the use of a PCL Print
Driver.
1.
Click on the Properties button.
2.
Click on the Paper/Output tab.
3.
Click on the Job Type field.
4.
Click on the Secure Print option.
Paper/Output
Image Options
Layout
Watermark/Forms
Job Type:
Detailed Settings Fax
2 Sided Copy
2 Sided Copy
Normal
Normal
Secure Print
Stapling
Sample Job
No Staples
Collated
Delay Start
Mailbox Number:
Fax
Staples
Paper Select
Output Location
None
Reduce
Save
Edit...
Output Sheets:
None
Output Color
Quantity
Auto
Defaults
OK
WorkCentre 7132
Quick Use Guide
Cancel
Help
WorkCentre 7132
Secure Print
5.
Click on the Settings button.
Paper/Output
Image Options
Layout
Watermark/Forms
Job Type:
Detailed
Fax
2 Sided Copy
2 Sided Copy
Secure Print
Settings
Stapling
Paper Summary
No Staples
11x17"
Collated
Staples
Paper Select
Output Location
None
Reduce
Save
Edit...
Output Sheets:
None
Output Color
Quantity
Auto
Defaults
OK
6.
Cancel
Help
Enter your User ID and 1-12 digit password into the
appropriate fields, then click the OK button.
Secure Print
User ID:
Password
Enter your 1-12 digit password.
OK
Cancel
Help
7.
Click on the OK button.
8.
Enter the quantity you want to print, then click on the OK
button.
WorkCentre 7132
Quick Use Guide
WorkCentre 7132
Secure Print
9.
At the machine, touch the Job Status button on the control
panel.
All Services
Copy
Email
Fax
Network Scan
Scan to Mailbox
Check Mailbox
1
2
4
5
3
6
7
8
9
*
0
#
-
C
Internet Fax
Scan to FTP / SMB
10. Touch the Stored Documents tab.
Current and
Completed Jobs
Stored
Documents
Secure Print
Sample Print
Public Mailbox
Undelivered Faxes
Delayed Print
11. Touch the Secure Print button.
12. Select a UserID.
WorkCentre 7132
Quick Use Guide
WorkCentre 7132
Secure Print
13. Touch the Document List button.
Secure Print
Refresh
Close
Document List
14. Enter your 1-12 digit password.
15. Touch the Confirm button.
16. Select your document and touch Print.
Document List
Refresh
Close
Delete
Print
17. Touch the Print and Delete button or the Print and Save
button.
Your document will be delivered to the output tray.
WorkCentre 7132
Quick Use Guide
WorkCentre 7132
Simple Faxing (Option)
1.
Load the documents into the Document Feeder.
2.
Press the Fax icon.
All Services
3.
Copy
Email
Internet Fax
Fax
Network Scan
Scan to FTP / SMB
Scan to Mailbox
Check Mailbox
Enter the recipient phone number using the numeric
keyboard on the control panel. Alternatively, you can enter
recipient phone numbers by touching the Keyboard button,
or by selecting the recipient from the Address Book.
Fax
General Settings
Layout Adjustment
Transmission
Options
Advanced Fax
Features
Next
Fax
Keyboard
Address:
Recipient
Fax Number
Address Book
Cover Page
WorkCentre 7132
Quick Use Guide
WorkCentre 7132
Simple Faxing (Option)
4.
Change the Fax settings using any of the tabs highlighted
here.
Fax
General Settings
Layout Adjustment
Transmission
Options
Advanced Fax
Features
Next
Fax
Keyboard
Recipient
Address:
001
Address Book
Fax Number
J. Smith
555-1212
Cover Page
5.
Press the Start button.
Fax
General
Settings
Layout
Adjustment
Transmission
Options
Advanced Fax
Features
3
1
2
4
5
6
7
8
9
*
0
#
-
C
Next
Fax
Keyboard
Address:
Address Book
001
Recipient
Fax Number
J. Smith
555-1212
Cover Page
Your fax job will be submitted.
Current and Pending
Jobs
Document / Job Type
Fax job 123
WorkCentre 7132
Completed Jobs
Stored Documents
Print Waiting Jobs
Status:
Scanning
Quick Use Guide
WorkCentre 7132
Printing the Settings List
A variety of useful reports are available on the Print
Report/List screen.
Perform the steps below to access the Print Report/List
screen:
1. Press the Machine Status button on the Control Panel.
2. Touch the Billing Meter/Print Report tab on the touch
screen.
3. Touch the Print Report/List button.
Machine Status
Billing Meter/
Print Report
Supplies
Faults
Billing Meter
Print Report/List
WorkCentre 7132
Quick Use Guide
WorkCentre 7132
Printing the Settings List
4.
Touch the Print Mode Settings button.
Close
Print Report/List
5.
Job Status/Activity
Report
Copy Mode Settings
Print Mode Settings
Scan Mode Settings
Fax Mode Settings
Mailbox List
Job Counter Report
Auditron Administration
Touch the Settings List-Common Items button.
Close
Print Mode Settings
Settings List-Common
Items
6.
Press the Start button.
Print Mode Settings
Close
1
2
4
5
3
6
7
8
9
*
0
#
-
C
Settings List-Common Items
The report will be delivered to the output tray.
WorkCentre 7132
Quick Use Guide
WorkCentre 7132
Auditron Setup
1.
Press the Log In/Out button on the control panel.
All Services
Copy
Fax
Scan to Mailbox
2.
1
2
4
5
6
7
8
9
*
0
#
-
C
3
Internet Fax
Email
Network Scan
Scan to FTP / SMB
Check Mailbox
Enter the correct UserID, then touch the Confirm button.
System Administrator Login
Cancel
UserID
WorkCentre 7132
Confirm
Keyboard
Quick Use Guide
WorkCentre 7132
Auditron Setup
3.
Touch the System Settings button.
System Administration Menu
User Mode
4.
System Settings
Touch the Login Setup/Auditron Administration button.
Close
System Settings
System Settings
Setup Menu
System Administrator
Settings
Login Setup / Auditron
Administration
5.
Touch the Login Setup/Auditron Mode button.
Close
Login Setup / Auditron Administration
Create / Check User
Accounts
Reset User Accounts
User Details Setup
Charge Print Settings
Password Entry from
Control Panel
Login Setup / Auditron Mode
WorkCentre 7132
Quick Use Guide
System Administrator's
Meter (Copy Jobs)
WorkCentre 7132
Auditron Setup
6.
Touch the Local Machine Access button.
Login Setup / Auditron Mode
Cancel
Save
Cancel
Save
Off
Auditron Mode
Local Machine
Access
Network Access
Mailbox Access
Remote Access
7.
Touch the Auditron Mode button.
Login Setup / Auditron Mode
Off
Auditron Mode
Local Machine
Access
Network Access
Mailbox Access
Remote Access
8.
Select the appropriate Auditron service (copy, print...), then
touch the Save button.
Cancel
Auditron Mode
Copy Service
Print Service
Off
Off
On
On
WorkCentre 7132
Save
Quick Use Guide
WorkCentre 7132
Auditron Setup
9.
Touch the Save button.
Cancel
Login Setup / Auditron Mode
Save
Off
Auditron Mode
Local Machine
Access
Network Access
Mailbox Access
Off
Guest Password
On
Remote Access
10. Touch the Create/Check User Accounts button.
Close
Login Setup / Auditron Administration
Create / Check User
Accounts
Reset User Accounts
User Details Setup
Charge Print Settings
Password Entry from
Control Panel
Login Setup / Auditron Mode
System Administrator's
Meter (Copy Jobs)
11. Select an available UserID option, then touch the
Create/Delete button.
Close
Create / Check User Accounts
UserID
User Name
Create/Delete
WorkCentre 7132
Quick Use Guide
WorkCentre 7132
Auditron Setup
12. When the keyboard appears, enter the new UserID, then
touch the Save button.
Cancel
Save
13. Touch the Account Limit button.
Close
Create/Delete
UserID
E-mail Address
User Name
Account Limit
Reset Total
Password
Reset Account
14. Select the appropriate Auditron service (copy, print...), then
touch the Account Limit button.
To begin, select a Service.
Cancel
Save
Copy Service
Fax Service
Scan Service
Feature Access
Print Service
WorkCentre 7132
Quick Use Guide
Account Limit
WorkCentre 7132
Auditron Setup
15. Use the numeric keypad to enter the Account Limit
values. Use the Next button to navigate between the
Color and Black fields.
Copy Limits:
Cancel
Color
Black
(1-9,999,999)
(1-9,999,999)
99999
99999
Save
Next
16. Touch the Save button.
To begin, select a Service.
Cancel
Save
Copy Service
Fax Service
Scan Service
Feature Access
Print Service
Account Limit
17. Use the Feature Access button, if required, to restrict usage
to black only, color only, or allow free access to either feature.
18. Touch the Save button.
19. Touch the Close button repeatedly to exit the System
Settings screens.
WorkCentre 7132
Quick Use Guide
WorkCentre 7132
Banner Sheets
1.
Press the Log In/Out button on the control panel.
All Services
Copy
Fax
Scan to Mailbox
2.
1
2
4
5
6
7
8
9
*
0
#
-
C
3
Internet Fax
Email
Scan to FTP / SMB
Network Scan
Check Mailbox
Enter the correct UserID, then touch the Confirm button.
System Administrator Login
Cancel
UserID
Keyboard
3.
Touch the System Settings button.
4.
Touch the System Settings button.
5.
Touch the Print Mode Settings button.
Close
System Settings
Common Settings
Copy Mode Settings
Network Settings
Print Mode Settings
Scan Mode Settings
Fax Mode Settings
E-mail/Internet Fax
Settings
Mailbox/Stored Document
Settings
WorkCentre 7132
Confirm
Quick Use Guide
WorkCentre 7132
Banner Sheets
6.
Touch the Other Settings button.
7.
Use the scroll arrows to locate the Banner Sheet button.
Touch the Banner Sheet button.
Save
To begin, select a Service.
Items
Current Settings
Banner Sheet
Off
Change Settings
8.
Touch the Change Settings button.
Save
To begin, select a Service.
Items
Current Settings
Banner Sheet
Off
Change Settings
9.
Choose the appropriate banner sheet option, then touch the
Save button.
Banner Sheets
Cancel
Save
Off
Start Sheet
Start Sheet and End Sheet
End Sheet
10. Touch the Close button repeatedly to exit the System Settings
screens.
WorkCentre 7132
Quick Use Guide
WorkCentre 7132
Replacing the Toner Cartridges
The following window will automatically appear on the touch
screen when a toner cartridge needs to be replaced. The
machine will shutdown if a toner cartridge becomes empty.
Supplies
Close
Items Requested
Status
Black Toner (K)
Replace Toner Cartridge
You can also check and replace the toner cartridges as follows:
1.
Press the Machine Status button on the control panel.
All Services
Copy
Fax
Scan to Mailbox
2.
Email
Network Scan
1
2
4
5
6
7
8
9
*
0
#
-
C
3
Internet Fax
Scan to FTP / SMB
Check Mailbox
Touch the Supplies tab.
Machine Status
Billing Information
Supplies
Faults
Items Requested
Status
Black Toner (K)
Replace Toner Cartridge
WorkCentre 7132
Quick Use Guide
WorkCentre 7132
Replacing the Toner Cartridges
3.
Select the toner cartridges marked with a cross, indicating
replacement is required.
Billing Information
Machine Status
4.
Supplies
Faults
Items Requested
Status
Black Toner (K)
Replace Toner Cartridge
Touch the Replace Cartridge button.
Black Toner (K)
Close
NOTE: Be careful when handling the empty cartridge to avoid
spilling any residue toner.
Replace
Cartridge
WorkCentre 7132
Quick Use Guide
WorkCentre 7132
Replacing the Toner Cartridges
5.
Wait until the rotor turns to the correct position and the prompt is
shown on the screen. Then, confirm which toner should be
replaced.
NOTE: The sample screen indicates the Yellow (Y) Toner should
be replaced.
Replace Cartridge
Close
NOTE: Be careful when handling the empty cartridge
to avoid spilling any residue toner.
6.
Pull the front cover open.
WorkCentre 7132
Quick Use Guide
WorkCentre 7132
Replacing the Toner Cartridges
7.
Open the toner cartridge door.
8.
Remove the toner cartridge from the machine.
NOTE: Be careful when handling the empty cartridge to avoid
spilling any residue toner.
The toner cartridges are designed to be recycled. Return the
cartridge to Xerox in the original packaging using the return labels
included with each new cartridge.
WorkCentre 7132
Quick Use Guide
WorkCentre 7132
Replacing the Toner Cartridges
9.
Remove the new toner cartridge from its box. Rotate the
cartridge from side to side approximately 10 times to evenly
distribute the toner within the cartridge.
10. Insert the cartridge, aligning the arrow on the cartridge with the
arrow on the machine, and push until it locks into position.
WorkCentre 7132
Quick Use Guide
WorkCentre 7132
Replacing the Toner Cartridges
11. Close the toner cartridge door.
12. Close the front cover.
NOTE: Press firmly in the top center when closing the cover. If an
error message appears on the display, press the cover on the
right-hand side to close the cover completely.
13. When the touch screen indicates another toner should be
replaced, repeat the same procedure with the indicated toner.
WorkCentre 7132
Quick Use Guide
WorkCentre 7132