1
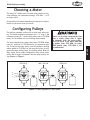
MODEL W1681
Buffing Assembly
OWNER'S MANUAL
Phone: (360) 734-3482 • Online Technical Support: [email protected]
COPYRIGHT © AUGUST, 2001 BY WOODSTOCK INTERNATIONAL, INC. REVISED JUNE, 2009 (TS)
#3723DS
WARNING: NO PORTION OF THIS MANUAL MAY BE REPRODUCED IN ANY SHAPE OR FORM WITHOUT
THE WRITTEN APPROVAL OF WOODSTOCK INTERNATIONAL, INC.
Printed in China
This manual provides critical safety instructions on the proper setup,
operation, maintenance and service of this machine/equipment.
Failure to read, understand and follow the instructions given in this
manual may result in serious personal injury, including amputation,
electrocution or death.
The owner of this machine/equipment is solely responsible for its safe
use. This responsibility includes but is not limited to proper installation in a safe environment, personnel training and usage authorization, proper inspection and maintenance, manual availability and
comprehension, application of safety devices, blade/cutter integrity,
and the usage of personal protective equipment.
The manufacturer will not be held liable for injury or property
damage from negligence, improper training, machine modifications or
misuse.
Some dust created by power sanding, sawing, grinding, drilling, and
other construction activities contains chemicals known to the State of
California to cause cancer, birth defects or other reproductive harm.
Some examples of these chemicals are:
• Lead from lead-based paints.
• Crystalline silica from bricks, cement and other masonry products.
• Arsenic and chromium from chemically-treated lumber.
Your risk from these exposures varies, depending on how often you
do this type of work. To reduce your exposure to these chemicals:
Work in a well ventilated area, and work with approved safety equipment, such as those dust masks that are specially designed to filter
out microscopic particles.
SAFETY.............................................................................................................3
Standard Machinery Safety................................................................................ 3
Additional Safety for Buffing Assemblies................................................................ 5
SERVICE.......................................................................................................... 13
Troubleshooting........................................................................................... 13
PARTS............................................................................................................ 14
WARRANTY...................................................................................................... 17
OPERATIONS
MAINTENANCE.................................................................................................. 12
General..................................................................................................... 12
Cleaning.................................................................................................... 12
Lubrication................................................................................................. 12
SET UP
OPERATIONS.................................................................................................... 10
General..................................................................................................... 10
Testing...................................................................................................... 10
Buffing/Polishing.......................................................................................... 11
ELECTRICAL
SETUP..............................................................................................................6
Unpacking.................................................................................................... 6
Inventory..................................................................................................... 6
Cleaning Machine........................................................................................... 6
Choosing a Motor............................................................................................ 7
Configuring Pulleys......................................................................................... 7
Mounting...................................................................................................... 8
SAFETY
INTRODUCTION...................................................................................................2
Woodstock Technical Support............................................................................. 2
INTRODUCTION
Contents
MAINTENANCE
SERVICE
PARTS
USE THE QUICK GUIDE PAGE LABELS TO SEARCH OUT INFORMATION FAST!
INTRODUCTION
W1681 Buffing Assembly
INTRODUCTION
Woodstock Technical Support
This machine has been specially designed to provide many years of trouble-free service. Close attention
to detail, ruggedly built parts and a rigid quality control program assure safe and reliable operation.
Woodstock International, Inc. is committed to customer satisfaction. Our intent with this manual is to
include the basic information for safety, setup, operation, maintenance, and service of this product.
We stand behind our machines! In the event that questions arise about your machine, please contact
Woodstock International Technical Support at (360) 734-3482 or send e-mail to: tech-support@shopfox.
biz. Our knowledgeable staff will help you troubleshoot problems and process warranty claims.
If you need the latest edition of this manual, you can download it from http://www.shopfox.biz.
If you have comments about this manual, please contact us at:
Woodstock International, Inc.
Attn: Technical Documentation Manager
P.O. Box 2309
Bellingham, WA 98227
Email: [email protected]
-2-
W1681 Buffing Assembly
SAFETY
SAFETY
Indicates an imminently hazardous situation which, if not avoided, WILL
result in death or serious injury.
Indicates a potentially hazardous situation which, if not avoided, COULD
result in death or serious injury.
Indicates a potentially hazardous situation which, if not avoided, MAY
result in minor or moderate injury.
NOTICE
1.
This symbol is used to alert the user to useful information about proper
operation of the equipment, and/or a situation that may cause damage
to the machinery.
Standard Safety Instructions
Standard Machinery Safety
READ THROUGH THE ENTIRE MANUAL BEFORE STARTING MACHINERY. Machinery presents serious
injury hazards to untrained users.
2.
ALWAYS USE ANSI APPROVED SAFETY GLASSES WHEN OPERATING MACHINERY. Everyday eyeglasses only have impact resistant lenses—they are NOT safety glasses.
3.
ALWAYS WEAR A NIOSH APPROVED RESPIRATOR WHEN OPERATING MACHINERY THAT PRODUCES
DUST. Wood dust is a carcinogen and can cause cancer and severe respiratory illnesses.
4.
ALWAYS USE HEARING PROTECTION WHEN OPERATING MACHINERY. Machinery noise can cause
permanent hearing damage.
5.
WEAR PROPER APPAREL. DO NOT wear loose clothing, gloves, neckties, rings, or jewelry which may
get caught in moving parts. Wear protective hair covering to contain long hair and wear non-slip
footwear.
6.
NEVER OPERATE MACHINERY WHEN TIRED, OR UNDER THE INFLUENCE OF DRUGS OR ALCOHOL.
Be mentally alert at all times when running machinery.
7.
ONLY ALLOW TRAINED AND PROPERLY SUPERVISED PERSONNEL TO OPERATE MACHINERY. Make
sure operation instructions are safe and clearly understood.
8.
KEEP CHILDREN AND VISITORS AWAY. Keep all children and visitors a safe distance from the work
area.
9.
MAKE WORKSHOP CHILD PROOF. Use padlocks, master switches, and remove start switch keys.
-3-
SAFETY
READ MANUAL BEFORE OPERATING MACHINE.
FAILURE TO FOLLOW INSTRUCTIONS BELOW WILL
RESULT IN PERSONAL INJURY.
W1681 Buffing Assembly
10. NEVER LEAVE WHEN MACHINE IS RUNNING. Turn power OFF and allow all moving parts to come to
a complete stop before leaving machine unattended.
SAFETY
11. DO NOT USE IN DANGEROUS ENVIRONMENTS. DO NOT use machinery in damp, wet locations, or
where any flammable or noxious fumes may exist.
12. KEEP WORK AREA CLEAN AND WELL LIT. Clutter and dark shadows may cause accidents.
13. USE A GROUNDED EXTENSION CORD RATED FOR THE MACHINE AMPERAGE. Undersized cords overheat and lose power. Replace extension cords if they become damaged. DO NOT use extension cords
for 220V machinery.
14. ALWAYS DISCONNECT FROM POWER SOURCE BEFORE SERVICING MACHINERY. Make sure switch is
in OFF position before reconnecting.
15. MAINTAIN MACHINERY WITH CARE. Keep blades sharp and clean for best and safest performance.
Follow instructions for lubricating and changing accessories.
16. MAKE SURE GUARDS ARE IN PLACE AND WORK CORRECTLY BEFORE USING MACHINERY.
17. REMOVE ADJUSTING KEYS AND WRENCHES. Make a habit of checking for keys and adjusting
wrenches before turning machinery ON.
18. CHECK FOR DAMAGED PARTS BEFORE USING MACHINERY. Check for binding and alignment of
parts, broken parts, part mounting, loose bolts, and any other conditions that may affect machine
operation. Repair or replace damaged parts.
19. USE RECOMMENDED ACCESSORIES. Refer to the instruction manual for recommended accessories.
The use of improper accessories may cause risk of injury.
20. DO NOT FORCE MACHINERY. Work at the speed for which the machine or accessory was designed.
21. SECURE WORKPIECE. Use clamps or a vise to hold the workpiece when practical. A secured
workpiece protects your hands and frees both hands to operate the machine.
22. DO NOT OVERREACH. Keep proper footing and balance at all times.
23. MANY MACHINES WILL EJECT THE WORKPIECE TOWARD THE OPERATOR. Know and avoid conditions that cause the workpiece to "kickback."
24. ALWAYS LOCK MOBILE BASES (IF USED) BEFORE OPERATING MACHINERY.
25. BE AWARE THAT CERTAIN DUST MAY BE HAZARDOUS to the respiratory systems of people and
animals, especially fine dust. Make sure you know the hazards associated with the type of dust you
will be exposed to and always wear a respirator approved for that type of dust.
-4-
W1681 Buffing Assembly
Additional Safety for Buffing Assemblies
Use this and other machinery with caution
and respect. Always consider safety first,
as it applies to your individual working
conditions. No list of safety guidelines can
be complete—every shop environment is
different. Failure to follow guidelines could
result in serious personal injury, damage
to equipment or poor work results.
1. Always wear a face shield and/or safety goggles.
2. Secure this buffer firmly to a benchtop or stand.
3. Never use a grinding wheel on this machine. It is strictly designed for buffing and polishing only.
4. Do not stand directly in front of buffing accessories when turning the machine on.
5. Do not jam work against the buffing wheel. Slowly ease the work into the buffing wheel.
6. Allow the wheel to attain full speed before introducing the workpiece.
7. Do not allow your hands to come into contact with the buffing wheel. Abrasive accessories are
designed to remove material very quickly.
8. Never perform any adjustment or maintenance procedure while the motor is plugged in.
9. Never leave the machine running unattended.
10. Never attempt to buff small parts. If you cannot hold small parts securely, do not buff them with
this machine. Secure them with clamps or similar jigs.
11. Buffing can produce large amounts of dust. Be sure to wear the appropriate dust mask to prevent
the breathing of harmful particles. Be sure to follow the recommended use of the specific dust
mask you are using.
12. Be aware of maximum speeds for the buffing wheels. Never exceed the maximum speed listed
on each buffing/polishing wheel.
-5-
SAFETY
READ and understand this
entire instruction manual
before using this machine.
Serious personal injury
may occur if safety and
operational information is
not understood and followed. DO NOT risk your
safety by not reading!
W1681 Buffing Assembly
SETUP
Unpacking
This machine has been carefully packaged for safe
transportation. If you notice the machine has been
damaged during shipping, please contact your authorized
Shop Fox dealer immediately.
Inventory
SETUP
The following is a description of the main components
shipped with the Model W1681. Lay the components out
to inventory them.
Keep machine disconnected from
power until instructed otherwise.
Note: If you can't find an item on this list, check the
mounting location on the machine or examine the
packaging materials carefully. Occasionally we pre-install
certain components for safer shipping.
Box Inventory
Qty
A. Buffing Assembly*...........................................1
B. V-Belt.........................................................1
C. Wheel Flanges...............................................4
D. Arbor Nuts...................................................4
*Motor and motor pulley are not included.
Cleaning Machine
The shafts of your buffer are coated with a waxy grease
that protects them from corrosion during shipment. Clean
this grease off with a solvent cleaner or citrus-based
degreaser. DO NOT use chlorine-based solvents such as
brake parts cleaner or acetone—if you happen to splash
some onto a painted surface, you will ruin the finish.
-6-
ALWAYS work in wellventilated areas far from
possible ignition sources
when using solvents to
clean machinery. Many
solvents are toxic when
inhaled or ingested. Use
care when disposing
of waste rags and
towels to be sure they
DO NOT create fire or
environmental hazards.
W1681 Buffing Assembly
Choosing a Motor
The Shop Fox® W1681 does not come with a motor or electrical package. We recommend using a 1725 RPM, 1⁄3 H.P.
or larger motor.
Always follow the motor manufacturer's electrical requirements for the motor that you install.
Configuring Pulleys
The buffing assembly comes with a three step arbor pulley. The three progressive diameters are 1", 2" and 3". We
recommend using a 1" motor shaft pulley and a 1725 RPM
motor for the easiest set up of buffing wheel speeds.
1725 R.P.M.
3"
2"
1"
SETUP
The arbor should never rotate faster than 1725 RPM. When
using a 1" pulley on a 1725 RPM motor, in conjunction with
the 1" step on the arbor pulley, you will achieve a buffing
wheel speed of 1725 RPM. As you move the V-belt to progressively larger pulley steps, the buffing wheel RPM will
drop. Never use a pulley configuration that uses a motor
pulley that is larger in diameter than the arbor pulley. See
the diagram in Figure 1.
Never use a pulley configuration that
uses a motor pulley that is larger
in diameter than the arbor pulley.
This will result in an arbor RPM that
is greater than 1725 RPM. An arbor
RPM greater than 1725 RPM is not
recommended.
862-1/2 R.P.M.
575 R.P.M.
1"
1"
Figure 1. Pulley alignment for each speed.
-7-
1"
W1681 Buffing Assembly
Mounting
The strongest bench mounting option is a "Through
Mount" where holes are drilled all the way through the
workbench, and hex bolts, washers, and hex nuts are
used to secure the drill press to the workbench.
Another option for mounting is a "Direct Mount" where the
machine is simply secured to the workbench with a lag
screw.
SETUP
The Model W1681 is designed to mount to a bench top
using (4) 5⁄16" diameter lag bolts or through bolts, as
shown in Figures 2 & 3.
Bolt
Flat Washer
Machine Base
Workbench
Flat Washer
Lock Washer
Hex Nut
Figure 2. Example of a through mount.
The motor must be mounted either directly below or
behind the Buffing assembly. If the motor is mounted
below the buffing assembly, a hole must be cut in the
bench to allow passage of the V-belt between the buffing
assembly and the motor. If the motor is mounted behind
the buffing assembly, no hole in the bench is needed
because the V-belt will connect to the motor through the
rear casting of the buffing assembly body.
The buffing assembly must be attached to a stable
workbench capable of handling the rigors of a motor
driven machine. Determine if you will be mounting the
motor below or behind the buffing assembly.
Motor Below
1. Position the buffing assembly on the workbench in
the desired position. Mark the four mounting hole
locations onto the workbench, as shown in Figure 4.
Lag Screw
Flat Washer
Machine Base
Workbench
Figure 3. Example of a direct mount.
3/8" Dia.
4-3/4"
2. Trace around the open area on the inside, bottom
edge of the buffing assembly. This will be the hole
for the V-belt passage to the motor mount beneath.
3. Remove the buffing assembly from the workbench.
Using a jig saw and drill, cut out the V-belt
passage hole and drill the mounting holes into the
workbench.
4. Place the buffing assembly over the mounting holes
in the workbench. Using (4) 5⁄16" diameter lag bolts
or through bolts, attach the buffing assembly to the
workbench, making sure that it is secure.
-8-
Provided for
reference only.
4-1/2"
For best results,
use your machine
as a template for
marking holes
Front
Figure 4. Mounting bolt layout.
W1681 Buffing Assembly
5. Mount the motor on a 1⁄2" plywood platform below
the buffing assembly so that the motor pulley
is directly beneath the arbor pulley. Be sure to
orient the motor rotation so the buffing wheels
will be rotating downward on the working side of
the buffing assembly. Attach the platform to the
workbench using a piano hinge, as shown in Figure
5.
Rotation
Buffer Assembly
Working Side
Motor
6. Install the V-belt on the desired pulleys.
1/2" Plywood
Motor Behind
1. Position the buffing assembly on the workbench in
the desired position. Mark the four mounting hole
locations onto the workbench.
Piano
Hinge
Figure 5. Motor and buffer assembly
locations.
2. Remove the buffing assembly from the workbench
and set aside.
4. Place the buffing assembly over the mounting holes
in the workbench. Using (4) 5⁄16" diameter lag bolts
or through bolts, attach the buffing assembly to the
workbench, making sure that it is secure.
5. Mount the motor on a 1⁄2" plywood platform and
attach to the back of the workbench with a piano
hinge as shown in Figure 6. Be sure to orient the
motor rotation so the buffing wheels will be rotating
downward on the working side of the buffing
assembly. Attach the motor so the motor pulley is
in-line with the arbor pulley.
Be sure to mount the motor so the
rotation of the buffing wheels is downward on the working side of the
assembly. If the buffing wheels rotate
upward on the working side, the
object being worked on could be propelled up and into the path of the
operator causing serious personal
injury.
Buffer Assembly
Working Side
Rotation
6. Install the V-belt on the desired pulleys.
Motor
7. We recommend building a plywood guard to cover
the V-belt and motor pulley assembly. This will
prevent the operator from accidentally coming into
contact with the belt during operation.
1/2" Plywood
Piano Hinge
Figure 6. Side view of motor mounting
behind.
-9-
SETUP
3. Using a drill, drill the mounting holes into the
workbench.
W1681 Buffing Assembly
OPERATIONS
General
This machine will perform many types of operations
that are beyond the scope of this manual. Many of these
operations can be dangerous or deadly if performed incorrectly.
The instructions in this section are written with the understanding that the operator has the necessary knowledge
and skills to operate this machine. If at any time you are
experiencing difficulties performing any operation, stop
using the machine!
If you are an inexperienced operator, we strongly recommend that you read books, trade articles, or seek training
from an experienced buffer operator before performing
any unfamiliar operations. Above all, your safety should
come first!
READ and understand this entire instruction manual before using this machine.
Serious personal injury may occur if
safety and operational information is not
understood and followed. DO NOT risk
your safety by not reading!
OPERATIONS
Testing
Once assembly is complete and adjustments have been
made, the machine is ready for a test run. The purpose of
a test run is to identify any unusual noises and vibrations,
as well as to confirm the machine is performing as intended.
To test run your buffer setup, do these steps:
1. Turn the machine ON by pressing the START button
on the power switch. Be sure to have your finger
poised to hit the STOP button if there is a problem.
2. Once the machine is running, listen for any unusual
noises. The machine should run smoothly with little
or no vibrations.
DO NOT investigate problems or adjust
the machine while it is running. Wait
until the machine is turned OFF,
unplugged and all working parts
have come to a complete stop before
proceeding!
3. If there are any unusual noises or vibrations, shut
the machine OFF immediately. The machine should
not be run any further until the problems are
corrected.
4. Unplug the machine and investigate the source of
the noise or vibration. Do not make any adjustments
to the machine while it is plugged in.
5. Repeat Steps 1-4 until machine runs smoothly.
-10-
Always wear safety glasses when operating this machine. Failure to comply
may result in serious personal injury.
W1681 Buffing Assembly
Buffing/Polishing
The Model W1681 buffing assembly is a simple and straightforward machine to use. There are many different styles
of discs and compounds to choose from. It is very important that you do not use grinding wheels on this machine.
The buffing assembly is designed exclusively for buffing
and polishing only.
Buffing Wheel
Arbor Shaft
Arbor Nuts
Wheel Flanges
To use your buffing assembly, do these steps:
1. Select the 3⁄4" buffing wheels that you want to
install on the machine.
2. Loosen the arbor nuts located on each end of the
arbor. The left hand end of the arbor has left hand
threads and the right hand end of the arbor has right
hand threads.
Figure 7. Buffing wheel assembled on
arbor.
3. Sandwich each buffing wheel between the wheel
flanges, making certain the convex side of the
washer faces away from the body of the buffing
wheels. Use only the wheel flanges supplied with the
machine.
5. Turn the buffing assembly ON and apply the desired
buffing compound to the rotating edge of the
wheels. Be sure to wear safety glasses and dust
mask, as compound often flies off during application
and operation.
Buffing and polishing can produce large
amounts of fine dust and particles. Be
sure to wear an appropriate respirator
mask. Do not use paper or cloth dust
masks.
6. Follow these tips while buffing your workpiece:
• Only use the area indicated in Figure 8 to do the
actual buffing. Contacting the workpiece on areas
outside the correct area may flip the workpiece
out of your hands.
• Hold the workpiece tightly at all times while buffing. Placing one hand near the contact point will
give you better control.
-11-
(Right Front Side View)
on
tati
o
FRONT
R
TOP
Wh
ee
l
• Thoroughly clean all parts that you plan to buff.
Any kind of dirt, oil, rust, paint or other film must
be removed either chemically or sprayed off with
water. Make sure to dry off parts with a rag after
cleaning.
Workpiece
Contact Here
BOTTOM
Figure 8. Location where workpiece
should contact wheel.
OPERATIONS
4. Slide the buffing wheel assemblies onto each end of
the arbors and securely tighten each of the arbor
nuts, as shown in Figure 7.
W1681 Buffing Assembly
MAINTENANCE
General
Regular periodic maintenance on your machine will
ensure its optimum performance. Make a habit of
inspecting your machine each time you use it.
Check for the following conditions and repair or
replace when necessary:
•
•
•
•
•
Loose mounting bolts.
Worn switch.
Worn or damaged cords and plugs.
Damaged V-belt.
Any other condition that could hamper the safe
operation of this machine.
Cleaning
Frequently vacuum dust off of the buffer and motor. This
is especially important for the internal working parts and
motor. Dust build-up around the motor is a sure way to
decrease its lifespan.
Lubrication
MAINTENANCE
Since all bearings are sealed and permanently lubricated,
simply leave them alone until they need to be replaced.
Do not lubricate them.
-12-
Make sure that your machine is
unplugged during all maintenance procedures! If this warning is ignored, serious personal injury may occur.
W1681 Buffing Assembly
SERVICE
Troubleshooting
This section covers the most common problems and corrections with this type of
machine. WARNING! DO NOT make any adjustments until power is disconnected and
moving parts have come to a complete stop!
PROBLEM
POSSIBLE CAUSE
corrective action
1. Correct motor wiring connections.
2. Test by rotating shaft; rotational grinding/loose
shaft requires bearing replacement.
3. Test/repair/replace.
3. Motor is at fault.
4. Buffing wheel is too large/wide or 4. Replace with smaller wheel or reduce wheel width.
exceeds recommended wheel rating.
Machine stalls or is over- 1. Motor connection wired incorrectly.
loaded.
2. Motor bearings are at fault.
1. Inspect/replace stripped or damaged bolts/nuts,
and re-tighten with thread locking fluid.
2. Shim or tighten mounting hardware.
Incorrectly mounted to workbench.
3. Replace dented fan cover; replace loose/damaged
Motor fan is rubbing on fan cover.
fan.
4. Test by rotating shaft; rotational grinding/loose
Bearings are at fault.
shaft requires bearing replacement.
5. Test with dial indicator and replace if necessary.
Shaft is bent.
Buffing wheel has become loose, 6. Replace buffing wheel.
worn, or components (steel center
hub) are dislodged.
Machine has vibration or 1. Motor or component is loose.
noisy operation.
2.
3.
4.
5.
6.
SERVICE
-13-
W1681 Buffing Assembly
PARTS
11
5
4
7-1
7
8
10
4
11
6
7-1
1
7
5
1
1
3
4
1
4
2
9
3
1
refpart #description
X1681001
X1681002
X1681003
X1681004
X1681005
X1681006
X1681007
X1681007-1
X1681008
X1681009
X1681010
X1681011
HEX HEAD BOLT
V-BELT 4L280
RIGHT HAND ARBOR NUT
3" PLEATED FLAnGES 3⁄4" ID
RETAINING RING
ARBOR SHAFT
BALL BEARING
RUBBER BEARING COVER
ARBOR PULLEY
REAR CAST HOUSING
FRONT CAST HOUSING
LEFT HAND ARBOR NUT
PARTS
01
02
03
04
05
06
07
07-1
08
09
10
11
-14-
1
W1681 Buffing Assembly
Warranty Registration
Name____________________________________________________________________________________
Street___________________________________________________________________________________
City__________________________ State____________________________Zip_________________________
Phone #_______________________ Email___________________________Invoice #____________________
Model #_________Serial #______________Dealer Name__________________Purchase Date___________
The following information is given on a voluntary basis. It will be used for marketing purposes to help us
develop better products and services. Of course, all information is strictly confidential.
CUT ALONG DOTTED LINE
1. How did you learn about us?
______ Advertisement
______ Mail Order Catalog
______ Friend
______ Website
_ ____ Local Store
_ ____ Other:
2. How long have you been a woodworker/metalworker?
______ 0-2 Years
______ 2-8 Years
_ ____ 8-20 Years ______ 20+ Years
3. How many of your machines or tools are Shop Fox?
______ 0-2
______ 3-5
_ ____ 6-9
______ 10+
4. Do you think your machine represents a good value?
______ Yes
_ ____ No
5. Would you recommend Shop Fox products to a friend?
______ Yes
_ ____ No
6. What is your age group?
______ 20-29
______ 50-59
______ 30-39
______ 60-69
7. What is your annual household income?
______ $20,000-$29,000
______ $30,000-$39,000
______ $50,000-$59,000
______ $60,000-$69,000
_ ____ 40-49
_ ____ 70+
_ ____ $40,000-$49,000
_ ____ $70,000+
8. Which of the following magazines do you subscribe to?
____
____
____
____
____
____
____
____
____
____
Cabinet Maker
Family Handyman
Hand Loader
Handy
Home Shop Machinist
Journal of Light Cont.
Live Steam
Model Airplane News
Modeltec
Old House Journal
____
____
____
____
____
____
____
____
____
____
Popular Mechanics
Popular Science
Popular Woodworking
Practical Homeowner
Precision Shooter
Projects in Metal
RC Modeler
Rifle
Shop Notes
Shotgun News
____
____
____
____
____
____
____
____
____
Today’s Homeowner
Wood
Wooden Boat
Woodshop News
Woodsmith
Woodwork
Woodworker West
Woodworker’s Journal
Other:
9. Comments:___________________________________________________________________
_ _____________________________________________________________________________
_ _____________________________________________________________________________
_ _____________________________________________________________________________
_ _____________________________________________________________________________
FOLD ALONG DOTTED LINE
Place
Stamp
Here
Woodstock international inc.
p.o. box 2309
bellingham, wa 98227-2309
FOLD ALONG DOTTED LINE
tape along edges--please do not staple
WARRANTY
WARRANTY
Woodstock International, Inc. warrants all Shop Fox machinery to be free of defects from workmanship
and materials for a period of two years from the date of original purchase by the original owner.
This warranty does not apply to defects due directly or indirectly to misuse, abuse, negligence or
accidents, lack of maintenance, or reimbursement of third party expenses incurred.
Woodstock International, Inc. will repair or replace, at its expense and at its option, the Shop Fox
machine or machine part, which in normal use has proven to be defective, provided that the original
owner returns the product prepaid to a Shop Fox factory service center with proof of their purchase
of the product within two years, and provides Woodstock International, Inc. reasonable opportunity to
verify the alleged defect through inspection. If it is determined there is no defect, or that the defect
resulted from causes not within the scope of Woodstock International Inc.'s warranty, then the original
owner must bear the cost of storing and returning the product.
This is Woodstock International, Inc.'s sole written warranty and any and all warranties that may
be implied by law, including any merchantability or fitness, for any particular purpose, are hereby
limited to the duration of this written warranty. We do not warrant that Shop Fox machinery complies
with the provisions of any law or acts. In no event shall Woodstock International, Inc.'s liability under
this warranty exceed the purchase price paid for the product, and any legal actions brought against
Woodstock International, Inc. shall be tried in the State of Washington, County of Whatcom. We shall
in no event be liable for death, injuries to persons or property or for incidental, contingent, special or
consequential damages arising from the use of our products.
Every effort has been made to ensure that all Shop Fox machinery meets high quality and durability
standards. We reserve the right to change specifications at any time because of our commitment to
continuously improve the quality of our products.