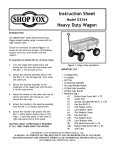
1
Model D3038
REMOTE DUST COLLECTOR SWITCH
Instruction Sheet
Phone #: (360) 734-3482 • Online Tech Support: [email protected] • Web: www.shopfox.biz
Introduction
The Model D3038 Remote Dust Collector Switch (Figure
1) allows the operator to turn the dust collector ON/OFF
from a distance of up to 75 feet. Read and understand
this entire document before installation to make sure the
Model D3038 fits the intended application.
Only connect the Model D3038 to a 110V circuit with a
NEMA 5-15 receptacle. DO NOT connect a dust collector with a motor larger than 1 1⁄2 HP. Failure to follow
these warnings will void the warranty and could cause
damage to the remote switch and the dust collector.
NOTICE
This switch is designed to be used only on dust
collectors with standard ON/OFF toggle switches.
Due to the nature of magnetic switches, the Model
D3038 WILL NOT function properly if connected
to a machine with this type of switch. If you are
uncertain about the type of switch on your dust
collector, contact the manufacturer for more
information. Do not attempt to bypass the dust
collector switch with this unit.
Use of the Model D3038 for applications other than
dust collectors may cause the unit to fail and will
void the warranty.
The remote control transmitters and receiver
included in this package are programmed
specifically for each other. For this reason,
replacement transmitters are not available for
purchase. If both transmitters are lost or damaged,
an entire new unit must be purchased.
Figure 1. Model D3038.
Specifications
Voltage............................... 110V Only
Max. Current..........................15A Peak
Receiver Range........................ 75 Feet
Control Signal..........................Infrared
Plug/Receptacle Type..................... 5-15
Inventory
A.
B.
C.
D.
Qty.
(Figure 2)
Receiver Unit............................. 1
Remote Control Transmitters........... 2
Tap Screws................................ 2
Mounting Bracket......................... 1
A
B
D
C
Figure 2. Inventory.
COPYRIGHT © JANUARY, 2011 BY WOODSTOCK INTERNATIONAL, INC.
#13756JB
WARNING: NO PORTION OF THIS MANUAL MAY BE REPRODUCED IN ANY SHAPE OR FORM WITHOUT
THE WRITTEN APPROVAL OF WOODSTOCK INTERNATIONAL, INC.
Printed in China
D3038 Remote Dust Collector Switch
Installation
1. Identify a mounting location for the receiver unit
that allows the power cord to reach an appropriate
outlet and the dust collector power to be plugged
into the receiver outlet.
Note: You may choose to attach the receiver unit
directly to your dust collector. If so, mount it to a
portion of the frame that will not compromise the
function or strength of the dust collector.
2. Attach the mounting bracket in the chosen location
using the included screws, as shown in Figure 3. If
you are mounting the bracket to the dust collector
frame, you may have to use alternative mounting
hardware.
Reciever
Unit
Side
View
Wall
Mounting
Bracket
3. Hook the receiver unit onto the mounting bracket.
Screws
Figure 3. Mounting.
4. Plug the receiver power cord into a 5-15 receptacle,
then plug the dust collector cord into the receiver
unit.
110V
GROUNDED
5-15 RECEPTACLE
Grounding Prong
Only connect the Model D3038 to a 110V circuit with a
NEMA 5-15 receptacle. DO NOT connect a dust collector with a motor larger than 1 1⁄2 HP. Failure to follow
these warnings will void the warranty and could cause
damage to the remote switch and the dust collector.
5. If the batteries are not installed in the remote
control transmitters, install them as described on
Page 3.
-2-
5-15 PLUG
Neutral Hot
Figure 4. NEMA 5-15 plug & receptacle.
DO NOT modify the provided plug or
use an adapter if the plug will not fit
your receptacle. This is an indication
that your power supply circuit does
NOT meet the requirements for the
machine; have an electrician install
the correct power supply circuit. If
the machine must be reconnected for
use on a different type of electric
circuit, the reconnection should be
made by a qualified electrician or
service personnel; after reconnection,
the machine must comply with all local
codes and ordinances.
D3038 Remote Dust Collector Switch
6. Turn the remote control transmitters ON with
the ON/OFF switch shown in Figure 5. The LED
indicators will light to show the transmitters are
working.
—If the LEDs don't light, remove the protective
covering from the batteries. See Replacing
Batteries below to access the batteries.
Note: To conserve battery life in the remote control
transmitters, only turn them on when they are
needed for use.
ON/OFF Switch
Figure 5. ON/OFF Switch location.
7. Turn the switch on the dust collector unit to the
ON position. Test the function of the remote dust
collector switch by pressing the ON and OFF buttons
on each remote.
Replacing Batteries
1. Remove the two screws from the back of the remote
control transmitter.
2. Remove the back of the remote control transmitter,
as shown in Figure 6.
3. Remove the existing battery, then install a new 9V
battery.
4. Replace the back of the remote transmitter and
secure it with the two screws removed in Step 1.
Tip: During long-term storage, remove the batteries from
the remote control transmitters to prevent damage from
battery leakage or corrosion.
Figure 6. Battery installation/
replacement.
Troubleshooting
PROBLEM
Unit will not turn on.
POSSIBLE CAUSE
corrective action
1. Remote is out of range.
2. Signal is obstructed.
3. Remote is not turned ON.
4. Dust collector is turned OFF
5. Receiver circuit breaker has
tripped.
6. Wall circuit breaker has tripped.
7. Remote battery is weak/dead.
8. Connected to a machine with a
magnetic switch.
9. Dust collector is at fault.
10.Remote control transmitter is at
fault.
11.Receiver unit is at fault.
-3-
1. Move remote closer to receiver unit.
2. Remove obstructions to provide direct line of sight
between remote and receiver.
3. Turn ON remote control transmitter.
4. Turn ON dust collector.
5. Allow unit to cool, then press the button on the
bottom of the receiver unit to reset breaker.
6. Reset wall circuit breaker. Check that breaker is in
good condition and circuit is properly sized for the
dust collector in use.
7. Replace weak/dead battery.
8. Only use this unit on machines with standard ON/
OFF toggle switches.
9. Refer to dust collector manufacturer's
documentation for troubleshooting.
10.Check/use second remote.
11.Replace unit.