1
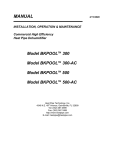
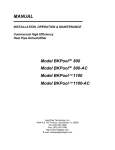
Dehumidistat Installation Instructions
APPLICATION
The dehumidistat (humidity controller) provides automatic low voltage control of the dehumidifier in central heating
and air conditioning systems. It has a SPST, snap-acting, dust-proof switch and is designed for wall or surface duct
mounting.
INSTALLATION
When installing the product . . .
1. Read these instructions carefully. Failure to follow them could damage the product or cause a hazardous
condition.
2. Check the ratings given in the instructions and on the product to make sure the product is suitable for
your application.
3. Installer must be trained, experienced service technician.
4. After installation is complete, check out product operation as provided in these instructions.
Personal Injury Hazard.
Power supply can cause electrical shock. Disconnect power supply before beginning installation.
Location and Mounting
The dehumidistat can be mounted at any convenient location in the living area or equipment room.
NOTE: The electrical connections are not shared with the thermostat.
Wall Mounting
IMPORTANT - Mount the control in an area with average room temperature and average relative humidity.
1.
Mark the holes for the two mounting screws (included). Then mark the hole for the low voltage
wiring.
2.
Drill the holes.
3.
Run low voltage wiring to the location and pull about 6 inches (152 mm) of wire through the hole.
4.
Plug the hole with nonflammable insulation to prevent drafts from affecting the control operation.
5.
Remove the case from the base.
6.
Position the base on the wall with the arrow up.
7.
Use the two, one inch (25 mm) mounting screws to secure the base to the wall.
IMPORTANT – Use 18- to 22-gauge wire for proper wiring.
8.
Connect the low voltage wires to the leads.
9.
Replace the case.
Duct Mounting
IMPORTANT – When mounting near an elbow area, locate the control six includes (152 mm) upstream from the elbow
so the element is exposed to the normal airflow (Figure 1).
1.
2.
3.
4.
5.
6.
7.
Locate the control at least 8 includes (203 mm) upstream from the dehumidifier in the return air duct.
(See Figure 1).
Apply the duct template to the duct location.
Use the duct template to make the opening and mounting hole.
Remove the dehumidistat case from the base.
Position the foam gasket on the base.
Position the base on the duct with the arrow up.
Use the four, one-inch (25 mm) mounting screws to
secure the base to the duct.
Connect the low voltage wire to the leads.
Replace the case.
8.
9.
IMPORTANT – Use 18- to 22-gauge wire for proper wiring.
Figure 1 - Selecting
Duct Location for
Control
WIRING
Personal Injury Hazard.
Power supply can cause electrical shock. Disconnect power supply before beginning installation.
All wiring must comply the applicable local codes, ordinances and regulations. Make wiring connections according to
dehumidifier instructions; otherwise see typical wiring diagram in Figure 2.
Figure 2 - Diagram for
Dehumidifier
ADJUSTMENTS
Humidity Control Adjustment
To maintain optimum humidity control without causing condensation on cold surfaces such as windows, the
homeowner must adjust the set point as the outdoor temperate changes.
To reduce the relative humidity, reduce the set point approximately three percent relative humidity every 24 hours.
To increase the relative humidity increase the set point approximately three percent relative humidity ever 24 hours.
Set Point Adjustment
Set the humidity set point according to the prevailing outdoor temperature. See table below for recommended
settings.
Recommended Humidity Controller Settings
Outdoor Temperature
F
C
-20
-29
-10
-23
0
-18
+10
-12
+20
-7
>+20
>-7
Recommended Humidity
Controller Setting
15
20
25
30
35
40
OPERATION AND CHECKOUT
Place the system in operation and observe through at least one complete cycle to make certain that all components
are functioning properly.