1
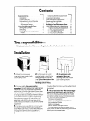
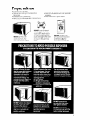
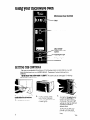
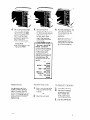
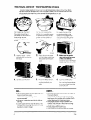
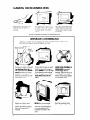
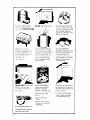
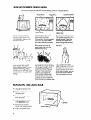
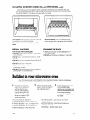
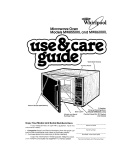
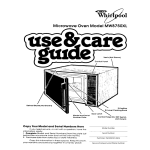
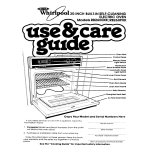
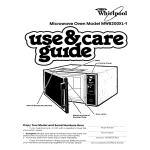
Microwave Oven Model&MW8400XL
and MW8450XL
cpn\ro,Panel \
y-----A
Bl-level Cooklng Rack
Mw6450XL only)
(Mod91
\
Door Latch
Model ona w3rial
Number Plate
copy
Your Model and Serial Numbers
If you need service,
irrtormation
ready:
1, Complete
or call with o question,
Mode) a-d Serial Numbers
Here
have
thts
-----
the Plate just
b&[nd
the mkrawave
oven door on the oven frame).
2. purchase date from sales slip (or dote installed],
Copy
fp+\s dormation
in these spaces. Keep this book,
your warranty and sales slip together in a handy place.
Model
Number
Serial
Number
(from
Purchase
~Installa~lon
Date
--Service
Company
and Phone
Number
Contents
Page
Page
Responsibilities
lnstollotion
:
Proper, Safe Use
Precautions to Avoid Possible
Exposure to Excessive
Microwave
Energy
Using Your Microwave
Oven
Setting the Controls
Defrosting
Cooking with the Temperature
Probe
3
4
4
5
6
Your responsfbiIities..
FM out and
return
the “MIcrowave
Cleaning
the Microwave
Oven
Important Information
How Microwave
Ovens Work
Replacing
the Light Bulb
Bi-Level Cooking Rock
Bulldlng In Your Microwave
Oven
If You Need Service or Assistance.
1, Before Calling For Assistance.
2. If You Need Assistance
3. If You Need Service
4. If You Hove a Problem
2
2
3
8
8
10
IO
11
11
12
12
12
12
12
.
Registration
Card”attached
to the oven
door.
Installation
1. Empty
the mlcrowove
oven and clean inside It with
a soft damp cloth
2.
Pul the oven on a cart.
counter, table or shelf that is
strong enough to hold the
oven. (The control side of the
unit is the heavy side.
Handling can be tricky.)
4. For your safety, this oven must be
grounded.
DO NOT REMOVE THE THIRD PRONG
FROM THE PLUG. You must hove a quaIlfled
electrician
put in the right outlet if yours does
not hove the j-prong
plug-in. or if the outlet
is not grounded
according
to National Electracol Codes and local codes or ordinances.
The outlet must supply 120 volts. 60 Hz., A C
When the oven is on It will use about 1375
watts. It should not shore a circuit with another
appliance.
5. Put about one cup (250 ml) of cold water
in a gloss container
in the oven. Close the
door. Make sure it lock-. Follow the directions
on page 4 to set the oven to COOK for 1%
2
3. Do not block
vents
on back of the oven.
Blocking vents con cause
poor cooking results
minutes When the time is up, the water
be heated.
should
6. Fill out and return the “Mlcrowave Reglstratlon Card”attached
to the oven door. If
the cord is missing, please send the model
and serial number of your microwave
oven,
with your name and address to...
Whirlpool Corporation
Microwave
Registration
Deportment
Administrative
Center
2000 U.S. 33 North
Benton Harbor, Michigan
49022
This information
will help us reach you if
there is ever a need to pass along information
about your microwave
oven.
Proper, safe use
Your microwave
must be...
l
Installed accordtng
to the installatton
InstructIons.
0 Protected from the weather.
l
Used only tor jobs expected
of home mlcrowave ovens
NEVER start the oven
when Its empty The
ovel-1 can be damaged
l
l
Used only by people who can operate
properly.
Kept clean and in good repair
DO NOT cook or reheat
whole eggs in the microwave oven. Steam buildUp can cause an egg to
burst Damage to the oven
or Injury to the user may
result
-- _.
DO NOT use the oven
until you have read ond
understand
ALL the
information
on safe use
it
microwave oven
Mlcrowave
Oven Controls
TIMER
Cook Power Control
MEAL SENSOR’
Temperature Probe
Control
Probe Signal Light
ON Signal light
Start Button
SETTING THE CONTROLS
Be sure you understand
the basics of microwave
oven cooking before you start
Follow the directions
Start with recipes from your MICRO MENUS Cookbook.
carefully.
NEVER START THE OVEN WHEN IT’S EMPTY. The oven can be damaged
For testing,
use at least a cup of water.
Be sure you have read and
understand
the directions.
1.
Put food in the oven.
2.
Close the door. Make
sure it locks The oven
won’t work if the door isn’t
closed tightly
3.
Set cooking times up to IO
minutes by pushing in the
timer knob and turning
clockwise.
The oven light
will go on. Push in and turn
counterclockwise
to
reduce time.
To set time for less than 1
minute, turn timer past
1 minute then to desired
time.
‘Tmk
4.
Set cooking times longer
than 10 minutes by turning the timer knob and
wheel Ftrst set the knob,
then move the wheel.
Example, to set 22 minutes, 30 seconds
0 Set 2 minutes, 30 seconds by pushing in and
turning knob.
l Set 20 minutes
by pushrng up on wheel.
5.
Set Cook Power to
desired setting from HI to
LO. Some recipes require
different Cook Powers
for best results. [See
chart.] The lower the
Cook Power, the slower
the cooking.
6.
-COOK POWER CHART Recipes in the MICRO
MENUS Cookbook
use Cook Power settings
from HI to LO. Recipes
in other books and
magazines
may use
different percentages
of
cooking power. The
following chart will be
helpful:
HI - 100% of full
power
MED-HI - 70% ol full
power
MED - 50% of full
power
MED-LO30% of full
power
(DEFROST)
LO - 15%,of full
power
Push the START Buttoze
oven light will stay on.
You will hear a fan running during oven
operation.
When the set time IS up,
the oven will shut off
automatrcally.
You will
hear a bell, the lrght will
go off and the fan WIII
stop
DEFROSTING
TO STOP THE OVEN
-
TO RESTART THE OVEN
For defrosting. set Cook
Power Control to DEFROST
(MED-LO) setting See the
Defrost Guide instde the oven
door or your MICRO MENUS
Cookbook
for suggested
defrost times.
1.
1.
2.
Push tn and turn the timer
knob counterclockwise
to 00 00
OR
Open the oven door
2.
3.
Close the oven door,
Set tamer (if needed).
To set timer for less
than 1 minute, turn
timer past 1 minute
then to desired time.
Push the START Button.
Tmk
5
THE MEAL SENSOR:‘: TEMPERATWRE PROBE
Roast or bake meats or casseroles
to a set temperature
instead of by time. When
the MEAL SENSOR Temperature
Probe is properly
used, the microwave
oven will turn
off automatically
when the probe senses the temperature
YOU set.
For casseroles, the tip of
the probe should be In
the center of the food. Stir
foods when recommended
Replace the
probe
For I~q~ds balance
the
probe on a wooden spoon
or spatula so the tip of the
probe IS In the center of
the I:quld
For roasts the rrp of the
probe should be tn the
center of the largest muscle, but not touching fat or
bone
d
I
Socket
1.
Insert at least 1 of the
temperature
probe Into
the food
2.
PIace food In the oven
and plug the probe into
the socket on the oven
3.
Make
does
of the
Close
Slgnal
6.
Push the START Button
When the probe senses
the cooking temperature,
a buzzer sounds, and the
oven turns off
WOII.
4.
Set the Cook Power II
desrred
5.
Move the Meal Sensor
pointer to the final cook!ng temperature
you
want
DO...
l
l
l
l
use hot pads when removing
probe from
food or food from oven
stir foods durrng cooking when
recommended
stir soups, casseroles
and drinks before
serving
cover roasts with !oil and let stand a few
minutes after cookrng. Remove foil If you
decide to cook rt longer.
DON’T...
l
l
l
l
l
l
6
sure the probe
not touch any part
oven interior.
the door. The Probe
Light will come on
let probe or probe cable touch any part of
the oven interror.
let probe touch foil (if used] Foil can be
kept away from probe with wooden toothpicks. Remove foil if arcing occurs.
use paper, plastic wrap or plastic containers. They will be in the oven too long.
use probe in regular oven.
force probe into frozen food.
use probe for foods that need to simmer.
-Tmk
MEAL SENSOR. TEMPERATURE PROBE GUIDE
Food
-.. ~-~-Beverages
-~-~~-.-~.-
- ~
Cook Power
Setting
HIGH
HIGH
Food
~_~~~~~
~_-.-~
MEDIUM HIGH
Casseroles
Canned
_~_~~~~~~
Chowders
MEDIUM HIGH
~~
.~
Meal Sensor
Setting
---~
165 F to 170 F
Tips
170 F
Use MEDIUM Cook Power for very thick
foods such as baked beans.
-~__
Use MEDIUM Cook Power for very thick
mixtures. Stir once or twice.
Balance probe on wooden spoon. Stir
once or twrce.
~__-.~.-~
170 Fto
175 F
~~__
180 F
Balance
~~---~
on wooden spoon.
probe
DIPS
~~-Meat Loaf (beef]
Poultry
140 F
MEDIUM
170 F
MEDIUM HIGH
Do not use the MEAL SENSOR probe when cookrng poultry. Because of the
amount of bone and shape of poultry, there is no place where the meat IS
thrck enough to place the probe properly.
Sandwiches
MEDIUM
110 F
soup
HIGH
165 Fto
170 F
Place sandwich
on paper napkin.
Insert probe from side so tip is in center
of fillrng. Thick sandwiches
work best.
~____-.-.-..
~~-~~
Balance probe on wooden spoon. Stir
once or twice
TIPS
in several of the items -all
not heat at the same rate.
Casseroles
cooked usrng the MEAL SENSOR
probe should be made from precooked
foods Do not use raw meats, raw vegetables and cream sauces in CaSSerOleS
l
o Dry casseroles
l
do not work well
l
0 Thaw frozen casseroles
and meats In the
mrcrowave
oven before Inserting the
probe
l
If you are cooking
rndrvrdual servings such
as mugs of soup, check the probe setting
CLEANING
l
Dry meat loaf mixtures
Tmk
don’t work well.
Remember
that roasts may vary in size,
shape and composition.
Use the timings for
minutes per pound as a guideline
as well as
the MEAL SENSOR probe.
Starchy vegetables
SENSOR probe.
tend to stick to the MEAL
THE PROBE:
1. Remove probe from microwave
oven using hot pads.
2. Wipe probe with a hot sudsy cloth Use a plastic scouring
foods.
3 Probe may be placed
in silverware
basket of dishwasher.
4. Be careful not to kink the cable.
NOTE: Make
handle.
the mugs may
sure you have the right probe
pad to remove
stubborn
for your oven. It will have “LO-Z” on the
CLEANING TIE MImOWaVE
Wipe often with warm sudsy
water and a soft cloth or
sponge
OVEN
For stubborn soil, boll a cup
of water in the oven for 2 or 3
minutes Steam ~111soften
the scj~l
Do not use abrasive
cleaners
IMPORTANT
Before you start using your microwave
/nformof/on
Metallic
w/l/ help you avo/d
In metal containers
can damage
the oven. So
can containers
with hidden
metal (twist-ties, foil-lining,
staples, metallic glaze or
Test dInnerwore
before usfng
or steel wool pads.
INFORMKIION
oven, read this section
carefully.
This
to your oven.
Trim
Cooking
trim]
wore
damage
Be sure to clean the areas
where the door and oven
frame touch when closed.
Rinse well
or cook-
Paper can char or burn,
and some plastics can
melt if used when heating
foods for more than 4
minutes.
Jo test o dish for safe use, put it
into the oven with a cup of
water beside it. Cook on high
Cook Power for one minute.
If the dlsh gets hot and the
water stays cool, do not
use It.
NEVER start a mlcrowave
oven when it’s empty. The
oven can be damaged.
If
you experiment,
put a
container
of water in the
oven
NEVER COOK OR REHEAT A
WHOLE EGG. Slice hard
boiled eggs before
heating. Steam build-up in
whole eggs may cause
them to burst and possibly
damage
the oven.
Don’t let anything touch
the top of the oven cavity.
Rough or harsh cleaners
DO NOT store things In the
can scratch or dull the
oven
CVS“I flnlsh DO NOT USE lHEh4.
I
Overcooking
some foods
can cause them to scorch
or flame. especially
foods
llke potatoes, popcorn,
snacks, etc See the MICRO
MENUS Cookbook
Make
pcg.zorn only ill
poppers deslgned
foi use
In microwave
ovens
Follow pc>pper dIrectIons
Results are the popper
marufac’~reis
rc?l.-ionslt]llIty
i lqulds heated In certain
corltolners
may overheat
The Ilqbld may then splash
out with a loud noise This
does not harm the oven,
tiut you should not use
such containers
to heat
ilqulds again
Do NOT OV[RCOOK
POTATOES At the end of the
recommended
cooking
time they should be
slightly firm Wrap In foil
and set aside for 5 minutes
They will finish cooking
while standing
USE HOT PADS. MIcrowave
energy does not heat
coi-ltalne-s, but the hot
foot_l d OPS
iollow MICRO MENUS
Cookbook
dlrections
carefully
If using a
different cookbook,
you
may need to expertment
with tlmnes and Cook
Powers
It is normal for the Inside of
the oven door to look wavy
after the oven has been running fcr a while
l
l
If your electric power line
voltage is less than the
normal 120 volts, cooking
times may be longer.
Imk
Double-check
settings
all
It IS normal for the signal
lights to flicker whi!e the
rnlcrowave
oven IS on
Use the oven only for
defrosting, cooklng or
reheating
9
HOW MICROWWE
OVENS WORK
Mrcrowave
ovens are safe Microwave
energy is not hot It causes
make Its own heat, and it’s this heat that cooks the food.
Mode
Mixer
Ceramic
Magnetron
/
\
food to
Bottom
OvenWCavrty
Metal
Mrcrowaves
are like TV
waves or light waves You
can’t see them. but You can
see what they do
A magnetron
in the micro.
wave oven produces
microwaves.
The microwaves
move into the oven where
they are scattered
or stirred
by a mode mixer (like a fan).
Microwaves
bounce off
metal oven walls and are
absorbed
by food.
The ceramic
bottom of your
microwave
oven lets microwaves through. Then they
bounce off a metal floor,
back through the ceramic
bottom and are absorbed
by
the food.
Mrcrowaves
pass through
glass, paper and plastic
without heatrng them so food
absorbs the energy. Mrcrowaves bounce off metal pans
so food does not absorb the
energy
Microwaves
may not reach
the center of a roast. The heat
around the outside is what
cooks the roast all the way
through. This is one of the
reasons for letting some
foods (roasts, baked potatoes) stand for a while after
cooking, or for stirring some
foods during the cooking time
The microwaves
disturb
water molecules
in the tood
As the molecules
bounce
around bumprng
into each
other, heat is made, like rubbing Your hands together
This is the heat that cooks
Floor
REPLACING THE LIGHT BULB
1.
Unplug
the power
2. Remove holding
access panel
cord
screw on
11\I
3. Remove the light bulb
from its socket
4. Replace bulb wrth a 40watt appliance
bulb.
Bulb
5. Replace the access
panel and holding screw.
6. Plug In the power
10
cord
Screw
-
BI-LEVEL COOKING RACK (Model MW845OXL only)
Use the Bi-Levei Cooking Rack when cooking in more than one container. The rack
can be turned upside-down
to help fit taller containers
on the bottom of the oven. See
the MICRO MENUS Cookbook
provided
with Your oven.
First Position: Use the rack only when heating
more than one container
of food
Do not let a container
touch the top of the
oven.
Second Position: Turn rack upside-down
when using a taller container
on the bottom
of the oven
CLEANING
SPECIAL CAUTIONS
Do not use with browning
dish.
Use only when cooking foods in more than
one container
l
Do not use IP conventlonal
ovens or under
brorler
l
Do not let food or container touch the top of
the oven
e Do not store rack tn the oven
l Put food
in containers.
then place
containers
on rack.
l Do not cook
foods directly on rack without
putting them in containers
first
l
l
l
l
Wash by hand with a mild detergent
or in
Your dishwasher.
Do not use abrasive
scrubbers or cleansers
Building in your miaowave
Your microwave
oven is not limited to carts, counters
are made easy with kits available
from Your dealer.
1.
Burld the mrcrowave
oven into a cabinet or
wall by itself or over
built-In single ovens In
the Whirlpool RDE, REE,
RGE, RB and SB model
series or Imperial 7200
single gas ovens.
2.
Tmk
oven
or tables.
Attach the microwave
oven to a wall by itself or
with cabinets
over it
Ask Your dealer for details on.
RCK803 (832849) - 30.inch Built-in Kit
l
RCK805 (832856) -251,-~nch
Built-In Kit
l
RCK807 (832850) - 27.inch Built-in Kit
l
RCK710 (832763) -Wall Mount Kit
l
THE RACK
3.
Custom
installations
Put the microwave
oven
on the MICRO SHELFHodd over a cooktop. The
hood is available
ducted
or as a recirculating
hood, and includes cooktop lights.
RCK811 (832875) -Wall Mount Vent Grille
and Filler Kit
l
RCK713 (832769) -Wall Mount Cookbook
Storage Cabinet
. RH3330XL - MICRO SHELF Hood
l
11
Ifyou need service or assistance,
we suggest you follow these four steps:
1
l
Before calling for assistance.. .
Performance
problems often result from
little things you can find and fix yourself without tools of any kind.
3
If you need service * . . .
l
if nothlng operates:
Is the oven correctly
plugged
into a
live circuit with the proper voltage?
(See page 2.)
l Have you checked
the main fuse or circuit
breaker box?
if the microwave oven will not run:
l Is the timer set?
l Is the Cook Power set?
* Is the door firmly closed and latched?
l Did you push the START Button?
l Did you follow the directions
on pages 4
and 5 exactly?
if microwave
cooking times seem too long:
l Is the electric
supply to your home low or
lower than normal? Your electric company
can tell you if the line voltage is low.
o IS the Cook Power at the recommended
setting?
l Are you allowing
for more time when cooking more food at one time?
if the microwave
oven turns off too soon or
not soon enough when using the probe:
a Is at least ‘I-, of the probe in the food?
l Is the probe
tip in the center of the food?
l Is the probe
touching bone or fat?
l Have You allowed
roasts to stand for a few
minutes after cooking?
l Is the probe
plugged
tightly into its socket?
l IS the Cook Power set where
it should be?
l Is the MEAL SENSOR’ Probe Control
set at the end temperature
you want?
l Do you have the correct
probe for Your
oven? See page 7.
Tmk
1
l
2
l
If you need assistance * . . .
Call the Whlripooi
CCCL-LINE’% service atslstance telephone
number. Dlai free from:
Continental
U.S. . . . . . . . . (800) 253-1301
Michigan
. . . . . . . . . . . . . . . . (eO0) 632-2243
Alaska & Hawall . . . . . . . . (eO0) 253-l 121
and talk with one of our trained Consultants.
The Consultant
can instruct you in how to obtain satisfactory
operation
from your appllante or, if service is necessary.
recommend
a
qualified
service company
in your area.
Part No. 311878
Rev A.
has a
net-
Whirlpool
nationwide
TECH-CARE service
product
warranty
and provide
afterwarranty
service,
anywhere
in the United
States. To locate
TECH-CARE service
in your
area, call our COOL-LINE service
assistance
telephone
number (see Step 2) or look in Your
telephone
directory
Yellow Pages under:
APPLIANCES-HOUSEHOLDMAJOR-SERVICE
6 REPAIR
ELECTRICAL
APPLIANCESMAJOR-REP*IRING
L PYRTS
OR
WHIRLPOOL APPLIANCES
FRANCHISED TECH-CARE SERVICE
WHIRLPOOL APPLIANCES
FRANCHISED TECH-CARE SERVICE
.SEHL’Il
XYZ SERVICE CO
123 Maple
.YEHI’/~‘E
XV2 SERVICE CO
123 Maple
‘E f‘(I.MI’A.V/b..S
999.9999
~‘OHl’A.Ylb.~
999.9999
OR
WASHING MACHINES.
6 IRONERS-SERVICING
4
l
DRYERS
WHIRLPOOLAPPLIANCES
FRANCHISED TECH.CARE SERVICE
SEHVIC‘E
XV2 SERVICE CO
123 Maple
i‘O.WI’A.~IES
999-9999
If you have a problem*. . .
Call our COOL-LINE service assistance Wenumber (see Step 2) and talk with one
of our Consultants, or if you prefer, write to:
Mr. Guy Turner, Vice President
Whlripooi Corporation
phone
Administrative
Center
2000 US-33 North
Benton Harbor, MI 49022
If you must call or write, please provide: model
number, serial number, date of purchase, and
a complete
description
of the problem. Thls
information
is needed
in order to better respond to Your request for assistance.
0
FSP
FSP IS a regrstered Irodemorlc of Whvlpool
Corporation
for quality parts. Look tar this symbol
of qualify whenever you need a replacement
part for your whirlpool appliance. FSP
replacement
parts will fit right and world right.
because they are made to the same exacting
@ specillcatiofrs
used lo build every new
Whirl-1
appliance
Bcnlon Harbor. Mlchlgan. AutomOUeWlsbOrS.CIO~OSDq~rc,
Frerzora, Rolriporalor-Froorors.ICO Makofs, DIs~wosLw~,
Bullt4n Ovonr rnd Surirco UMts. BSngOS,YlcrowrrO Ouoar.
Compaclors. Room Air Condlllonon, DShumldlllors. Coulrrl
Hsallnfl and Air Condillonlng Sysloms.
Printed In USA