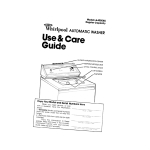
1
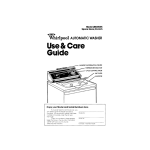
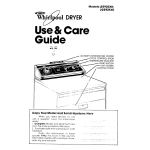
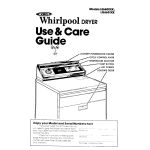
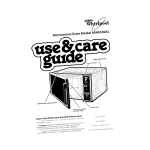
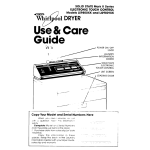
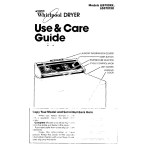
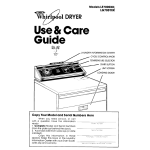
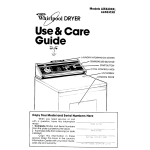
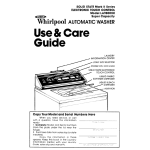
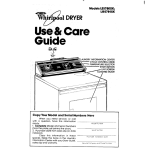
Models
WhirlpOOl
LEMOOXK;
LG5604Xk
DRYER
Use & Care
Guide
LAUNDRY INFORMATION
CENTER
TEMPERATURE SELECTOR
START BUTTON
ONTROL KNOB
LINT SCREEN
Copy
Your Model
When you
a question,
need
have
and Serial
Numbers
service,
or call
this information
with
ready:
1. Complete
Model and Serial Numbers
(from the plate just behind the door].
2. Purchase date from sales slip (or date
installed].
Copy
this information
in these
spaces. Keep this book in the Laundry
Information
Center with your Dryer Guide,
sales slip and warranty.
Here
Before using
your Dryer
Please reo-: I-, s i: soklet to be
,ure j )ur dryer 15 r;s’alled
and used
properly
It ~NIII htlc’ 4~ get the best
results 3rd longcct
fe \mzur dryer was
Jesig,led
to ‘gve
FOR YOUR SAFETY
If you smell gas:
1. Open windows
2. Don’t touch
electrical
switches
3. Extinguish any open
flame
4. Immediately
call
your gas supplier.
You are personally
responsible for making sure that your dryer...
Is installed
by o qL1ulified installer
Is Installed
in ar‘ a’-~ orotected
from
*?e weather
l Is properly
instoN Ed ar:d leveled
in o
,vell yentllated
rc or’
or: a floor ?hat
can support the +e ght
l Is located
In or ,3rea where the tern
perature
IS above
45 F 17 2 C)
l Is corlnected
to the rIghi <tnd of outlet,
electric
supply arid grounding
l Is properly
conleoted
to fuel and
exhaust systems
l Is used
only for ioDs normally
expected
of home clothes dryers
0 Is properly
maintained
l Is not run where
there may be explosive fumes
l Is not used
by c hllgrer- or anyone
unable to operate
it properly
Remove the Consumer
Buy
Guide label before usl?g your dryer It
will be easier to remove
Wipe out the drum with a damp
cloth to remove any ‘dust
l
l
Please read this manual
Follow the Instructions
to help
you get the best drying
results
Save the manual
for future use
SPECIAL INSTRUCTIONS: See the
Dryer Guide for drying tips, information about permanent
press and
knits, instructions
for drying special
items and for things not to be dried in
your dryer.
See the ‘Installaior~
IMructions
complete
inforrrlt~on
See Setting Drying Times section,
\
for
page
FOR YOUR SAFETY
Do not store or use
gasoline or other
flammable
vapors and
liqlrids in the vicinity of
this or any other
appliance.
I
6
/
I
Contents
Before Using Your Dryer
Loading Your Dryer
Understanding
Your Dryer
Lint Screen
Using Your Dryer
Selecting
Cycles and Temperature
Settings
Setting Drying Times
FLUFF AIR
TUMBLE PRESS’ Control
If You Need Service or Help
1
2
3
Before Colllng
for Service
If You lueed Service
If You Have a Problem
2
3
3
3
‘1
5
h
cj
0
6
7
7
Loading
your
Dryer
I--
For best dry!ng results and energy
sort dryer loads carefully
Separate
loads according
to
the type of fabric and weight
For
example
l
Dry heavy fabrics (denims. towels.
cottons)
separately
from light fabrics
(permanent
press synthetics)
0 Separate
lint givers (towels, sweatshirts, etc ) from Iiqt takers (synthetics.
blends, permanent
press)
l
Keep dark colors and light colors
separate
l
Keep colorfast
items away from noncolorfast
fabrics
Allow room for items to tumble
freely The load WIII dry faster with fewer
wrinkles
When drying permanent
press,
dry smaller-than-normal
loads for the
best wrinkle removal.
Use a mesh bag to hold small
Items such as baby socks
Read the Dryer Guide for more
hints on sorting ard loading
savings,
In all these cycles, the heat shuts
off 5 minutes before the dryer stops
tumbling.
This helps cool down the load
The cool-down
time IS built in so
the laundry will not be too hot when the
dryer stops tumbling
1 When a load of hot laundry IS
not tumbllna,
wrinkles can set In
2 A load o‘i hot laundry can
be too hot to handle comfortably
The other cycle IS PERMANENT
PRESS This cycle has a longer cooldown time at the end. This extra time IS
designed
to give permanent
press fobrlcs the extra wrinkle protectlon
they
need
This Use & Core Guide contains
suggestions
on the way to use your dryer
to get the best results and longest useful
life from your dryer Please read it
carefully
lint Screen
The lint screen IS under the lid on
top of the dryer
C/eon the iint screen before each
iood A screen that’s blocked
by lint
can cause longer drying times
Understanding
your Dryer
EXTRA
LIGHT
laundry
time
select
Your dryer has five cycles
The
HEAVY, HEAVY, MEDIUM and
Cycles ore designed
to tumble
for a certain
length of
depending
on the load You
the drying temperature
you want
To remove the screen, open the
l!d and pull the screen straight out. Roll
the lint off the screen with your fingers
DO NOT rinse the screen or wash
it. Wet lint IS hard to remove.
It firmly
When replacing
the screen,
into place
Close the IId
push
3
Using
your Dryer
1.
Put the sorted load in the dryer
and close the door tightly.
2.
Turn the Cycle Control
the cycle you want.
Knob to
IJse LIGHT for small loads of lightdeignt fabrics
The LIGHT Cycle runs for
ti?e least time Use LIGHT also to damp
dry lads
for ironing
l
Jse MED for normal size loads of IigW
or medium
weight fabrics (sheets, p~lbwcoses
shirts etc ‘I
l
Use YEA’JY for normal size loads of
i?eavy fabrics
(towels, jeans. corduroys
l
Jse EX HEAVY for large loads or for
hleavv bulky Items (quilts, sr>reads. blurKets etc 1
l
SUGGESTION:
YOS con set the Cycle Control Knob
onywhere
post between
or below
the EX HEAVY and LIGHT settings
For
the f rst few loads
l
Set the pointer In th’e mIddIe of the
load setting
l
If the load IS drier thar you wont
set ,t to the righ’ (for less time) tqe
next time
l
If t”le oad IS -lot OS dry as yod
want set I to the left [for more time
the next time
For example:
Jse PERMANENT PRESS for a longer
per od of cool-down
time Set +Qe
oointer for the number of minutes of
dn/ing time you wont [See Setting
Drying Imes on page 6 1,
l
If laundv
IS left in the dryer after I+ has
stopped
tumbling,
use the Tumble
Press Control setting [page 6’ to Wp
remove the tirlnkles
l
3.
Set TEMPERATURE SELECTOR.
Turn the TEMPERATURE SELECTOR to
We dryng temperature
needed
for
tb,e load See page 5 for suggested
settings
l
4.
Push the Start Button.
Make sure the door IS closed and
Cycle Control IS set If the door IS
opened
dciring the cycle, the dryer will
stop To restart the dryer, close the
door and push the Start Button
l
5.
To stop the dryer:
Open the door
l
Or turn the Cycle
of the OFF postlons
l
Control
Knob to one
To change
the setting while the
dryer is running, turn the Cycle Control
l
Knob either way
tlng you wont
so it points
to the set-
NOTE: The Cycle Control Knob
should point to OFF when the dryer
not being used.
IMPORTANT
To help reduce
wrirkling, take the load from the dryer
Important
for permanent
press,
is
OS
knits
4
SELECTING CYCLES AND TEMPERATURE SETTINGS
CPoc?se
the xrrec
sri+t ‘qs
xcord’rlg
!c “e
cplort
belo&
CYCLE
TYPE OF LOAD
COTTONS - LINENS
: r-z -0.1
den age
03s
3eYsnreoJs
EX hEA/V
To”ress
Dads
1 1 ‘i
.-i;;.
CaB’, -‘<
’ z,e 5 p:,‘s
ZC”OL.rC ,( i, ;,r
,l37es
h-..l> _ ‘,“,*,[ -I;.*.. j
S?ee*s LIII h cases
aapers
_-‘++or ur Clerj.eur
G 3 Ts”:f ,s h - ,z;
7 Pv< r damp
cxk - Emstes
xgond
es
nger
rEA;lY
V E 3 I‘J M
IGH-
e
PERMANENT PRESS - SYNTHETIC FIBERS AND
BLENDS
PERMANENT
PRESS
40-X
MIN
.,t;,qtt
GwT :;,y;
_
iv :rk clctpes
#ackets
‘a’pcoa’s
etc
““[
.:+7,
j
:p,rts p,(-Jy c))rpes
“.d ‘, ,,d’,:t s.*s-seeis SOCKS
/ CT- ‘1’. t ,z- - LA,;
a*-
_:
. qerle
c axes
-t4,;‘,j”E
_ s ,rts s.+.
s,. -k- -; :;sC;,S
RAYC)r\S
BLENDS
C>’
r “C
-,
L C,.--I’,t
St.7 -: yr,‘tiE-IC
;4BRlCS
!pcl,ester
0cQc
etc ’ c’ 2 Ble’ 3s
Llngerle
blauses
Y resses e’c
-7 (_ ‘> L‘ ;,qp C’ ~ &r*o,rs
L-,iL L iJ,-LJ-;,. 13”.
-113 mr els S-,eerS
To Cjorp
20 mn,tes
[;mr, c’3jrvs’:
r rmr
C 11~~s txas
g set contrc
MIN
2%3C
MIN
PERMANENT
PRESS
40-50 MIN
KNITS
FOAM RUBBER ARTICLES
30-40
aresses
PERM T PRESSHEAJY HIGH
?ERM T PRESSHEAVY HIGH
PERM T PRESSHEAVY HIGM
PERM T PRESSHEA
HIGH
PERM T ?RESS~
tiEAVY HIGH
PERM T PRESSHEAVY HIGH
PERM: PRESSHEAVY HIGH
PERM T PRESS+EAVY YlGh
3O-C3 MIN
KNITS GENTLE-LOW
2G-3C MIN
KNITS GENTLE~,OW
2
FLLFF-AIR
PERMANENT
PRESS
20-30 MIN
e+z
lrI XtiT
TEMPERATURE
SELECTOR
setmg
or PERMANENT
PRESS cycle
for
MIXED LOADS
lf yoL. dry 0 mIxed
SQ~ L“ .or ous aeIghts
sf ‘abrlcs
select the cycle for the lighter
fobr c &her drye, stops ‘eqmzve the dry m#cles
and reset the control
weigh+
Setting
Times
Drying
Modern
drvers are designed
wrth drying temperatures
needed
to
safely handle
modern
fabrics.
Cooldown times have been added
to heat
settings. You might notice slightly
longer drying times
The time rt takes +o dry a load
depends
on:
l The kmd
of f&x,
its weight,
and the
size of the iood A large load of jeans
WIII take a lot longer
to dry than a
small load of lignt synthetics.
0 The omount
of moisture
in the load
Towels hold a lot of moisture;
synthetics
don’t
Synthetics
dry faster
l Temperature
of the unse water
Cold
rinses help save on energy
and wrinkles, but a cold load WIII take slrghtly
longer to dry than a warm one.
l Amount
of //nt on the screen. A full
lint screen slows the air flow and can
make drying time longer
l Temperature
around
the dryer The
dryer heats room arr. If the room arr
temperature
is not above
45-F (7.2-C),
dryng
time will be longer and removal
of wrinkles may be poor
0 Proper insta//ot/on
and exhaust
sys~
terns For the fastest possrble
drying
time, rnstalling
and exhausting
Your
dryer properly
is important
See r&allation instructions
FLUFF AIR
Thus temperature
setting IS useful
for fluffing bedding,
pillows and clothing, or dusting drapes
It IS also best
to use when damp-dryng
heatsensitrve items
Turn the TEMPERATURE SELECTOR to
FLUFF AIR.
l
Turn the Cycle Control Knob to the
number of minutes You want In the
PERMANENT PRESS Cycle
l
Push the Start Button.
l
TUMBLE PRESS’
Control
This setting IS useful for removing
wrinkles from packrng
in suitcases
or
closets. TUMBLE PRESS will help put
them back Into their pre-set shape
l
Set Cycle Control
Knob to TUMBLE
PRESS
Set TEMPERATURE SELECTOR to
PERM’T PRESS HEAVY HIGH
l
Push the Start Button
For best results, TUMBLE PRESS
only a few Items at a trme, put them
on hangers
or fold them as soon as
the dryer stops
l
If You Need
Service or Help,
We suggest You
Follow These Three
Steps:
1. Before
for service
...
DRYER DOES NOT RUN
l
FLUFF AIR should be used for
such items as plastic
shower curtains
or tablecloths,
rubber-backed
rugs,
some pillows,
stuffed toys, etc
6
calling
Problems are sometrmes
caused
by little things you can correct
without
tools Check this list before You call
for service
Is electric
power
cord
plugged
In7
l
l
l
Is the dryer
dryer has a
shuts off the
opened
door closed tightly’
Your
switch by tre door thor
dryer if the door 1s
~___
Drd y/01-I push the Start Button’
Check :lrcu:t breakers
or fuses !n the
fuse box
DRYER RUNS BUT DOES nOT HEAT
Is the Cycle Corlfrol Knob pointing
to at least 10 IFI: Jtes or I.lGHT?
(The last minutes ore cool-down
time 1
Is It a gas dryer? See if ‘rle gas IS
turned on If not turr the Cycle Control
Knob to OFF Turr on the gas and wart
five minutes for tne automatic
switch
to reset. Then try starting it again.
Is It an electric
dryer7 Check the cir
curt breakers
or fuses ID tne fuse box
An electric
dryer WIII have two fuses. If
one IS blown, the dryer may run, but
not heat.
DRYING TIME IS LONGER ‘HAN USUAL
l Check
the lint screen
Remove
lint
Keep the screen clear1 for best drying
results and times
l
Modern
dryers are deslgned
to dry at
the cooler tempera?ures
needed
by
modern
fabrrcs
They may need more
time than your are used to
2. If you need
service.
:
You’ll frnd your nearest
TECH-CARE
service
company
listed in your local
telephone
book Yellow Pages under
APPLIANCES-HOUSEHOLD
- MAJOR
SERVICE & REPAIR. Should you not
find a listing, dial free, the
Whirlpool
COOL-LINE’
service assistance telephone
number.
When calling
from:
Michigan
(800) 632-2243
Alaska &
Hawaii
(800) 253-l 121
All other
states
.
(800) 253-l 301
make sure that your
If you move...To
appliance
is correctly
installed
and
to Insure Its continued
satisfactory
operation,
please telephone
your
nearest
TECH-CARE ’ service
company
for installation
or to get the name of
a qualified
installer. (Installatron
cost
will, of course, be paid by you.)
Helpful hints...You can help your
TECH-CARE
service
representative
give
you faster service
if you include
the
model and serial number
of your
appliance
when requesting
service.
Also, retain your sales slip and
warranty
to verify your warranty
status,
Remember...Your
TECH-CARE
service
IS specially
trarned
tn
representative
the expert repairing
and servicing
of
your WHIRLPOOL
appliances.
He can
help you marntain
the quality
orrgrnally
built into your WHIRLPOOL
appliance.
So why not take the time,
now, to look up his telephone
number
and jot it down in the space
provided
on the cover.
3. It you have
If your WHIRLP03L
opplrance
ever
needs service anywhere
in the United
States, help IS Just a phone call away
to your nearest Whtrlpool
franchised
TECH-CARE’
service representative
WhIrlpool
morntarns
a natronwrde
network
of franchised
TECH-CARE servrce compantes
to fulfill your warranty
and provide
after~warranty
service and
maintenance
to keep your WHIRLPOOL
appliance
in peak condition
a problem+:
Call Whirlpool
Corporation
in
Benton Harbor at the COOL-LINE
service
assistance
telephone
number
[see Step 2) or write:
Mr Guy Turner, Vice Presrdent
Whirlpool
Corporation
AdmInistratIve
Center
2000 U.S. 33 North
Benton Harbor, Mrchrgan
49022
‘If you must call or write, please
provide
your name, address,
telephone
number,
type of appliance,
brand,
model,
serial number,
date of
purchase.
the dealer’s
name, and o
complete
description
of the problem.
This information
is needed
in order
to better respond
to your request
for
assistance
Eenlon Harhor. Mlchlgan. Aulomailc Washers Clolhes Dryers
Freezers. Relrlgeralol-Freezers,
Ice Makers. DIshwashers
Bu~li-III Ovens and Surlace Units Ranges. Microwave Ovens
Compaclors
Room Air Condllmners.
Dehumldlllers
Cenlral
Healing and AN Condllmnfng Systems.
Quality. Our way of life
Dar+ N= 691257
?ev
8
Prmted
In U S.A