1
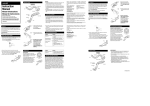
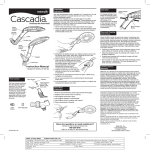
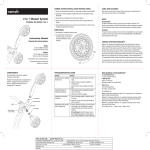
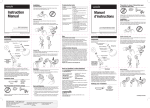
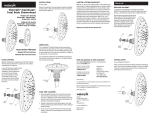
1. Remove old showerhead. Clean pipe threads thoroughly.
2. Attach the flexible shower arm collar to the
showerhead, being careful to align
the threads.
Clean the filter screen at least once a year, or when you notice a drop in
water pressure. To remove, unscrew the nut from the pipe. Remove the
screen by turning it counter-clockwise (pliers may be used) and rinse.
If you remove the flow regulator, be sure you reinstall it with the black O-ring
facing out.
drenching rain showerhead
• Cleaning is required when mineral deposits appear on the spray holes to
maintain proper working conditions.
• Clean the flexible nozzles by rubbing with a finger or soft bristled toothbrush.
Spray Change
Button
• Do not clean or rinse any part with harsh chemicals, heavy-duty cleaners or
abrasives. This may damage parts or finish and may void the warranty.
Shower
Arm Nut
Collar
Models:
CF-200
CF-201
CF-201C
CF-203C
CF-209C
CF-261
CF-263C
Flexible Arm
Spray Change
Button
Bracket
Adapter
5’ hose
Instruction Manual
3. While installing, support the showerhead and hold onto the
nut rather than the cover. Turn only the nut to tighten.
Do not twist the flexible shower arm covering
during installation. (This could damage the
covering and/or cause the product to
malfunction.) Take care in aligning
the nut to the shower pipe so you
do not cross threads.
4. Tighten the shower nut onto the pipe
securely by hand. Do not over
tighten or use pliers.
5. Slowly turn on cold water and check for leaks. If leaks occur, retighten
all connections.
Limited Lifetime Warranty
Water Pik, Inc. warrants to the original purchaser of this product that
it is free from defects in material and workmanship for as long as the
original purchaser owns this product. Water Pik, Inc. will at our election,
repair or replace any part of the product which in our opinion is defective, provided that the product has not been abused, misused, altered
or damaged after purchase. (This includes damage due to use of tools
or harsh chemicals.) In the event an item has been discontinued we will
replace with what we deem to be the closest product. Water Pik, Inc.
is not responsible for labor charges, installation, or other consequential
cost. The responsibility of Water Pik, Inc. shall not exceed the original
purchase price of the product. This warranty gives you specific legal
rights. You may also have other rights that vary where you reside. Save
your receipt as proof of purchase is required for warranty action.
6. Do not use excessive force in positioning the showerhead and/or arm.
7. If the showerhead is not maintaining its position, re-tighten the
showerhead collar and shower arm nut.
Flow Control
Hand-Held Installation
Waterpik® showerheads are equipped with an OptiFLOW® regulator that
limits maximum water flow to 2.5 gallons per minute at 80 psi
as mandated by U.S. federal law.
1. Remove old showerhead. Clean pipe threads thoroughly.
In areas with extremely low water pressure, causing
the shower water flow to be unsatisfactory, the
flow regulator may be removed to improve
the water flow in the showerhead.
To remove, unscrew
filter screen by turning
Nut
counterclockwise.
Remove regulator
Flow
Regulator
with needle-nose
(black O-ring faces out)
Filter Screen
pliers and replace
Washer
filter screen.
3. Hand tighten pivot ball to pipe.
Filter
Screen
Operation
2. Slightly loosen swivel collar on bracket.
4. Hand tighten adaptor to showerhead.
U.S. Patent Numbers: 5,865,378; 5,997,047 (Lic);
6,164,570 (Lic); 6,626,210; 6,629,651;6,641,057; D440,641;
D452,897; D485,887
Have any questions or need assistance?
If in the U.S., call our toll-free
Customer Assistance Line,
1-800-525-2774
www.waterpik.com
5. Hand tighten hose to adapter and bracket.
6. Place showerhead in bracket.
Waterpik®, Waterpik® (stylized), Cascadia®, and OptiFLOW® are
registered trademarks of Water Pik, Inc.
© 2006 Water Pik, Inc.
Water Pik, Inc.
1730 East Prospect Road, Fort Collins, CO 80553-0001 USA
www.waterpik.com
Flow Regulator
Flexible Installation
Your new showerhead will fit a standard 1/2” shower arm. Do not
attach this product to a plastic shower arm since it may not provide
adequate support.
Tools are not required. Do not use pipe tape or any other sealants when
installing the showerhead. These materials are not necessary and may cause
the nut to loosen prematurely. Hand tightening is sufficient to secure the
shower thread. Make sure the washer is in the end of the nut.
If outside the U.S., write us at:
Water Pik, Inc.
1730 East Prospect Road
Fort Collins, CO 80553-0001
USA
Operation
To change settings, from
Spray Change Button
either the full-body spray
or the concentrated power
spray, push the spray
change button at the base
of the showerhead so it
extends to the opposite
side of its current position.
Spray Change Button
FN 20007764-F AB
1. Quite la boquilla de la ducha vieja. Limpie meticulosamente
la rosca del tubo.
Cuidado y la Limpieza
2. Una el collar del brazo flexible de la ducha a la
boquilla de la ducha siendo cuidadoso de
alinear las roscas.
Limpie la pantalla del filtro por lo menos una vez al año, o cuando note que
la presión de agua baja. Para quitar, desenrosque la tuerca del tubo. Quite
la pantalla girándola hacia la izquierda y levantándola (se pueden usar
pinzas) y enjuáguela.
cabezal de ducha empapante
Si quita el regulador de flujo, cerciórese de volver a colocarlo con el anillo
negro O mirando hacia afuera.
• Para mantener las condiciones de operación adecuadas, se necesita
limpiar cuando los depósitos de minerales aparecen en los orificios del
rociado.
Botón de cambio
de rociado
• Limpie las boquillas flexibles frotándolas con los dedos o un cepillo de
dientes blando.
Tuerca del
brazo de la
ducha
Collar
Modelos:
CF-200
CF-201
CF-201C
CF-203C
CF-209C
CF-261
CF-263C
Brazo Flexible
Botón de cambio
de rociado
Soporte
Adaptador
Manguera de 5 pies
3. Durante la instalación, soporte la boquilla de la ducha y agarre la tuerca
en vez de la cubierta. Gire solamente la tuerca para apretar. No tuerza la
cubierta del brazo flexible durante la instalación. (Esto puede
dañar la cubierta y/o causar que el
producto funcione mal.) Tenga cuidado de
alinear la tuerca al tubo de la ducha
para no atravesar la rosca.
4. Apriete la tuerca de la ducha en
el tubo con la mano. No apriete
demasiado ni use pinzas.
5. Abra el agua fría lentamente y
verifique si hay fugas. Si hay fugas,
vuelva a apretar todas las conexiones.
6. No use fuerza excesiva al ubicar la boquilla de ducha y/o el brazo.
Manual de Instrucciones
7. Si la boquilla de la ducha no se mantiene en posición, vuelva a apretar el
collar de la boquilla de la ducha y la tuerca del brazo de la ducha.
Control de Flujo
Instalación de mano
Los cabezales para duchas Waterpik® vienen provistos de un regulador
OptiFLOW® que limita el flujo máximo de agua a 2,5 galones por
minuto a 80 lbs/pulg2, tal como lo dispone la ley federal de los EE.UU.
1. Quite la boquilla de la ducha vieja. Limpie meticulosamente
la rosca del tubo.
En zonas con presión de agua extremadamente baja,
lo que hace que el flujo de agua de la ducha no
sea satisfactorio, puede quitarse el regulador
de flujo para mejorar el flujo de
agua en el cabezal.
Para quitarlo,
desatornille
la rejilla del filtro
girándola en
sentido antihorario
Water Pik, Inc. le garantiza al comprador original de este producto que el
mismo está libre de defectos en materiales y mano de obra por el tiempo
que el comprador original sea el dueño del producto. A nuestra opción,
Water Pik, Inc. reparará o reemplazará cualquier parte del producto que
sea defectuosa según nuestra opinión, siempre y cuando el producto no
haya sido objeto de abuso, mal uso, alteración o daño después de haber
sido comprado. (Esto incluye daños debido al uso de herramientas o productos químicos ásperos). En el caso de que un artículo se haya dejado
de fabricar, lo reemplazaremos por el artículo disponible que consideremos más cercano posible. Water Pik, Inc. no es responsable por cargos
de mano de obra, instalación u otros costos consecuentes. La responsabilidad de Water Pik, Inc. no excederá el precio de compra original del
producto. Esta garantía le otorga derechos legales específicos. Usted
también puede tener otros derechos que varían de acuerdo a donde vive.
Guarde su recibo como prueba de compra, ya que ésta se requiere para
recibir atención bajo la garantía.
Números de patentes de EE.UU.: 5,865,378; 5,997,047 (Lic);
6,164,570 (Lic); 6,626,210; 6,629,651;6,641,057; D440,641;
D452,897; D485,887
4. Apriete a mano el adaptador a la boquilla de la ducha.
¿Tiene alguna pregunta o necesita ayuda?
5. Apriete a mano la manguera al adaptador y al soporte.
Si está dentro de los EE. UU.,
llame a nuestra línea de
asistencia al consumidor
gratuita al 1-800-525-2774
Tuerca
Pantalla
del filtro
Garantía limitada de por vida
3. Apriete a mano la bola pivotada al tubo.
6. Coloque la boquilla de la ducha en el soporte.
Arandela
Pantalla
del filtro
2. Afloje ligeramente el collar giratorio del soporte.
• No limpie ni enjuague ninguna pieza con productos químicos ásperos,
limpiadores de servicio pesado o abrasivos. Esto puede deteriorar las
piezas o el acabado y puede anular la garantía.
Regulador del flujo
(el anillo negro O mira
hacia fuera)
Regulador
del flujo
Instalación flexible
Su nueva boquilla de ducha se ajustará a un brazo de ducha estándar
de 1/2”. No conecte este producto en un brazo de ducha plástico ya
que puede no proporcionar el soporte adecuado.
No se necesitan herramientas. No use cinta para tuberías o ningún otro
sellado cuando instale la boquilla de la ducha. Estos materiales no son
necesarios y pueden causar que la tuerca se afloje prematuramente.
El ajuste a mano es suficiente para asegurar la rosca de la ducha.
Cerciórese que la arandela esté en el lado de la tuerca.
www.waterpik.com
Waterpik®, le logo stylisé de
Waterpik®, Cascadia® y OptiFLOW®
son marcas de comercio registradas
de Water Pik, Inc.
© 2006 Water Pik, Inc.
Funcionamiento
Para cambiar los ajustes
tanto del rociado de cuerpo
entero como del rociado de
fuerza concentrada, oprima
el botón en la base de la
boquilla de la ducha para
que se extienda hacia el
lado opuesto de la posición
actual.
Botón de cambio de rociado
Botón de cambio de rociado
FN 20007764-F AB
Si está fuera de los EE. UU.,
escríbanos a:
Water Pik, Inc.
1730 East Prospect Road
Fort Collins, CO 80553-0001
USA
Water Pik, Inc.
1730 East Prospect Road,
Fort Collins, CO 80553-0001
USA
www.waterpik.com