1
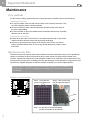
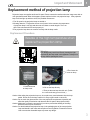
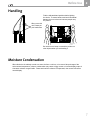
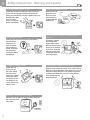
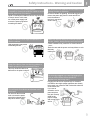
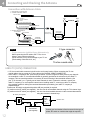
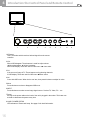
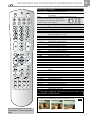
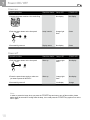
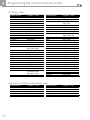
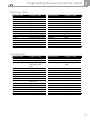
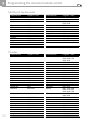
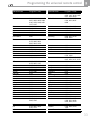
Important Statement 1 FCC Warning This product has undergone tests in pursuance of Part 15 of the FCC Regulations and has been found to meet the regulations for Class B devices, which are provided for reasonable protections while keeping the product from hazardous interference when installed and used. This product may emit radioactive energy while in use. Failure to install and use this product in accordance with the guidelines set out in the User s Manual may lead to hazardous interference generated by radio communications. ●To increase the distance between this product and the radio telecommunications product. ●To adjust or re-orient the location of the antenna of the radio telecommunications product. ●To connect this product to a different electrical outlet than one used for a radio telecommunications product. ●To contact local dealer for technical assistance. In order to meet the FCC requirements , please use the grounded power cord provided and shielded ferrite core video adapter. All modifications conducted by the user without consent of local authorities shall void the operation of this product. Accessories Check Please make sure you have these standard accessories with your device. ●Remote Control x 1pcs ●AA Batteries x 2pcs ●This User’s Guide x 1pcs ●Power Cord x 1pcs ●Warranty Card *1pcs 1 Important Statement Maintenance Clear methods For the reason of safety, please make sure to unplug the power cord before start to do the cleaning. Cleaning for the case ■ To mop the outside of the case with soft and clean cloth. Follow the instruction if use any cloth containing certain chemical materials. ■ Do not use alcohol or other material inflammable, which will result in the decay of the case or paint fading. ■ Do not use robber or other clue-related material to interface with the case. It possibly will leave scar on the case. Cleaning for the monitor ■ Please clean up the dust on the surface of the monitor with soft cloth or other similar material and then clean the monitor with dry and soft cloth again. ■ It’s prone to get scratch on the surface of the monitor so do not rub or knock the surface with hard material. Also, do not use any diluted detergent to scrape or clean the monitor. Maintenance for filter Please do not leave the machine without filter installed or the have a dirty filter owing to lack of periodically cleanup. It’s because the filter is to prevent the dust or other objects from going into the internal of the machine. And keep the machine in a good ventilation condition. It will result in the rise of temperature in the machine and even cause a fire or damage if the filter with dust does not be replaced for a long period of time. The filters are supplies and please contact the resellers for details if you need to replace the filter. Please contact the reseller for information about replacement or cleanup of the filter within 1 year. The outgoing or incoming vent hole should be cleaned periodically. Method to replace the filter Step1 : Loose this tow Screw on the filter cover Step 2 : Take out the used filter and put new filters on 4 slots Filter Filter Slot Step 3. Put the filter cover back and Screw the filter on the back of the machine Important Statement 1 Replacement method of projection lamp Projection lamps are supplies and have life span. Please contact the resellers when the image turns dark or color gets deteriorated. When this happens, please replace it with a new projection lamp. If the projection lamp could not light up and have noise, the possible reasons are: 1.The life span for the projection lamp are ended or 2.Shutting down the TV right after the turn-on of power. At the moment, the temperature of projection lamp is too high and does not cool down to certain degree. Turn it on after a few minutes and it will work properly. or 3.The projection lamp does not connect correctly with the lamp cradle. Replacement Procedure Beware of the high temperature when replace the projection lamp. Warning: Eye damage may result from Directly viewing the light produced by the lamp used in this apparatus. Always turn off lamp before opening this cover. Lamp 2.Then loose the screw on lamp 1.Loose the screw on lamp cover 3.Pull out the lamp directly 4.Then put the new lamp into this unit. (Follow the reverse the way you took it out.) Caution: After taking the projection lamp out, do not place any metal substance into the lamp cradle. Do not touch the lamp cradle or it’s easy to get burned or cause fire. Caution: Do not touch the glass surface of the new projection lamp because it possibly will affect the quality of resolution and decrease the life span of the projection lamp. Caution: Make sure to screw the screws firmly in order to prevent the shaking of the lamp, which will result in poor connection. Caution: Put the discarded used projection lamp in the packaging box of the new projection lamp and handle it with case and compliant to local regulation. Please do not have kids to access the discarded lamps to prevent any danger. Index 1.Important Statement 1 2.Before Use 6 3.Safety Instructions - Warning and Caution 8 4.Connection with Antenna Cable 12 5.System Connection 13 FCC Warning Accessories Check Maintenance Method to replace the filter Replacement method of projection lamp Correct viewing Remote Control Handling Moisture Condensation Front Connector Rear Connector 1 1 2 2 3 6 6 7 7 13 14 6.Introduction the Control Panel and Remote Control 16 7.Power ON / OFF 18 8.How to use OSD 19 Before use OSD, You must know 19 OSD explanation Picture Adjust PIP SETUP INPUT SETUP TV TUNER SETUP AUDIO ADJUST PARENTAL CONTROL PECIAL FEATURE 20 20 23 24 24 26 27 28 9.Programming the universal remote control 29 10.Display Modes 40 11.Specifications 41 12.Troubleshooting 42 13.LED Status 43 14.Service Information and Announcement 44 To program the remote to control other devices: Device program codes Searching for device codes Reassigning device buttons Teaching the remote control new functions Using the universal remote control Using picture-in-picture (PIP) mode Setting the sleep timer Troubleshooting Video Input Format Default PC Input Mode Miscellaneous Service Information Announcement 29 29 36 36 37 37 38 38 39 40 40 40 44 44 2 Before Use Correct viewing Distance The most appropriate viewing distance varies between 5~7 times the height of the screen. ight 5-7 Times the he n of the scree Viewing Angle and Height Suitable viewing angle and height will avoid fatigue. Volume As a courtesy to others, be sure to keep the volume down (especially in the evening). Brightness of your viewing location Direct sunshine onto the screen, too bright or dark a room lighting, dark surrounding or reflected light may cause fatigue to your eyes.Be sure to keep out direct sunshine from the screen while maintaining soft lighting in the room. Reading light is recommended. Prolonged Viewing This device uses DLPTM technology that will not flash or emit radiation. However, we would suggest you to take rest after viewing it for some time. Remote Control The effective range of the IR sensor of the remote control is given as follows. Be sure to keep the IR sensor clear and avoid placing the sensor in bright light which might cause detriment to the receiving sensitivity. Remarks on the battery of the remote controller The service life of the battery is about 1 year (depending on your use). When the operation range of the remote controller shortens or its sensitivity lowers, be sure to replace both batteries inside the remote control. Note: Make sure to avoid replacing a new battery with an old one. This may cause eventually damage the remote control. When you will not use the remote control for a long period of time, be sure to remove the batteries that could possibly leak. In the event of leakage, be sure to wipe off the liquid on the inside of the compartment before loading new batteries. Before Use 2 Handling Find the indicated hand positions before lighting the device. To ensure balance and avoid accidental damage, be sure to have at least two people carry the product. When move this unit. Please put your hands here Be careful not to bump or scratch the product on other objects when you are handing it. Moisture Condensation When this device is suddenly moved to a warm site from a cold one, or in case of abrupt change of the environmental temperature, moisture condensation may cause a foggy screen or incorrect display output. It s because moisture congeal inside. Please wait until the moisture is evaporated, then screen will restore normal display. 3 Safety Instructions - Warning and Caution Smoking emitting from device In the case of smoke emitting from the product, be sure to turn off the power switch and remove the power plug immediately. Using the product while it is smoking may cause a fire or electric shock. Contact the dealer immediately. No image or sound In this case, be sure to turn off the power switch and remove the power plug. In case of sudden loss of image or sound, stop using the device and contact the dealer immediately. Dropped or broken case In this case, be sure to turn off the power switch and remove the power plug. Please contact the dealer for service. Do not use the device as it may cause fire or electric shock. Use only 110V or 220V AC outlets Use only 110V or 220V AC power outlets, otherwise fire or electric shock may result. Keep power plug dust free Keep dust free of the power cord. Dust can cause the insulation to be damaged and cause a fire. Do not service, modify or disassemble this device This device contains high voltage and fragile objects inside that may cause electric shock, fire or damage of the parts. Read the warranty booklet and contact the dealer for more information. Keep foreign objects off the device Objects on the device can cause fire or electric shock When there is foreign object inside the device, turn off the power supply and remove the power plug before contacting the dealer. Be sure not to allow children insert foreign objects inside the device. Safety Instructions - Warning and Caution Do not place flower vases, glasses, cosmetics, chemical solutions, liquids or small metal objects on this device Liquid or small objects inside the device may cause fire or electric shock. In this case, turn off the power supply and remove the power plug before contacting the dealer. Keep this device from high temperature or direct sunshine High temperature may cause overheating and fire. 3 Do not touch the antenna or the power cord during thunder or lightning In case of thunder or lightning, we would suggest you remove the power plug from the outlet and do not touch the antenna lead, as it may cause electric shock. Keep this device away from kitchen smoke, steam, heater, dusty places and heat source *These conditions may cause fire or electric shock to occur. *Both the case and the power cord may deform or melt with heat, causing fire Keep the device from contacting rubber or plastic products for long period of time This may cause the case to be deformed or the paint to strip off. We strongly suggest you avoid plugging this into an outlet where other electrical appliances are being used Do not touch the device and power cord while wet. Do not touch the electrical cord or remove the power plug with wet hands which may cause electric shock. Plugging this device into a power strip or extension cord where other high-voltage appliances are already being used, may cause fire and overload the electrical circuit. Make sure if you use an extension cord or power strip that they are correctly rated for the proper voltage and current of this device. 3 Safety Instructions - Warning and Caution Keep the ventilation grill free *Do not let the screen face up, to the side or up side down. *Do not keep this device in a closet or bookshelf with poor ventilation. *Do not place this device on a rug or flammable objects. *Do not cover this device with curtains or tablecloths. Doing any above may cause a fire. Install this device in a flat and solid place Be sure to allow for proper ventilation around the device. Keep heavy objects off this device The device may turn over and fall causing damage to the unit. Do not stand or sit on this device Be sure to keep children from climbing on top of the television set, since it may fall over, break or result in damage. Keep the device from incline and vibration surfaces Or it may fall or turn over to cause damage or injuries. Be sure to remove the power plug before cleaning or servicing Otherwise electric shock may result. To clean the screen, use a piece of soft cloth that does not scratch the surface. 10 Safety Instructions - Warning and Caution Do not remove back cover, case front panel or any other cover The high-voltage components inside the unit may cause electrical shock if mishandled. For all adjustments and servicing to interior circuitry please contact the dealer. 3 When you will not use this device for a long period of time, be sure to remove the power plug When you are away for long periods of time be sure to unplug the device to avoid any fire due to electrical storms or power surges. Be sure to remove the plug by holding the power cord plug Remove the power cord at the receptacle by pulling on the plug, not on the cord. Or it may cause fire or electric shock. Do not cut, twist, perforate, modify or bend the connector or force the power cord or place heavy objects on it Doing so may cause fire or electric shock. In case of broken power cord, please contact the dealer. 11 4 Connecting and Checking the Antenna Connection Cable E. Connection withwith Antenna Antenna Cable 1. Cable without a CATV Converter 2. VHF/UHF Combination Antenna Cable TV lead-in Back of Rear Projection TV $)')4!, VHF, UHF or VHF/UHF combination antenna !.!,/' ANTENNA IN 75 ohm coaxial cable (round) or 300 ohm twin-lead (flat) 300-75 ohm ADAPTOR (Not supplied) 3. Separate VHF/UHF Antenna VHF ANTENNA Home Antenna terminal (75 ohm) UHF ANTENNA 300 ohm twin-lead 300 ohm twin-lead Coaxial Cable (Not supplied) Signal Splitter (commercially available) COMBINER (Not supplied) IN OUT or 75 ohm coaxial cable F-type connector Notice F-type connector shold be finger-tightened only. When connecting the RF cable to the TV set, do not tighten F-type connector with tools. If tools are used, it may cause damage to your TV set. (The breaking of internal circuit, etc.) X 75-ohm coaxial cable CABLE TV (CATV) CONNECTION • A 75 ohm coaxial cable connector is built into the set for easy hookup. When connecting the 75 ohm coaxial cable to the set, screw the 75 ohm cable to the COAXIAL CABLE CONNECTOR. • Some cable TV companies offer “premium pay channels”. Since the signals of these premium pay channels are scrambled, a cable TV converter/descrambler is generally provided to the subscriber by the cable TV company. This converter/descrambler is necessary for normal viewing of the scrambled channels. (Set your TV on channel 3 or 4. Typically one of these channels is used. If channel is unknown, consult your cable TV company.) For more specific instructions on installing cable TV, consult your cable TV company. One possible method of utilizing the converter/descrambler provided by your cable TV company is explained below. Please note: RF switch equipped with position A/B (not provided) is required. “A” position on the RF switch (not supplied) : You can view all unscrambled channels using the TV’s channel keys. “B” position on the RF switch (not supplied) : You can view the scrambled channels via the converter/descrambler using the converter’s channel keys. RF switch (not suppiled) A OUT IN B OUT IN Cable TV converter / descrambler (not supplied) 12 Two-set signal splitter (not supplied) Cable TV Line Consult your local dealer or Service center for the type of splitter, RF switch or combiner that might be required. System Connection 5 Please unplug the power cord of the machine and other devices attached before start to connect the device on the side of the machine. Front Connector Use the Remote control or Machine front "Input" key to select the Input source to Front AV Only digital camera with Video channel output function can be connected directly to the machine. There’re still few digital cameras that require PCs in order to function properly. V8, Game, Digital Camera....etc. Please use S-Video as the first priority for Video input, thus having a better image quality. Machines in early days, however, do not support S-Video; these devices only have Video for output. Please attach the Video output cable to the machine’s video input. If you attach the S-Video and Video output cable to the machine, the machine will use S-Video as &2/.4ß!6 the first priority for video input and at this moment, the video input for Video will not take any effect. Find the front connector here 36)$%/ 6)$%/ Connect audio output to the Audio-in of this device. White Red Master Connect to Headset or earphone Slove , !5$)/ 2 -AIN 3UB &2/.4ß2'" 15Pin RGB Signal Cable 6)$%/). PC Audio Connector(Hi-Fi Micro-type plug) To Audio-out of computer. !5$)/). Use the Remote control or Machine front "Input" key to select the Input source to Front RGB 13 5 System Connection Rear Connector - 1 Use the Remote control or Machine front "Input" key to select the Input source to AV1 IN or AV2 IN VCR, Stereo, VCD, DVD Player Video : Please use S-Video as the first priority for Video input, thus having a better image quality. Machines in early days, however, do not support S-Video; these devices only have Video for output. Please attach the Video output cable to the machine’s video input. If you attach the S-Video and Video output cable to the machine, the machine will use S-Video as the first priority for video input and at this moment, the video input for Video will not take any effect. Audio: To left audio input (White) To right audio input (Red) DVD, Satellite, Cable etc. Input video and Audio signal to the monitor. Video: To machine Y image input (Green) To machine Pb/Cb image input (Blue) To machine Pr/Cr image input (Red) Audio: To left audio input (White) To right audio input (Red) Use the Remote control or Machine front "Input" key to select the Input source to COMP1 IN or COMP2IN If you are already using the COMP1 IN input for another component, or you do not want to use the COMP1 IN input for the DVD player, you can connect the DVD player to the COMP2 IN group of connections. Refer to your DVD player user manual for more information about the video output requirements of the product. 14 Stereo amplifier These terminals are used for connecting a stereo amplifier for Digital TV Audio Signals only. They relay (pass-through) the audio signals of all DTV programs displayed on the RPTV screen. Speaker System System Connection Rear Connector -2 5 Use the Remote control or Machine front "Input" key to select the Input source to DVI/HDCP IN The DVI port supports High-bandwidth Digital Content Protection (HDCP). HDCP encrypts the transmission between the video source and the digital Display for added security and protection. New generation for home entertainment Digital video equipment and other devices that have a digital interface compliant with the HDCP(High-bandwidth Digital Content Protection) & DVI (Digital Visual Interface) standard should be connected to the DVI/HDCP IN input of the RPTV. Video: DVI / HDCP Audio: To left audio input (White) To right audio input (Red) Audio Connector (Hi-Fi stereo mini-jack plug) To audio out of computer 15Pin RGB Signal Cable PC Use the Remote control or Machine front "Input" key to select the Input source to PC INPUT 15 6 Introduction the Control Panel and Remote Control 6/, ß 1 !$*534 2 -%.5 #( !$*534 3 /+ %8)4 4 5 0/7%2 ).054 ,!-0 34!453 6 7 1.IR Sensor This is a windorw which receivers infrared signal from the remote controller 2.VOL When OSD disappear. Thess buttoms is used for adjust volume ◄Volume decreases ►Volume increases When OSD display. These are used for OSD menu ◄► item select 3.CH If the source of image is TV. These buttons are for selecting channels. If OSD display. These are used for OSD menu item select 4.OK Come with OSD menu. When choice one item, then press this button to adjust it's value. 5.Menu Press this button to show or disappear OSD menu. 6.INPUT Press this button to select correct image signal source. Such as TV, Video, PC.....etc. 7.Power As long as the power cable on the back of the unit is plugged in the socket. This button can activate or deactivate the power at any time. 8.LAMP / POWER STATUS LED indicators of Power and Lamp. See page 43 for detail information. 16 8 8 Introduction the Control Panel and Remote Control 6 Button name Function Starts all programming sequences. Blinks when the remote is being programmed or is sending a signal to your RP TV Power Turns your RP TV or other selected device on and off. Programs the remote control to recognize a device. For programming instructions, see “Programming the universal remote control” on page 29 " Setup Remote LED TV DVD VCR TV2 CBL/SAT AMP CD AUX 1, 2, 3....0, • Mute VOL CH LAST *** SLEEP INPUT WIDE/GUIDE EXIT ▲▼◄► OK INFO MENU PIP SWAP CC STYLE SOURCE PIP SIZE PIP CH ZOOM *** FREEZE*** AV MODE *** AUDIO SCAN TV / DTV COMP PC AV Selects a programmed TV. Pre-programmed for your 56-inch RP TV Selects a programmed DVD player Selects a programmed VCR Selects a second programmed TV Selects a programmed cable TV set-top box or selects a programmed satellite TV set-top box Selects a programmed amplifier Selects a programmed CD player Selects a programmed device Number(OSD) Channel select(TV) Turn on/off the sound Lower / Louder volume Increment/Decrement TV Channel Switch to last Chosen Channel / Input Setup sleep timer (P28) Scroll through available inupts (P24) Change Scaling Mode Hide the OSD Navigate Up/Down/Left/Right in the OSD Accept the select item in the OSD Bring up display information Bring up the OSD Turn the PIP Mode On/Off Swap the Main and PIP Windows Close Caption Toggle On/Off (P24.25) Change the style of the PIP Window (P23, same as PIP INPUT fuction) Change the PIP Input (P24) Decrease/Increase the PIP Window (P23) Decrease/Increase the PIP Channel Zoom Taggle (see fig1) Freeze Taggle Standard, Movie, Dynamic Audio style eg:BBE/SRS/VIVA/HD3D/Surround/SIM.STEREO (P26) PIP Auto/Main Scan Direct access of TV or DTV (P24) Toggle between 2 Device Inputs Toggle between 3PC Inputs Toggle between 3AV Inputs *** This mark means the event only for remote control , you can’t adjust it via OSD menu. Function for Zoom (Not suitable for YPbPr) Could Zoom in 1 / 2 / 4 Note: If remote control can not work. Please press TV buttom firstly and try again. Scale1 Scale2 Fig 1 Scale3 17 7 Power ON / OFF Power on Operation status Machine status Lamp LED POWER LED Not display Not display Lamp is active Orange light flash Green Display status Not display Green Operation status Machine status Lamp LED POWER LED 1.Push the power button on the front panel Warm up Orange light flash Not display Warm up Orange light flash Not display Not display Orange 1.Connect the power cord into 110V~240V Plug -%.5 2.Push the power button on the front panel 0/7%2 ).054 ,!-0 34!453 %8)4 3.Successfully power on Power off -%.5 0/7%2 ).054 ,!-0 34!453 %8)4 2.Press the power button again to make sure you want to power off this RPTV. 3.Successfully power off Note: In order to protect the lamp, when you press the POWER key two times to turn off the machine, please wait at least 30 seconds for cooling down the lamp, then could press the POWER key again to turn on the RPTV again. 18 How to use OSD 8 Before use OSD, You must know: Recommended ways to learn about operations Before starting, please follow the suggested steps to understand the fundamentals of operating the display, and then you will be able to learn the operations in a short time: 1.Please first learn to power on and power off the display. Refer to page 18 for the descriptions of the operations. 2.Please learn how to operate the OSD. 3.Understand what each OSD menu is. Refer to page 20~28 for an explanation of the OSD contents. Example how to select correct input signal source. After power on the display, first step: you need to select the correct input signal source. The screen will be blank without any images with incorrect input signal source. Follow the steps to set up: 1.Use OSD to select the correct input source, press the MENU key and bring up the OSD menu. 2.Use ▲▼ keys to select the “INPUT SETUP” option , press OK to enter the submenu. Press OK to enter the Submenu 3.Then the OSD will show the Submenu as below: Follow the OSD's indicate to operate the OSD. For example: 1.Use ▲▼ key to select the item "Main Input" , "PIP INPUT" or "INPUT SIGNAL" 4.Press OK , then press ◄ ► to change the main input source, last pressOK again to exit this main input setup. 2.then use OK to enter the item that you select. eg: use ▲▼ to select MAIN INPUT, press ok then use ◄ ► to select input source TV, DTV.... 3.If you want to exit the submenu, press EXIT on remote control to main menu or Menu key to exit OSD. 5.Now you understand: Just to press the MENU key to show the OSD And follow the OSD buttom line's information to operat the OSD. So you only need MENU, ▲▼ ◄► , ENTER these keys to control the whole OSD. If you still have any question, please call our service center to help you. EXIT , OK, Quick Input Source select way For Main Input Press the INPUT key in the front control panel or remote control repeatedly, the input signal mode will appear on the top left corner, please select correct input signal mode.(Refer to Input relative page 13~15,24)COMP1 For PIP Input Please refer to page 24. 19 8 How to use OSD OSD explanation Picture Adjust For other input source (Except Front RGB, RGB, DVI) Only for Input source Mode: Front RGB, RGB, DVI Original image 1.CONTRAST Adjust the contrast of the screen image ◄ Reduce contrast ► Increase contrast 20 2.BRIGHTNESS Adjust the brightness of the screen image ◄ Reduce brightness ► Increase brightness 3.COLOR Adjust the color saturation of the screen image ◄ Reduce saturation ► Increase saturation 4.TINT Adjust the tone of the screen image ◄ Increase red tone ► Increase green tone 5.SHARPNESS ◄ Reduce sharpness ► Increase sharpness How to use OSD 6.COLOR TEMPERATURE Use ◄ ►to adjust the color temperature ♦ NEUTRAL General neutral setting ♦ WARM To increase the red tone of the display, obtain the white and more vivid red colors among warm ones. ♦ COOL To increase the blue tone of screen images, obtain the white color among soft colors. Generally suitable for offices with fluorescent lamps. 8 ♦ Side Bar Suitable for viewing conventional 4:3 programs in their normal format. ♦ S.Stretch Suitable for stretching 4:3 programs to fill the screen (Smart - Stretch ) 7.NOISE REDUCTION Use ◄ ► to change on / off ♦ ON To reduce the Noise, regular do this action could help you to get the clear image. ♦ OFF Not reduce the souce image. Keep original image situation. eg: If the source image have the Noise interference, you could use ON to reduce the noise. ♦ Zoom Suitable for viewing wide-screen 2.35:1 nongraphic DVD in full screen. For RGB, DVI input source mode 8.WIDE FORMAT =remote control key "WIDE" ♦ Normal Keeps the original aspect ratio in a full screen display. Use ◄ ►to select items. For TV, AV, COMP input source mode ♦ Stretch This mode is useful for 1.78:1 DVDs. When viewing 1.85:1 DVD, Stretch mode will still show very thin black bands at the top and bottom of the screen. ♦ Zoom Keeps the original aspect ratio in a full screen display. The top and bottom of the image is slightly cropped. 21 8 How to use OSD ♦ Stretch An image fully fills the screen. 12.AUTO CONFIG Press ok to auto get the input signal again. 13.ADC CLOCK ♦ Dot by Dot Detects the resolution of the signal and displays an image with the same number of pixels on the screen. Use◄ ►to change the clock value Adjusting the image interference. When the screen shows interference caused by disturbing wave, please adjust the clock. 14.ADC PHASE Notes: * Wide Format is not available when using the POP, SPLIT functions. * When you use 720p or 1080i signal input source. The screen will always keep STRETCH mode. 9. DEFAULT Use ◄ ►to select ON or OFF. ON OFF Mean call the factury default setting for Picture Adjust. Keep your picture adjust setting. 10.H POSITION Use ◄ ►to change image Horizontal position. 11.V POSITION Use ◄ ►to change image Vertical position. 22 Adjusting Phase distortion of image in PC mode.When the screen shows flashing, ghost image or undulation, please adjust the phase. How to use OSD PIP SETUP 8 2.WIDE FORMAT (PIP, POP only) =remote control key "PIP WIDE" Use ◄ ► to change sub-piecure scale 4:3 or 16:9 WIDE FORMAT, SIZE, H POSITION, V POSITION, TRANSPARENCY these function are only available for PIP STYLE. POP, SPLIT mode can't use. 1.PIP STYLE =remote control key "STYLE" PIP 4:3 PIP 16:9 3.SIZE (PIP only) =remote control key "- PIP SIZE +" Use ◄ ► to change sub-piecure size Use ◄ ► to select OFF, PIP, SPLIT, POP ♦ OFF only display main picture, not display sub-picture. 4.H POSITION (PIP only)=remote control key "◄►" ♦ PIP Display the sub-picture on the screen. Use ◄ ► to adjust sub-piecure horizontal poisition. Sub-Picture Main-Picture ♦ SPLIT The screen is divided in half. Main-Picture Use ◄ ► to adjust sub-piecure vertical poisition. Sub-Picture ♦ POP The screen is in the 16:9 mode and divided in half. Main-Picture 5.V POSITION (PIP only) =remote control key "▲▼" Sub-Picture 6.TRANSPARENCY Use ◄ ► to change sub-piecure transparency. 23 8 How to use OSD INPUT SETUP TV TUNER SETUP 1.MAIN INPUT =remote control key "INPUT" Press OK first, then use ◄ ► to change the Main picture input source signal. such as TV, FRONT RGB, RGB, DVI, AV1, AV2, FRONT AV, COMP1, COMP2 1.CLOSE CAPTION Use ◄ ► to ON or OFF the Cloase caption function. If your local TV system station not provide this service. This function will not work. Change main picture's input signal source 2.ANALOG TV SETUP 2.PIP INPUT =remote control key "SOURCE" Press OK first, then use ◄ ► to change the Main picture input source signal. ♦ ANTENA / CABLE Use ◄ ► to select the TV input source is from Antena or cable ♦ CH SEARCH Press ok to auto search the all channel. Sometimes the TV signal not stable, you need to use this function to reset the whole channel again. Change sub-picture's input signal source ♦ CH MEMORY To skip or add the channel that you designate. When you run the CH SEARCH 1~100%, then the TV will auto seach the whole channel to display. But some channel are blank , you could use this function to skip those blank channel or some channel you don't like. Then when you press the channel key It will skip those channel that you already define skiped. eg: Use ◄ ► to add or skip channel no. 2. 3.INPUT SIGNAL Press OK first, then use ◄ ► to change. When input source is 640*480, you can use this function change it to 720*480. (Only suitable for DVI , FRONT RGB, RGB mode) 24 and use ▲▼ to select which channel want to skip. How to use OSD 3.DIGITAL TV SETUP 8 ●CAPTION SIZE Adjust caption size. Such as, Default, small, standard, larger. ●FONT STYLE Change font to different style. e.g.: ●FOREGROUND COLOR Change froeground color. e.g.: ♦ CHANNEL SETUP(DTV) ●FOREGROUND OPACITY Change foreground opacity. ●BACKGROUND COLOR Change background color. e.g.: ●BACKGROUND OPACITY Change background opacity. ●AUTO SEARCH(DTV) Press OK to let machine auto search the whole channels. ●MANUAL SEARCH You could also search the channel by yourself. Just keyin the channel's no. then press OK to add that channel. ●CHANGE EDGE Change font's edge style. Such as, Default, None, Raised, Depressed, Uniform, LTshadow, RT shadow. e.g.: ●RESET Return to factory default setting value. ♦ AUDIO(DTV) ●EDIT Edit channel for parenthesis. Use this function to easy control the channel by menu. ♦ CLOSED CAPTION(DTV) ●AUDIO Use ◄►to select audio language ENGLISH, FRENCH, SPANISH.(depend on source) Use ▲▼to change audio effect SURROUND, STEREO, MONO. ●CAPTION SERVICE Depend on the input signal are supported which services, like CC1, CC2, CC3, CC4, CS1, CS2, CS3, CS4, CS5, CS6. ●AUDIO SETUP Press OK , then use ◄►to change audio output type DOLBY DIGITAL, PCM. You must setup another Sound expanding device to reveal this function. 25 8 How to use OSD AUDIO ADJUST ♦BBE High Definition Sound ♦VIVA HD3D Replace traditional live sound stereo with more natural and clearer sound. Features: a.Increase the horizontal sound field, depth, and vertical sound field while maintaining clear sense of directions. b.Highly stable central sound track c.Compatible with news channels, theatrical performances, movies, music, sports, and games. No audio mode switching is needed every time when you change programs 1.BASS Use ◄► to djust the ratio of Bass ♦SURROUND 2.TREBLE ♦SIM STEREO Dual channel simulated. Use ◄► to djust the high-pitched sound 3.BALANCE Use ◄► to djust the balance level between left and right speakers. 4.SPEAKER Use ◄► to select speaker on or off SP ON: Audio from built-in speakers. SP OFF: You can select speaker off to mute the audio. When use another amplifier device, you may need to setup the speaker off. 5.SUB VOL Use ◄► to djust sub-picture's volue. The RPTV audio will always sound main-picture's voice.You need to use Headphone or earphone to listen the sub-picture's voice and use this function to adjust the volue louder or lower. 6.EFFECT =remote control key "AUDIO" Use ◄► to select audio effect mode. ♦SRS = Sound Retrieval System Base on the human hearing system; use the HRTF characteristics to compensate difference between traditional recordings. Extract the hidden environment sounds from the recording, and then process and recreate the original stereo sound. The display adapts the SRS technology, as well as the SRS Focus sound effect; this delivers displays with stereo that’s broad and with vertical sound field. 26 8 How to use OSD PARENTAL CONTROL The parental controls feature prevents viewers from watching programs that are not age-appropriate, such as programs containing violence or adult language. The factury default access code is 0000. Just use remote control keyin the number to enter the parental controls sub-menu. When enter the parental controls sub-menu. It will display the OSD as below: 1.MPAA RATING 2.TV RATING U -> Unblock , B -> Block ♦TV-Y → For all children. ♦TV-Y7 → For children of age 7 and above. FV means the program may include mild violence. ♦TV-G → For general audience. But most parents do not approve it for small children. program contains material that parents may find unsuitable for younger children. ♦TV-PG → Guodamce siggested. ♦TV-14 → Unsuitable for children under 14 year of age. ♦TV-MA → Mature Audience Only, unsuitable for children under 17. TV-PG / TV-14 / TV-MA are further rated based on categories: V → Some violent scenes S → Some sex scenes L → Some obscene, adult language D → Some luring sexual dialogues 3.UNRATED ALLOWED U -> Unblock , B -> Block Use ▲▼to select which rating you want to block or unblock, then press ENTER to block or unblock the current rating level. ♦ G → General audience ♦ PG → Parental guidance suggested ♦ PG-13 → Recommended for children 13 yearsof age and later ♦ R → Mature audience ♦ NC-17 → No one under 17 years of age ♦ X → No one under 17 years of age. Decide if block the signal from the channel that does not contain rating information. YES → No, view the program NO → Block the channel 4.CHANGE ACCESS CODE Change and set up new Parental Control password. Enter the 4 new digits and the set up will automatically proceed to the next line - CONFIRM ACCESS CODE 5.CONFIRM ACCESS CODE Enter the 4 digits typed during CHANGE ACCESS CODE, press OK to confirm and the change is completed. 27 8 How to use OSD SPECIAL FEATURE 4.LANGUAGE Set OSD display language, there are three language options: ENGLISH FRANÇAIS ESPAÑOL 5.SYSTEM INFO Display some information about the display, may also be displayed by pressing the hotkey INFO on the remote control. 1.OSD H POSITION Use ◄►to move OSD horizontal position. 2.OSD V POSITION Use ◄►to move OSD vertical position. ♦ MODEL NUMBER Show the display’s model number ♦ MAIN INPUT Display the input signal of current main picture ♦ WIDE FORMAT (MAIN) Display main picture’s aspect ratio (Refer to page 25) ♦ PIP INPUT Display the input signal of current main picture ♦ LAMP TIME Display the time the lamp has consumed. ♦ SOFTWARE VERSION Display the display’s software version 6.RESET ALL SETTING Select YES to return all OSD settings to the defult values, the LAMP timer and OSD display language will not be affected. Select NO to stay unchanged. 3.OSD TIMEOUT Use◄►to set up OSD display time, the value range is 15 seconds to 49 seconds. After press the MENU key, the OSD will appear. If the OSD TIMEOUT is set to 30 seconds, OSD screen will automatically disappear in 30 seconds if not any key is pressed. 28 7.RESET LAMP TIMER Select YES to set the time lamp consumed to zero. Select NO to stay unchanged. When installing a new lamp, be sure to set the LAMP TIMER to zero. This ensures correct display of the time consumed by the lamp. 8.SLEEP TIMER =remote control key "SLEEP" Set up the time to turn off the display, works the same as the hotkey SLEEP on the remote control. The sleep timer will be reset to zero every time when the display restarts. If it is set to 30 minutes, this means in 30 minutes from the timer is set, the display will be turned off automatically. If the timer is set to OFF, the function will be disabled. 9 Programming the universal remote control The TV device button has been preset to work with your RPTV TV (program code 0080). You can program the remote control to work with as many as seven other devices. To program the remote to control other devices: 1 Turn on the device. 2 Press the matching device button on the remote control. 3 Press and hold the SETUP button until the LED flashes twice. 4 Enter the programming code for the device and manufacturer. For a list of device programming codes, see“Device program codes” below. If the code is accepted, the LED flashes twice after the last digit is entered. If the LED does not flash twice, repeat Steps 2 through 4 with the next code listed for the device and manufacturer. Important If there more than one code listed for the device and manufacturer, make sure that you try all the codes listed to find the one that works for the device. 5 Point the remote control at the device and press the POWER button. The device should turn off. Tips & Tricks If you cannot find your manufacturer in the device list or the program code does not work, you can use the remote control to search for the correct component code. See “Searching for device codes” on page 36. Device program codes Use the codes in the following tables to program the remote control to work with your existing audio and video devices. Amplifier and tuner codes Manufacturer Program Code Manufacturer Program Code Bose GE Harman/Kardon JVC Marantz Optimus Philips 0674 0078 0892 0331 0892 0395 0892 Polk Audio Realistic Sony Soundesign Victor Wards Yamaha 0892 0395 0689 0078 0331 0078 0354 Cable set-top box codes Manufacturer Program Code Manufacturer Program Code ABC Americast Bell South General Instrument Goldstar Hamlin Jerrold Memorex Motorola Pace Panasonic Paragon 0003, 0017 0899 0899 0276, 0476, 0810 0144 0009, 0273 0003, 0276, 0476, 0810 0000 1106 0237 0107, 0000 0000 Philips Pioneer Pulsar Quasar Regal Runco Samsung Scientific Atlanta Starcom Toshiba Zenith 0305, 0317 0144, 0533, 0877 0000 0000 0273, 0279 0000 0144 0017, 0477, 0877 0003 0000 0000, 0525, 0899 29 9 Programming the universal remote control CD Player codes Manufacturer Program Code Manufacturer Program Code Aiwa Burmester California Audio Labs 0157 0420 0029 Parasound Philips Pioneer Carver DKK Denon Emerson Fisher 0157, 0179 0000 0003, 0873 0305 0179 Polk Audio Proton QED Quasar RCA Garrard Genexxa Harman/Kardon Hitachi JVC Kenwood 0420 0032, 0305 0157, 0173 0032 0072 0028, 0190, 0826, 0037, 0626, 0681 0157 0305 0157 0029 0420 0157, 0305 0157, 0626, 0029 0157 0157 0101, 0868 0032, 0468, 0420 0179, 0305, 1063, 0000, 0037, 0145 Realistic Rotel SAE Sansui Sanyo Scott 0420 0157, 0626 0032, 0468, 0305, 1062, 1063 0157 0157 0157 0029 0053, 0032, 1062, 0468, 0305, 0179 0179, 0420 0157, 0420 0157 0157, 0305 0179 0305 Sears Sharp Sherwood Sonic Frontiers Sony Soundesign Tascam Teac Technics Victor Wards Panasonic Yamaha 0305 0037, 0861 1067 0157 0000, 0490 0145 0420 0420 0029 0072 0053, 0157 0029 0036, 0888 Krell LXI Linn MCS MTC Magnavox Marantz Mission NSM Onkyo Optimus Computer and Home automation codes 30 Manufacturer Program Code Manufacturer Program Code Gateway GE One For All Radio Shack 1272 0240 0167 0240 Security System Universal X10 X10 0167 0167 0167 Programming the universal remote control DVD Player codes Manufacturer Program Code Manufacturer Program Code Apex Denon Fisher Gateway GE Gradiente Hitachi Hiteker JVC Kenwood Konka Magnavox Marantz Mitsubishi Onkyo 0672 0490 0670 0081 0522 0651 0573, 0664 0672 0623, 0558 0682, 0534 0719, 0711, 0720, 0721 0503, 0675 0539 0521 0503 Optimus Oritron Panasonic Philips Pioneer Proscan RCA Samsung Sharp Sony Technics Theta Digital Toshiba Yamaha Zenith 0571 0651 0490, 0677, 0632 0539, 0503 0571, 0525, 0632 0522 0522, 0571 0573 0630 0533 0490 0571 0503 0490, 0545 0591, 0503 Manufacturer Program Code Manufacturer Program Code ADC Aiwa Bose 0531 0121, 1405, 1089 0238, 0639, 1229 1253, 1355, 1356 1357 0531 1089, 1189 1160, 1104 0110 0110 0074 1027, 0186, 1313 1569, 1570 0039 1089, 0531, 1189 1189, 1089, 0039 0135 1023, 0186, 0531, 0670 Panasonic Philips Pioneer 039, 1518 1089, 1189, 1269 0150, 0531, 0630 1023 Proscan Quasar RCA Sansui Sharp Sony Soundesign 1254 0039 1254, 0531, 1023 1089 0186 1158, 1058, 1258 0670 Sunfire Technics Thorens Victor Yamaha 1313 0039, 1308, 1518, 1309 1189 0074 0176, 0186, 1176 Receiver codes Capetronic Carver Denon Harman/Kardon JBL JVC Kenwood MCS Magnavox Marantz Onkyo Optimus 9 31 9 Programming the universal remote control Satellite set-top box codes Manufacturer Program Code Manufacturer Program Code AlphaStar Chaparral Echostar 0772 0216 0775, 1005 Next Level Panasonic Philips Expressvu GE General Instrument HTS Hitachi Hughes Network Systems JVC Magnavox Memorex Mitsubishi 0775 0566 0869 0775 0819 0749, 1142, 1749 Proscan RCA Radio Shack Samsung Sony Star Choice 0869 0247, 0701 1076, 1142, 0722 0724, 0749 0392 0566, 0392, 0143, 0855 0869 1109 0639 0869 0775 0722, 0724 0724 0749 Toshiba Uniden Zenith 0749, 0790 0724, 0722 0856 Manufacturer Program Code Manufacturer Program Code AOC 0019, 0030 Memorex Admiral Aiko Aiwa Akai Alaron America Action Anam Audiovox Baysonic Belcor Bell & Howell Bradford Brockwood Broksonic 0093, 0463 0092 0701 0030 0179 0180 0180 0092, 0180, 0451, 0623 0180 0019 0016, 0154 0180 0019 0236, 0463 Midland Mitsubishi Motorola Multitech NAD NEC NTC Nikko Onwa Optimus Optonica Orion Panasonic Penney CXC 0180 Philco Candle Carnivale Carver Celebrity Cineral Citizen Concerto Contec Craig Crosley 0030, 0056 0030 0054 0000 0451, 0092 0056, 0030, 0060, 0092 0056 0180 0180 0180 Philips Pilot Pioneer Portland Princeton Prism Proscan Proton Pulsar Quasar 0179, 0463, 0178 0016, 0056, 0150 0154, 0250 0017, 0047, 0051 0150, 0178, 0019, 0093 0093 0180 0156, 0166, 0178 0030, 0019, 0056 0092 0178, 0030, 0092 0180 0250, 0166, 0154 0093 0463, 0179, 0236 0051, 0250 0047, 1347, 0060 0030, 0178, 0051 0019, 0056, 0156 0145, 0019, 0030 0054, 0463 0054 0019, 0030 0166, 0679 0019, 0092 0717 0051 0047 0178 0017, 0019 0051, 0250 TV codes 32 Programming the universal remote control Manufacturer Program Code Manufacturer Program Code Crown 0180 RCA Curtis Mathes 0060, 0030, 0016, 0047 0051, 0054, 0056, 0093 0145, 0154, 0166, 0451 1147, 1347 0092, 0623, 0019 0624, 0451 0019 0145 0017, 0019 0000 Radio Shack 0047, 1347, 1147, 1047 0679, 1247, 0019, 1447 0051, 0090, 0093 0180, 0030, 0178 0154, 0019, 0047 0056 Sansei Envision Fisher Fujitsu Funai Futuretech 0236, 0180, 0178 0179, 0463, 0624 0623, 0019, 0154 0030 0154 0179, 0683 0180, 0171, 0179 0180 Gateway 0072, 0080 Sears GE 0047, 1347, 0051, 0093 0178, 0451, 1147 0017, 0019, 0030 0178, 0019, 0030, 0056 0056, 0053 0179, 0180 0178 0179 0054 0180 0145, 0056, 0016 0054 0017 0054 0000 0053 0180 0180, 0030 0030, 0019 0707, 0632, 0628 0638, 0703 Semivox 0056 0154, 0047, 0054 0156, 0178 0016 Telefunken Toshiba Daewoo Daytron Denon Dumont Electroband Emerson Gibralter GoldStar Gradiente Grunpy Hallmark Harley Davidson Harman/Kardon Harvard Hitachi Infinity Inteq JBL JCB JVC KEC KTV Kenwood Konka LG LXI Lofik Realistic Runco SSS Sampo Samsung Sansui Sanyo Scimitsu Scotch Scott Semp Sharp Shogun Signature Sony Soundesign Squareview Starlite Supreme Sylvania Symphonic TMK TNCi Tandy Technics Technol Ace Techwood Teknika Vector Research 9 0180, 0154, 0030 0178, 0019, 0056 0017, 0030 0019, 0180 0030 0060, 0019, 0178 0030, 0056 0451 0463 0154 0019 0178 0236, 0019, 0178 0179, 0180 0154, 0056, 0156, 0047 0047, 0054, 0171, 0179 0180 0156 0093, 0688 0019 0016 0000 0178, 0179, 0180 0171 0180 0000 0054, 0030 0171, 0180 0056, 0178 0017 0093 0051, 0250 0179 0051, 0056 0016, 0054, 0179 0180, 0019, 0092 0056, 0060, 0150 0056 0156, 0060, 0154, 1256 0030 33 9 Programming the universal remote control Manufacturer Program Code Manufacturer Program Code Luxman MGA MTC 0056 0150, 0019, 0030, 0178 0060, 0030, 0019 0056 0054, 0030, 0179 1254 Victor Vidikron Vidtech 0053 0054 0019, 0178 Wards Majestic Marantz Matsushita 0016 0054, 0030 0250 Whit Westinghouse Yamaha Zenith 0054, 0178, 0016 0019, 0030, 0056 0179 0624, 0623, 0463 0019, 0030 0017, 0624, 0016 0092,0463 Megatron 0145, 0178 Magnavox VCR codes 34 Manufacturer Program Code Manufacturer Program Code Admiral Adventura Aiko Aiwa America Action American High Asha Audiovox 0048, 0209 0000 0278 0000, 0037 0278 0035 0240 0037 Mitsubishi Motorola Multitech NEC Nikko Noblex Olympus Optimus Beaumark Bell & Howell 0240 0104 Orion Panasonic Broksonic Penney CCE Calix Canon 0121, 0184, 0002 0209, 0479 0072, 0278 0037 0035 Carver Cineral Citizen Colt Craig Curtis Mathes Cybernex Daewoo Denon 0081 0278 0278, 0037 0072 0037, 0072, 0047, 0240 0035, 0060, 0162 0240 0278, 0045 0042 Pilot Pioneer Polk Audio Profitronic Proscan Protec Pulsar Quasar RCA Dynatech Electrohome Electrophonic Emerex 0000 0037 0037 0032 Radio Shack Radix Randex Realistic 0043, 0048, 0067 0035, 0048 0000, 0072 0038, 0067, 0104 0037 0240 0035 0162, 1062, 1162 0048, 1262, 0037 1048, 0104, 0432 0479, 0002, 0184, 0209 0035, 0162, 1162 1262, 1362, 0616 1062 0035, 0240, 0037 0042, 0038 0042 0035, 0209, 0479 0081, 0035, 0618 1081, 1181 0037 0067 0081 0240 0060 0072 0039 0035, 0162, 1162 0060, 0149, 0042 0035, 0048, 0240 0000, 1037 0037 0037 0000, 0104, 0047 0048, 0037, 0035 Pentax Philco Philips Programming the universal remote control Manufacturer Program Code Manufacturer Program Code Emerson 0184, 0002, 0209 0278, 0121, 0479 0000, 0037, 0043 0047, 0104 0000 0035, 0060, 0048, 0240 0000 0432 0037, 0038 0000 Replay TV 0614, 0616 Runco Samsung Sanky Sansui Sanyo Scott Sears 0047 0000 0038, 0081 0072 0042, 0000 0042 Semp Sharp Shintom Shogun Singer Sony 0067 0037, 0278 0072 0067, 0038 0035, 0037 0037 0000 0072 0035 0043, 0240 0240 0000, 0240 0278 0035, 0081, 0563 0000, 0039, 0149 0240 0081, 0035 Sylvania Symphonic TMK Teac Technics Teknika Thomas Tivo Toshiba Totevision Unitech Vector Vector Research Video Concepts 0039 0045, 0240 0039, 0048 0479, 0000, 0067, 0209 0047, 0104, 0240 0184, 0121, 0043, 0045 0037, 0042, 0000 0035, 0047, 0104 0045 0048 0072 0240 0072 0033, 0032, 0000 0035, 0636, 1032 0035, 0081, 0000, 0043 0000 0240 0000 0035, 0162 0000, 0035, 0037 0000 0618, 0636 0045, 0043 0037, 0240 0240 0045 0038 0045 Videosonic Wards 0240 0035, 0060, 0000 0047, 0240, 0042 0048, 0072, 0081 0149 0037 0035, 0162 0104, 0047, 0479 0000, 0037, 0048 0035, 0240, 1037 0039, 0162, 0209 1162, 1262 0042 White Westinghouse XR-1000 Yamaha 0072, 0278, 0209 0072, 0000, 0035 0038 Zenith 0039, 0000, 0033 0209, 0479 Fisher Funai GE Garrard Go Video GoldStar Gradiente HI-Q Harley Davidson Harman/Kardon Harwood Hitachi Hughes Network Systems JVC KEC KLH Kenwood Kodak LXI Lloyd’s Logik MEI MGA MGN Technology MTC Magnasonic Magnavox Magnin Marantz Marta Matsushita Memorex Minolta 9 35 9 Programming the universal remote control Searching for device codes If you cannot find your manufacturer in the device list or the program code does not work, you can use the remote control to search for the correct device code. To search for a device code: 1 Turn on the device. 2 Press the matching device button on the remote control. 3 Press and hold the SETUP button until the LED flashes twice. 4 Press 991. The LED flashes twice. 5 Point the remote control at the device and alternate between pressing the POWER button and the device button on the remote control until the device turns off. If the device still does not respond, clear the device button, then repeat the search procedure. To clear the device button: 1 Make sure that the device is turned on. 2 Press and hold the SETUP button on the remote control until the LED flashes twice. 3 Press 992, then press the device button on the remote control twice. Reassigning device buttons You can reassign the device buttons on the remote control if you have more than one of the same type of device. Example: If you are using the remote to control the cable (CBL), CD, DVD, TV, and two VCRs, you can reassign the satellite (STB) button as a second VCR(STB)button. To reassign device buttons: 1 Press and hold the SETUP button until the LED flashes twice. 2 Press 992. The LED flashes twice. 3 Press the device button that you want (VCR) once, then press the device button that you are reassigning (STB) once. The(STB)button is now reassigned and can be programmed as a VCR device button. See “ Programming the universal remote control” on page 29. 36 Programming the universal remote control 9 Teaching the remote control new functions The remote control can learn up to 25 additional functions from the device’s original remote control. Example: Your DVD player remote control has a scan function that you may use frequently. There is not a scan button on the remote control. You can assign a button and use the DVD remote to teach the remote control the scan function. Important Make sure that you have already programmed the remote control for the device. See “ Programming the universal remote control” on page 29. Make sure that area lighting is not too bright or it will interfere with the learning process. To teach the remote control a new function: 1 Press and hold the SETUP button on the remote control until the LED flashes twice. 2 Press 975. The LED flashes twice. 3 Press the device button that you want (DVD) once. 4 Press the button that you are assigning the new function to. The LED flashes quickly while it is waiting to receive the signal from the teaching remote. 5 Hold the teaching remote control approximately 1-inch (2.54cm) from the remote control making sure that the infrared ports are lined up, then press the button on the teaching remote that you want the remote to learn. The LED flashes twice. 6 Press the SETUP button to exit learning mode. Using the universal remote control Your RP TV features an on-screen display (OSD) that lets you adjust and save contrast, brightness, and other settings. The TV saves changes you make to the settings, even if you turn off the TV. See the documentation that came with your RP TV for more information about the OSD. To access the OSD with the universal remote control: 1 Press the TV device button. 2 Press the MENU button on the universal remote control. The MAIN MENU opens. 3 Press the ▲and ▼ buttons to select the menu you want. 4 Press the ▲and ▼ buttons to select the menu option you want. 5 Press the OK button to open the menu. 6 Press the ◄and ► buttons to adjust the option settings. 7 Press the EXIT button to return to the MAIN MENU. 8 Press the EXIT button again. The MAIN MENU closes. 37 9 Programming the universal remote control Using picture-in-picture (PIP) mode When the picture-in-picture (PIP) mode is active, one picture is displayed on the full screen (main picture) and the other picture is displayed in a small window (sub-picture). To control PIP mode using the universal remote control: 1 Press the TV device button. 2 Press the PIP button on the remote control once to turn on PIP mode. A small window appears in one corner of the screen. The picture on the full screen is the main picture. The picture in the window is the sub- picture. Press the STYLE button to select one of the other preset PIP modes. See the user guide that came with your RP TV for additional information. 3 Press the POSITION button one or more times to move the window to a different area of the screen. 4 Press the SWAP button to swap the main picture and the sub-picture. 5 Press any one of the direct input buttons (TV1, AV1, AV2, etc.) on the remote control to change the video input source for the main picture. 6 Press the SOURCE button on the remote control one or more times to change the video input source for the sub-picture. Go to “Universal remote control buttons” on page 17 for information about the other buttons on the universal remote. Setting the sleep timer The sleep timer lets you set a time when you want your RP TV to turn off automatically. One minute before the timer turns off your RP TV, the timer appears and shows the seconds remaining before your RP TV turns off. You can set the sleep timer using the remote control or the OSD. To set the sleep timer using the universal remote control: 1 Press the TV device button. 2 Press the SLEEP button on the remote control. The sleep timer appears in the upper-left corner of your screen. 3 Press the SLEEP button one or more times to cycle through all the preset times. To turn off the sleep timer using the universal remote control: Press the SLEEP button repeatedly until SLEEP: OFF appears. 38 Programming the universal remote control 9 Troubleshooting Use the following information to solve common problems. The LED doesn’t blink when a button is pressed. Replace the batteries. Insert two AA batteries into the remote control. Make sure that you match the + and – on the batteries with the + and – symbols inside the battery compartment. The LED blinks when a device mode is pressed, but the device does not respond. Make sure that you are less that 15 feet (4.57 meters) from the infrared remote sensors on the device. Make sure that nothing is blocking the infrared remote sensors on the remote control or the device. Make sure that you have selected the correct device mode. Make sure that the remote is programmed for that device. See “Programming the universal remote control” on page 29. The remote control will not accept the device program code. Make sure that you followed all the steps in the programming procedure. See “Programming the universal remote control” on page 29. Make sure that you tried all the program codes listed for the device manufacturer. See “Device program codes ” on page 29. Search for the device code. See “Searching for device codes” on page 36. 39 10 Display Modes Video Input Format Input Format Aspect Ratio Pixel Clock(MHz) 480i 4:3 480p 4:3 / SMPTE 293M 720p / SMPTE 296M 1080i / SMPTE 274M 700x480 700x480 1280x720 1290x1080i 13.5MHz 27.000 74.25/1.001 74.25/1.001 Horizontal Frequecy(kHz) 15.734/1.001 31.469/1.001 45.0/1.001 33.750/1.001 Vertical Frequecy(Hz) 30.0/1.001 60/1.001 60.0/1.001 30.0/1.001 Default PC Input Mode The display automatically detects: 1) Horizontal sync signal frequency between 30.0 ~ 60.0 kHz 2) Vertical sync signal frequency between 50 ~ 85 Hz. But 60 Hz vertical sync input signal is recommended, for it will take the display longer to display the screen when other input signals are used. The display supports resolution up to 1024 * 768, the higher mapping ratio entered will be automatically changed to 1024*768. The display supports the general industry factory default modes as follows: Resolution Pixel Clock(MHz) 640x350 @70Hz 640x350 @85Hz 720x400 @70Hz 720x400 @85Hz 640x480 @60Hz 640x480 @72Hz 640x480 @75Hz 640x480 @85Hz 800x600 @56Hz 800x600 @60Hz 800x600 @72Hz 800x600 @75Hz 800x600 @85Hz 1024x768 @60Hz 1024x768 @70Hz 1024x768 @75Hz 1280x768 @60Hz 25.180 31.500 28.322 35.500 25.175 31.500 31.500 36.000 36.000 40.000 50.000 49.500 56.250 65.000 75.000 78.750 74.125 Horizontal Frequency +/ – Sync Polarity 0.5kHz 31.48 P 37.861 P 31.469 N 37.927 N 31.469 N 37.861 N 37.500 N 43.269 N 35.156 P 37.879 P 48.077 P 46.875 P 53.674 P 48.363 N 56.476 N 60.023 P 45.000 IV Vertical Frequency +/ – Sync Polarity 0.1 Hz N 85.080 N 70.087 P 85.039 P 59.940 N 72.809 N 75.000 N 85.008 N 56.250 P 60.317 P 72.188 P 75.000 P 85.061 P 60.004 N 70.069 N 75.029 P 59.940 IV Miscellaneous When the range of the input signal frequency is beyond what the display accepts, the “OUT OF RANGE” message will appear. Please adjust the input signal frequency to an acceptable value. Plug & Play The display confirms to VESA DDC1 and DDC2B standards When connected to a DDC1 system, the display will sync with V.CLK based on VESA standards and output EDID to data routes. When connected to a DDC2B system, the display will automatically switch to various communications. 40 Specifications Number T. M. D. S Headphone TV System Received Channels Image output / input terminals(video, audio) 190.5 Component Input 514mm Power Power Consumption Weight Viewable Area Physical Dimensions Speaker Audio Output Simulated RGB input Multimedia digital projector display / TV Main system Remote Control AC 110V/220V 50 Hz / 60 Hz 3V (two AA batteries) 220W --------40Kg 155.5g (including batteries) 853 mm - Length 640 mm - Hight 1066 mm - Diagonal 1381 mm - Length 482 mm - Hight 1113.5 mm - Diagonal 2 circular ones, 120 mm Maximum output 10W + 10W (Total audio output 20W) Video signal: D-SUB 15 pin RGB video signal connector Simulation: 0.7V (p-p) 75 Ohm Maximum dpi: XGA (1024*768) Horizontal Sync: Positive / Negative TTL Frequency: 30KHz-70K HzVertical Sync: Positive / Negative TTL Frequency: 50Hz-85Hz Audio Signal: 150mV (rms) over 47 thousand Ohms (AV Terminal) Video signal: Standard T.M.D.S DVI-D 24 Pin input Audio signal: 150mV (rms) over 47 thousand Ohm (AV Terminal) 3.5 mm diameter stereo connector Resistance larger than 20 Ohm Standard NTSC 181 CH or PAL system Regular TV (VHF: 2-13 UHF:14-69) Cable TV (2-125) S-Video: Y output / input : 1V (p-p) 75 Ohm Negative Sync C output / input : 0.286V (p-p) 75 Ohm Color Sync Video: 1V (p-p) 75 Ohm Negative Sync (AV Terminal) Audio: 150 mV (rms) over 47 thousand Ohms (AV Terminal) Image: Y input : 1V (p-p) Negative Sync (AV Terminal) Pb / Cb, Pr / Cr input: 0.35V (p-p) (AV Terminal) Audio: 150 mV (rms) over 47 thousand Ohms (AV Terminal) 1381 1247.5 1381mm 697.4 802 1113.5 481. 5 50. 1113mm Product Name 11 431. The product outlook and dimensions For the graphic design and technical specifications, in order to improve the products, our company reserves the right of modifications and no further notice on this will be issued. The display’s model number does not represent the screen dimension but the approximate diagonal size of the display area. Use with a lightning protector when using the display is recommended. 41 12 Troubleshooting Sometime the set up problems or other reasons will result in the false impression of display malfunctions. Please check before sent for repair: /+ If-%.5 following situations 0/7%2 ).054 Please check the following items Power LED does not light * If the power plug was disconnected or loose? * If the fuse or electricity outlet are not working? %8)4 ? No image ? The remote does not work Delays for video and audio outputs 42 ,!-0 34!453 * Make the antenna is in place or it is loose? * The power is on? * To check the image input signal source settings is correct or not? (see page 13-15, 24) * Check the TV analog/digital setup mode is correct or not? (see page 24~25) * If the TV station or cable TV system is not in service? * If the PC connected to the display is powered on? * Try pressing the keyboard or mouse of the connected computer? * Check if the video cable is connected correctly (If some PC needs to use external adapter?)? * Check if the connected computer ‘s video adapter is completely plugged into correct expansion slot? * Check if the frequency range of the input signal is beyond the display’s acceptable rage (If over the range, “Out of Range” will appear) * The display supports plug and play, but if for some reason the PC couldn’t find the display’s driver, please change the PC’s display settings manually and set the screen display to XGA 1024*768 or Super VGA 800*600. * If the batteries are dead? * If the batteries are placed upside down? * If too far from the reception area, if the angle is too big, if there is strong light blinking in reception area (please remove the strong light) or if there is obstacles in between? ? * If the monitor is warming up (The POWER led on display’s control panel will be orange and blinking)? * To protect the lamp, after turn off the power, you should wait to turn on the display again after 60 seconds. Dim image * If the color and color tone settings are inappropriate? * If the projector lamp is dead, please change the lamp. Blurry image * When using the system, there might be water condensing inside the display when the environment changes from cold to warm, or from dry to wet. Please power off the system and restart after the water vapors. * Please adjust the display’s video phase or clock. Overlapped image * It might come from the electrical interference caused by buildings, airplanes, and hills, please adjust the antenna position * It might be the interference by bad signal cable, try another cable. Strips on the screen * It might come from the electrical interference caused by the composite electrical signal created by computer, other TVs, TV video game system, VCR, radio station. Please adjust the positions of those objects or the anetnna. Snowflake on the screen or noise interference *If the antenna has changed direction, loose or damaged? Spots on the screen * This may caused by the electronic interference from automobiles or motorcycles, hair dryer, high voltage power lines or neon light. Clear image but no sound * Please press the “Mute” key on the remote control. * Check if the audio cable is installed correctly * Check if the Internal Speakers is set to Off, refer to page 26. 13 LED Status There are two status LEDs on the front of your Micro Chip Display Projection RP TV. You may obtain the display’s related status through the LED in the front panel. Their meanings are explained as follows: 0/7%2 ).054 Power LED ,!-0 34!453 Lamp LED Normal Operation States Power LED Lamp LED Status Description AC off Not lit Not lit AC power not connected Standby mode Orange Not lit AC power is connected and your RPTV is in standby mode. Warm-up/Cool down Blue Flashing AC power is connected and the power button has just been turned on or off. Operation mode Blue Not lit AC power is connected, the power button has been pressed, and the lamp has warmed up States Power LED Lamp LED Status Description 21 Flashes blue twice, then orange once Not lit One of the cooling fans has failed. Call Service Center to help you solve the question. 32 Flashes blue three times, then orange twice. Flashing Lamp trouble or failure. Your RPTV automatically shut down and restart itself. If this does not solve the problem, Call Service Center to help you solve the question. 52 Flashes blue five times, then orange twice. Flashing Hardware error. Shut off your RPTV, wait one minute, then restart your RPTV. If this does not solve the problem,Call Service Center to help you solve the question. Error Codes 43 14 Service Information and Announcement Service Information If troubleshooting information does not resolve your problem or if you have other questions relating to you Micro Chip Display Projection, visit www.vivitek.us You can also call our Service Center. Announcement All Rights Reserved. Vivitek Corp 48017 Fremont Blvd. Fremont, CA 94538 All Rights Reserved This publication is protected by copyright and all rights are reserved. No part it may be reproduced or transmitted by any means or in any form, without prior consent in writing from Vivitek. The information in this manual has been carefully checked and is believed to be accurate. However, changes are made periodically. These changes are incorporated in newer publication editions. Vivitek may improve and/or change products described in this publication at any time. Due to continuing system improvements, Vivitek is not responsible for inaccurate information which may appear in this manual. For the latest product updates, consult the Vivitek Web site at www.vivitek.us. In no event will Vivitek be liable for direct, indirect, special, exemplary, incidental, or consequential damages resulting from any defect or omission in this manual, even if advised of the possibility of such damages. In the interest of continued product development, Vivitek reserves the right to make improvements in this manual and the products it describes at any time, without notices or obligation. 44 www.vivitek.us Vivitek Corp. 48017 Fremont Blvd. Fremont, CA 94538 Tel: (510) 651-0881 Efax: (510) 226-4163 © 2005 Vivitek Copyrights


![User's Manual AH-480 Series [Machine / Software]](http://vs1.manualzilla.com/store/data/006867875_1-b2cd01726e15f409a063f19433f9385d-150x150.png)