1
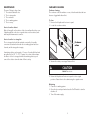
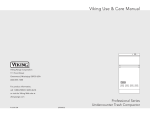
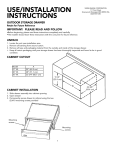
Viking Use & Care Manual
Viking Range Corporation
111 Front Street
Greenwood, Mississippi 38930 USA
(662) 455-1200
For product information,
call 1-888-VIKING1 (845-4641)
or visit the Viking Web site at
15”W. Undercounter/Freestanding
Ice Machine
vikingrange.com
F20733EN
17-3336-02
(070110)
CONGRATULATIONS
TABLE OF CONTENTS
Congratulations and welcome to the elite world of Viking ownership.
We hope you will enjoy and appreciate the care and attention we have
put into every detail of your new, state-of-the-art ice machine.
Your Viking appliance is designed to offer years of reliable service. This
Use and Care Guide will provide you with the information you need to
become familiar with your ice machine’s care and operation.
Your complete satisfaction is our ultimate goal. If you have any
questions or comments about this product, please contact the dealer
from whom you purchased it, or contact our Consumer Support Center
at 1-888-VIKING1.
Important Safety Instructions______________________________________4
Initial Start Up __________________________________________________4
Use ____________________________________________________________4
Maintenance____________________________________________________7
Care and Cleaning ______________________________________________8
Condenser Cleaning ___________________________________________8
Winterizing ___________________________________________________9
Removing the Scale from the Ice Making System _________________10
Troubleshooting Guide _________________________________________12
We appreciate your choice of a Viking ice machine and hope that you
will again select our products for your other major appliance needs.
For more information about the complete and growing selection
of Viking products, contact your dealer or visit us online at
vikingrange.com
2
3
IMPORTANT – PLEASE READ AND FOLLOW
INITIAL START UP
• Before beginning, please read these instructions completely and
carefully.
• DO NOT remove permanently affixed labels, warnings, or plates
from the product. This may void the warranty.
• Please observe all local and national codes and ordinances.
• Please ensure that this product is properly grounded.
• The installer should leave these instructions with the consumer who
should retain for local inspector’s use and for future reference.
1. Turn on the water supply.
2. Switch on the electrical power.
3. Push and release the On/Off switch to start the machine. The Ice
Making light next to the On/Off switch will glow Blue.
WARNING
To reduce the risk of fire, electric shock, or injury when using your unit, follow
these basic precautions:
• Read all instructions before using the unit.
• Never allow children to operate, play with, or crawl inside the unit.
• Never clean unit parts with flammable fluids. The fumes can create a fire
hazard or explosion.
• Always turn the power on/off switch (located behind the air grille on top right
side) to the OFF position before attempting to change light bulbs, clean, or
service the unit.
FOR YOUR SAFETY
DO NOT STORE OR USE GASOLINE OR OTHER FLAMMABLE VAPORS AND
LIQUIDS IN THE VICINITY OF THIS OR ANY OTHER APPLIANCE. THE FUMES
CAN CREATE A FIRE HAZARD OR EXPLOSION.
It is your responsibility to be sure your ice machine is:
• located so the front is not blocked to restrict incoming or discharge
air flow.
• properly leveled.
• located in a well ventilated area.
• connected to the proper kind of outlet, with the correct electric
supply and grounding. A 115V, 60 Hz, 15 amp fused electrical
supply is required. Note: Time delay fuse or circuit breaker is
recommended.
• not used by anyone unable to operate it properly.
• used only for its intended purpose.
• properly maintained.
4. Water will begin to flow into the unit. When the reservoir is full,
water will start to drain from the machine. After a few minutes the
compressor, water pump and fan motor will begin to operate and
the first ice making cycle will have begun.
No adjustments are needed.
After about half an hour, ice will fall into the ice storage bin. The
machine makes 24 cubes per batch. It is normal for the first batches of
ice to melt, that continues until the bin has cooled. It will take 8 to 10
hours of continuous run time to fill the ice bin. When the bin is full of
ice, the ice machine will shut off. It will automatically restart when the
ice level falls, either from use or normal meltage.
USE
No special instructions are needed for use. Just take as much ice as
you need, the machine will replace it. A scoop is provided, and it can
be stored in the machine using the loop of tubing on the right side as
a holder. That tubing is also the ice level sensor; ice will fill the storage
bin until it is near to or on that tube and then the machine will shut off.
The machine can be shut off anytime by just pushing and releasing the
On/Off button. The machine will shut off at the end of the next cycle.
To shut off immediately, push and hold the On/Off button in until the
machine stops.
•SAVE THESE INSTRUCTIONS•
4
5
USE (cont.)
WATER QUALITY
Never keep anything in the ice storage bin that is not ice. Objects like
wine or beer bottles are not only unsanitary, but the labels can slip off
and plug up the drain.
All water, including potable water supplied by municipalities, contains
some impurities or minerals. Water absorbs impurities from the air as rain
and/or as it flows through the ground. Some of the impurities are solid
particles, these are known as suspended solids, and a fine particle filter
will remove them. Other impurities are chemically bonded to the water
molecules, and cannot be filtered out, these are called dissolved solids.
Never allow the machine to operate without regular cleaning. The
machine will last longer if it is kept clean. Regular cleaning should
happen at least once per year, and preferably twice. Some water
conditions will dictate even more frequent cleaning of the ice making
section, and some carpets or pets will dictate more frequent cleaning
of the condenser.
Note: The Time to Clean light will switch ON after 6 months of use. It
will remain ON until the ice making system is cleaned using the process
in the “How to clean the condenser and winterize” section.
Noise
The ice machine is designed for quiet operation, but will make some
noise during the ice making cycle. During a freezing cycle, it is normal
to hear the fan moving air and the water pump circulating water. Ice
hitting the bin or ice in the bin can be heard during harvest. If ice
making noise is objectionable, an appliance grade timer can be added
to the power supply. Set the timer to turn the machine off at the time(s)
of day when the noise is most objectionable.
Ice cubes
Ice made by this machine will have a lower mineral content than the
water it was made from. This is due to the method of making ice. Purer
water will freeze first in the ice making molds. The reason for this is that
anything dissolved in water lowers the water’s freezing temperature. This
concentrates most of the impurities in the ice machine water reservoir
where they may form hard deposits known as scale. The machine dilutes
the concentration of minerals by over-filling the reservoir during the
harvest cycle (with the excess water flowing down the drain). s. Between
2 and 4 pints of water flow into the unit each cycle. Between 1 and 3.5
pints of that rinses the reservoir and goes down the drain.
Some impurities will inevitably remain, and will stick to the parts in the
machine, and will cause malformed ice cubes. Eventually, built up
mineral scale can shorten machine life.
To keep the machine operating properly, these impurities or minerals
will have to be regularly dissolved by an acid cleaning, using Ice
Machine Scale Remover. Directions for this may be found in the section
under care and cleaning.
Normal cubes are tapered cylinders. If the cubes are ragged and misshaped, mineral scale must be removed from the ice making system.
6
7
MAINTENANCE
CARE AND CLEANING
There are 5 things to keep clean:
1. The outside cabinet & door.
2. The ice storage bin.
3. The condenser.
4. The ice making system.
5. The ice scoop.
Condenser cleaning
The condenser is like the radiator on a car, it has fins and tubes that can
become clogged with dirt and lint.
To clean:
1. Remove the kickplate and front service panel.
2. Locate the condenser surface.
How to clean the cabinet
Wipe off any spills on the surface of the door and handle as they occur.
If anything spilled on the door or gasket dries onto the surface, wash
with soap and warm water to remove.
How to clean the ice storage bin
The ice storage bin should be sanitized occasionally. It is usually
convenient to sanitize the bin after the ice making system has been
cleaned, and the storage bin is empty.
Condenser
surface
A sanitizing solution can be made of 1 ounce of household bleach and
two gallons of hot (95° F. – 115° F.) water. Use a clean cloth and wipe
the interior of the ice storage bin with the sanitizing solution, pour
some of the solution down the drain. Allow to air dry.
3. Vacuum the surface, removing all dust and lint.
CAUTION
DO NOT dent the fins.
4. Return the kickplate and front service panel to their original
positions. Fasten them to the cabinet using the original screws.
Winterizing
1. Clean the ice making system.
2. Open the door and push and release the On/Off switch to turn the
machine off.
3. Turn off the water supply.
8
9
CARE AND CLEANING (cont.)
4. Drain the water reservoir by removing the rubber cap under the
reservoir - it's near the back wall of the ice storage bin.
CARE AND CLEANING (cont.)
4. Pour 8 ounces of Ice Machine Scale Remover into the ice machine
reservoir.
Pour scale
remover here
Rubber
cap
5. Disconnect the incoming water line at the inlet water valve.
6. Open the door, push and release the on/off switch to turn the
machine on.
7. Blow air through the inlet water valve; a tire pump could do the job.
8. Drain pump models should have about 1/2 gallon of RV antifreeze
(propylene glycol) poured into the ice storage bin drain.
Note: Automotive antifreeze must NOT be used.
9. Switch off and unplug the machine.
Removing scale from the ice making system
1. Scoop out all of the ice, either discard it or save it in an ice chest or
cooler.
2. Press and HOLD the On/off button in for 3 seconds until the Blue
light goes out.
5. Operate the machine for about ½ hour.
6. Push and release the On/Off switch. The Time to Clean light will
stop blinking and remain on. The machine will begin to flush out the
cleaning solution.
7. Operate the machine for another 1/2 hour.
8. Push and release the On/Off switch. The machine will stop the
cleaning process.
9. Pour a gallon of hot (95°F. – 115°F.) water into the bin to flush out
the drain.
10. Clean the bin liner of mineral scale by mixing some ice machine
scale remover and hot water, and using that solution to scrub the
scale off of the liner.
11. Rinse the liner with hot water.
12. Sanitize the bin interior.
13. Replace the ice removed in step 1.
14. Push and release the On/Off button to restart ice making.
The ice scoop should be washed regularly, wash it just like any other
food container.
3. Press and HOLD the both the Clean-Reset and On/Off buttons for 5
seconds. The Time to Clean light will blink on and off.
10
11
TROUBLESHOOTING GUIDE
FGIM/FPIM UNDERCOUNTER/FREESTANDING ICE MACHINE WARRANTY
PROBLEM
CORRECTION
Ice cubes are incompletely
formed
• Clean the ice making system.
Low capacity
• Check for restricted drain or standing
water in the bin.
• Clean the air cooled condenser fins.
No ice
“Time to Clean” light is on
• Check On/Off switch.
• Check electrical breaker.
• If the “Check Water” light is flashing
blue, check water supply. The control
system checks for water every 20
minutes. When the water supply is
restored, the machine will
automatically restart ice making.
• Clean the ice making system
TWO YEAR FULL WARRANTY
Undercounter/freestanding ice machines and all of their components and accessories, except as detailed below*, are
warranted to be free from defects in material or workmanship under normal household use for a period of two (2) years
from the date of original retail purchase. Viking Range Corporation, warrantor, agrees to repair or replace, at its option,
any part which fails or is found to be defective during the warranty period
*Painted and decorative items are warranted to be free from defective materials or workmanship for a period of ninety
(90) days from the date of original retail purchase. ANY DEFECTS MUST BE REPORTED TO THE SELLING DEALER
WITHIN NINETY (90) DAYS FROM DATE OF ORIGINAL RETAIL PURCHASE.
SIX YEAR FULL WARRANTY
Any sealed refrigeration system component, as listed below, is warranted to be free from defective materials or
workmanship in normal household use during the third through the sixth year from the date of original retail purchase.
Viking Range Corporation, warrantor, agrees to repair or replace, at its option, any part which fails or is found to be
defective during the warranty period.
Sealed Refrigeration System Components: Compressor, Evaporator, Condenser, Connecting Tubing, Dryer/Strainer
TWELVE YEAR LIMITED WARRANTY
Any sealed refrigeration system component, as listed above, which fails due to defective materials or workmanship in
normal household use during the seventh through the twelfth year from the date of original retail purchase will be
repaired or replaced, free of charge for the part itself, with the owner paying all other costs, including labor.
NINETY (90) DAY RESIDENTIAL PLUS WARRANTY This warranty applies to applications where use of the product
extends beyond normal residential use. Examples are, but not limited to, bed and breakfasts, fire stations, private
clubs, churches, etc. This warranty excludes all commercial locations such as restaurants, food service locations and
institutional food service locations.
This warranty extends to the original purchaser of the product warranted hereunder and to each transferee owner of
the product during the term of the warranty.
This warranty shall apply to products purchased and located in the United States and Canada. Products must be
purchased in the country where service is requested. Warranty labor shall be performed by an authorized Viking Range
Corporation service agency or representative. Warranty shall not apply to damage resulting from abuse, accident,
natural disaster, loss of electrical power to the product for any reason, alteration, improper installation, improper
operation or repair or service to the product by anyone other than an authorized Viking Range Corporation service
agency or representative. Warranty shall not apply to damage resulting from indoor units being used in outdoor
situations. This warranty does not apply to commercial usage. Warrantor is not responsible for consequential or
incidental damage whether arising out of breach of warranty, breach of contract, or otherwise. Some jurisdictions do
not allow the exclusion or limitation of incidental or consequential damages, so the above limitation or exclusion may
not apply to you.
Owner shall be responsible for proper installation, providing normal care and maintenance, providing proof of
purchase upon request, and making the appliance reasonably accessible for service. If the product or one of its
component parts contains a defect or malfunction during the warranty period, after a reasonable number of attempts
by the warrantor to remedy the defects or malfunctions, the owner is entitled to either a refund or replacement of the
product or its component part or parts. Replacement of a component part includes its free installation. Warrantor’s
liability on any claim of any kind, with respect to the goods or services covered hereunder, shall in no case exceed the
price of the goods or service or part there of which gives rise to the claim.
WARRANTY SERVICE: Under the terms of this warranty, service must be performed by a factory authorized Viking
Range Corporation service agent or representative. Service will be provided during normal business hours, and labor
performed at overtime or premium rates shall not be covered by this warranty. To obtain warranty service, contact the
dealer from whom the product was purchased, an authorized Viking Range Corporation service agent, or Viking Range
Corporation. Provide model and serial number and date of original purchase. For the name of your nearest authorized
Viking Range Corporation service agency, call the dealer from whom the product was purchased or Viking Range
Corporation. IMPORTANT: Retain proof of original purchase to establish warranty period.
The return of the Owner Registration Card is not a condition of warranty coverage. You, however, should return the
Owner Registration Card so that Viking Range Corporation can contact you should any question of safety arise which
could affect you.
Any implied warranties of merchantability and fitness applicable to the above described undercounter ice machine are
limited in duration to the period of coverage of the applicable express written limited warranties set forth above. Some
jurisdictions do not allow limitations on how long an implied warranty lasts, so the above limitation may not apply to
you. This warranty gives you specific rights, and you may also have other rights which may vary from jurisdiction to
jurisdiction.
12
13
Notes
Notes
_____________________________________________________________________________________________________
_____________________________________________________________________________________________________
_____________________________________________________________________________________________________
_____________________________________________________________________________________________________
_____________________________________________________________________________________________________
_____________________________________________________________________________________________________
_____________________________________________________________________________________________________
_____________________________________________________________________________________________________
_____________________________________________________________________________________________________
_____________________________________________________________________________________________________
_____________________________________________________________________________________________________
_____________________________________________________________________________________________________
_____________________________________________________________________________________________________
_____________________________________________________________________________________________________
_____________________________________________________________________________________________________
_____________________________________________________________________________________________________
_____________________________________________________________________________________________________
_____________________________________________________________________________________________________
_____________________________________________________________________________________________________
_____________________________________________________________________________________________________
_____________________________________________________________________________________________________
_____________________________________________________________________________________________________
_____________________________________________________________________________________________________
_____________________________________________________________________________________________________
_____________________________________________________________________________________________________
_____________________________________________________________________________________________________
_____________________________________________________________________________________________________
_____________________________________________________________________________________________________
_____________________________________________________________________________________________________
_____________________________________________________________________________________________________
_____________________________________________________________________________________________________
_____________________________________________________________________________________________________
_____________________________________________________________________________________________________
_____________________________________________________________________________________________________
_____________________________________________________________________________________________________
_____________________________________________________________________________________________________
14
15