1
Atlantis 200
TWO-WAY VHF MARINE RADIO
OWNER’S MANUAL
GUIDE D’UTILISATION
RADIO VHF MARITIME
Making a Distress Call
For future reference, write your boat’s name & call sign here:
Speak slowly - clearly - calmly.
1. Make sure your radio is on.
2. Press the 16/9-TRI button to switch to Channel 16 (156.8
MHz). (If the display does not show 16, press the 16/9-TRI
button again until it does.)
3. Press the Push to Talk button and say: “MAYDAY -MAYDAY -- MAYDAY.”
4. Say “THIS IS {name of your boat (three times) and call sign/
boat registration number (once)}.”
5. Repeat “MAYDAY {name of your boat}” once.
6. Tell where you are: (what navigational aids or landmarks are
near, or read the latitude and longitude from your GPS).
7. State the nature of your distress (e.g. sinking, medical
emergency, man overboard, on fire, adrift, etc.).
8. State the type of assistance you need (medical, towing,
pumps, etc.).
9. Give the number of persons aboard and describe the
condition of any injured persons.
10.Estimate present seaworthiness of your ship (e.g. how
immediate is the danger due to flooding or fire).
11.Briefly describe your ship, giving ship name (i.e., “Blue Duck
is 32 foot cabin cruiser, white hull, blue deck house”).
12.Say: “I WILL BE LISTENING ON CHANNEL 16.”
13.End the message by saying “THIS IS {name or call sign of
your boat}, OVER.”
14.Release the Push to Talk button and listen.
15.If you do not get an answer after 30 seconds, repeat your
call beginning at step 3 above.
Faire un appel de détresse
Pour toute référence ultérieure, transcrivez ci-dessous le nom et l’indicatif d’appel de
votre bateau:
Parlez lentement – clairement – calmement.
1. Vérifiez si votre radio est en marche.
2. Appuyez sur la touche 16/9-TRI du microphone afin de commuter
au canal 16 (156,8 MHz). (Si le canal 16 n’apparaît pas à
l’affichage, appuyez de nouveau sur la touche 16/9-TRI jusqu’à
ce qu’il soit affiché.)
3. Appuyez sur le bouton de microphone Push to Talk et
dites:“MAYDAY -- MAYDAY -- MAYDAY”.
4. Donnez l’identité de votre navire en disant : “ICI {nom de votre
bateau (trois fois) ou indicatif d’appel et le numéro d’identification
de votre bateau (une fois)}”.
5. Dites “MAYDAY {nom ou indicatif d’appel de votre bateau} une fois”.
6. Donnez votre position : (quels sont les points de repère ou
aides à la navigation près de vous ou lisez les coordonnées de
longitude et de latitude apparaissant sur votre dispositif GPS).
7. Révélez la nature de votre détresse (par exemple, nous
sommes en train de couler, urgence médicale, un homme à la
mer, un incendie, nous sommes à la dérive, etc.
8. Révélez la nature de l’aide désirée (médicale, remorquage, essence, etc.)
9. Donnez le nombre de personnes à bord et les conditions des
blessés, s’il y en a.
10. Donnez la condition de navigabilité actuelle de votre navire, tel que
le degré de l’urgence par rapport une inondation, et une incendie.
11. Donnez une brève description de votre navire en donnant le nom
du bateau (par exemple, “Blue Duck est un yacht de croisière de
32 pieds, avec une coque blanche et un rouffle bleu.).
12. Dites : “JE VAIS ÉCOUTER SUR LE CANAL 16”.
13. Terminez le message en disant “ICI {nom ou indicatif d’appel de
votre bateau}, À VOUS”.
14. Relâchez le bouton Push to Talk du microphone et écoutez.
15.Si vous n’obtenez pas de réponse après 30 secondes,
répétez l’appel encommençant à l’étape 3 ci-dessus.
Table of Contents
Introduction................................................................. 2
Features......................................................................................2
Included in Your Package.......................................... 3
Controls and Indicators............................................. 4
LCD Display................................................................................5
Getting Started............................................................ 6
Attaching the Antenna.................................................................6
Set Battery Type.........................................................................6
Install Batteries...........................................................................6
Charging Ni-MH Batteries...........................................................7
Battery Level Display..................................................................7
Attach and Remove Belt Clip......................................................8
Operation..................................................................... 9
Turn On and Set Squelch............................................................9
Selecting a Channel..................................................................10
Change Channel Mode.............................................................10
Transmitting and Receiving.......................................................10
One-touch Channel 16/9...........................................................11
Triple Watch..............................................................................11
Monitoring Weather Channels..................................................11
Emergency/Weather Alert.........................................................12
USA, International and Canadian Channels.............................12
Programming a Channel into Memory......................................13
Deleting a Channel from Memory.............................................13
Scanning...................................................................................13
Transmit....................................................................................14
Turn On Keypad and Display Light...........................................14
Enable or Disable Key Beep.....................................................15
Key Lock...................................................................................15
Maintenance & Troubleshooting...............................................15
Common Questions..................................................................16
Specifications............................................................................16
Marine Channels....................................................... 18
United States Channels............................................................18
Canada Channels.....................................................................19
International Channels..............................................................22
Weather Channels....................................................................24
RBRC Information.....................................................................24
Maritime Radio Services Operation..........................................24
Basic Radio Guidelines.............................................................25
FCC/Industry Canada Information............................................25
FCC RF Exposure Information..................................................26
RF Exposure Information..........................................................26
Body-worn Operation................................................................27
Three Year Limited Warranty....................................................27
Introduction
The Atlantis 200 is a waterproof, portable two-way VHF transceiver.
It is compact, lightweight, rugged and fits easily in your hand. This
marine radio will give you consistent, outstanding performance in
virtually all conditions and situations.
Your radio has many important and valuable features. To ensure
that you get the most from these features, please read this operating
guide carefully before using the unit.
Features
•
•
•
•
•
•
•
•
•
•
•
•
•
•
•
•
•
•
E-2
Triple Watch Mode
Priority Channel Startup (Channel 16)
Programmable Memory
One-Touch Channel 16/9
10 Weather Channels
Weather Alert
Memory Scan
USA, International, and Canadian Channels
Operates from 6 rechargeable Ni-MH
AAA batteries (included)
Optionally operates from 6 AAA
alkaline batteries (not included)
Battery Save Operation
Battery Level Indicator and Battery Low Alert —
sounds every 5 seconds at Level 0 (flashing)
Key Lock
Backlit Keys and Display
Belt Clip
Wrist Strap
TX Power LO: 1 W or HIGH: 3.5 W
Optional external Speaker and Mic usable
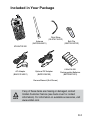
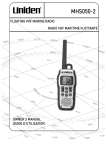
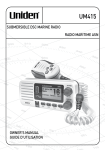
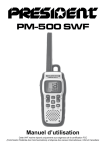
Included in Your Package
PWR
H/L
ATLANTIS 200
AC Adapter
(BADG1194001)
Antenna
(BATG0565001)
Wrist Strap
(RLET4C1661Z)
Optional DC Adapter
(BWZG189100)
Belt Clip
(GBCT4E3473Z)
6 AAA Ni-MH
Rechargeable Batteries
(BBTG0873001)
Owners Manual (Not Shown)
NOTE
If any of these items are missing or damaged, contact
Uniden Customer Service (see back cover for contact
information). For information on available accessories, visit
www.uniden.com.
E-3
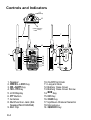
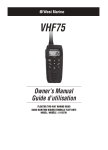
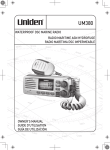
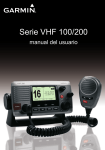
Controls and Indicators
9
(seebelow)
10
8
(underprotective
rubbercover)
7
7
10
11
10
6
9
8 5
4
3
2
PWR H/L
1
1. Speaker
2. PWR H/L - LOCK Key
3. WX - ALERT Key
4. 16/9 - TRI Key
5. LCD Display
6. PTT Button
7. Antenna
8. Multifunction Jack (Ext.
Speaker/Mic/CHARGE)
9. Belt Clip
E-4
14
15
16
17
18
19
9
12
13
10. On/Off/Vol Knob
11. Lanyard Hole
12. Battery Case Cover
13. Battery Case Cover Screw
14. MEM Key
15. UIC Key
16. SCAN Key
17. Up/Down Channel Selector
18. Microphone
19. SQUELCH Key
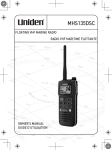
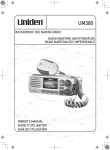
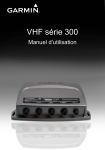
LCD Display
B C
D E FG H
I
A
O
J
K LM
N
A.
B.
C.
D.
Battery Level Indicator Icons
Memory (MEM) Indicator
Transmit (TX) Indicator
United States (US) Channel Indicator
E. LO (1 W) Power Indicator
F. International (INT) Channel Indicator
G. HIGH (3.5 W) Power Indicator
H. Canada (CAN) Channel Indicator
I. Channel Number Display
J. Triple Watch (TRIPLE) Indicator
K. Weather (WX) Mode Indicator
L. Weather Alert (WX ALERT) Indicator
M. Key Lock (LOCK) Indicator
N. Scan Indicator
O. Channel A Indicator
E-5
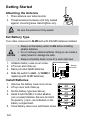
Getting Started
Attaching the Antenna
1. Place antenna over antenna stub.
2. Thread antenna clockwise until fully seated
against mounting base. Hand tighten only.
NOTE
Be sure the antenna is firmly seated.
Set Battery Type
Your radio comes set to Ni-MH and with 6 Ni-MH batteries installed.
CAUTION
1.
2.
3.
4.
• Always set the battery switch to Alk. before installing
alkaline batteries.
• Do not recharge alkaline batteries. Doing so can create a
safety hazard or damage the radio.
• Always completely fasten screw for a water tight seal.
Unfasten battery case cover screw.
Lift cover and rotate up.
Remove 6 AAA Ni-MH batteries.
Slide the switch to ALK. (or Ni-MH if
replacing with Ni-MH batteries).
Battery
Switch
AAA
AAA
AAA
AAA
Alk. Ni-MH
AAA
AAA
Install Batteries
1.
2.
3.
4.
Unscrew the battery case cover screw.
Lift up cover and rotate up.
Set the battery type (see above).
Install 6 AAA Ni-MH or 6 AAA alkaline
(not included) batteries. Be sure to match
the polarity (+ and -) as indicated on the
battery compartment.
5. Close battery case cover and fasten screw.
E-6
AAA
AAA
AAA
AAA
AAA
AAA
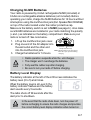
Charging Ni-MH Batteries
Your radio is powered by 6 AAA rechargeable Ni-MH (included) or
6 AAA non-rechargeable alkaline batteries (not included). Before
operating your radio, charge the Ni-MH batteries for 14 hours without
interruption using the multifunction jack (Ext. Speaker/Mic/CHARGE)
on top of the radio located under the rubber protective cap.
Make sure the battery switch is set to Ni-MH (see page 6 ). Also make
sure Ni-MH batteries are installed in your radio matching the polarity
(+ and -) as indicated on the battery compartment. Make sure your
radio is turned off. See note below.
1. Lift up the multifunction jack cover.
2. Plug one end of the AC adapter into
the wall outlet and the other end
into the multifunction jack.
3. Charge the batteries for 14 hours.
NOTE
•
•
•
•
Lift Up Protective Cap
Note: Waterproofing is not guaranteed
when the cap is open and during
charging.
Radio operation suspends while the unit charges.
The charger won’t overcharge the batteries.
Fully seat the rubber cap after charging.
Be sure to turn your radio off before charging.
Battery Level Display
The battery indicator at the left of the LCD screen indicates the
battery level (0 to 5) at all times.
HIGH
US
When the battery level is at Level 0, the
battery indicator flashes and the battery
alert sounds every 5 seconds.
The radio shuts off 60 seconds after the
alert prior to shutdown.
NOTE
In the event that the radio shuts down, turn the power off
before recharging to ensure the radio charges and provides
the correct battery level display indication when turned on.
E-7
Battery
Level
Icon
LEVEL 5
100% Full
US
LEVEL 3
Battery
Approx.50%
Capacity
US
LEVEL 1
Low Battery
(10% or Less)
CAUTION
US
HIGH
HIGH
HIGH
Battery Level
LEVEL 4
Battery
Approx.70%
Capacity
LEVEL 2
Battery
Approx.20%
Capacity
LEVEL 0
Nearly Empty
(Flashing)
US
US
US
HIGH
HIGH
HIGH
• You can’t transmit if the Battery Indicator shows Level 0
when you press PTT.
TX LO HIGH
US
• As long as you press PTT, an error
tone sounds and TX and CH blink.
A
• It is possible to receive at Level 0, .
Attach and Remove Belt Clip
To attach:
1. Position belt clip above its
receptacle on the upper back
side of the radio.
2. Slide the belt clip down into its
receptacle until you hear it click.
The belt clip is firmly attached.
To remove:
1. Pull up on the locking tab.
2. Slide the belt clip up and out of
its receptacle.
E-8
Icon
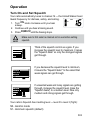
Operation
Turn On and Set Squelch
Your radio automatically tunes to channel 16 — the United States Coast
Guard frequency for distress, safety, and calling.
HIGH
1. Turn VOL knob clockwise until you hear
a beep.
2. Continue until you hear a hissing sound.
3. Press SQUELCH until the hissing stops.
NOTE
US
Make sure to first select a channel not in use before setting
squelch.
Think of the squelch control as a gate. If you
increase the squelch level to maximum, it raises
the “Squelch Gate” so only the strongest signals
get through.
If you decrease the squelch level to minimum,
it lowers the “Squelch Gate”’ to the extent that
weak signals can get through.
If unwanted weak and noisy signals are getting
through, increase the squelch level (raise the
“Squelch Gate”) to a medium level. Now only
medium and strong signals get through.
Your radio’s Squelch has 4 setting level — level 0 to level 3 (Tight):
S0 - monitor mode
S1 - minimum squelch (default)
E-9
S2 - medium squelch
S3 - maximum (tight) squelch
1. Press SQUELCH. S displays and the
current squelch level flashes.
2. Press SQUELCH while the squelch level
displays in order to change the squelch
level to the next level.
3. Press and hold SQUELCH to save and exit the squelch setting.
The unit beeps twice on exit.
Selecting a Channel
After turning on your radio, press or
scroll though the channels individually.
to
1. To select a higher channel, press ▲.
2. To select a lower channel, press the ▼.
Press and hold or for more than 1 second
to scroll rapidly through the channel numbers.
Refer to page 18 through page 23 for a list of the
available channels, corresponding frequencies,
and usage guidelines.
Change Channel Mode
HIGH
US
[UP ]
LO
US
[DOWN ]
HIGH
US
Press UIC to switch between USA, International,
and Canadian Channel modes.
Transmitting and Receiving
The radio uses U.S., Canadian, and International Marine Channels.
Refer to page 18 through page 24 for a list of the available channels and
corresponding frequencies. The radio’s maximum RF transmit power
is 3.5 W (HIGH).
1. Hold the radio with microphone approximately 2 inches in front
of your mouth with the antenna at approximately a 45° angle
away from your head.
2. Speak in a clear, normal conversational voice.
E-10
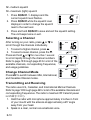
One-touch Channel 16/9
Monitoring
CH 20, press
16/9 to
monitor CH 16.
US
HIGH
Press 16/9
again to
monitor
CH 9.
US
HIGH
Press 16/9 again
to monitor the
original channel
(CH 20).
US
HIGH
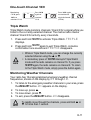
Triple Watch
Triple Watch mode monitors channels 16 and 9 for a signal while you
listen to the currently-selected channel. The marine radio checks
channel 16 and 9 for activity every 2 seconds.
1. Press and hold 16/9/TRI to activate Triple Watch. TRIPLE
displays.
2. Press and hold 16/9/TRI again to exit Triple Watch. A double
confirmation tone sounds and TRIPLE disappears.
NOTE
• While in Triple Watch mode, you can change the currently
selected channel using the ▲ or ▼.
• A momentary press of 16/9/TRI interrupts Triple Watch
mode and the radio remains on channel 16. If you press
16/9/TRI again, the radio remains on channel 9. To return
to the Triple Watch mode, simply press the button again.
Monitoring Weather Channels
Your radio has 10 preprogrammed emergency/weather channel
frequencies, shown on the display by 01 through 10.
1. To listen to the emergency/weather channels in your area, press
the WX/ALERT button. WX appears on the display.
2. To move up, press ▲.
3. To move down, press ▼.
4. To exit, press the WX/ALERT button. WX disappears.
NOTE
To rapidly move through the channels, press and hold ▲ or
▼ for more than 1 second.
E-11
Emergency/Weather Alert
Emergency/Weather Alert allows your radio to function as a severe
weather warning radio and will also alert you to any local or national
emergencies. If the NOAA issues a warning while this feature is turned
On, the radio sounds an alert tone. You will then hear the emergency/
weather broadcast.
1. To use Emergency/Weather Alert, select the emergency/weather
channel in your area.
2. Press and hold the WX/ALERT button
for 2 seconds. A double confirmation
tone sounds.
WX ALERT
3. When the unit receives a WX Alert
signal, it will sound a siren 3 times to
let the user know of a serious impending WX condition.
4. If the radio detects a 1050 Hz tone, the
radio’s WX channel will flash along
with WX and ALERT.
5. To turn off Emergency/Weather
WX ALERT
Alert, press and hold WX/ALERT for 2
seconds. A double confirmation tone sounds.
6. When Emergency/Weather Alert is activated, the highest priority
is given to this function. If the unit is in Scan, Triple Watch, or
any other mode or marine channels, it checks the weather alert
signals every 7 seconds and switches to the warning receive
mode automatically.
USA, International and Canadian Channels
When you first turn on your radio it sets to
United States (US) marine channels.
E-12
US
HIGH
1. To listen to International marine channels,
press the UIC button. INT
appears on the display. To listen to
Canadian marine channels,
press the UIC button again. CAN
appears on the display.
2. The radio will keep the last mode
setting that was selected when
turned back on.
3. For USA, International, and Canadian
marine channels and functions, refer to
the tables starting on page 18.
INT
HIGH
HIGH
CAN
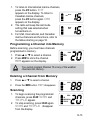
Programming a Channel into Memory
Before scanning, you must have channels
programmed in memory.
1. Press ▲ or ▼ to select a channel.
2. Press MEM to store the channel.
MEM appears on the display.
NOTE
US
MEM
HIGH
You cannot program Channel 70 or any of the weather
channels into memory.
Deleting a Channel from Memory
1.
Press ▲ or ▼ to select a channel.
2.
Press the MEM button. MEM disappears.
US
HIGH
Scanning
1. To begin scanning the programmed
channels, press SCAN. SCAN and
TRIPLE appear.
2. To stop scanning, press SCAN again.
SCAN and TRIPLE disappear
from the display.
HIGH
US
MEM SCAN
TRIPLE
E-13
• Scanning starts from the lowest to highest channel and stops
when it finds an active channel. It remains on that channel
until the transmission ends, then resumes scanning after a 2
second delay period.
NOTE
• When in the scan mode, the unit automatically activates
the Triple Watch feature. To deactivate Triple Watch from
the scanning mode, press and hold 16/9/TRI for 2 seconds.
TRIPLE disappears from the display.
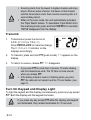
Transmit
1.
Transmission power can be set to
3.5 W (HIGH) or 1 W (LO).
Press PWR H/L-LOCK to make the change.
The HIGH or LO indicator on the
displays accordingly.
US
HIGH
2.
To transmit, press and hold PTT (push-to-talk). TX appears on the
display.
3.
To return to receive, release PTT. TX disappears.
• If you press PTT for more than 3 minutes, TX starts blinking
and the transmission ends. The TX time out tone sounds
when you release PTT.
NOTE
• If the battery indicator Level 0 is flashing when you press
PTT, the radio will not transmit and the TX icon flashes. (see
page 7).
Turn On Keypad and Display Light
To light the keypad and the display simultaneously, press any key except
PTT. Both the display and the keypad illuminate.
NOTE
E-14
If you press any key except PTT while the display and keypad
are illuminated, they remain illuminated for 10 seconds.
Enable or Disable Key Beep
Your radio beeps each time you press a key except PTT.
1. To enable key beep, turn the radio off and then on again while
pressing and holding the ▲ or ▼ buttons.
2. To disable key beep, turn the radio off and then on again while
pressing and holding the ▲ or ▼ buttons.
Key Lock
To prevent accidental entries, you can lock the keypad.
1. Press and hold LOCK for 2 seconds. A double confirmation tone
sounds. LOCK appears on the display.
2. To unlock, press and hold LOCK for 2 seconds again. A double
beep sounds and LOCK disappears.
NOTE
The radio retains Key Lock status even when you cycle
power on/off. To unlock the keypad, press and hold LOCK
again for 2 seconds. LOCK disappears.
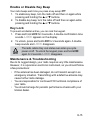
Maintenance & Troubleshooting
Due to its rugged design, your radio requires very little maintenance.
However, it is a precision electronic instrument, so you should follow
a few precautions:
xx If the antenna has been damaged, do not transmit except in an
emergency situation. Transmitting with a defective antenna may
cause further radio damage.
xx You are responsible for continued FCC technical compliance of
your radio.
xx You should arrange for periodic performance checks with your
Uniden dealer.
E-15
Common Questions
Problem
The radio won’t turn on.
The radio does not
charge.
The radio won’t transmit.
Things to Try
Charge the radio.
• Make sure the Battery Switch is in the
Ni-MH position (refer to page 6).
• Make sure you installed Ni-MH
batteries.
• Make sure the AC adapter is fully
connected to the multifunction jack.
• Replace the batteries.
• Make sure you are not in scan mode.
• Make sure you are not trying to transmit
on a receive-only channel (see the
channel lists starting on page 18 through
page 24.
• Check the battery power level; charge
the battery before trying to transmit.
• Make sure the duration of each
transmission is less than 3 minutes.
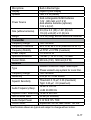
Specifications
General
Channels
Frequency Range
Frequency Control
Frequency Tolerance
Operational Temperature
Antenna
Antenna Impedance
E-16
All US/International/Canada marine
channels
10 Weather channels
156 ~ 164 MHz
PLL
Transmit: 1.5 PPM (at 77°F/25°C)
Receive: 1.5 PPM (at 77°F/25°C)
-4°F (-20°C) to +122°F(+50°C)
Flexible
50Ω
Microphone
Display
Speaker
Power Source
Size (without antenna)
Weight
Transmitter
Frequency Range
Frequency Tolerance
Frequency Stability
Power Output
Spurious Emissions
Current Drain
Receiver
Built-in Electret type
Liquid Crystal Display
16Ω, 0.2 W (Rated)
AAA rechargeable Ni-MH batteries
1.2V , 900 mAh x 6 (7.2 V)
AAA alkaline batteries (optional)
1.5V x 6 (9 V)
4.5 (H) x 2.5 (W) x 1.22 (D) inch
116 (H) x 63 (W) x 31 (D) mm
15.2 oz (430g) without antenna & batteries
156~158 MHz
±0.5 PPM; ±2.5 PPM (maximum at 25°C)
±3 PPM; ±10 PPM (maximum)
1.0 W & 3.5 W
-36 dBc ( 1 W or 3.5 W); -18 dBm
650 mA (1 W), 1200 mA (3.5 W)
Double Conversion Super Heterodyne
Phase Locked Loop system for Local Osc.
Frequency Range
156~164 MHz
Sensitivity
0.25 μV for 12 dB SINAD
Threshold: 0.15 μV; 0.30 (maximum)
Squelch Sensitivity
Tight: 0.35 μV; 2.0 (maximum)
+6 dB @ 500 Hz
Audio Frequency Resp.
-6 dB @ 2000 Hz
Adjacent Chan. Selectivity 79 dB @ ±25 kHz
Hum & Noise Ratio
53 dB (35 minutes)
Audio Output Power
0.16 W @10% THD
Current Drain
Squelched: 45 mA; Max. Audio: 160 mA
Type
Specifications shown are typical and subject to change without notice.
E-17
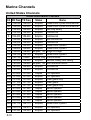
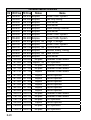
Marine Channels
United States Channels
Ch
1A
5A
6
7A
8
9
10
11
12
13
14
15
16
17
18A
19A
20
20A
21A
22A
23A
24
25
26
27
28
63A
65A
66A
E-18
RX Freq
156.050
156.250
156.300
156.350
156.400
156.450
156.500
156.550
156.600
156.650
156.700
156.750
156.800
156.850
156.900
156.950
161.600
157.000
157.050
157.100
157.150
161.800
161.850
161.900
161.950
162.000
156.175
156.275
156.325
United States Marine Channels
TX Freq
Status
Name
156.050
Simplex Vessel traffic system/commercial
156.250
Simplex Vessel traffic system/commercial
156.300
Simplex Inter-ship safety
156.350
Simplex Commercial
156.400
Simplex Commercial
156.450
Simplex Non commercial
156.500
Simplex Commercial
156.550
Simplex Vessel traffic system
156.600
Simplex Vessel traffic system
156.650 Simplex, 1W Bridge to bridge
156.700
Simplex Vessel traffic system
Inhibit Receive only Environmental
156.800
Simplex Distress, safety, and calling
156.850 Simplex, 1W Govt maritime control
156.900
Simplex Commercial
156.950
Simplex Commercial
157.000
Duplex Port operation
157.000
Simplex Port operation
157.050
Simplex Coast guard only
157.100
Simplex Coast guard
157.150
Simplex Coast guard only
157.200
Duplex Marine operator
157.250
Duplex Marine operator
157.300
Duplex Marine operator
157.350
Duplex Marine operator
157.400
Duplex Marine operator
156.175
Simplex Vessel traffic system
156.275
Simplex Port operation
156.325
Simplex Port operation
Ch
67
68
69
70
71
72
73
74
75
76
77
78A
79A
80A
81A
82A
83A
84
85
86
87
88
RX Freq
156.375
156.425
156.475
156.525
156.575
156.625
156.675
156.725
156.775
156.825
156.875
156.925
156.975
157.025
157.075
157.125
157.175
161.825
161.875
161.925
157.375
157.425
United States Marine Channels
TX Freq
Status
Name
156.375 Simplex, 1W Bridge To Bridge
156.425
Simplex Non Commercial
156.475
Simplex Non Commercial
Inhibit Receive only Digital Selective Calling
156.575
Simplex Non Commercial
156.625
Simplex Non Commercial (Ship-Ship)
156.675
Simplex Port Operation
156.725
Simplex Port Operation
156.775 Simplex, 1W Port Operation
156.825 Simplex, 1W Port Operation
156.875 Simplex, 1W Port Operation (Ship-Ship)
156.925
Simplex Non Commercial
156.975
Simplex Commercial
157.025
Simplex Commercial
157.075
Simplex Coast Guard
157.125
Simplex Coast Guard
157.175
Simplex Government
157.225
Duplex Marine Operator
157.275
Duplex Marine Operator
157.325
Duplex Marine Operator
157.375
Simplex Marine Operator
157.425
Simplex Commercial (Ship-Ship)
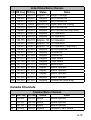
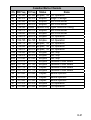
Canada Channels
Ch
1
2
3
4A
RX Freq
160.650
160.700
160.750
156.200
Canadian Marine Channels
TX Freq Status
Name
156.050 Duplex
Marine Operator
156.100 Duplex
Marine Operator
156.150 Duplex
Marine Operator
156.200 Simplex
Canadian Coast Guard
E-19
Ch
5A
6
7A
8
9
10
11
12
13
14
15
16
17
18A
19A
20
21A
22A
23
24
25
26
27
28
60
61A
62A
63A
64
64A
65A
E-20
RX Freq
156.250
156.300
156.350
156.400
156.450
156.500
156.550
156.600
156.650
156.700
156.750
156.800
156.850
156.900
156.950
161.600
157.050
157.100
161.750
161.800
161.850
161.900
161.950
162.000
160.625
156.075
156.125
156.175
160.825
156.225
156.275
Canadian Marine Channels
TX Freq Status
Name
156.250 Simplex
Vessel Traffic System
156.300 Simplex
Inter-Ship Safety
156.350 Simplex
Commercial
156.400 Simplex
Commercial
156.450 Simplex
Boater Calling Channel
156.500 Simplex
Commercial
156.550 Simplex
Vessel Traffic System
156.600 Simplex
Vessel Traffic System
156.650 Simplex, 1W Bridge To Bridge
156.700 Simplex
Vessel Traffic System
156.750 Simplex, 1W Environmental
156.800 Simplex
Distress, safety, calling
156.850 Simplex, 1W State Control
156.900 Simplex
Commercial
156.950 Simplex Canadian Coast Guard
157.000 Duplex, 1W Port Operation
157.050 Simplex Canadian Coast Guard
157.100 Simplex Canadian Coast Guard
157.150
Duplex Canadian Coast Guard
157.200
Duplex Marine Operator
157.250
Duplex Marine Operator
157.300
Duplex Marine Operator
157.350
Duplex Marine Operator
157.400
Duplex Marine Operator
156.025
Duplex Marine Operator
156.075 Simplex Canadian Coast Guard
156.125 Simplex Canadian Coast Guard
156.175 Simplex Port Operation
156.225
Duplex Marine Operator
156.225 Simplex Port Operation
156.275 Simplex Port Operation
Ch
66A
67
68
69
70
71
72
73
74
75
76
77
78A
79A
80A
81A
82A
83
83A
84
85
86
87
88
RX Freq
156.325
156.375
156.425
156.475
156.525
156.575
156.625
156.675
156.725
156.775
156.825
156.875
156.925
156.975
157.025
157.075
157.125
161.775
157.175
161.825
161.875
161.925
157.375
157.425
Canadian Marine Channels
TX Freq Status
Name
156.325 Simplex, 1W Port Operation
156.375 Simplex Bridge To Bridge
156.425 Simplex Non Commercial
156.475 Simplex Non Commercial
Inhibit Receive only Digital Selective Calling
156.575 Simplex Non Commercial
156.625 Simplex Non Commercial
156.675 Simplex Port Operation
156.725 Simplex Port Operation
156.775 Simplex, 1W Port Operation
156.825 Simplex, 1W Port Operation
156.875 Simplex, 1W Port Operation
156.925 Simplex Inter Ship
156.975 Simplex Inter Ship
157.025 Simplex Inter Ship
157.075 Simplex Canadian Coast Guard
157.125 Simplex Canadian Coast Guard
157.175
Duplex Canadian Coast Guard
157.175 Simplex Canadian Coast Guard
157.225
Duplex Marine Operator
157.275
Duplex Marine Operator
157.325
Duplex Marine Operator
157.375 Simplex Port Operation
157.425 Simplex Port Operation
E-21
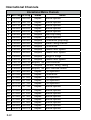
International Channels
Ch
1
2
3
4
5
6
7
8
9
10
11
12
13
14
15
16
17
18
19
20
21
22
23
24
25
26
27
28
60
61
E-22
RX Freq
160.650
160.700
160.750
160.800
160.850
156.300
160.950
156.400
156.450
156.500
156.550
156.600
156.650
156.700
156.750
156.800
156.850
161.500
161.550
161.600
161.650
161.700
161.750
161.800
161.850
161.900
161.950
162.000
160.625
160.675
International Marine Channels
TX Freq
Status
Name
156.050
Duplex Marine operator
156.100
Duplex Marine operator
156.150
Duplex Marine operator
156.200
Duplex Marine operator
156.250
Duplex Marine operator
156.300 Simplex Inter-ship safety
156.350
Duplex Marine operator
156.400 Simplex Commercial (ship-ship)
156.450 Simplex Boater calling channel
156.500 Simplex Commercial
156.550 Simplex Vessel traffic system
156.600 Simplex Vessel traffic system
156.650 Simplex Bridge to bridge
156.700 Simplex Vessel traffic system
156.750 Simplex, 1W Environmental
156.800 Simplex Distress, safety, calling
156.850 Simplex, 1W Govt maritime control
156.900
Duplex Port operation
156.950
Duplex Commercial
157.000
Duplex Port operation
157.050
Duplex Port operation
157.100
Duplex Port operation
157.150
Duplex Marine operator
157.200
Duplex Marine operator
157.250
Duplex Marine operator
157.300
Duplex Marine operator
157.350
Duplex Marine operator
157.400
Duplex Marine operator
156.025
Duplex Marine operator
156.075
Duplex Marine operator
Ch
62
63
64
65
66
67
68
69
70
71
72
73
74
75
76
77
78
79
80
81
82
83
84
85
86
87
88
RX Freq
160.725
160.775
160.825
160.875
160.925
156.375
156.425
156.475
156.525
156.575
156.625
156.675
156.725
156.775
156.825
156.875
161.525
161.575
161.625
161.675
161.725
161.775
161.825
161.875
161.925
157.375
157.425
International Marine Channels
TX Freq
Status
Name
156.125
Duplex Marine operator
156.175
Duplex Marine operator
156.225
Duplex Marine operator
156.275
Duplex Marine operator
156.325
Duplex Marine operator
156.375 Simplex Bridge to bridge
156.425 Simplex Non commercial
156.475 Simplex Non commercial
Inhibit Receive only Digital Selective Calling
156.575 Simplex Non commercial
156.625 Simplex Non commercial
156.675 Simplex Port operation
156.725 Simplex Port operation
156.775 Simplex, 1W Port operation
156.825 Simplex, 1W Port operation
156.875 Simplex Port operation (ship-ship)
156.925
Duplex Port operation
156.975
Duplex Port operation
157.025
Duplex Port operation
157.075
Duplex Port operation
157.125
Duplex Port operation
157.175
Duplex Port operation
157.225
Duplex Marine operator
157.275
Duplex Marine operator
157.325
Duplex Marine operator
157.375 Simplex Marine operator
157.425 Simplex Marine operator
E-23
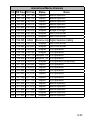
Weather Channels
Weather Channels
Channel RX Frequency (MHz) TX Frequency (MHz)
No.
1
RX ONLY
162.55
2
RX ONLY
162.4
3
RX ONLY
162.475
4
RX ONLY
162.425
5
RX ONLY
162.45
6
RX ONLY
162.5
7
RX ONLY
162.525
8
RX ONLY
161.65
9
RX ONLY
161.775
10
RX ONLY
163.275
Regulations and Safety Warnings
WARNING! Read this information before using the radio.
RBRC Information
As part of our commitment to protect the environment and
conserve natural resources, Uniden voluntarily
participates in an RBRC® industry program to
collect and recycle used Ni-MH batteries within
the US.
Please call 1-800-8-BATTERY for information on
Ni-MH battery recycling in your area. (RBRC®
is a registered trademark of the Rechargeable Battery Recycling
Corporation.)
Maritime Radio Services Operation
Warning! This transmitter will operate on channels/frequencies that
have restricted use in the United States. The channel assignments
include frequencies assigned for exclusive use of the U.S. Coast
E-24
Guard, use in Canada, and use in international waters. Operation on
these frequencies without proper authorization is strictly forbidden.
See page 18 through page 24 for tables of the available channels and
their uses. If you are still not certain which channels to use, see the
FCC maritime radio page at the FCC website
(http://wireless.fcc.gov/marine/) or contact the FCC Call Center
at 1-888-CALL-FCC. For individuals requiring a license, such as
commercial users, you should obtain a license application from
your nearest FCC field office (for US users) or Industry Canada (for
Canadian users).
Basic Radio Guidelines
You should familiarize yourself with the rules on marine radios and
be aware of which rules apply to your boat. Complete guidelines for
all ship and marine radio types can be found at the US Coast Guard
website under the topic Radio Info for Boaters (the direct link is:
http://www.navcen.uscg.gov/marcomms/boater.htm). Here
are a few guidelines that affect nearly all boaters:
xx If you have a VHF radio on your boat, you must maintain a watch
on channel 16 (156.800 MHz) whenever the radio is not being
used to communicate. Starting in 2004, if a radio is carried,
it must be on and set to channel 16 whenever your boat is
underway.
xx If you hear a distress call, wait a few minutes to let a shore
station or Coast Guard vessel respond. If no other station has
responded after 5 minutes, you must respond to the distress call.
xx Do not make false mayday or distress calls as a prank or to test
your radio. (This is essentially like making a false 9-1-1 call; you
may be subject to fines.)
FCC/Industry Canada Information
xx
xx
xx
xx
Certification: FCC Part 80 or RSS-182
Output Power: 3.5W
Emission: 16K0F3E
Transmitter Frequency Range: 156.025-157.425 MHz
E-25
This device complies with Part 15 of the FCC Rules. Operation is
subject to the condition that this device does not cause harmful
interference.
Unauthorized changes or modifications to this equipment may void
compliance with the FCC Rules. Any change or modification must
be approved in writing by Uniden. Changes or modifications not
approved by Uniden could void the user’s authority to operate the
equipment.
FCC RF Exposure Information
In August 1996 the Federal Communications Commission (FCC)
of the United States with its action in Report and Order FCC 96326 adopted an updated safety standard for human exposure to
radio frequency electromagnetic energy emitted by FCC regulated
transmitters. Those guidelines are consistent with the safety
standard previously set by both U.S. and international standards
bodies. The design of the radio complies with the FCC guidelines
and these international standards.
Never allow children to operate the radio without adult supervision
and the knowledge of the following guidelines.
WARNING! It is up to the user to properly operate this radio
transmitter to insure safe operation. Please adhere to the following:
xx Use only the supplied or an approved antenna. Unauthorized
antennas, modifications, or attachments could impair call quality,
damage the radio, or violate FCC regulations.
xx Do not use the radio with a damaged antenna. If a damaged
antenna comes into contact with the skin, a minor burn may
result. Please contact your local dealer for a replacement
antenna.
RF Exposure Information
For hand-held operation, the radio should be held 1 inch from
the user’s face. The use of accessories that do not satisfy these
requirements may not comply with FCC RF exposure requirements
and should be avoided. For more information about RF exposure,
E-26
please visit the FCC website at www.fcc.gov.
Avoid exposing the batteries (whether attached to the radio or not)
to direct sunlight, heated cars, or temperatures below -4°F (-20°C)
or above +140°F (+60°C). Exposing the chemical contained within
the batteries to temperatures above +140°F (+60°C) may cause the
battery to rupture, fail, or reduce performance. In case of exposure
to the cell contents, wash the affected area thoroughly, and seek
medical attention.
Body-worn Operation
This device was evaluated for body-worn operations with the
supplied belt-clip accessory. (All necessary accessories are
included in the package; any additional or optional accessories
are not required for compliance with the guidelines.) Third party
accessories (unless approved by the manufacturer) should
be avoided as these might not comply with FCC RF exposure
guidelines.
For more information about RF exposure, please visit the FCC web
site at www.fcc.gov.
Three Year Limited Warranty
WARRANTOR: UNIDEN AMERICA CORP. (“Uniden”)
ELEMENTS OF WARRANTY: Uniden warrants, for three years, to the
original retail owner, this Uniden Product to be free from defects in
materials and craftsmanship with only the limitations or exclusions
set out below.
WARRANTY DURATION: This warranty to the original user shall
terminate and be of no further effect 36 months after the date
of original retail sale. The warranty is invalid if the Product is
(A) damaged or not maintained as reasonable or necessary,
(B) modified, altered, or used as part of any conversion kits,
subassemblies, or any configurations not sold by Uniden, (C)
improperly installed, (D) serviced or repaired by someone other
than an authorized Uniden service center for a defect or malfunction
covered by this warranty, (E) used in any conjunction with equipment
E-27
or parts or as part of any system not manufactured by Uniden, or
(F) installed or programmed by anyone other than as detailed by the
Operating Guide for this product.
STATEMENT OF REMEDY: In the event that the product does not
conform to this warranty at any time while this warranty is in effect,
warrantor will repair the defect and return it to you without charge
for parts, service, or any other cost (except shipping and handling)
incurred by warrantor or its representatives in connection with the
performance of this warranty. THE LIMITED WARRANTY SET FORTH
ABOVE IS THE SOLE AND ENTIRE WARRANTY PERTAINING TO
THE PRODUCT AND IS IN LIEU OF AND EXCLUDES ALL OTHER
WARRANTIES OF ANY NATURE WHATSOEVER, WHETHER
EXPRESS, IMPLIED OR ARISING BY OPERATION OF LAW,
INCLUDING, BUT NOT LIMITED TO ANY IMPLIED WARRANTIES
OF MERCHANTABILITY OR FITNESS FOR A PARTICULAR
PURPOSE. THIS WARRANTY DOES NOT COVER OR PROVIDE
FOR THE REIMBURSEMENT OR PAYMENT OF INCIDENTAL OR
CONSEQUENTIAL DAMAGES. Some states do not allow this
exclusion or limitation of incidental or consequential damages so the
above limitation or exclusion may not apply to you.
LEGAL REMEDIES: This warranty gives you specific legal rights, and
you may also have other rights which vary from state to state. This
warranty is void outside the United States of America.
PROCEDURE FOR OBTAINING PERFORMANCE OF WARRANTY:
If, after following the instructions in this Operating Guide you are
certain that the Product is defective, pack the Product carefully
(preferably in its original packaging). Include evidence of original
purchase and a note describing the defect that has caused you to
return it. The Product should be shipped freight prepaid, by traceable
means, or delivered, to warrantor at:
Uniden America Corporation
Parts and Service Division
4700 Amon Carter Boulevard
Fort Worth, TX, 76155
(800) 554-3988
E-28