1
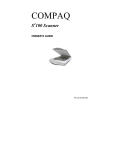
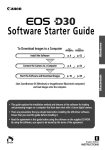
AstraNET e3420 &
AstraNET e3470
Color Scanner
Quick Start Guide
UMAX Data Systems, Inc.
The Quick Start Guide is divided into three parts: Part 1 – UMAX scanner CD and software
installation, Part 2 – hardware installation and Part 3 – how to scan your first image. Please
follow the steps listed in this guide to install your scanner.
Le guide d’introduction est divisé en trois parties : Partie 1 – installation des programmes du
CD du scanner UMAX, Partie 2 – installation du matériel et Partie 3 – comment scanner
votre première image. Veuillez suivre les étapes listées dans ce guide pour installer votre
scanner.
Esta guía de comienzo rápido se divide en tres partes: Parte 1: Instalación del CD del escáner
UMAX; Parte 2: Instalación del hardware; Parte 3: Cómo digitalizar la primera imagen. Siga
los pasos indicados en esta guía para instalar el escáner.
!! READ ME FIRST !!
The Power Saving button on the front of scanner allows you to turn off the scanner lamp when
the scanner is not in use, in order to reduce power consumption. However, the Power Saving
button cannot shut down the power of the scanner. The Power Saving button works together
with the UMAX VistaAccess program. If you follow the quick start guide to install the UMAX
scanner CD and reboot the computer, UMAX VistaAccess will be running automatically.
!! LISEZ-MOI !!
Le bouton d’économie d’énergie du scanner permet d’éteindre la lampe du scanner quand le
scanner n’est pas utilisé, afin de réduire la consommation d’énergie. Cependant, le bouton
d’économie d’énergie ne peut pasd être utilisé pour éteindre le scanner. Le bouton d’économie
d’énergie fonctionne en commun avec le programme UMAX VistaAccess. Si vous suivez le
guide de référence pour installer le CD UMAX et
l’ordinateur, UMAX VistaAccess
automatiquement.
!! LÉAME PRIMERO !!
El botón Power Saving de la parte frontal del escáner le permite desactivar la lámpara del
escáner cuando éste no está en uso, a fin de reducir el consumo de energía. No obstante, el
botón Power Saving no sirve para apagar el escáner. El botón Power Saving funciona en
conjunción con el programa UMAX VistaAccess. Si sigue la guía rápida para instalar el CD
del escáner UMAX y reiniciar el equipo, UMAX VistaAccess se ejecutará automáticamente.
Although UMAX scanners support Plug & Play, we suggest you install the programs on the UMAX CD and
bundled software before proceeding with the hardware installation. This will allow your scanner installation to run
more efficiently.
Bien que le scanner supporte la fonction Plug & Play, nous vous conseillons d’installer les programmes sur le CD
UMAX avant de procéder avec l’installation du matériel pour compléter plus rapidement l’installation.
Aunque el escáner es compatible con la función Plug & Play (Conectar y listo), recomendamos instalar los
programas incluidos en el CD UMAX antes de pasar a la instalación del hardware a fin de poder realizar la
PART 1
UMAX Scanner CD Installation Guide
PARTIE 1 Installation des programmes du CD
Parte 1
Instalación del CD del escáner UMAX
1
A
2
B
Insert the UMAX scanner CD into your CD-ROM drive. The installation program should
start automatically. The installation program detects the language used on your system and
selects it as the language to be installed. Please press the “Next” button and go to the next
step.
Note : If the installation program doesn’t start automatically, select
StartèProgramsèWindows Explorer and then double-click on the VistaScan icon (your
CD-ROM drive)èSetup icon (as shown in picture B).
Insérez le CD UMAX dans votre lecteur CD-ROM. Le programme d’installation devrait
démarrer automatiquement. Le programme d’installation détecte le langage utilisé sur votre
système comme langage à utiliser pour l’installation. Veuillez cliquer sur le bouton
Suivant » pour passer à l’étape suivante.
Note : Si le programme d’installation ne démarre pas automatiquement, sélectionnez
èProgrammesèWindows Explorer et cliquez deux fois sur l’icône de VistaScan
(votre lecteur CD-ROM)èl’icône Setup (voir l’image B).
Inserte el CD del escáner UMAX en la unidad de CD-ROM. El programa de instalación debe
comenzar automáticamente. El programa detectará el idioma utilizado por el sistema y lo
utilizará durante la instalación. Presione el botón “Next” y continúe con el siguiente paso.
Nota: Si el programa de instalación no se inicia automáticamente, seleccione Inicio è
Programas è Explorador de Windows y haga doble clic en el icono VistaScan (la unidad de
CD-ROM) è y a continuación haga clic en el icono Setup (tal como se muestra en la Figura
B).
The installation program will
automatically install the VistaScan
TWAIN driver and other application
software bundled in the CD. It is
recommended to install all the software
bundled. Press “Next” to go to the next
step.
Le programme d’installation installera
le gestionnaire TWAIN de VistaScan et
les autres logiciels sur le CD
automatiquement. Il est recommandé
d’installer tous les logiciels fournis.
Cliquez sur « Suivant » pour passer à
l’étape suivante.
El programa de instalación instalará el
controlador TWAIN VistaScan y otras
aplicaciones que se incluyen en el CD
de manera automática. Se recomienda
instalar todas las aplicaciones incluidas.
Haga clic en “Next” para continuar con
el siguiente paso.
NewSoft Presto! PageManager Installation Guide
Installation de NewSoft Presto! PageManager
Guía de instalación de NewSoft Presto! PageManager
1
2
3
The “NewSoft PageManager” Setup
Window appears. Press “Next” to start
the installation of the “NewSoft
PageManager” program.
The “NewSoft license Agreement”
window appears. Please press “Yes” to go
to the next step.
The installation program will install
PageManager in the default path. Press
“Next” and go to the next step.
L’écran d’installation de « NewSoft
PageManager » apparaît. Cliquez sur
« Suivant » pour lancer l’installation du
NewSoft PageManager ».
L’écran « NewSoft license Agreement »
apparaît. Cliquez sur « Oui » pour passer
à l’étape suivante.
Le programme d’installation installera
PageManager dans le chemin par défaut.
Suivant » pour passer à
l’étape suivante.
Aparecerá la pantalla de instalación
“NewSoft PageManager”. Haga clic en
“Next” para comenzar la instalación del
Aparecerá la ventana “NewSoft license
El programa de instalación instalará
PageManager en la ruta predeterminada.
Haga clic en “Next” y continúe con el
siguiente paso.
4
5
6
NewSoft PageManager application
includes two parts:
PageManager – Image and document
managing software and Presto! Page
Type – Table editing software. Press
“Next” and go to the next step.
NewSoft PageManager inclut deux
composants :
PageManager – le logiciel de gestion
d’images et de documents et Page Type –
le logiciel d’édition de tables. Cliquez
Suivant » pour passer à l’étape
suivante.
0NewSoft PageManager tiene dos partes.
PageManager, la aplicación de gestión de
documentos e imágenes, y PageType, la
aplicación de edición de tablas. Haga clic
en “Next” y continúe con el siguiente paso.
The installation program creates a new
program group for PageManager in the
Start/Programs menu. Press “Next” to
copy the files from the CD and install
PageManager.
The installation of PageManager is
complete. The installation program will
remind you to restart your computer
before using the program.
Le programme d’installation crée un
nouveau groupe de programmes pour
PageManager dans le menu
Démarrer/Programmes. Cliquez sur
Suivant » pour copier les fichiers du
CD et installer PageManager.
L’installation de PageManager est
complétée. Le programme d’installation
vous invitera à relancer votre ordinateur
avant d’utiliser le programme.
El programa de instalación creará un
nuevo grupo de programas para
PageManager en el grupo Programas del
menú Inicio. Haga clic en “Siguiente”
para copiar los archivos desde el CD e
instalar PageManager.
La instalación de PageManager habrá
concluido. El programa de instalación le
indicará que debe reiniciar su PC antes
de poder usar el programa.
7
Select “ Register later” and continue to install other programs.
Register later » et continuez à installer les autres programmes.
Seleccione “Register later” y continúe con la instalación de otros programas.
NewSoft VistaShuttle Installation Guide
Installation de NewSoft VistaShuttle
Guía de instalación de NewSoft VistaShuttle
1
2
3
The “NewSoft VistaShuttle” Setup
Window appears. Press “Next” to start
the installation of the “NewSoft
VistaShuttle” program.
The “NewSoft software license
Agreement” window appears. Please
press “Yes” to go to the next step.
The installation program will install
VistaShuttle in the default path. Press “
Next” and go to the next step.
L’écran d’installation de « NewSoft
VistaShuttle » apparaît. Cliquez sur
« Suivant » pour lancer l’installation du
NewSoft VistaShuttle ».
L’écran « NewSoft software license
Agreement » apparaît. Cliquez sur
« Oui » pour passer à l’étape suivante.
Le programme d’installation installera
VistaShuttle dans le chemin par défaut.
Suivant » pour passer à
l’étape suivante.
Aparecerá la pantalla de instalación
“NewSoft VistaShuttle”. Haga clic en
“Next” para comenzar la instalación del
programa “NewSoft VistaShuttle”.
Se mostrará la ventana “NewSoft
software license Agreement”. Haga clic
en “Yes” y continúe con el siguiente
paso.
El programa de instalación instalará
VistaShuttle en la ruta predeterminada.
Haga clic en “Next” y continúe con el
siguiente paso.
4
5
The installation program creates a new program group for
VistaShuttle in the Start/Programs menu. Press “Next” to copy the
files from the CD and install VistaShuttle.
The installation of VistaShuttle is complete. The installation
program will remind you to press the “Finish” button.
Le programme d’installation crée un nouveau groupe de
programmes pour VistaShuttle dans le menu
Démarrer/Programmes. Cliquez sur « Suivant » pour copier les
fichiers du CD et installer VistaShuttle.
L’installation de VistaShuttle est complétée. Le programme
d’installation vous invitera à cliquez sur le bouton « Terminer ».
El programa de instalación creará un nuevo grupo de programas para
VistaShuttle en el grupo Programas del menú Inicio. Presione
“Next” para copiar los archivos desde el CD e instalar VistaShuttle.
La instalación de VistaShuttle habrá concluido. El programa de
instalación le indicará que debe hacer clic en el botón “Finish”.
UMAX VistaScan Installation Guide
Installation de UMAX VistaScan
Guía de instalación de UMAX VistaScan
1
2
The “UMAX VistaScan” Setup Window appears. Press “Next” to
start the installation of the “UMAX VistaScan” program.
The “UMAX software license Agreement” window appears.
Please press “Yes” to go to the next step.
L’écran d’installation de « UMAX VistaScan » apparaît. Cliquez
sur « Suivant » pour lancer l’installation du programme « UMAX
VistaScan ».
L’écran « UMAX software license Agreement » apparaît. Cliquez
sur « Oui » pour passer à l’étape suivante.
Aparecerá la pantalla de instalación “UMAX VistaScan”. Haga
clic en “Next” para comenzar la instalación del programa “UMAX
Aparecerá la ventana “UMAX software license Agreement”.
Presione “Yes” y continúe con el siguiente paso.
3
4
The installation program offers two types of installation. We
recommend you select “Typical Installation”. Press “Next” to go
to the next step.
Press “Install” to copy the files from the VistaScan CD and install
VistaScan.
Le programme d'installation offre deux types d'installation. Nous
recommandons de selectionner " Typical Installation ". Cliquez
sur " Suivant " pour passer a l'etape suivante.
Cliquez sur " Install " pour copier les fichiers du CD VistaScan et
installer VistaScan.
El programa de instalación ofrece dos tipos de instalación.
Recomendamos seleccionar “Typical Installation”. Haga clic en
“Next” para continuar con el siguiente paso.
Haga clic en “Install” para copiar los archivos desde el CD e
instalar VistaScan.
Caere OmniPage LE Installation Guide
Installation de Caere OmniPage LE
Guía de instalación de Caere OmniPage LE
1
2
3
The “OmniPage LE” Setup Window
appears. Press “Next” to start the
installation of the “OmniPage Limited
Edition” program.
The “Caere software license Agreement”
window appears. Please press “Yes” to go
to the next step.
Please input your name and the name of
your company and press “Next” to go to
the next step.
L’écran d’installation de « OmniPage
LE » apparaît. Cliquez sur « Suivant »
pour lancer l’installation du programme
OmniPage Limited Edition ».
L’écran « Caere software license
Agreement » apparaît. Cliquez sur
« Oui » pour passer à l’étape suivante.
Entrez votre nom et le nom de votre
société et cliquez sur « Suivant » pour
passer à l’étape suivante.
Aparecerá la pantalla de instalación
“OmniPage LE”. Haga clic en “Next” para
comenzar la instalación del programa
“OmniPage Limited Edition”.
Se mostrará la ventana “Caere software
license Agreement”. Haga clic en “Yes” y
continúe con el siguiente paso.
Escriba su nombre y el de su
organización y haga clic en “Next” para
continuar con el siguiente paso.
5
6
4
The “Registration Confirmation” dialogue
box appears to confirm that the
information you typed is correct. If the
information is correct, press “Yes” to go
to next step.
Select your country of residence and
press “OK”
Select the OCR recognition languages
you would like to install on your system
and then press “Next”.
La boîte de dialogue « Registration
Confirmation » apparaît pour confirmer
que les informations entrées sont
correctes. Cliquez sur « Oui » pour passer
à l’étape suivante.
Sélectionnez votre pays de résidence et
OK ».
Sélectionnez les langues de
reconnaissance OCR que vous voulez
installer sur votre système et cliquez sur
Suivant ».
Aparecerá el diálogo “Registration
Confirmation” para que pueda confirmar
que la información introducida es
correcta. Presione “Yes” para continuar
con el siguiente paso.
Seleccione el país en el que reside y haga
Seleccione los idiomas que desee
instalar en el sistema para utilizar la
función de OCR y haga clic en “Next”.
7
8
9
Select the language of the Acrobat
documentation you would like to install
on your system and press “Next”.
Select the language of the Acrobat
Reader used to read the on-line electronic
manual of this program. Press “Next” to
go to the next step.
Select the word processor program
installed on your system and then press
“Next”.
Sélectionnez la langue de la
documentation d’Acrobat que vous
voulez installer sur votre système et
Suivant ».
Sélectionnez la langue du programme
Acrobat Reader utilisé pour lire le
manuel en ligne électronique de ce
programme. Cliquez sur « Suivant » pour
passer à l’étape suivante.
Sélectionnez le programme de traitement
de texte installé sur votre système et
Suivant ».
Seleccione el idioma de la
documentación en formato Acrobat que
desee instalar en el sistema y haga clic en
“Next”.
Seleccione el idioma del programa
Acrobat Reader que utilizará para leer el
manual electrónico en pantalla de este
programa. Haga clic en “Next” para
continuar con el siguiente paso.
Seleccione el programa de tratamiento
de textos que está instalado en el sistema
y haga clic en “Next”.
10
11
The installation program will install OmniPage in the default path.
Press “Next” and go to the next step.
The installation program creates a new group for OmniPage in the
Start/Programs menu. Press “Next” to copy the files from the CD
and install OmniPage.
Le programme d’installation installera OmniPage dans le chemin
par défaut. Cliquez sur « Suivant » pour passer à l’étape suivante.
Le programme d’installation crée un nouveau groupe de
programmes pour OmniPage dans le menu Démarrer/Programmes.
Suivant » pour copier les fichiers du CD et installer
OmniPage.
El programa de instalación instalará OmniPage en la ruta
predeterminada. Haga clic en “Next” y continúe con el siguiente
paso.
El programa de instalación creará un nuevo grupo de programas para
OmniPage en el grupo Programas del menú Inicio. Haga clic en
“Next” para copiar los archivos desde el CD e instalar OmniPage.
12
13
The installation of OmniPage LE is complete. Please select “No, I
will restart my computer later” and then press “Finish” to
complete the software installation.
All the software is installed. The installation program will remind
you to press “Restart” to reboot your computer.
L’installation de OmniPage LE est complétée. Sélectionnez « No, I
will restart my computer later » et cliquez sur « Terminer » pour
compléter l’installation.
Tous les logiciels sont installés. Le programme d’installation vous
» pour relancer votre ordinateur..
La instalación de OmniPage LE habrá concluido. Seleccione “No, I
will restart my computer later” y haga clic en “Finish” para terminar
Con esto habrá instalado todos los programas. El programa de
instalación de recordará que debe hacer clic en “Restart” para
reiniciar su PC.
Adobe Photoshop LE Installation Guide (included in AstraNET e3470)
Guide d’installation d’Adobe Photoshop LE (Le de AstraNET e3470)
Guía de instalación de Adobe Photoshop LE (Esta la AstraNET e3470)
1
2
3
Insert the PhotoShop LE CD into your
CD-ROM drive and double-click on the
CD-ROM icon. Select the language you
want to install.
Double-click on the Photosle folder icon.
Double-click on the Setup.exe icon to
begin the installation procedure.
Insérez le CD de PhotoShop LE dans
votre lecteur CD-ROM et cliquez deux
fois sur l’icône du CD-ROM.
Sélectionnez la langue que vous voulez
installer.
Cliquez deux fois sur l’icône du dossier
Photosle.
Cliquez deux fois sur l’icône Setup.exe
pour commencer la procédure
Inserte el CD PhotoShop LE en la unidad
de CD-ROM y haga doble clic en el
icono del CD-ROM. Seleccione el
idioma en el que desee que se efectúe la
Haga doble clic en el icono de la carpeta
Photosle.
Haga doble clic en el icono Setup.exe
para inicair el proceso de instalación.
4
5
6
Click on the Next button to continue.
Select your country then click on Next to
continue.
Read the Adobe license agreement, and
click on Accept to continue.
Cliquez sur le bouton Suivant pour
continuer.
Sélectionnez votre pays, et cliquez alors
sur Suivant pour continuer.
Lisez l’accord de licence d’Adobe, et
cliquez sur Accepter pour continuer.
Haga clic en el botón Siguiente para
continuar.
Seleccione su país y haga clic en
Siguiente para continuar.
Lea el acuerdo de licencia de Adobe y
haga clic en Aceptar para continuar.
7
8
9
Click on Next to install PhotoShop LE
with the Typical setup.
Please key in your personal information
and click on Next. You can find the serial
number on the CD box.
Click on Yes to continue.
Cliquez sur Suivant pour installer
PhotoShop LE avec l’installation
typique.
Entrez vos informations personnelles et
cliquez sur Suivant. Vous pouvez trouver
le numéro de série sur l’étui du CD.
Cliquez sur Oui pour continuer.
Haga clic en Siguiente para instalar
PhotoShop LE con la instalación típica.
Escriba por favor su información
personal y haga clic en Siguiente. Puede
encontrar el número de serie en la caja
del CD.
Haga clic en Sí para continuar.
10
11
12
Click on Next to begin copying the files
to your system.
Click on Finish to continue.
Click on OK to restart your system.
Cliquez sur Suivant pour commencer à
copier les fichiers.
Cliquez sur Terminer pour continuer.
Cliquez sur OK pour relancer votre
système.
Haga clic en Siguiente para empezar a
copiar los archivos en su sistema.
Haga clic en Finalizar para continuar.
Haga clic en Aceptar para reinicar el
sistema.
PhotoDeluxe Installation Guide (included in AstraNET e3420)
Installation de PhotoDeluxe (Le de AstraNET e3420)
Guía de instalación de PhotoDeluxe (Esta la AstraNET e3420)
1
2
Insert the PhotoDeluxe CD into your CD-ROM drive. The installation program should
starts automatically. Select the language to be installed and then press the “Next” button
The “Adobe software license
Agreement” window appears. Please
press “Yes” to go to the next step.
Note : If the installation program doesn’t start automatically, select
StartèProgramsèWindows Explorer and then double-click on the PhotoDeluxe icon
(your CD-ROM drive)èSetup icon
Insérez le CD PhotoDeluxe dans votre lecteur CD-ROM. Le programme d’installation
devrait démarrer automatiquement. Le programme d’installation détecte le langage utilisé
sur votre système comme langage à utiliser pour l’installation. Veuillez cliquer sur le
Suivant » pour passer à l’étape suivante.
L’écran « Adobe software license
Agreement » apparaît. Cliquez sur
« Oui » pour passer à l’étape suivante.
Note : Si le programme d’installation ne d émarre pas automatiquement, s électionnez
èProgrammesèWindows Explorer et cliquez deux fois sur l’ic ône de
PhotoDeluxe (votre lecteur CD-ROM)èl’ic ône Setup
Inserte el CD del escáner PhotoDeluxe en la unidad de CD-ROM. El programa de instalación
debe comenzar automáticamente. El programa detectará el idioma utilizado por el sistema y
lo utilizará durante la instalación. Presione el botón “Next” y continúe con el siguiente paso.
Se mostrará la ventana “Adobe software
license Agreement”. Haga clic en “Yes”
y continúe con el siguiente paso.
Nota: Si el programa de instalaci ón no se inicia autom áticamente, seleccione Inicio è
Programas è Explorador de Windows y haga doble clic en el icono PhotoDeluxe (la
unidad de CD-ROM) è y a continuaci ón haga clic en el icono Setup (tal como se muestra
en la Figura B).
3
Please select “Install” to install the
4
Please press “Next” to go to the next step.
PhotoDeluxe software.
5
The installation program will install
PhotoDeluxe in the default path. Press “
Next” and go to the next step.
Veuillez sélectionner « Install » pour
installer le logiciel PhotoDeluxe.
Cliquez sur «Next» pour passer à l’étape
suivante.
Le programme d’installation installera
PhotoDeluxe dans le chemin par défaut.
Next » pour passer à l’étape
suivante.
Por favor, seleccione “Install” para
haga clic en “Next” para continuar con el
El programa de instalación instalará
instalar el software PhotoDeluxe.
siguiente paso.
PhotoDeluxe en la ruta predeterminada.
Haga clic en “Next” y continúe con el
siguiente paso.
6
7
8
Please input your name and the name of
your company and press “Next” to go to the
next step.
Please press “Next” to go to the next
step.
The Setup Program will install the
Acrobat reader to be able to read the online help manual. Press “Next” to go to
the next step.
Entrez votre nom et le nom de votre société
Next » pour passer à l’étape
suivante.
Cliquez sur «Next» pour passer à l’étape
suivante.
Le programme d’installation installera
Acrobat Reader pour pouvoir lire le
manuel d’aide en-ligne. Pressez « Next»
pour passer à l’étape suivante.
Escriba su nombre y el de su organización y
haga clic en “Next” para continuar con el
siguiente paso.
haga clic en “Next” para continuar con el
siguiente paso.
El Setup Program instalará Acrobat
Reader, necesario para poder leer el
manual de ayuda en línea. Presione
“Next” para ir al siguiente paso.
9
The Setup program will install the “Adobe
Type Manager” program, press “ Install” to
begin to install.
Le programme d’installation installera le
Adobe Type Manager ».
Pressez « Install » pour commencer à
10
The installation of PhotoDeluxe is
complete. Then press “Finish” to complete
the software installation.
11
Select I want to restart my computer
now” to restart your computer before
using the program.
L’installation de PhotoDeluxe est
Veuillez sélectionner « I want to restart
complétée. Cliquez sur « Finish » pour
my computer now»pour relancer votre
compléter l’installation.
ordinateur avant d’utiliser le programme.
installer.
El Setup Program instalará el programa
La instalación de PhotoDeluxe habrá
“Adobe Type Manager”; presione “Install”
concluido. Clic en “Finish” para terminar la
para comenzar la instalación.
instalación del programa.
I want to restart my
computer now” para reiniciar su PC.
PART 2
Hardware Installation
PARTIE 2 Installation du matériel
TEIL 2
Instalación del hardware
Connecting the transparency unit (For the AstraNET e3470 only)
Connect the interface cable to the connector port on back of the scanner.
Branchement du couvercle transparents
Branchez le câble d’interface au connecteur du scanner.
Conexi ón de la cubierta transparente
Conecte el cable de interface en el conector del escáner .
Connecting the USB Cable
1.
Connect the “TYPE B” end of the USB cable into the port located on the back panel of the
scanner.
2.
Connect the “TYPE A” end of the USB cable to one USB port of your computer.
1.
Connectez l’extrémité « TYPE A » du câble USB à un port USB sur votre ordinateur.
2.
Connectez l’autre extrémité « TYPE B » du câble USB au port localisé sur le panneau postérieur
du scanner.
For Model AstraNET e3420
For Model AstraNET e3470
USB connector TYPE A
Connecteur USB TYPE A
USB-Anschluss TYP A
Conexi ón del USB cable
1.
Conecte el extremo “TYPE A” del cable USB a uno de los puertos USB de su PC.
2.
Conecte el extremo “TYPE B” del cable USB en el puerto que se encuentra en la parte posterior
USB connector TYPE B
Connecteur USB TYPE B
USB-Anschluss TYP B
Connecting the Power
1.
Plug the scanner’s power adapter into an electrical outlet.
2.
Insert the other end of this cable into the power adapter receptacle on the back panel of the
scanner. The power indicator on the front panel of the scanner should be illuminated now.
Connecter l’alimentation
For Model AstraNET e3420
For Model AstraNET e3470
1.
Branchez l’adaptateur d’alimentation du scanner dans une sortie électrique.
2.
Insérez l’autre extrémité de ce câble dans la prise d’alimentation sur le panneau postérieur du
scanner. L’indicateur d’alimentation sur le panneau avant du scanner devrait s’allumer.
1.
Conecte el adaptador de alimentación del escáner a un enchufe eléctrico.
2.
Inserte el otro extremo de este cable en el receptáculo de la fuente de alimentación que se encuentra
en la parte posterior del escáner. El indicador de alimentación del panel frontal del escáner se
PART 3: How to get your first image with Presto! PageManager
PARTIE 3 : Scanner votre première image De Presto! PageManager
TEIL 3: Digitalización de la primera imagen Desde Presto PageManager
1
2
3
Double-click on the “Presto!
PageManager” icon on your desktop.
The PageManager window appears.
Choose the “Select Source” command in
the File menu.
The “Select Source” dialogue box
appears. Choose a scanner driver and
then press the “Select” button.
Cliquez deux fois sur l’icône « Presto!
PageManager » sur votre bureau.
La fenêtre de PageManager apparaît.
Choisissez la commande « Select
Source » dans le menu File.
La boîte de dialogue « Select Source »
apparaît. Choisissez un gestionnaire de
scanner et cliquez sur le bouton
« Select ».
Haga doble clic en el icono “Presto!
PageManager” del escritorio.
Aparecerá la ventana de PageManager.
Seleccione el comando “Select Source”
del menú Archivo.
Aparecerá el cuadro de diálogo “Select
Source”. Seleccione el controlador del
escáner y haga clic en el botón “Select”.
4
5
6
Click on the “scanner” icon (as seen in the
red circle in the window above) to invoke
VistaScan.
The UMAX VistaScan TWAIN driver
window appears. Click on the “Preview”
button to pre-scan the scanning material
Select the area to be scanned by clicking
on the Frame tool , and dragging the
cursor diagonally to form a rectangle that
best defines the area. As you drag, the
borders of a frame encompassing the
desired area will appear.
Click “Color Photo” button and scanning
will commence
Cliquez sur l’icône du scanner, dans le
cercle rouge dans l’image ci-dessus, (le
média pour acquérir les images) pour
invoquer VistaScan.
La fenêtre du gestionnaire TWAIN de
UMAX VistaScan apparaît. Cliquez sur le
bouton « Preview » pour préscanner le
document sur le scanner.
Sélectionnez la zone à scanner en
cliquant sur l’outil Cadre , et en
déplaçant le curseur en diagonal pour
former un rectangle qui définit mieux la
zone. Quand vous déplacez, les bordures
d’un cadre entourant la zone désirée
apparaissent.
Cliquez sur le bouton « Color Photo »
pour lancer le procédé de scanage.
Haga clic en el icono “Scanner”, señalado
con circulo rojo en la figura (el medio
para adquirir la imagen) para iniciar
VistaScan.
Aparecerá la ventana del controlador
TWAIN UMAX VistaScan. Haga clic en
el botón “Preview” para realizar una
predigitalización del objeto que haya en
Seleccione el área que desee digitalizar
haciendo clic en la herramienta Frame
y arrastrando el cursor diagonalmente para
formar un rectángulo y definir este área.
Al arrastrar, aparecerán los bordes del
marco bordeando el área deseada.
Haga clic en el botón “Color Photo” para
iniciar el proceso de digitalización.
7
You return to the PageManager window
to edit the scanned image.
Volverá a la ventana PageManager,
donde podrá modificar la imagen
digitalizada.
Vous retournez à la fenêtre de
PageManager pour éditer l’image
scannée.
How to get your first image with Caere OmniPage LE
Scanner votre première image Caere OmniPage LE
Digitalización de la primera imagen Desde Caere OmniPage LE
1
2
3
Select StartàProgramsàCaere
ApplicationsàOmniPage Limited
Edition to run the OmniPage LE
program.
Click on the “Acquire Image” (as seen in
the red circle in the picture above) in the
OmniPage Limited Edition window.
Click on the “Scan” button to start the
scanning procedure.
Sélectionnez DémarreràProgrammesà
Caere ApplicationsàOmniPage Limited
Edition pour exécuter le programme
OmniPage LE.
Cliquez sur l’icône d’acquisition
d’images (dans le cercle rouge dans
l’image ci-dessus) dans la fenêtre de
OmniPage Limited Edition.
Cliquez sur le bouton « Scan » pour
lancer la procédure de scanage.
Seleccione Inicio à Programas à Caere
Applications à OmniPage Limited
Edition para ejecutar el programa
OmniPage LE.
Haga clic en el icono “Acquire Image”,
señalado con un círculo rojo en figura, en
la ventana OmniPage Limited Edition.
Haga clic en el botón “Scan” para iniciar
el proceso de digitalización.
4
5
6
The image scanned appears in the
window of the OCR program. Click on
the “OCR” icon to execute the OCR
function.
The OCR recognition program is
processing.
Press “Stop Scanning” to quit the OCR
program.
L’image scannée apparaît dans la fenêtre
du programme OCR. Cliquez sur l’icône
OCR » pour exécuter la fonction
d’OCR.
Le programme de reconnaissance OCR
traite le texte.
Cliquez sur « Stop Scanning » pour
quitter le programme OCR.
La imagen digitalizada aparecerá en la
ventana de la aplicación OCR. Haga clic
en el icono OCR para ejecutar la función
OCR.
El programa de reconocimiento de
caracteres comenzará a procesar el
archivo.
Haga clic en “Stop Scanning” para salir
del programa de OCR.
7
Input a name for the processed file and save
it in a proper format for the word processor
program (e.g. Microsoft Word) on your
system.
Escriba un nombre para el archivo
procesado y guárdelo con un formato
adecuado para la aplicación de tratamiento
de texto que tenga instalado en el sistema
(p.ej. Microsoft Word).
Entrez un nom pour le fichier traité et
enregistrez-le dans un format approprié
pour le programme de traitement de texte
(par ex. Microsoft Word) sur votre système.
How to get your first image with Adobe Photoshop LE (included in AstraNET e3470)
Scanner votre première image Adobe Photoshop LE (Le de AstraNET e3470)
Digitalización de la primera imagen Desde Adobe Photoshop LE (Esta la AstraNET e3470)
1
2
Click on Start à Programs à Adobe to
run PhotoShop LE
3
Select VistaScan 32V3.x then click on
the Select button
Select File àImport àTWAIN_32 to
run the scanner driver.
Sélectionnez VistaScan 32V3.x et cliquez
sur le bouton Select
Sélectionnez File àImport à
TWAIN_32 pour exécuter le pilote du
scanner.
Seleccione VistaScan 32V3.x y haga clic
en el botón Select.
Seleccione File àImport àTWAIN_32
para iniciar el driver del escáner.
Select File à Import à Select TWAIN
Source to select the scanner driver
Cliquez sur Démarrer à Programmes à
Adobe pour exécuter PhotoShop LE
Sélectionnez File à Import à Select
TWAIN Source pour sélectionner le
pilote du scanner
Haga clic en Start à Programs à Adobe
para iniciar PhotoShop LE
Selecione File à Import à Seleccione
TWAIN Source para seleccionar el driver
del escáner.
4
5
The UMAX VistaScan TWAIN driver window appears. Click on
the “Preview” button to pre-scan the scanning material
,
Select the area to be scanned by clicking on the Frame tool
and dragging the cursor diagonally to form a rectangle that best
defines the area. As you drag, the borders of a frame
encompassing the desired area will appear.
Click on the “Color Photo” button to start the scanning process
La fenêtre du gestionnaire TWAIN de UMAX VistaScan apparaît.
Cliquez sur le bouton « Preview » pour préscanner le document
sur le scanner.
, et
Sélectionnez la zone à scanner en cliquant sur l’outil Cadre
en déplaçant le curseur en diagonal pour former un rectangle qui
définit mieux la zone. Quand vous déplacez, les bordures d’un
cadre entourant la zone désirée apparaissent.
Color Photo » pour lancer le procédé de
scanage.
Aparecerá la ventana del controlador TWAIN UMAX VistaScan.
Haga clic en el botón “Preview” para realizar una predigitalización
del objeto que haya en el escáner.
Seleccione el área que desee digitalizar haciendo clic en la
y arrastrando el cursor diagonalmente para
herramienta Frame
formar un rectángulo y definir este área. Al arrastrar, aparecerán
los bordes del marco bordeando el área deseada.
Haga clic en el botón “Color Photo” para iniciar el proceso de
How to get your first image? From Adobe PhotoDeluxe (included in AstraNET e3420)
Scanner votre première image? De Adobe PhotoDeluxe (Le de AstraNET e3420)
Digitalización de la primera imagen? Desde Adobe PhotoDeluxe (Esta la AstraNET e3420)
1
2
3
Select “Get & Fix Photo”
Select “Get Photo” and then from the
items listed, select “scanner”
Cliquez deux fois sur l’icône
PhotoDeluxe » sur votre bureau.
Sélectionnez « Get & Fix Photo ».
Sélectionnez « Get Photo » et « scanner »
des articles listés.
Haga doble clic en el icono “PhotoDeluxe”
del escritorio.
Seleccione “Get & Fix Photo”
Seleccione “Get Photo” y luego, de los
elementos enumerados, seleccione
“scanner”
your desktop.
4
5
appears. Choose a scanner driver and then
press the “OK” button.
6
Select “2 Mode” and then select “Custom” to
call VistaScan.
Sélectionnez « 1 Scanner », puis
« Choose Scanner ».
La boîte de dialogue « Select input
Source » apparaît. Choisissez un
gestionnaire de scanner et cliquez sur le
bouton « OK ».
Sélectionnez « 2 Mode », puis « Custom »
pour invoquer VistaScan.
Seleccione “1 Scanner” y, a
continuación, seleccione “Choose
Aparecerá el cuadro de diálogo “ Select
input Source”. Seleccione el controlador
del escáner y haga clic en el botón “ OK ”.
Seleccione “2 Mode” y, a continuación,
seleccione “Custom” para llamar a
VistaScan.
7
8
9
The UMAX VistaScan TWAIN driver
window appears. Click on the “Preview”
button to pre-scan the scanning material
Select the area to be scanned by clicking
You return to the PhotoDeluxe window
to edit the scanned image or create cards,
calendars…
on the Frame tool
, and dragging the
cursor diagonally to form a rectangle that
best defines the area. As you drag, the
borders of a frame encompassing the
desired area will appear.
Click on the “Color Photo” button to start
the scanning process
La fenêtre du gestionnaire TWAIN de
UMAX VistaScan apparaît. Cliquez sur
Preview » pour préscanner le
document sur le scanner.
Sélectionnez la zone à scanner en
, et en
cliquant sur l’outil Cadre
déplaçant le curseur en diagonal pour
former un rectangle qui définit mieux la
zone. Quand vous déplacez, les bordures
d’un cadre entourant la zone désirée
apparaissent.
Vous retournez à la fenêtre de
PhotoDeluxe pour éditer les images
scannées ou créer des cartes,
Cliquez sur le bouton « Color Photo »
pour lancer le procédé de scanage.
Aparecerá la ventana del controlador
TWAIN UMAX VistaScan. Haga clic en
el botón “Preview” para realizar una
predigitalización del objeto que haya en
Seleccione el área que desee digitalizar
haciendo clic en la herramienta Frame
y arrastrando el cursor diagonalmente para
formar un rectángulo y definir este área.
Al arrastrar, aparecerán los bordes del
marco bordeando el área deseada.
Haga clic en el botón “Color Photo” para
iniciar el proceso de digitalización.
Regresará a la ventana PhotoDeluxe
donde puede editar la imagen digitalizada
o crear tarjetas, calendarios…