1
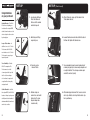
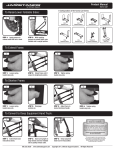
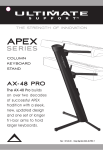
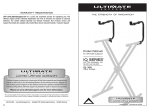
warranty registration
Visit www.ultimatesupport.com for a quick and convenient process for registering your new
Ultimate Support product. Warranty Registration and Proof of Purchase are required for warranty
fulfilment. Full Limited Lifetime Warranty and Ultimate Protection Plus Premium Service and
Support Plan details are available online under Music Gear & Instrument Stands / Customer Support.
Product Manual
for Ultimate Support
APEX
S E R I ES
KEYBOARD STAND
AX- 48 PRO
ITEM #17351
800.525.5628 . www.ultimatesupport.com . Copyright 2009, Ultimate Support Systems . All Rights Reserved
4
Revision 1, 07.24.09 . Product Manual Item #AX-48 PRO-M
SETUP
Congratulations
on your purchase!
SETUP ( Cont inued )
1
5
5.Attach Tribars to clamps by Tribar hook. Push
Tribar down into slot.
1.Lay stand on the floor.
Press the buttons at
the base of the column
and slide legs out.
Updated Design – The AX-48
Pro delivers everything you
loved about the original APEX
stand, but now features a sleek
exterior design for the modern
keyboard player.
2
2.Rotate legs until they
snap into place.
6
6.Loosen thumbscrew and slide stabilizer to touch
the floor. Re-tighten the thumbscrew.
Longer Tri-bar Arms – In
addition to one set of 13-inch
Tri-bar arms, the AX-48 Pro
now includes a set of 18-inch
Tri-bar arms to support your
larger keyboards.
True Portability – Take the
AX-48 Pro anywhere. The
Tri-bar arms store in the
3
3.Open top cap to
remove Tribars.
7
column top and the legs slide
7.To accommodate larger, heavier keyboard and /
or lower playing styles, remove angle adapter and
re-adjust stabilizer. This changes column angle
and shifts center of gravity.
into the bottom creating a
self-contained, compact unit
complete with a heavy-duty
carrying handle.
Stable & Durable – Just like
the original APEX, the AX-48 Pro
features locking legs for proven
stability and a black anodized
aluminum finish that won’t rust
and resists scratches.
2
4
4.Position clamp on
column face and install
bracket and T-screw.
(Angular edge rides
in column slot.)
8
8.After loading top instrument first, secure cords in
cable clips. Rotate cable clips. Rotate cable clips
for re-positioning.
3