1
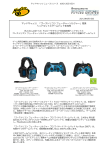
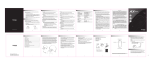
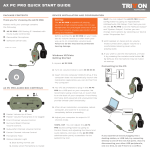
Quick Start Guide
Thank you for choosing
AX 360 .
AX 360
Dolby Digital & Pro Logic
Audio Controller
Please verify your package contains
the following:
1
A - AX360 Dolby Digital & Pro Logic
TD/DRC (Continued)
Button 7 and 8 will now increase or decrease
the Time-Delay
- Toggle 4 to change the time delay between the
front channel and the center channel, or the
front channel and rear channels
Audio Controller
B - AX360 Headset with in-line volume controller
for Center, Front, Rear and Vibration Control
2
C - Power Adapter
(TD) Time Delay is a function associated with 4
(SUR/CTR). Default setting is 0mS, except when
in Pro Logic mode then it is defaulted to 15mS.
3
D - Removable Microphone
E - Microphone Extension Cable (for Xbox Live®)
4
F - Digital Fiber Optic Cable (Remove protective
5
6
7
8
When in Dolby Digital 5.1:
- Center channel range is from 0-5mS,
caps before installing.)
G - Coaxial Audio Cable
bk
H - G9 Adapter (PC/MAC, 5.1 sound card adapter)
adjustable in 1mS increments
- Surround channel range is from 0-15mS
adjustable in 1mS increments
If the audio source is stereo (Dolby Digital 2
channel or PCM format) and Pro Logic is “on”:
bl
bm
bn
bo
I - Soft Carrying Case
- Center channel range is from 0-5mS
- Surround channel range is from 15-30mS
Images not to scale.
NOTE: The Time Delay adjustment with Dolby
Digital 5.1 mode will automatically update the
associated Time Delay value in Pro Logic mode
and vice versa. However, if the source is Dolby
Digital 2 channel and Pro Logic is off, nothing
will be adjusted.
9
A
1
2
3
B
CEN
FRONT
C
VIB
REAR
FRONT
CEN
Digital Input Selection: Coaxial & Optical
DC Jack
Multi-Function Selector Switch (for fine tuning)
VOL/PL
Move the selector to the
Button 6 will select Pro Logic on/off
Button 7 and 8 will adjust volume up and down
VOL/PL position
(Pro Logic) When Dolby Pro Logic is “on” with an
audio source that is 2 channel, the audio will
then be converted to 5.1 channel sound. When
Dolby Pro Logic is “off” with an audio source that
is 2 channel, the audio will remain 2 channel
stereo.
REAR
VIB
(Volume up/down) Pressing the volume up/
down one time will adjust the volume 1dB in
either direction. Press and hold the volume up
to increase the volume to the maximum level.
Press and hold the volume down to decrease the
volume to the minimum level (mute).
D
E
F Remove protective caps before installing.
TD/DRC (Time Delay, Dynamic Range Control)
Button 6 now becomes DRC (Dynamic Range
Compression) on/off
Move the selector to the
TD/DRC position
4 Select Time-Delay
5 Power on/off
6 Pro Logic / DRC on/off
7 Volume up & Time-Delay Increase
8 Volume down and Time-Delay decrease
9 Headset connections, this unit can support
2 headsets at the same time
bk
5.1 analog out, connection to external
5.1 speaker system
bl
bm
bn
bo
Indicator light for power on/off
Indicator light for Dolby Digital format
(5.1 or Stereo)
Indicator light for Pro Logic on/off
Indicator light for DRC on/off
NOTE: When the unit is turned off, all settings will be saved and
remain the same when the unit is powered on. To reset the settings to
the factory defaults, push and hold 7 + 8 together and power down
the unit. Then, power up the unit holding 7 + 8 together and you will
see bm bn bo flash three times indicating that the factory defaults
have been applied. If the unit is unplugged, it may lose its current
settings.
Customer Support
G
H
I
Manufactured under license from Dolby Laboratories. “Dolby”, “Pro Logic”, and the double-D symbol are
registered trademarks of Dolby Laboratories, all rights reserved.
©2006 Microsoft Corporation. All Rights Reserved. Xbox, Xbox Live, the Live Logo, and the Xbox logos are
registered trademarks or trademarks of Microsoft Corp.
©2007 Sony Computer Entertainment America Inc. All Rights Reserved. “PlayStation”, “PLAYSTATION”, “PS” Family
logo and “PSP” are registered trademarks of Sony Computer Entertainment Inc.
Quick Start.indd 1
TRITTON would like to make sure you are completely satisfied with your purchase of the AX360. We offer
toll-free technical support from 8:30 to 5:00pm PST, continental U.S. only. TRITTON also offers extensive
online support with FAQ’s, knowledge base articles and online chat support.
If you have any questions regarding the AX360,
please contact us:
• Toll-free support: 800-431-1176
• Email support: [email protected]
• Web support: www.trittonusa.com
• Product registration: www.trittonusa.com
REV 9/06 Part# TRI-QS-001
www.trittonusa.com
2/5/08 12:08:47 PM
Connecting your AX 360
Connecting to your
Game Console
Connecting to your
PC or MAC
Connecting to your
DVD / Audio Receiver
Make Sure to remove the protective caps from your optical cable before use.
Failure to do so could result in poor or no sound output, and possibly damage
electronic devices.
*If you use the AX360 blue digital audio controller on a computer and
want to use the microphone, additional hardware will be needed to
plug the microphone into the standard analog jack of your computer.
Diagram A
Diagram A
XBox360 Elite/Premium
XBox360
**Dolby Digital surround sound will only be played back by the
AX360 headset when a “Dolby Digital” signal is received by our audio
controller, indicated by a blue light at location bm.
Option 1
Diagram B
Diagram B
PS3
The AX360 can connect to any game console that
supports a fiber optic or digital coaxial audio port.
For example, connecting with an Xbox 360 you will
need to have the High Definition cable accessory.
This cable connects directly into the back of the
Xbox 360 and has a digital Fiber Optic port located
on the cable housing. This is the same connection
for the original Xbox (See Diagram A). Connecting to a
Playstation II, just plug the fiber optic cable directly
into the Playstation (See Diagram B).
Connecting the AX360 to a DVD player or audio
receiver is easily achieved through either the digital
optic or coaxial port. Diagram A shows connecting via
the digital coaxial. Diagram B shows connecting via
the digital optic port. The AX360 audio controller has
is a selector switch that must be positioned to either
optic or coaxial depending on which connection you
use.
Option 2
Connecting to your
“self-powered” 5.1
Speaker System
Connecting the
microphone to your
Xbox 360™ (for Xbox Live®)
Option 1 - connecting through digital optic/coaxial
port
To hear other players during Xbox Live communication, you will need to make changes within the Xbox
360 dashboard. While running an Xbox game, press
the Xbox Guide button (the X button is located in the
center of your controller) to access your Xbox Live
Settings. (Half-page screen with profile information
will appear.) Select “Personal Settings” and press
the “A” button on your controller. Then select “Voice”
from the menu and press “A”. On the Voice screen,
select “play through both” for voice output selection.
If you have difficulties hearing the voices of other
players on XBox Live, you can adjust the voice volume
by turning up the “center” channel. If you continue to
have issues, you can adjust the in-game sound
effects and music levels to a desired volume.
Quick Start.indd 2
If your computer has a fiber optic or digital coaxial
port, then the AX360 can be connected directly to
the computer. Both optic and coaxial are digital so it
does not matter which cable you use.
Option 2 - connecting through the G9 adapter
AX360 can be used with 5.1 output sound card. Use
the G9 adapter to connect as shown above in option
2. The G9 adapter plugs into the back of the sound
card. The mini-jacks on the G9 have labels indicating
the following:
•
Pink:
•
Green:
Mic
•
Black:
•
Orange: (Microphone Port)
The AX360 audio controller includes analog 5.1
outputs. Through these outputs you can connect
to a 5.1 speaker system that is “self-powered”,
meaning that the speaker system has its own
amplification. Connect the speakers accordingly per
the description:
Front (Front Channels)
•
Front = Front speakers
Rear (Rear Channels)
•
Surround = Rear Surround speakers
C/S
•
CTR/SUB = Center Channel / Sub woofer
speakers
(Center channel and Subwoofer)
2/5/08 12:08:48 PM