1
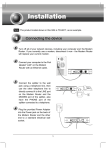
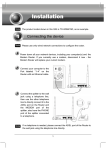
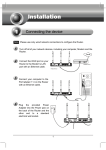
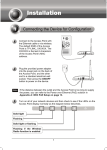
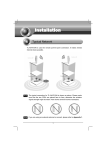
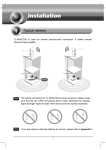
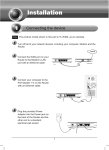
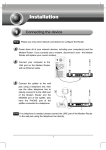
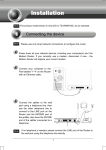
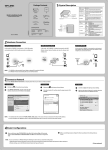
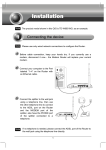
Installation Note Please tear off the plastic film on the modem router for heat dissipation. If you currently use a modem, disconnect it now - the modem router will replace your current modem. Connect your computer to the Port labeled “1~4” on the modem router with an Ethernet cable. Connect the splitter to the wall jack using a telephone line, then use the other telephone line to directly connect it to the ADSL port on the modem router and the MODEM port of the splitter, also have the PHONE port of the splitter connected to a telephone. Note ! If no telephone is needed, please connect the ADSL port of the modem router to the wall jack using the telephone line directly. 1 Plug the provided Power Adapter into the Power jack on the back of the Modem Router and the other end to a standard electrical wall socket. Power on all your network devices and then check to see if the LEDs of the modem router display normally as the diagram below describes. Solid light POWER: ADSL: Solid light or flashing WLAN: Solid light or flashing LAN: Solid light if the corresponding port is connected Note If the LEDs display abnormally, please check to see if all the cable connectors (power adapter, phone line and Ethernet cable) are well connected to your device. With the phone line well connected, if the ADSL LED turns off after flashing, please contact your ISP to ensure that your Internet connection is active. 2 Note To configure the device, TP-LINK strongly recommends that Windows users run the setup CD, Mac OS\Linux\Windows\Android\iOS user who can not run the mini CD, please refer to Appendix to run the web-based Quick Setup Wizard. Insert the provided Resource CD into your CD-ROM drive. The Setup Wizard will automatically pop up on your computer’s screen. Please select your product model and click Start Setup 3 Then a flash video will pop up and show you how to connect your devices. After that, the Easy Setup Assistant will start. Click NEXT, and then follow the step-by-step instructions until you complete the configuration The configuration has now been completed. Please skip to Step 3 “Testing the Internet Connection”. The basic settings for your modem router are completed. Please open the web browser and try to log on to some popular website to test your Internet connection, for example: http://www.tp-link.com http://www.google.com If the above websites can be accessed, it indicates that your modem router has been configured successfully and you can start to enjoy the Internet. If the websites cannot be accessed, please refer to “T4. What can I do if I cannot access the Internet?” in the Troubleshooting guide. Note For the advanced configurations, please refer to the User Guide on the CD provided. Note The above configurations only need to be set once. If you want other computers in your LAN to access the Internet, please connect the desired computer to the ADSL Modem Router directly. If the additional computer can not access the Internet, please set that computer referring to “T3. What can I do if I cannot access the web-based configuration page?” in the Troubleshooting guide. 4 Troubleshooting T1. How do I restore my modem router’s configuration to its factory default settings? With the modem router powered on, press and hold the RESET button on the rear panel for 8 to 10 seconds before releasing it. Press it for 8 to 10 seconds Note Once the modem router is reset, the current configuration settings will be lost and you will need to re-configure the modem router. T2. What can I do if I don’t know or forget my password? 1) Restore the modem router’s configuration to its factory default settings. If you don’t know how to do that, please refer to T1. 2) Use the default user name and password: admin, admin. 3) Try to configure your modem router once again by following the instructions in the previous steps of the QIG. T3. What can I do if I cannot access the web-based configuration page? 1) Configure your computer’s IP Address. For Windows 7 OS Go to Start > Settings > Control Panel, and then you will see the following page. Click View network status and tasks 5 Click Change adapter settings Right-click Local Area Connection Click Properties Double-click Internet Protocol Version 4 (TCP/IPv4) 6 Select Obtain an IP address automatically Select Obtain DNS server address automatically Click OK For Windows Vista OS Go to Start > Settings >Control Panel, and then you will see the following page. Click View network status and tasks Click View status 7 Click Properties Double-click Internet Protocol Version 4 (TCP/IPv4) 8 Select Obtain an IP address automatically Select Obtain DNS server address automatically Click OK For Windows XP OS Go to Start > Control Panel, you will then see the following page. Click Network and Internet Connections 9 Click Network Connections Right-click Local Area Connection Click Properties Double-click Internet Protocol (TCP/IP) 10 Select Obtain an IP address automatically Select Obtain DNS server address automatically Click OK Click OK 11 2) Configure your IE browser. Open your IE browser, click Tools tab and you will see the following screen. Click Internet Options Select Never dial a connection Click OK Now, try to log on to the Web-based configuration page again after the above settings have been configured. If you still cannot access the configuration page, please restore your modem router’s factory default settings and reconfigure your modem router following the instructions of this QIG. Please feel free to contact our Technical Support if the problem persists. 12 T4. What can I do if I cannot access the Internet? 1) Check to see if all the connectors are connected well, including the telephone line, Ethernet cables and power adapter. 2) Check to see if you can log on to the web management page of the modem router. If you can, try the following steps. If you cannot, please set your computer referring to T3 then try to see if you can access the Internet. If the problem persists, please go to the next step. 3) Consult your ISP and make sure all the VPI/VCI, Connection Type, account username and password are correct. If there are any mistakes, please correct the settings and try again. 4) If you still cannot access the Internet, please restore your modem router to its factory default settings and reconfigure your modem router by following the instructions of this QIG. 5) Please feel free to contact our Technical Support if the problem still exists. Note For more details about Troubleshooting and Technical Support contact information, please log on to our Technical Support Website: http://www.tp-link.com/en/support 13 Appendix Login Open your web browser and type 192.168.1.1 in the address bar and press Enter A dialog box will prompt you for the User name and Password. Enter the default values and click OK. User name: admin Password: admin Click OK Note If the dialog box does not pop up, please refer to T3 in the Troubleshooting guide and T2 will give you some help if you forget the password. The web management page will display after a successful login. Click Quick Setup 14 Internet Parameters Configuration This page will then display. Choose the WAN Type for Internet access. If ADSL WAN is selected, please continue to read this guide; If Ethernet WAN is selected, please refer to section 4.4. 2 WAN Service in User Guide; Click Next Note If you are unwilling to configure WAN Service now, you can click the Skip WAN button, and you can configure it in the Layer2 Interface referring to User Guide later. ADSL WAN Type Enter the VPI and VCI values given by your ISP Choose the WAN Link Type given by your ISP. If PPPoE or PPPoA is selected, please proceed to A; If IPoE is selected, please skip to B; If IPoA is selected, please skip to C; If Bridge is selected, please skip to D. Note If you did not get the VPI, VCI and WAN Link Type information, please contact your ISP for this information. Note Bridge mode is not recommended because multiple computers are not permitted to share Internet access in this mode. 15 A. Configuration for PPPoE or PPPoA Enter the PPP Username and PPP Password provided by your ISP Click Next Note If you did not get the PPP Username or PPP Password, please contact your ISP for this information. Note The configuration for PPPoA is similar to that of PPPoE. B. Configuration for IPoE If WAN IP Address, Subnet Mask, Gateway IP Address and DNS are provided by your ISP, check the Static IP and Set DNS Manually boxes and enter them into the corresponding blanks. Otherwise, check the Use DHCP and Obtain Automatically boxes Click Next C. Configuration for IPoA Enter the WAN IP Address, Subnet Mask and DNS addresses provided by your ISP Click Next 16 Note If you did not get the IP Address, Subnet Mask and DNS addresses, please contact your ISP for this information. D. Configuration for Bridge Mode This type doesn't need to be configured. Click Next After completing the above configuration, please proceed to Configuration. Wireless Wireless Configuration Create a unique and easy to remember name for your wireless network. You can also keep the default setting without the device being affected Select a Network Authentication (here takes Mixed WPA2/WPA-PSK Personal for example) Create a Security Key using 8-64 characters Click Next Note The wireless security is Disabled by default. You are suggested to select a Network Authentication for security settings. After completing the above configuration, please proceed to Summary. 17 Quick Setup - Quick Setup – Summary To continue, the following page will be displayed. Click Confirm Now, your modem router has been configured. 18 Technical Support For more troubleshooting help, go to: http://www.tp-link.com/en/support/faq To download the latest Firmware, Driver, Utility and User Guide, go to: http://www.tp-link.com/en/support/download For all other technical support, please contact us by using the following details: Global Tel: +86 755 26504400 E-mail: [email protected] Service time: 24hrs, 7 days a week Singapore Tel: +65 62840493 E-mail: [email protected] Service time: 24hrs, 7 days a week UK Tel: +44 (0) 845 147 0017 E-mail: [email protected] Service time: 24hrs, 7 days a week Turkey Tel: 444 19 25 (Turkish ServiceDž E-mail: [email protected] Service time: 9:00 AM to 9:00 PM 7 days a week USA/Canada Toll Free: +1 866 225 8139 E-mail: [email protected] Service time: 24hrs, 7 days a week Australia / New Zealand Tel: AU 1300 87 5465 NZ 0800 87 5465 E-mail: [email protected] Service time: 24hrs, 7 days a week Ukraine Tel: 0-800-505-508 E-mail: [email protected] Service time: Monday to Friday 14:00 PM to 22:00 PM Italy Tel: +39 0230519020 E-mail: [email protected] Service time: Monday to Friday 9:00 AM to1:00 PM, 2:00 PM to 6:00 PM Brazil Toll Free: 0800-770-4337 (Portuguese Service) E-mail: [email protected] Service time: Monday to Saturday 08:00 AM to 08:00 PM Indonesia Tel: (+62) 021 6259 135 E-mail : [email protected] Service time : Monday to Friday 9:00 -12:00; 13:00 -18:00 *Except public holidays France Tel: +33 (0) 820 800 860 (French service) Email: [email protected] Fee: 0.118 EUR/min from France Service time: Monday to Friday 9:00 AM to 6:00 PM (Except French Bank holidays) Malaysia Tel: 1300 88 875465 (1300 88TPLINK) Email: [email protected] Service time: 24hrs, 7 days a week Russian Federation Tel: 8 (499) 754-55-60 8 (800) 250-55-60 (toll-free call from any RF region) E-mail: [email protected] Service time: From 10:00 to 18:00 (Moscow time) *Except weekends and holidays in Russian Federation Switzerland Tel: +41 (0) 848 800998 (German Service) E-mail: [email protected] Fee: 4-8 Rp/min, depending on rate of different time Service time: Monday to Friday9:00 AM to 6:00 PM.GMT+ 1 or GMT+ 2 (Daylight Saving Time) Poland Tel: +48 (0) 801 080 618 / +48 22 7217563 (if calls from mobile phone) E-mail: [email protected] Service time: Monday to Friday 9:00 AM to 5:00 PM. GMT+1 or GMT+2 (Daylight Saving Time) Germany / Austria Tel: +49 1805 875465 (German Service) +49 1805 TPLINK E-mail: [email protected] Fee: 0.14 EUR/min from the German fixed phone network and up to 0.42 EUR/min from mobile phone Service time: Monday to Friday9:00 AM to 6:00 PM.GMT+ 1 or GMT+ 2 (Daylight Saving Time in Germany) *Except bank holidays in Hesse